Table of Contents
Advertisement
Quick Links
Advertisement
Table of Contents
Troubleshooting

Summary of Contents for PAC R6000S
- Page 1 R6000S Operation Manual Revision G www.paclp.com...
- Page 2 At any time, PAC may modify these materials, its instruments or its programs without notice and subsequent versions of these materials may contain different information.
- Page 3 R6000S Operation Manual: Rev. G GENERAL DISCLAIMERS AND NOTICES Thank you for purchasing a PAC™ product. This instruction manual should be read thoroughly and all operators should be given adequate training before attempting to place this unit in service. Consult your company’s training program(s) for correct training.
- Page 4 R6000S Operation Manual: Rev. G LEFT BLANK Page 2 of 92 PAC L.P., All Rights Reserved, 2015...
- Page 5 R6000S Operation Manual: Rev. G IN THIS MANUAL This manual describes the correct operation for the PAC R6000S. Within this manual the PAC R6000S will be referred to as R6000S. The below section provides an overview of this manual. A full Table of Contents follows this section.
- Page 6 R6000S Operation Manual: Rev. G LEFT BLANK Page 4 of 92 PAC L.P., All Rights Reserved, 2015...
-
Page 7: Table Of Contents
R6000S Operation Manual: Rev. G TABLE OF CONTENTS CONTACT US ........................15 SAFETY AND INFORMATIONAL MESSAGES ..............18 REFERENCES ........................22 DEFINITIONS OF TERMS ....................22 MAINTENANCE TOOLS NEEDED ..................24 PERSONAL PROTECTION EQUIPMENT ................. 24 LOCK-OUT/TAG-OUT PROCEDURES ................25 ACRONYMS ........................ - Page 8 R6000S Operation Manual: Rev. G Fluorescence Chamber Lens Cleaning Procedure ..........63 PMT High-Voltage Adjustment .................. 64 Troubleshooting and Service Guide ................ 64 4.7.1 Electrical / Electronic Component Replacement ........... 65 4.7.2 Troubleshooting Guide ..................66 DRAWINGS AND DOCUMENTS ................77 Drawings ........................
- Page 9 R6000S Operation Manual: Rev. G POLICY STATEMENT This is the property of PAC L.P. This manual and all information disclosed herein shall not be used to manufacture, construct, or fabricate the goods disclosed herein; shall not be exploited or sold; shall not be copied or otherwise reproduced in whole or in part and shall not be revealed or disclosed to others or in any manner made public without the express written permission of PAC L.P.
- Page 10 The above WEEE symbol is the official marking for equipment under the WEEE scope. In some EC Member states, "pure B2B equipment" is not necessarily marked with the waste bin symbol. To provide a homogenous EC-wide procedure, PAC uses the marking in all EC Member states. CE NOTICE symbol indicates PAC’s compliance with the European Union (EU) directives and standards...
- Page 11 R6000S Operation Manual: Rev. G This system contains devices classified for use in a typical Class A commercial environment and is not designed or intended for use in other EMC environments. The user of this system is obliged to properly use and install the system and to take all steps necessary to remove sources of interference to telecommunications or other devices.
- Page 12 R6000S Operation Manual: Rev. G LEFT BLANK Page 10 of 92 PAC L.P., All Rights Reserved, 2015...
- Page 13 Within a reasonable time after such notification, PAC will correct any failure to conform to specifications or any defect in materials or workmanship, or in lieu of such repair, and at its sole option, shall replace the product, F.O.B. PAC’s city of shipment or refund the purchase price, less a reasonable reduction in such purchase price as determined by PAC.
- Page 14 PAC’s standard rate for parts and labor. Further, if upon PAC’s inspection and review, PAC determines the condition of the product for which a warranty claim is submitted is not caused by a defect in PAC’s material and workmanship, but is the result of some other condition, including but not limited to damage caused by any of the events or conditions set forth in Section I.3., BUYER shall be liable for all expenses incurred by PAC to conduct the inspection and review of...
- Page 15 4. Limitation on Warranty Claims. Prior to any obligation of PAC to perform any limited warranty service as set forth herein, BUYER must have: (i) paid all invoices to PAC in full, whether or not they are specifically related to the product at issue; and (ii) notified PAC of the limited warranty claim within sixty (60) days from the date BUYER knew or had reason to know of the defect.
- Page 16 R6000S Operation Manual: Rev. G ASSUMPTIONS The R6000S is generally installed onsite by a trained service technician. However, on occasion, it may be necessary to move the hardware or reinstall the software, if applicable. The hardware and software installations require the following for many PAC products; your product may differ in general needs: ...
-
Page 17: Contact Us
R6000S Operation Manual: Rev. G RECORD OF SERIAL NUMBER AND PURCHASE DATE Catalog Number: ________________________________________ Serial Number: __________________________________________ Purchase Date: ______________________________________ CONTACT US If you have any questions about your product, contact us using the information below: PAC L.P. 8824 Fallbrook Drive... - Page 18 R6000S Operation Manual: Rev. G Table 1. Contact Information Web: http://www.paclp.com Phone: +1 281 940 1803 France +33 231 264 300 Germany +49 9343 6400 Singapore +65 6412 0890 Netherlands +31 10 462 4811 Russia & CIS +7 495 617 10 86...
- Page 19 R6000S Operation Manual: Rev. G Sales: Email to:Sales@paclp.com France Email to:Sales.France@paclp.com Germany Email to:Sales.Germany@paclp.com Singapore Email to:Asia-Sales@paclp.com Netherlands Email to:Sales.Netherlands@paclp.com Russia & CIS Email to:Alexander.sungurov@paclp.com China Email to:Asia-Sales@paclp.com South Korea Email to:Asia-Sales@paclp.com Thailand Email to:Asia-Sales@paclp.com Abu Dhabi Email to:Sales.MiddleEast@paclp.com Service: Email to:Service@paclp.com...
-
Page 20: Safety And Informational Messages
Flash Point Monitor is performed by anyone except PAC factory-approved personnel. HOW TO PROCEED: Installation, service, or maintenance of the Flash Point Monitor should be performed only by PAC factory-approved personnel. Contact PAC for help and guidance if you have any questions. ELECTROCUTION HAZARD! - Page 21 R6000S Operation Manual: Rev. G CHEMICAL HAZARD! MINOR OR MODERATE INJURY COULD OCCUR IF NOT AVOIDED! A chemical hazard exists because petroleum products are used in the operation, cleaning, or maintenance of this product. Minor or moderate injury could occur if the chemical comes into contact with skin, eyes, or any human body part.
- Page 22 R6000S Operation Manual: Rev. G FIRE, HARMFUL VAPOR, SKIN IRRITANT HAZARDS! DEATH OR SERIOUS INJURY COULD OCCUR IF NOT AVOIDED! Some procedures in this manual may involve handling flammable liquids and exposure to skin irritants and harmful vapors. HOW TO PROCEED: Avoid hazard(s) by wearing appropriate Personal Protective...
- Page 23 CO sample. Operation and/or results for any other use cannot be guaranteed. Corrosive Environments – The standard configuration of the R6000S Series analyzer is not intended for use in corrosive environments.
-
Page 24: References
ASTM D1655 DEFINITIONS OF TERMS To show menu selections in this manual, the > symbol is used. For example, 1. Click Start > Programs > PAC. The following terms are/may be used in this manual: Page 22 of 92 PAC L.P., All Rights Reserved, 2015... - Page 25 PAC approval, or the product may have to be shipped to PAC for service. PAC L.P. is also referred to as PAC throughout the chapters and appendices of this manual. PAC L.P., All Rights Reserved, 2015 Page 23 of 92...
-
Page 26: Maintenance Tools Needed
R6000S Operation Manual: Rev. G MAINTENANCE TOOLS NEEDED The following tools are a basic guide. PERSONAL PROTECTION EQUIPMENT Consult your company’s training standards for correct PPE usage. The following PPE (but not limited to) should be used while operating or servicing the unit. Exercise caution at all times. -
Page 27: Lock-Out/Tag-Out Procedures
R6000S Operation Manual: Rev. G LOCK-OUT/TAG-OUT PROCEDURES Follow all of your company’s lock-out/tag-out procedures at all times. Exercise caution at all times. ACRONYMS Acronym Definition ºC Degrees Celsius Calibration Customer Interface Cont. Controller Detector Detector Control Unit Electromagnetic Interference Furn. - Page 28 R6000S Operation Manual: Rev. G Acronym Definition Photomultiplier tube Parts per million Pre-Amp Pre-Amplifier Pres. Pressure Power Supply Pounds per square inch (pressure) psig Pounds per square inch (gauge) Resistor on a printed circuit board Relief valve Resistance temperature detector...
-
Page 29: Chapter One: Introduction
R6000S Operation Manual: Rev. G 1. CHAPTER ONE: INTRODUCTION The PAC R6000S Sulfur in Carbon Dioxide Analyzer provides a safe, reliable automated system for the detection and analysis of sulfur in carbon dioxide. The analyzer section uses a sample combustion and UV fluorescent detection process to perform the analysis. -
Page 30: Model R6000S Specifications
The sensitivity of the instrument should be restored with the replacement of the aged components. Model R6000S Specifications PAC’s R6000S Sulfur in Carbon Dioxide Process Analyzer is designed to conform to the following specifications: Voltage: 115/230 VAC + 10%, 50/60 Hz, voltage swings should be less than 10%. -
Page 31: Component Description
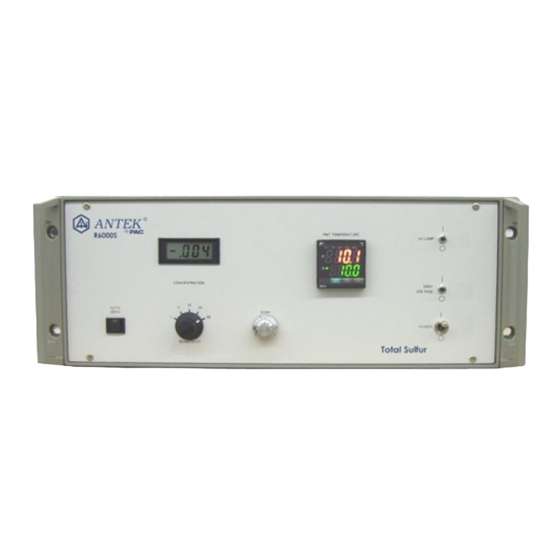
When pressed, the auto zero button forces the detector’s voltage output(s) to zero volts and/or 4 PAC R6000S. Zeroing Light (located on auto zero button): Lights up when the instrument is forcing its outputs to zero. Remains lit unit zero is reached. - Page 32 R6000S Operation Manual: Rev. G B. Sensitivity Selection Switch Controls the sensitivity of the conditioning board to allow for different ranges of concentration. The signal level from the PM tube is multiplied by the number selected on the switch. For concentrations of 0 –...
- Page 33 R6000S Operation Manual: Rev. G Detector Back View A. Cover for fan filter B. Terminal strip signal out C. UV lamp fuse (2 amp) D. 115 volt fuse (3 amp) E. Power Input F. Detector in G. Detector vent H. 12 volt P/S fuse (1 amp) PAC L.P., All Rights Reserved, 2015...
- Page 34 R6000S Operation Manual: Rev. G 1.4.1.2 Furnace Module Furnace Front View A. Dryer flow controller: Indicates the total flow of gas through the analyzer. The gas is scrubbed dry and supplied to the membrane dryer as cross flow. B. Sample flow controller C.
- Page 35 R6000S Operation Manual: Rev. G K. Zero/Span switch: Selects one of the cal. streams, either the zero stream or the span stream, for analysis when the sample/calibrate switch is in the calibrate position. Zero position de-energizes the solenoid valve. Furnace Back View A.
- Page 36 R6000S Operation Manual: Rev. G 1.4.1.3 Alarm Indications A mechanical contact is provided as a common trouble alarm for the following conditions. Low Furnace Temperature Alarm is provided when furnace temperature is below 980ºC. High Furnace Temperature Alarm is provided when the furnace temperature exceeds 1150ºC. A relay on p/n 58903 Interface Board located in the furnace section will open and, in turn, open a relay that provides power to the furnace.
-
Page 37: Chapter Two: Installation
R6000S Operation Manual: Rev. G 2. CHAPTER TWO: INSTALLATION Preinstallation Requirements Power Requirements Voltage: 115/230 VAC + 10%, 50/60 Hz, voltage swings should be less than 10% Current: Service at greater than 20 Amps (10 Amps for 230VDC) Analyzer is set for either 115VAC or 230 VAC operation. -
Page 38: Installation Procedures
R6000S Operation Manual: Rev. G Also, any dead volumes should be eliminated as best as possible. Dead volumes in the sample system will also cause a lag in response. Installation Procedures 1. Inspect the instrument for any obvious damages from shipping. -
Page 39: Signal And Power Connections
R6000S Operation Manual: Rev. G Figure 2. Detector In: Detector Module 3. Connect “Detector Vent” fitting on the back of the detector module to the inlet side of the Hopcalite/Drierite scrubber tube and the outlet of the scrubber tube to the “Argon IN” fitting (“Dryer IN”... - Page 40 R6000S Operation Manual: Rev. G Figure 4. Signal Out Terminal Block: Detector Module 2. Connect a power cord from the detector module to an adequate supply (greater than 5 Amps@ 115- VAC or 3A @ 230-VAC). 3. Connect a power cord from the furnace module to an adequate supply (greater than 10 Amps @ 115 VAC or 5 A @ 230 VAC).
-
Page 41: Pyrotube Installation
R6000S Operation Manual: Rev. G Figure 5. Ground and Ground Wires 2.2.4 Pyrotube Installation Perform the following steps to install the pyrotube. 1. Turn OFF power to the furnace and let it cool to a safe temperature. ELECTROCUTION HAZARD! DEATH OR SERIOUS INJURY COULD OCCUR IF NOT AVOIDED. - Page 42 R6000S Operation Manual: Rev. G POSSIBLE EXPLOSIVE ATMOSPHERE AND BURN HAZARDS! DEATH OR SERIOUS INJURY COULD OCCUR IF NOT AVOIDED! Furnace operates at a temperature in excess of 1000ºC and can serve as an ignition or burn source. HOW TO PROCEED: Ensure there are no explosive gases present in the working area of the furnace.
- Page 43 R6000S Operation Manual: Rev. G 3. Loosen the two knurled screws on the top of the hinged furnace front panel and allow it to pivot down to the open position. 4. Clean the outside of the pyrolysis tube with acetone or alcohol and allow it to dry.
- Page 44 R6000S Operation Manual: Rev. G LEFT BLANK Page 42 of 92 PAC L.P., All Rights Reserved, 2015...
-
Page 45: Chapter Three: Operation
R6000S Operation Manual: Rev. G 3. CHAPTER THREE: OPERATION Initial Startup Procedure 1. Set furnace power switch ON: a. Check for dents and broken components. b. If Set Value (SV) is not set to 1000º C, press the up (↑) or down (↓) arrow accordingly to achieve SV of 1000º... -
Page 46: Calibrating The Analyzer
R6000S Operation Manual: Rev. G g. Set backpressure regulator to 5 - 9 psi. (This pressure setpoint is not critical. The flow setting in the next step is). h. Adjust flow meter to 1.0. Readjust backpressure regulator back to the pressure set in step 7E, if necessary. -
Page 47: Set Span
R6000S Operation Manual: Rev. G 3.2.2 Set Span 1. Leave sample/calibrate switch in the calibrate position and set zero/span switch to span position. NOTE: The sample flow meter and backpressure regulator should be at the same setting that was used on the zero gas. - Page 48 R6000S Operation Manual: Rev. G Duration of the AUTOTUNE process varies with every application. The process may take between 1 and 30 minutes to complete. Refer to the Fuji temperature controller operating manual for complete details. Table 2. Parameter Information...
-
Page 49: Adjusting Full-Scale
R6000S Operation Manual: Rev. G Block Furnace Detector Block Furnace Detector Furnace Detector Parameter Parameter Block Para meter SG – 1 SG - 8 Γ n 1r Γ n 8r Γ n 15 Γ n 85 3.2.5 Adjusting Full-Scale The full-scale range is pre-set at the factory. In the event the full-scale range needs to be changed, the following steps should be taken. - Page 50 R6000S Operation Manual: Rev. G LEFT BLANK Page 48 of 92 PAC L.P., All Rights Reserved, 2015...
-
Page 51: Chapter Four: Maintenance And Troubleshooting
4. CHAPTER FOUR: MAINTENANCE AND TROUBLESHOOTING Routine Preventative Maintenance The R6000S is a relatively low maintenance system. Regular care of a few items should keep the system operating at peak level. There is no scheduled maintenance on the analyzer. Maintenance is only required if a problem occurs. -
Page 52: Removal And Replacement Procedures
R6000S Operation Manual: Rev. G Removal and Replacement Procedures The following sections contain the procedures for removal and replacement of the major subassemblies in the analyzer. ELECTROCUTION HAZARD! DEATH OR SERIOUS INJURY WILL OCCUR IF NOT AVOIDED! An electrocution hazard exists because severe electrical shock hazards exist when working around the high-voltage and/or 115/230 VAC components while power is applied. -
Page 53: Sulfur Detector Removal And Replacement
R6000S Operation Manual: Rev. G POSSIBLE EYE OR FACE INJURY HAZARD! DEATH OR SERIOUS INJURY COULD OCCUR IF NOT AVOIDED! Eye injuries can result when handling the glass pyrotube. HOW TO PROCEED: Avoid hazard(s) by wearing appropriate Personal Protective Equipment (PPE) such as goggles, face shields, face masks, or respirators that should be used while performing this task or operating, servicing, or maintaining this equipment in general. -
Page 54: Photomultiplier Tube Removal And Replacement
R6000S Operation Manual: Rev. G 4. Remove the UV Lamp leads from their terminal block. 5. Remove the defective sulfur detector module by loosening the knurled screws holding it to the mounting plate. 6. Carefully remove all connectors, cables, interconnecting wiring, and interconnecting tubing associated with the defective sulfur detector module, noting their location and orientation. -
Page 55: Pre-Amplifier Assembly Removal And Replacement
R6000S Operation Manual: Rev. G 1. The PMT is extremely light sensitive. All operations involving exposure of the PMT should be conducted in darkness or in a very low light environment. 2. Make sure that all interconnections are properly installed. Improper connections may cause damage to system components. -
Page 56: Fluorescence Chamber Assembly Removal
R6000S Operation Manual: Rev. G 1. The PMT is extremely light sensitive. All operations involving exposure of the PMT should be conducted in darkness or in a very low light environment. 2. Make sure that all interconnections are properly installed. Improper connections may cause damage to system components. -
Page 57: Uv Lamp Nulling Procedure
R6000S Operation Manual: Rev. G 2. Use the Sulfur Detector Removal and Replacement procedure to remove the sulfur detector. 3. Remove the reaction chamber assembly from the front side of the PMT housing by twisting the reaction chamber assembly approximately 30º counterclockwise. -
Page 58: Uv Lamp Replacement
R6000S Operation Manual: Rev. G 2. Make sure the Sulfur Level Meter has a display. If Auto Zeroing didn't occur with power up, press Auto Zero button and observe that the Zeroing Light illuminates and that the number on the Level Meter is adjusted towards zero (0.0). - Page 59 R6000S Operation Manual: Rev. G ELECTROCUTION HAZARD! DEATH OR SERIOUS INJURY WILL OCCUR IF NOT AVOIDED! An electrocution hazard exists because severe electrical shock hazards exist when working around the high-voltage and/or 115/230 VAC components while power is applied. HOW TO PROCEED: Avoid hazard by turning off the unit with the ON/OFF switch and remove the power connection or power cord from the unit to the power source.
-
Page 60: Uv / Pmt Power Supply Removal And Replacement Procedure
R6000S Operation Manual: Rev. G 11. Use the UV Lamp Nulling Procedure to null the UV lamp. 12. Perform the start-up procedure to confirm proper operation of the new UV lamp. 13. Recalibrate the instrument. 14. Resume normal operation. 4.2.7... -
Page 61: Thermoelectric Cooler Replacement
R6000S Operation Manual: Rev. G 4.2.8 Thermoelectric Cooler Replacement In the event a detector thermoelectric cooler needs service or replacement, the following steps should be taken. 1. Turn the power switch to the OFF position and remove the power cord from the detector module. -
Page 62: Temperature Sensor Replacement
R6000S Operation Manual: Rev. G 4.2.9 Temperature Sensor Replacement In the event a detector temperature sensor needs service or replacement, the following steps should be taken. 1. Turn the power switch to the OFF position and remove the power cord from the detector module. -
Page 63: Gas Leak Testing
R6000S Operation Manual: Rev. G 10. Reinstall the detector assembly. 11. Perform the start-up procedure to confirm proper operation of the new temperature sensor. 12. Recalibrate the instrument. 13. Resume normal operation. Gas Leak Testing In the event a gas leak in the flow system is suspected, the following procedure should be performed. - Page 64 R6000S Operation Manual: Rev. G Light leaks can only be detected if the entire detector system is operational. ELECTROCUTION HAZARD! DEATH OR SERIOUS INJURY WILL OCCUR IF NOT AVOIDED! An electrocution hazard exists because severe electrical shock hazards exist when working around the high-voltage and/or 115/230 VAC components while power is applied.
-
Page 65: Fluorescence Chamber Lens Cleaning Procedure
R6000S Operation Manual: Rev. G 11. Resume normal operation. Fluorescence Chamber Lens Cleaning Procedure ELECTROCUTION HAZARD! DEATH OR SERIOUS INJURY WILL OCCUR IF NOT AVOIDED! An electrocution hazard exists because severe electrical shock hazards exist when working around the high-voltage and/or 115/230 VAC components while power is applied. -
Page 66: Pmt High-Voltage Adjustment
R6000S Operation Manual: Rev. G PMT High-Voltage Adjustment In the event that the PMT High-Voltage module needs to be changed, the following steps should be taken. 1. Remove the top cover of the detector module. 2. Turn the high-voltage switch to the OFF position. -
Page 67: Electrical / Electronic Component Replacement
In the event an electrical or electronic component needs replacement, the following steps should be taken. 1. Unplug the AC power cord and then place the R6000S main power switch to the OFF position. ELECTROCUTION HAZARD! DEATH OR SERIOUS INJURY WILL OCCUR IF NOT AVOIDED! -
Page 68: Troubleshooting Guide
R6000S Operation Manual: Rev. G 4.7.2 Troubleshooting Guide Figure 7. Troubleshooting Guide Symptom Probable Cause Corrective Action Non-Operational or No External Power Switch Off. Switch External Power Switch Power Power not being supplied to to ON. Use AC voltmeter to... - Page 69 R6000S Operation Manual: Rev. G Symptom Probable Cause Corrective Action Pyro Furnace Not Heating, Defective Heater Element(s) Check for continuity in heater. Continued Replace heater if necessary. Replace heater element(s). Defective Solid-State Relay Check for input voltage to relay. Check contact closure on output.
- Page 70 R6000S Operation Manual: Rev. G Symptom Probable Cause Corrective Action UV Lamp is OFF Power Supply connector not Ensure power supply connected connector is plugged into UV Lamp assembly. Defective UV/PMT Power Check for 12 VDC. Replace Supply UV/PMT PS.
- Page 71 R6000S Operation Manual: Rev. G Symptom Probable Cause Corrective Action No Response to Standard or Defective High-Voltage Supply Replace Cable or Power Sample, Continued or Cable (Low reading on Supply. High-Voltage PCB) Defective 12 VDC Power Replace fuse, cable or Power Supply, fuse or cable Supply as necessary.
- Page 72 R6000S Operation Manual: Rev. G Symptom Probable Cause Corrective Action Low or Poor Response to UV Lamp weak or defective Replace UV Lamp. Sample or Standard Back pressure has changed Reset back pressure as necessary. Decreased High-Voltage Readjust HV out or Replace HV PCB or cable.
- Page 73 R6000S Operation Manual: Rev. G Symptom Probable Cause Corrective Action Unstable Sulfur Detector Unstable PMT high-voltage Adjust or replace high-voltage Response PCB. Leak in Flow System Use gas leak test to find leaks and repair as needed. Light leaks Use light leak test to find leaks and repair as needed.
- Page 74 R6000S Operation Manual: Rev. G Symptom Probable Cause Corrective Action Baseline Drift, Continued UV Lamp is Unstable Replace UV Lamp. High-voltage is unstable Monitor high-voltage for stability. Replace high-voltage board if necessary. Light Leak Use Light Leak Check procedure to check. Correct if necessary.
- Page 75 R6000S Operation Manual: Rev. G Symptom Probable Cause Corrective Action Response Changing Gas leak Use gas leak test to find leaks and repair as needed. Contaminated gas supply Replace gas supply. Contaminated Pyrotube Clean or replace Pyrotube. Unstable AC power source Determine cause of instability and correct.
- Page 76 R6000S Operation Manual: Rev. G Symptom Probable Cause Corrective Action Non-repeatable Results Amplifier saturation Reduce Sample size, concentration or amplifier gain. Contaminated gas supply Replace gas supply. Contaminated Pyrotube Clean or replace Pyrotube. Incomplete sample Ensure furnace temperature combustion and gas flows are correct.
- Page 77 R6000S Operation Manual: Rev. G Symptom Probable Cause Corrective Action Inaccurate Results, Abnormal ambient temp Stabilize ambient temperature. Continued change Light leakage Use light leak test to find leaks and repair as needed. Defective PMT or Cooler Replace PMT or Cooler.
- Page 78 R6000S Operation Manual: Rev. G Symptom Probable Cause Corrective Action No Detection No high-voltage Replace high-voltage supply. Soot in System Check for soot deposits in system. Gas leak Use gas leak test to find leaks and repair as needed. No detector electronics...
-
Page 79: Drawings And Documents
R6000S Operation Manual: Rev. G 5. DRAWINGS AND DOCUMENTS Drawings The drawings described below and located on the following pages should be referenced when performing maintenance or service on the analyzer. When separate manuals or addenda are provided for OEM components or accessories, they should be used as references as well. - Page 80 R6000S Operation Manual: Rev. G LEFT BLANK Page 78 of 92 PAC L.P., All Rights Reserved, 2015...
- Page 81 PAGE 79 OF 92 INTERCONNECT DIAGRAM R6000S REF: B42175-R3-TP-1/1...
- Page 82 PAGE 80 OF 92 FLOW DIAGRAM INTERCONNECT DET/FURNACE REF: B42134-R1-TP-1/1...
- Page 83 PAGE 81 OF 92 COMPONENT IDENT FRONT PANEL SULFUR DET. SECTION REF: B42160-R3-TP-1/1 PDalbello...
- Page 84 PAGE 82 OF 92 COMPONENT IDENT BASE PANEL SULFUR DETECTOR SECTION REF: B42165-D-TP-1/1 DGA QM SR DA...
- Page 85 PAGE 83 OF 92 COMPONENT IDENT REAR PANEL SULFUR DETECTOR SECTION REF: B42166-R3-TP-1/1 P Dalbello...
- Page 86 PAGE 84 OF 92 ASSY SULFUR DETECTOR W/COOLER REF: B42025-N-TP-1/1...
- Page 87 PAGE 85 OF 92 WIRING DIAGRAM SULFUR DETECTOR 110-120VAC REF: B42146-F-TP-1/1 LL DGA QM SR...
- Page 88 PAGE 86 OF 92 WIRING DIAGRAM SULFUR DETECTOR 220-230VAC REF: B42145-E-TP-1/1 QM JK...
- Page 89 PAGE 87 OF 92 COMPONENT IDENT FRONT PANEL FURNACE OPTIONAL FURN. BYPASS REF: B42159-R4-TP-1/1 PDalbello...
- Page 90 PAGE 88 OF 92 COMPONENT ASSY BASE PANEL FURNACE SECTION OPTIONAL FURNACE BYPASS REF: B42161-R5-TP-1/1...
- Page 91 PAGE 89 OF 92 COMPONENT IDENT REAR PANEL FURNACE SECTION REF: B42162-R3-TP-1/1 PDalbello...
- Page 92 PAGE 90 OF 92 FLOW DIAGRAM FURNACE SECTION WITH OPTIONAL FURNACE BYPASS REF: B42163-R1-TP-1/1...
- Page 93 SEE NOTE 4 SEE NOTE 4 SEE NOTE 4 SEE NOTE 4 SEE NOTE 4 SEE NOTE 4 SEE NOTE 3 SEE NOTE 4 SEE NOTE 4 SEE NOTE 4 PAGE 91 OF 92 WIRING DIAGRAM FURNACE SECTION 110-120VAC REF: B42143-C-TP-1/1...
- Page 94 PAGE 92 OF 92 WIRING DIAGRAM FURNACE SECTION 220-230VAC REF: B42144-R3-TP-1/1 PDalbello...
- Page 95 Petroleum Analyzer Company, LP. Web site: www.paclp.com For a complete list of contact information, refer to the Contacts section of this publication.