Kenwood krf v5080d Instruction Manual
Audio video surround receiver
Hide thumbs
Also See for krf v5080d:
- Instruction manual (32 pages) ,
- Instruction manual (37 pages) ,
- Service manual (31 pages)
Table of Contents
Advertisement
AUDIO VIDEO SURROUND RECEIVER
VR-806
KRF-V5080D
INSTRUCTION MANUAL
KENWOOD CORPORATION
This instruction manual is for some models. Model availability and features
(functions) may differ depending on the country and sales area.
About the supplied remote control
Compared to standard remote controls, the remote control supplied with this model has several operation
modes. These modes enable the remote control to control other audio/video components. In order to
effectively use the remote control it is important to read the operating instructions and obtain a proper
understanding of the remote control and how to switch its operation modes (etc.).
Using the remote control without completely understanding its design and how to switch the operation
modes may result in incorrect operations.
B60-5439-00 00
MA
(K, P, X, Y)
0311
Advertisement
Table of Contents

Related Manuals for Kenwood krf v5080d


Summary of Contents for Kenwood krf v5080d
- Page 1 AUDIO VIDEO SURROUND RECEIVER VR-806 KRF-V5080D INSTRUCTION MANUAL KENWOOD CORPORATION This instruction manual is for some models. Model availability and features (functions) may differ depending on the country and sales area. About the supplied remote control Compared to standard remote controls, the remote control supplied with this model has several operation modes.
-
Page 2: Before Applying The Power
Once you have setup the remote control, you’ll be able to operate both this model and your KENWOOD DVD player using the remote control supplied with this model. AC 220-... -
Page 3: Table Of Contents
Before applying the power Contents Caution : Read the pages marked safe operation. Before applying the power ... 2 Safety precautions ... 2 How to use this manual ... 2 Unpacking ... 2 Channel space switching ... 3 Preparing the remote control ... 4 Special features ... -
Page 4: Preparing The Remote Control
TAR ® Partner, Kenwood As an NERGY Corporation has determined that this TAR ®... -
Page 5: Special Features
EQ is turned on. Universal IR (InfraRed) remote control In addition to the basic receiver, the remote control supplied with this offers special features for model can also operate KENWOOD DVD player. Just follow the simple setup procedure. ’s features. -
Page 6: Names And Functions Of Parts
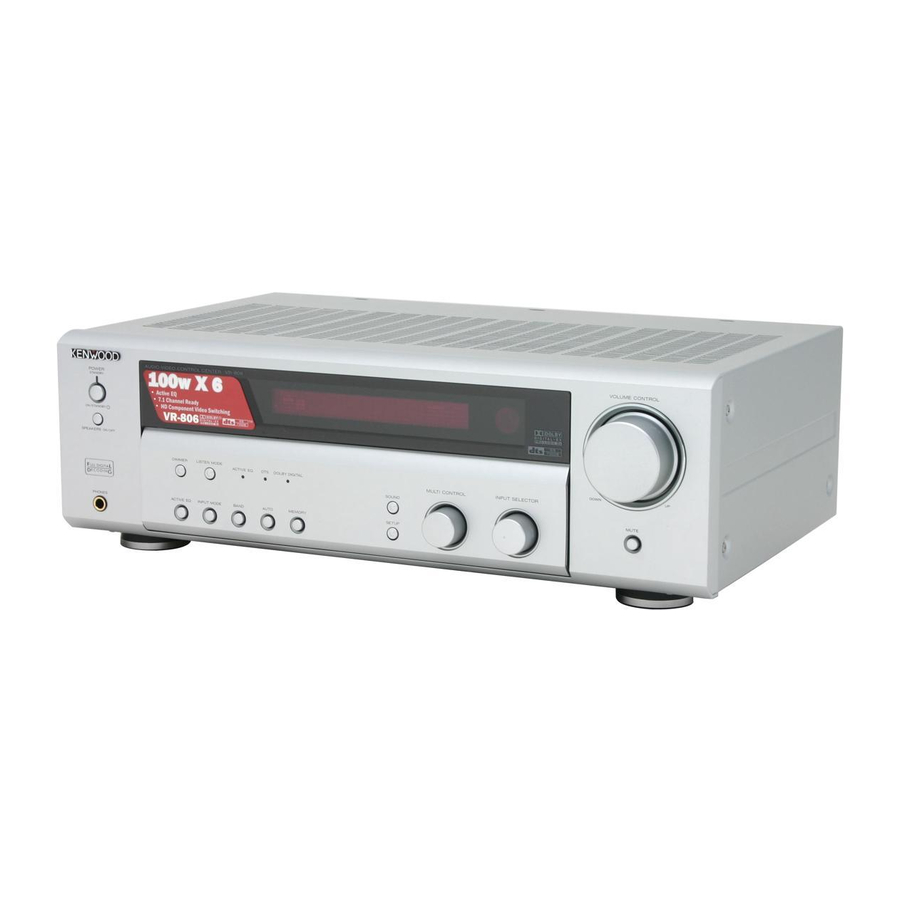
Names and functions of parts Main Unit AUTO indicator Speaker indicator CLIP indicator MUTE indicator LOUDNESS indicator TONE indicator TUNED indicator ST. indicator POWER STANDBY STANDBY ON/STANDBY ON/STANDBY SPEAKERS ON/OFF DIMMER POWER ACTIVE EQ PHONES For VR-806 1 POWER ON/OFF key (For KRF-V5080D) Use to turn the main power ON/OFF. -
Page 7: Remote Control Unit
Names and functions of parts Remote control unit RC-R0626 (for VR-806) and RC-R0625 (for KRF-V5080D) 1 Numeric keys If CD or MD is selected as the input source, these keys function as numeric keys. If tuner is selected as the input source, these keys are used to call up station presents. -
Page 8: Setting Up The System
Setting up the system Make connections as shown in the following pages. When connecting the related system components, be sure to refer to the instruction manuals supplied with the components you are connecting. Do not connect the power cord to a wall outlet until all connections are completed. -
Page 9: Connecting Audio Components
Setting up the system Connecting audio components Shape of AC outlets Australia Other countries AUDIO REC OUT PLAY IN REC OUT PLAY IN CD/DVD MD / TAPE VIDEO 1 Video component ) Cassette deck or MD recorder CD or DVD player Other component To AC wall outlet... -
Page 10: Connecting Video Components
Setting up the system Connecting video components VIDEO MONITOR VIDEO 2 VIDEO 1 Video output (Yellow RCA pin cords) Video OUT A video component with digital audio outputs should be connected to the VIDEO 2 jacks. AUDIO REC OUT PLAY IN PLAY IN VIDEO 1 VIDEO 2... -
Page 11: Connecting Video Components
Setting up the system Connecting video components (COMPONENT VIDEO) (Except for the Australia) If you have connected this model to a video component with COMPONENT jacks, you can get a better picture quality than by connecting to the S-VIDEO jacks. COMPONENT VIDEO VIDEO 2 IN When connecting the TV to the COMPONENT jacks, be sure to connect all the other components to the COMPONENT jacks. -
Page 12: Digital Connections
Setting up the system Digital connections The digital in jacks can accept DTS, Dolby Digital, or PCM signals. Connect components capable of outputting DTS, Dolby Digital, or standard PCM (CD) format digital signals. If you have connected any digital components to this model, be sure to read the “Input mode settings” section carefully. COAXIAL DIGITAL (AUDIO) -
Page 13: Connecting A Dvd Player (6-Channel Input) (Krf-V5080D Only)
Setting up the system Connecting a DVD player (6-channel input) (KRF-V5080D only) If you have connected a DVD player to this model with digital connection, be sure to read the “Input mode settings” section carefully. VIDEO MONITOR VIDEO 2 VIDEO 1 VIDEO 1 VIDEO OUT (Yellow RCA... -
Page 14: Connecting The Speakers
Setting up the system Connecting the speakers Front Speakers Right Left FRONT WHITE SUB WOOFER PRE OUT Powered sub woofer To make sure that each speaker has been connected properly, pay attention to the test tone from each speaker. Refer to “4 Adjust the speaker volume level ”. Surround Back Speakers Left Center... -
Page 15: Connecting The Terminals
Setting up the system Connecting the terminals 1 Strip coating. 2 Push the lever 3 Insert the cord. 4 Return the lever. • Never short circuit the + and – speaker cords. • If the left and right speakers are connected inversely or the speaker cords are connected with reversed polarity, the sound will be unnatural with ambiguous acoustic imaging. -
Page 16: Preparing For Surround Sound
%/fi keys to select the speaker system setting. MULTI CONTROL 1 CUSTOM 2 FULL RANGE : For selected KENWOOD speaker - for example, 3 2WAY 2SPKR : For selected KENWOOD speaker – for 4 2WAY 3SPKR : For selected KENWOOD speaker – for •... - Page 17 Preparing for surround sound If you have selected “NML” as the Front speakers setting, 1 CNTR NML (normal) : An average size Center speaker is connected to this model. 2 CNTR OFF : Center speaker setting mode to this model is OFF. 9 Press the SETUP key again to accept the setting.
-
Page 18: Normal Playback
Preparing for surround sound 3 Use the MULTI CONTROL knob or MULTI CONTROL %/fi keys to select the distance to the front speakers. Indication in feet Indication in meters • The allowable setting range is 1 to 30 feet (0.3m to 9.0m), adjustable in 1 foot (0.3m) increments. -
Page 19: Listening To A Source Component
Normal playback Listening to a source component VOLUME CONTROL INPUT SELECTOR Input Selector Use the INPUT SELECTOR knob or keys to select the source you want to listen to. The input sources change as shown below: 1 “TUNER” 2 “CD/DVD” 3 “TAPE”... -
Page 20: Recording
Normal playback Adjusting the Loudness mode (remote control only) You can adjust the Loudness function which controls the low volume settings to maintain the music’s richness. The adjustment can be made when this model is in the PCM stereo and analog stereo mode. Press the LOUDNESS key to turn the Loudness setting ON. -
Page 21: Listening To Radio Broadcasts
Recording 3 Press and hold the DIMMER key for more than 2 seconds to select the A-REC or M-REC mode during digital input. 1 Rec mode off : The digital input record mode is switched off. 2 A-REC mode : The digital input signals (DTS, Dolby Digital, or PCM) are identified automatically and converted into stereo signals that are ready for recording. -
Page 22: Presetting Radio Stations Manually
Listening to radio broadcasts Presetting radio stations manually MEMORY MULTI CONTROL Tune to the station you want to store. Press the MEMORY key while receiving the station. Blinks for 20 seconds Proceed to step 3 within 20 seconds. (If more than 20 seconds elapse, press the MEMORY key again). Use the MULTI CONTROL knob or MULTI CONTROL % / fi... -
Page 23: Ambience Effects
Ambience effects This model is equipped with listening modes that allow you to enjoy an enhanced sonic ambience with a variety of video sources. In order to obtain the optimum effect from the surround modes, make sure to input the proper speaker settings beforehand. Surround modes The below speaker placements are for 5.1 channel surround sound system which are;... - Page 24 Ambience effects Dolby Digital The Dolby Digital surround format lets you enjoy up to 5.1 channels of digital surround sound from Dolby Digital program sources (such as Laserdisc or DVD software marked previous Dolby surround, Dolby Digital provides even better sound quality, greater spatial accuracy, and improved dynamic range.
-
Page 25: Surround Play
Ambience effects Surround play The DTS compatible models can reproduce a CD, DVD, or LD carrying the DTS mark. DOLBY DIGITAL can be used when playing DVD or LD software bearing mark and DOLBY DIGITAL format digital broadcasts (etc.). DOLBY PRO LOGIC can be used when playing video, DVD, or LD software bearing the mark. -
Page 26: Dvd 6-Channel Playback
Ambience effects = THEATER : DSP Surround THEATER mode. ~ STADIUM : DSP Surround STADIUM mode. ! DISCO : DSP Surround DISCO mode. @ STEREO : Normal stereo playback. • Dolby Digital or DTS signal having more channels than the maximum number of playback channels available using this model’s current settings is input, downmixing is performed to match the number of available channels. -
Page 27: Convenient Functions
Ambience effects Convenient functions DIMMER SOUND MULTI CONTROL SOUND Adjusting the sound You can make further adjustments to the sound while listening to playback in the surround mode. 1 Press the SOUND key until the desired item appears in the display. - Page 28 Ambience effects Soundfield is adjusted towards the front. Soundfield is in neutral position. Soundfield is adjusted towards the rear. Center Width mode (Pro Logic II x and Pro Logic II Music mode only) Center Width adjustment allows you to enjoy an enhanced sound when listening to music through center image from only center speaker, or left and right speakers or various combinations adjustments.
-
Page 29: Basic Remote Control Operations For Other Components
DVD player operation keys The remote control of this unit can control two groups of KENWOOD DVD players directly without using the remote control supplied with the DVD player. Group-1 : DV-4900, DV-4070B, DV-2070, DV-203, DVF-9010, DVF-K7010, DVF-5010, DVF-R9030, DVF-R7030, DVF-3530, DV-402, DV-5900, DV5700, DVF-R9050, DVF-J6050, DV-505, DV-503, DV-502, DVF-3550, DVF-3050, DVF-R4050, DVF-605, DV-6050, DVF-R5060, DVF-3060, DVF-3060K, DV-705, DVF-R5070 ,DVF-3070, DVF-3080, DVF-N7080 and DVF-8100. -
Page 30: In Case Of Difficulty
In case of difficulty Resetting the Microcomputer The microcomputer may malfunction (unit cannot be operated, or shows an erroneous display) if the power cord is unplugged while the power is ON, or due to some other external factor. If this happens, execute the following procedure to reset the microcomputer and return the unit to its normal operating condition. - Page 31 • Place the tape or CD in the source component which you want to play. • Wait for recording to complete. • Press the DVD POWER key for more than 2 seconds to activate the operation mode for the KENWOOD DVD player you want to control ª before operation.
-
Page 32: Specifications
VOLUME at -30dB level ... +8 dB (at 100 Hz) Notes 1. KENWOOD follows a policy of continuous advancements in development. For this reason specifications may be changed without notice. 2. The full performance may not be exhibited in an extremely cold location (under a water-freezing temperature).