Table of Contents
Advertisement
Quick Links
Advertisement
Table of Contents

Related Manuals for Hyundai H- F2563


Summary of Contents for Hyundai H- F2563
- Page 1 H- F2563 MP3 PLAYER Instruction manual...
-
Page 2: Table Of Contents
Dear customer! Thank you for purchasing our product. For safety, it is strongly recommended to read this manual carefully before connecting, operating and/or adjusting the product and keep the manual for reference in the future. Table of contents Table of contents... 2 Important safeguards ...3 Characteristics of Product ...4 Names of controls &... -
Page 3: Important Safeguards
Important safeguards WARNING: To prevent fire or shock hazard, Do not expose this appliance to rain or moisture. · Keep the unit away from direct sunlight, storing magnetic fields, excessive dust, humidity and electronic / electrical equipment which generate electronic noise. ·... -
Page 4: Characteristics Of Product
Characteristics of Product Multi-Codec Player - MP3, WMA, and ASF Formats are serviced as the Multi-Codec Player. Firmware Upgrade - Product enabling the Firmware Upgrade allows you to enjoy the music of the best quality all the time by adding, changing and improving the functions of Player. Multi-languages serviced Graphic LCD is installed - Graphic LCD providing the service of multi-languages is adopted. -
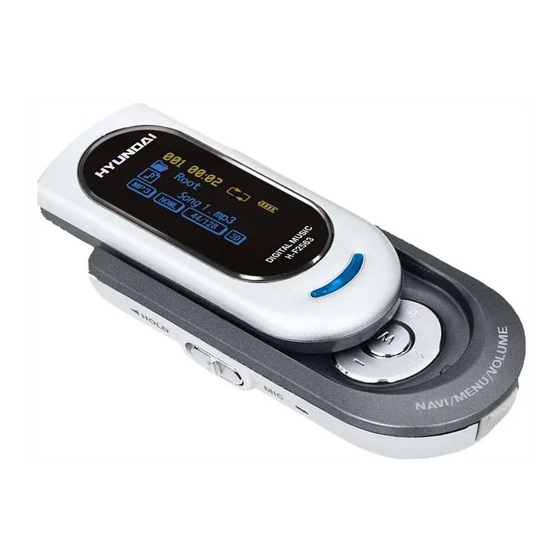
Page 5: Names Of Controls & Indicators
Names of controls & indicators Portable MP3 Player... - Page 6 NAMES OF CONTROLS & INDICATORS Play Mode: Name Earphone Jack Strap Hole Line-in Jack Hold S/W Microphone jack OLED display LED lamp (-) Button NEXT/Fast Forward (+) Button PREV/Fast Rewind MENU PLAY/STOP/POWER Start Playback / Stop / Power On / Power Off A-B/EG Button MODE Button USB Port...
-
Page 7: Accessories
Accessories 1. Installation CD 2. Stereo earphone 3. User manual 4. USB cable. 5. AAA Alkaline Battery 6. Line-in cable 7. Necklace (optional) Remark: Accessories and items are subject to change... -
Page 8: Lcd Display
LCD display Number of Music being Played Playing Time Repeat Mode Battery Strength/ Hold Key Currently Used Folder Names of Signer and Music or Song Type of File Equalizer Mode Bit RATE 10. 3D Mode... -
Page 9: Getting Playback Started
Getting playback started 1. Power ON / OFF POWER ON Press Play / Stop / Power and hold it for 1-2 seconds to turn on the power. POWER OFF Press Play / Stop / Power and hold it for 1-2 seconds to turn off the power. Caution: Don t remove the battery while the player is Power On, it will damage the firmware &... - Page 10 8. Control mode · Press and hold MENU button for 2 seconds. 9. Searching the music · Press MENU button shortly. 10. Program list/Delete · Press MENU button, then press A-B button -> PlayList / MODE button. · Click the button shortly -> Delete.
-
Page 11: Summary Of Road Map
Summary of road map 1. Menu mode 2. Control mode General Download Load default LYRIC language Menu language Fast format Low format Information Sound Equalizer L/R balance Fade-in 3D control Treble Bass control Display LCD contrast Backlight LCD off-time Time mode Tag info Origin mode Play... -
Page 12: Basic Functions
Basic functions MUSIC Mode 1. Listening to the music · Click the MENU button and then select the folder containing the music or song you want using (+) or (-) button. · Transfer (Searching): You may search music or song you want using (+) or (-) button. ·... - Page 13 2. Repeat listening to the specific part Part repetition: used when you want to repeat listening to the selected part while playing. · Select the first part of music or song (A position) by clicking the A-B/EQ button. · Select the end part of music or song (B Position) by pressing the A-B/EQ button again - You may repeat listening to the A-B Part.
- Page 14 4. PLAY LIST function · MENU Button. You can select the folder using (+) or (-) button. · Move (searching): You can search the song using (+) or (-) button. · Select Music: Select the song you want to upload on play list and push the button A-B/EQ shortly then you will see the song you selected on the play list.
- Page 15 If you want to delete the play list song, just push the button (A-B/EQ) shortly or Play List, you use the button of (FF Caution: Do not forward this Button ( FF For listening play list, play mode on the control function should be "ON". Reference with control mode for more information.
- Page 16 1. Listening to the FM broadcasting · Adjust the frequency of broadcasting you want by pushing ether (Before) AUTO SCAN function The frequency on the broadcasting is automatically searched by pushing and holding either button after releasing the PRESET. When you searching the frequency by AUTO SCAN, please set receiving sensitivity using FM SCAN LEVEL of control mode.
- Page 17 (Frequency Settlement) · Select the desired channel using ether button. (Choosing Channel) · Save the selected channel by pressing the A-B/EQ Button, (Remember Channel) · For searching this saved channel, press the button again.
- Page 18 (CH2) 3. FM Broadcasting AUTO Memory · Click A-B/EQ button for 1-2 second then auto searching frequency then memorized automatically. Maximum 20 channels can be memorized. (CH1) (CH3) (CH1)
- Page 19 (CH2) If you want to back to previous mode from Auto searching, you push and hold the PLAY/ POWER button for 1-2 seconds. 4. FM Broadcasting record · The broadcasting you are listening is recorded if pressing the MODE Button while listening to the broadcasting.
- Page 20 5. Key Functions in the Music Mode Function key Length of Pressing POWER long shortly EQ/A-B long MODE shortly long shortly long shortly MENU long LINE-IN ENCODE Mode This mode allows you to store the music or song n the name of mp3 music in the Player via a connection to the external device.
- Page 21 (Encoding mode) · Push the PLAY/POWER button when you want to pause and re-record when push this button again. · Push the MODE button when you want to stop then it will be stored on MUSIC folder. Move to MUSIC folder when you push (MENU) button. Move to control mode when you push (MENU) button longer.
- Page 22 1. Voice recording · Initiate recording by pressing the MODE Button. (Voice recording mode) · Push PLAY/POWER button when you want to pause and push PLAY/PAUSE button to play again. · If you want to stop, push EQ/AB button and stored on VOICE folder. Push MENU button then move stored VOICE folder.
- Page 23 SETTING THE PRODUCT FUNCTIONS (CONTROL) MODE CENTRE THE FUNCTIO NS OF PLAYER 1. Function keys in the Control Mode Function key Length of Pressing shortly POWER long EQ/A-B MODE shortly MENU long 2. General DOWN LOAD LOAD DEFAULT LYRIC LANGUAGE MENU LANGUAGE FAST FORMAT LOW FORMAT...
- Page 24 · LYRIC Language selection Title or information of music or song is decided according to the operating system of PC where music or song is made. Select the language suitable for the setting Example: Make sure to set to the KOREA if made in the Hangul Window. Make sure to set to the CH NESE if made in Chinese Window.
- Page 25 · INFORMATION Displays the name of product, Firmware version, approval number, product capacity, and remained capacity. INFORMATION Model Name TMS700 F/W Ver Serial No. 05110BF9A Memory 3. Display · LCD CONTRAST Used to adjust the brightness of LCD Screen (1 ~30Level). 114/256MB 1.
- Page 26 · BACKLIGHT Allows you to set the time of backlight. Setting is available up to 0-30 sec. · LCD OFF-TIME Allows you to set the backlight time of LCD Screen. · TIME MODE Select the mode you want out of playing time (NORMAL) and remaining time (REMAIN) of music or song being played.
- Page 27 This function allows the user to change the direction text is d splayed on the LCD. Normal: LCD will d splay text normally (top down). Reverse: LCD will reverse the direct on the text is displayed by 180 degrees (bottom up). 4.
- Page 28 · MUSIC RECORD Selects the sound quality upon recording the external sound source. Bit RATE: 56Kbps-256Kbps Auto SYNC ON: Is the function of creating new file through the classification by audio track when recording the audio CD through the input into the Line-in. Auto SYNC OFF: Releases the function of sensing the audio signal, SYNC Level: Creates new file f there is no audio signal during the time designated for sensing (1-10 seconds),...
- Page 29 · EQUALIZER You may select the genre of muse or song using the EQ Selection button. Genres: (NORMAL, JAZZ, CLASSIC, ROCK, POP) · FADE-IN If setting to ON, the volume is gradually increased upon initiation of playing It prevents the sound from being played too loudly upon playing after the stop ·...
- Page 30 · 3D CONTROL You may set the high and low tones as per your preference. 3D MODE ON: Activation. OFF: Retraction. STEREO DEPTH /16: Used to adjust the weight of left and right sounds. Example: Upon setting to 8/16, - Left Speaker: You may hear the sound and the left 100% and the one on the right 50%. - Right Speaker: You may hear the sound on the right 100% and the one on the left 50%.
- Page 31 6. Play · REPEAT This function allows you to select the ways of selecting and repeating the music or song. NORMAL Plays the whole music or song once. Repeats playing the selected music or song. Repeats playing the selected folder. Sequentially repeats playing the whole unlimitedly.
- Page 32 * If you want to intro mode search, push the («+»} lever more than 1-2 seconds. · RESUME Replays at the part where music or song is played for the last time with this function set (ON) when turning on or off the power. ·...
- Page 33 7. Etc. · STOP POWER OFF You may adjust the power off time at the idle state. (Setting in the unit of a minute up to 1 -60 minutes s available). · SLEEP POWER OFF When the designated time elapses, the power is automatically off. (Setting in the unit of a minute up to 1-180 minutes is available).
- Page 34 · BATTERY TYPE This function is used to set the BATTERY TYPE you use. Select the using BATTERY TYPE "ALKALINE" and charger "M-CD" using the (vol+,vol-) button. Caution: Make sure to select the BATTERY you use. Life of battery may be reduced if using the charger after selecting the ALKALINE Mode. Playing time may be reduced if using the ALKALINE after selecting the Charger Mode.
-
Page 35: Firmware Upgrade
UPGRADING 1. Firmware upgrade · Enter the control mode by licking and ho ding the MENU Button · Select the DOWNLOAD after entering the GENERAL Mode using the (+) or (-) Button · Now, the product is ready to be upgraded, and install the driver in the computer according to the following guideline after inserting the CD provided with the product. - Page 36 · Click the Non USB Driver Install. DOS Screen appears and driver installation procedure is completed. · Once Nan USB Driver installation is completed, click the Chkcopy of guide program after inserting the Player in the USB Port. Caution: For the WIN98/SE user, install the 98 driver. You are required to reboot the computer for some cases.
- Page 37 · Main File: Means all operating execution files installed in the product. Font File: Un code font file of LCD. a. Operates main flle (main.b.n) in upgrade folder b. Use the font file when the font disappears, or you want to use other fonts. * Caution: Above upgrading process is not available if the serial number of device does not appear.
-
Page 38: How To Set The Pc Environment By Operating System
Operating with computer PC Requirements Windows 98/Me/2000/XP Hard disk space of above 20Mb CD-ROM Drive USB Port serviced PC Setting the PC Environment - Window 98 User Make sure to install the WIN98 Driver. Use by connecting the player after installing the driver. To upgrade the player, you need to install the Non USB Driver. - Page 39 · Click the WIN98/SE Install. DOS Screen appears and installation procedure is completed. · When the installation is completed, connect the player to the USB Port. · The Player is recognized and automatically installed, and it is recognized as "Mobile disk" in the file monitoring window.
- Page 40 DOS Screen appears and driver deleting procedure is completed. Execute the driver installation program again to get the Player recognized after the deletion. Win 98 Installation Driver Win 98 Deleting Driver Manual HYUNDAI Homepage Link Descriptions of Installing Guide Programs Non USB Installation Driver Non USB Deleting...
-
Page 41: How To Store And Connect The Data
How to store and connect the data 1. Connecting to the PC Connect the one end of cable to the USB Port of computer and another end to the USB Terminal of Player using the USB Connection cable provided with the product. 2. - Page 42 · Select new folder by clicking the right part of mouse. 2) Copy of file or folder of Player · Move the folder or f le to make a copy to the position where you want to make a copy by dragging the corresponding folder or file.
- Page 43 3) Deletion of file or folder of Player · Select the file or folder to delete. · Select the Delete Key. Popup window prompting you to delete or not appears at this time. If you want to delete, press "Yes." ·...
- Page 44 Disconnecting from the PC When all works are completed, make sure to disconnect the product from the PC as follow When disconnecting the product from the PC, make sure to click the green arrow (removal of hardware safety) twice on the bottom work displaying line. ·...
-
Page 45: Electronic Features
Electronic Features Files Support Digital Volume Control Audio Frequency Head Phone Output Power Signal to Noise Ratio Total Harmonic Distortion Audio Output Internal Memory Capacity Battery Type Battery Life Time PC interface FM Radio Specification Frequency Range S/N Ratio Sensitivity at 30dB S/N Stereo Separation Audio output Distortion Our company will not be responsible for any lost or damaged data downloaded to your MP3... -
Page 46: Troubleshooting Guide
Occasionally some parts of a data stream may be damaged owing to instability of power while downloading files. In such case, format to initialize the memory in the player by the utility MP3 Player. Check if the USB cable is connected properly, and if the player is on. -
Page 47: Regulatory Information
Regulatory information Federal Communications Commission (FCC) This device has been tested and found to comply with the limits for a Class B digital device, Pursuant to Part 15 of the FCC Rules. Operation is subject to the following two conditions: 1. - Page 48 ...48 ...49 ...50 ...51 ...53 ...54 ...55 ...57 ...58 ...84 ...87 ...91 FM ...91 ...92 ...94...
- Page 49 · · · · · · ·...
- Page 50 MP3, WMA ASF. « AGC, »...
- Page 52 Hold S/W NEXT/Fast Forward PREV/Fast Rewind PLAY/STOP/POWER A-B/EG MODE...
- Page 53 USB.
- Page 54 3D (...
- Page 55 Play / Stop / Power Play / Stop / Power · « · « · Play / Stop / Power · Play / Stop / Power », », «+», Play / Stop / Power « » « » «-»,...
- Page 56 · · · MENU · MENU , «MODE» · -> MODE MENU « » ->...
- Page 58 · MENU · · «PLAY/POWER» (-). (+) (-) (-).
- Page 59 · «A-B/EQ», · «A-B/EQ» · MODE · · « «A-B/EQ» « ?» » « » (« ») (« »)
- Page 60 · MENU . · · «A-B/EQ». «A-B/EQ» «FF » «FF »...
- Page 61 POWER EQ/A-B MODE MENU (Normal >JAZZ >Classic >Rock >POP) (Normal >1 >DIR >All >R.DIR >R.A I) « »...
- Page 62 · · « » « » « « « » On/Off. « ». « ».
- Page 63 · « /EQ» · « » « » · « /EQ»...
- Page 64 · · « /EQ». · « » « ».
- Page 65 · · RADIO001.MP3, RADIO002.MP3 «PLAY/POWER» MODE RADIO...
- Page 66 POWER EQ/A-B MODE MENU · «MODE»...
- Page 67 · PLAY/POWER · «MODE» «MENU» MUSIC001. 3, MUSIC002. MUSIC «MENU» «MODE» MUSIC. MUSIC...
- Page 68 · · PLAY/POWER · «EQ/A-B» «MENU» «PLAY/POWER» VOICE001. 3, VOICE 002. «MODE» VOICE «MENU» «MODE» VOICE. VOICE...
- Page 69 POWER EQ/A-B MODE MENU...
- Page 70 · · · KOREAN ENGLISH JAPANESE CHINESE-SIMP CHANESE-TRAD · ·...
- Page 71 · · · H-F2563 05110BF9A 114/256MB...
- Page 72 · · · « » (NORMAL) « » (REMAIN) ·...
- Page 73 · (Normal): (Reverse): · VAD: · : 56 VAD. 64KBPS VAD 1/9...
- Page 74 · : 56 · : NORMAL, JAZZ, CLASSIC, ROCK, POP 128KBPS (1-10 1-32). 128KBPS 5/10 17/32...
- Page 75 · · ·...
- Page 76 STEREO DEPTH 0/16: : 100 % : 100 % · · 8/16, , 50% - , 50 % -...
- Page 77 · R.DIR R.ALL · (75% - 130%)
- Page 78 · «+» · · (ON): (OFF): ·...
- Page 79 · (1-60 · 1-180 ·...
- Page 80 · (ALKALINE ( )) Ni-CD ( vol+ vol- « », « » Ni-Cd · ·...
- Page 81 · · «+» « » · · · H-F2563.exe c D. « » (General) «MENU» « » (DOWNLOAD) CD-ROM.
- Page 82 · «Non USB driver install». · (CHKCOPY program) Main File: Font file: · · «Chkcopy» WIN98/SE, DOS. (CHKCOPY program) (main.bin)
- Page 83 · « » (DOWNLOAD). « » (DOWNLOAD). ·...
- Page 84 Windows 98/ME/2000/XP CD-ROM Windows 98 «Non USB Driver» Windows ME/2000/XP «Non USB Driver» 98/SE, · CD-ROM · H-F2563.exe c D. Win 98 <None> Windows...
- Page 85 · · · · CD-ROM · H-F2563.exe c D. Win 98 · «WIN98/SE Install» «WIN98/SE Uninstall»...
- Page 86 · Win 98 «Non USB driver» Win 98 «Non USB Driver» HYUNDAI...
- Page 87 (USB · Windows...
- Page 88 · ·...
- Page 89 · · «Delete». ·...
- Page 90 « ».
- Page 91 WMA, MP3, ASF ... 20 > 80 < 0,1% AAA ( 87,5 ... 108 40 ... 60 25 ... 31 < 1-2 %...
- Page 92 1,5 , MP3 Player, 1,5 . (Ni-Cd) 1,2 . «HOLD» ( «On» ( USB,...
- Page 93 USB.
- Page 94 and TV interference Problems» ( Printing Office, Washington, DC 20402. (FCC) 004-000-00345-4, FCC. FCC). «How to Identify and Resolve Radio U.S. Government...