Table of Contents
Advertisement
Available languages
Available languages
Quick Links
WEATHER STATION
WS500
Manuel d'utilisation
User manual
Bedienungsanleitung
Manual de usuario disponible en:
Manuale utente disponibile su:
Manual do usuário disponível em:
Gebruikershandleiding beschikbaar op:
Instrukcja obsługi dostępna na stronie:
Felhasználói kézikönyv elérhető a:
Uživatelská příručka k dispozici na:
Руководство пользователя доступно по адресу:
www.gtcompany.fr/en/customer-support/
Advertisement
Table of Contents

Related Manuals for NASA WS500


Summary of Contents for NASA WS500
- Page 1 WEATHER STATION WS500 Manuel d’utilisation User manual Bedienungsanleitung Manual de usuario disponible en: Manuale utente disponibile su: Manual do usuário disponível em: Gebruikershandleiding beschikbaar op: Instrukcja obsługi dostępna na stronie: Felhasználói kézikönyv elérhető a: Uživatelská příručka k dispozici na: Руководство пользователя доступно по адресу:...
-
Page 2: Station Météo
STATION MÉTÉO REF : WS500 EDITION : FR LIRE ATTENTIVEMENT TOUTES LES INSTRUCTIONS DE LA PRESENTE NOTICE, EN RESPECTANT LES CONSIGNES D’UTILISATION ET DE SECURITE. CONSERVER CETTE NOTICE POUR CONSULTATION ULTERIEURE ET EN AVISER LES UTILISATEURS POTENTIELS. CONSIGNES DE SÉCURITÉ... - Page 3 - Ne pas exposer pas l‘appareil à des chocs, des vibrations, de la poussière ou une humidité extrême. Cela pourrait entraîner des dysfonctionnements, des courts-circuits voir des dommages aux batteries et aux composants. - Ne pas exposer l’appareil aux rayons du soleil, à des flammes ou à...
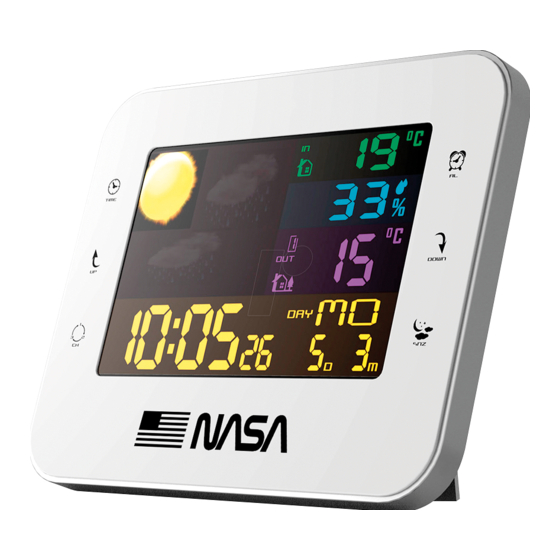
- Page 4 DESCRIPTION 1. Station météo 2. Écran LCD 3. Température intérieure 4. Bouton AL (sélection alarmes AL1 et AL2) 5. Taux d’humidité intérieure 6. Bouton DOWN + changement unité température (C°/F°) 7. Température extérieure 8. Jour de la semaine 9. Bouton SNZ (répétition alarme) + éclairage de l’écran 10.
-
Page 5: Installation
INSTALLATION / UTILISATION 1 - INSTALLATION STATION MÉTÉO - Ouvrez le support à l’arrière de la station météo. - Poser la station météo sur une surface plane horizontale. SONDE La sonde peut être installée : - soit au mur à l’aide d’une vis (non fournie). Accrochez la sonde par l’orifice situé au dos. - soit horizontalement Pour la connecter à... - Page 6 3 - RÉGLAGE DE LA DATE ET DE L’HEURE - Pressez le bouton (TIME) durant 2 secondes pour entrer dans le mode réglage de la date et de l’heure. - La première donnée à régler est le format d’affichage de l’heure (12/24 Hr). - Utilisez les boutons (UP) et (DOWN) pour ajuster les valeurs.
-
Page 7: Weather Station
WEATHER STATION REF : WS500 VERSION : EN PLEASE READ ALL THE DIRECTIONS IN THIS MANUAL CAREFULLY AND FOLLOW THE OPERATING AND SAFETY INSTRUCTIONS. KEEP THIS MANUAL FOR FUTURE REFERENCE AND SHOW IT TO POTENTIAL USERS. SAFETY INSTRUCTIONS - Keep children away from packaging materials (plastic bags, rubber bands, etc.) -
Page 8: Battery Information
- Do not expose the unit to direct sunlight, flames or high temperatures. - Do not expose the unit to dripping water or splashes. - Do not use the unit if it does not operate normally. - Do not repair the unit yourself. Only allow repairs to be carried out by a qualified person. - Page 9 DESCRIPTION 1. Weather station 2. LCD screen 3. Indoor temperature 4. AL button (AL1 and AL2 alarms selection) 5. Humidity 6. DOWN button + temperature unit change (C°/F°) 7. Outdoor temperature 8. Day of the week 9. SNZ button (snooze) + screen lighting 10.
-
Page 10: Weather Indicator
INSTALLATION / USE 1 - INSTALLATION WEATHER STATION - Open the stand on the back of the weather station. - Place it on a flat horizontal surface. SENSOR The sensor can be installed: - either on the wall using a screw (not included). Hang the sensor through the hole on the back. - or horizontally To connect it to the weather station, proceed as follows: - Press the (CH) button to select the transmission channel on which the slider within the batteries... -
Page 11: Stopping The Alarm
3 - SETTING THE DATE AND TIME - Press the (TIME) for 2 seconds to enter the date and time setting mode. - The first data to be set is the time display format (12/24 Hr). - Use the (UP) and (DOWN) buttons to adjust the values. - Press the (TIME) button to confirm and then move to the next data setting whose display will flash. - Page 12 WETTER STATION REF : WS500 VERSION : DE LESEN SIE ALLE ANWEISUNGEN IN DIESER BEDIENUNGSANLEITUNG SORGFÄLTIG DURCH UND BEACHTEN SIE DIE ANWENDUNGS- UND SICHERHEITSHINWEISE. BEWAHREN SIE DIESE BEDIENUNGSANLEITUNG FÜR ZUKÜNFTIGE ZWECKE AUF UND INFORMIEREN SIE POTENZIELLE BENUTZER. SICHERHEITSHINWEISE - Halten Sie Verpackungsmaterialien (Plastiktüten, Gummibänder usw.) von Kinder fern.
- Page 13 - Setzen Sie das Gerät keinen Stößen, Vibrationen, Staub oder extremer Feuchtigkeit aus. Dies kann zu Fehlfunktionen, Kurzschlüssen oder zur Beschädigung von Batterien und Komponenten führen. - Setzen Sie das Gerät nicht direkter Sonneneinstrahlung, Flammen oder hohen Temperaturen aus. - Setzen Sie das Gerät Wassertropfen und -spritzern aus. - Nehmen Sie das Gerät nicht in Betrieb, wenn es nicht einwandfrei funktioniert.
- Page 14 BESCHREIBUNG 1. Wetterstation 2. LCD-Bildschirm 3. Innentemperatur 4. AL-Taste (Auswahl der Alarme AL1 und AL2) 5. Luftfeuchtigkeit 6. DOWN-Taste + Änderung der Temperatureinheit (C°/F°) 7. Außentemperatur 8. Wochentag 9. SNZ-Taste (Schlummerfunktion) + Bildschirmbeleuchtung 10. Datum TT / MM 11. Uhr (Stunden, Minuten, Sekunden) / Alarme 12.
- Page 15 INSTALLATION / VERWENDUNG 1 - INSTALLATION WETTERSTATION - Öffnen Sie den Ständer auf der Rückseite der Wetterstation. - Stellen Sie sie auf eine ebene, waagerechte Fläche. SENSOR Der Sensor kann folgendermaßen installiert werden: - mit einer Schraube (nicht im Lieferumfang enthalten) an der Wand Befestigen Sie den Sensor mithilfe der Öffnung auf der Rückseite.
- Page 16 3 - EINSTELLUNG DES DATUMS UND DER UHRZEIT - Drücken Sie die Taste (TIME) 2 Sekunden lang, um in den Einstellmodus für Datum und Uhrzeit zu gelangen. - Die ersten einzustellen Daten ist das Zeitanzeigeformat (12/24 Hr). - Verwenden Sie die Tasten (UP) und (DOWN), um die Werte einzustellen. - Drücken Sie die Taste (TIME), um zu bestätigen und zur nächsten Dateneinstellung zu gelangen, deren Anzeige blinkt.
- Page 17 GT COMPANY - 5 rue de la Galmy - 77700 Chessy - France +33 (0) 1.61.10.09.25 - www.gtcompany.fr NASA space program imagery: Source - International Space Archives LLC. NASA does not design, manufacture, distribute or endorse GT Company weather stations nor provide warranty support of GT Company weather stations.