
Summary of Contents for TIM VELOCE PRO
- Page 1 VELOCE PRO MONOPATTINO ELETTRICO CON ACCELERATORE A PEDALE MANUALE D’USO USER MANUAL V1.0 V1.0 Grazie per la lettura!/Thank you for your reading!
-
Page 3: La Confezione Include
Contenuto PAGE 2 _______________________ ITA PAGE 23 _____________________ EN La confezione include Contatta rivenditore centro assistenza autorizzato in caso della mancanza di alcune di queste parti. Monopattino elettrico Manopole Attrezzi per il montaggio Carica batteria Cavalletto Gancio di bloccaggio Manuale di utilizzo Manuale di utilizzo Carica batteria Monopattino elettrico... -
Page 4: Istruzioni Di Assemblaggio
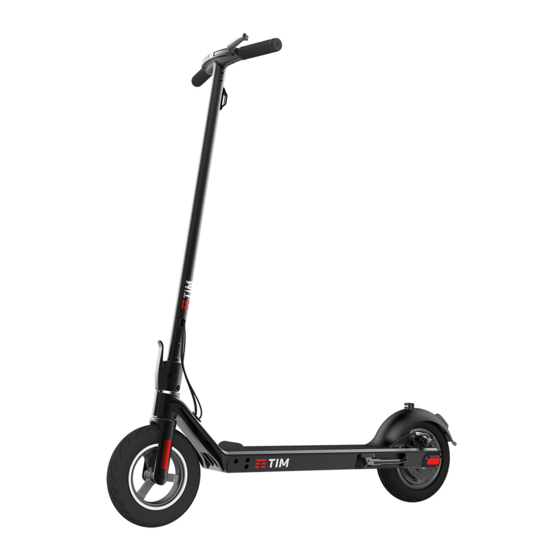
Struttura del prodotto Schermo Pulsante di Pulsante luce anteriore accensione Manopole Leva del Freno Gancio di chiusura Struttura anteriore Pad anti-vibrazioni Gancio di chiusura Leva di chiusura Luce posteriore e luce di stop 10’ ’ pneumatico anteriore 10’ ’ pneumatico posteriore honeycomb honeycomb Cavalletto laterale... - Page 5 1. Avvitare la vite con il cacciavite e in senso orario, fino a quando sarà fissata. Gancio Di bloccaggio 2. Avvitare la leva del freno con la chiave a brugola. Leva del freno 3. Ruotare le monopole sx , in senso orario fino a fissarle.
- Page 6 Display integrato Cliccare il tasto sinistro per accendere per spegnerlo tieni premuto il tasto sx 3 secondi Lo scooter si spegne automaticamente dopo 10 minuti di inutilizzo. Km percorsi Velocita’ a sx il display indica i Km percorsi a dx la velocità in Km/h Beginner Comfort Sport...
- Page 7 Tenere premuto tenere premuto il pulsante destro per accendere e spegnere la luce anteriore. Indicatore del livello batteria. 4 tacche massima carica. Aprire il monopattino Step 1: Sollevare leggermente il manubrio e farlo scorrere verso sinistra, finché il manubrio non si stacca dal gancio del parafango posteriore.
- Page 8 Step 2: Girare leggermente il manubrio a sinistra o a destra per evitare di colpire il blocco di sicurezza, mettere il piede sulla pedana e poi spingere il piantone dello sterzo nella posizione finale fino a sentire uno scatto.
- Page 9 Chiudere il monopattino Step 1: Ruotare leggermente il piantone dello sterzo a sinistra o a destra fino a quando la leva di aggancio si allontana completamente dal blocco di sicurezza, poi premerla per sbloccare il manubrio. Aprire Gancio di sicurezza Leva di chiusura...
- Page 10 Step 2: Abbassa il piantone dello sterzo, allinea la chiusura di bloccaggio con il gancio di bloccaggio, ora potrai bloccarlo. Controllo prima dell’ utilizzo Il monopattino è composto da alcune parti meccaniche ed elettriche. Prima di guidarlo, ispezionarlo per garantire il normale funzionamento: (1) Assicurarsi che il gancio Utility/Locking sia bloccato.
- Page 11 Come guidare il monopattino 1. Tenere il manubrio con le mani e mettere il piede destro sul pedale dell'acceleratore. Poi fai scorrere il piede sinistro per darti una leggera spinta. 2. L’ acceleratore a pedale dinamico, ti permette di contrallare la velocità in base alla pressione del piede.
- Page 12 3. Utilizzare il manubrio per cambiare la direzione di marcia. 4. Per rallentare o fermare lo scooter, rilasciare l’ acceleratore a pedale e tirare la leva del freno.
- Page 13 Attenzione Guida con prudenza e usa il casco e protezioni. Prestare attenzione agli ostacoli sulla strada. Non immergere le ruote in acqua più alta di 30cm...
- Page 14 Rapid acceleration Rapid deceleration Non superare i 15 gradi di pendenza durante la guida. DA NON FARE Non guidare con una sola mano.
- Page 15 Non distrarti con altri mentre si guida. Non salire e scendere le scale.
- Page 16 Non immergere lo scooter in acqua. Non andare in strade non consentite.
- Page 17 Non andare in più di una persona. Non guidare in strada impervia e/o strada ghiacciata.
- Page 18 Metodo di ricarica La prima ricarica richiede 5-8 ore. Per preservare ed ottimizzare al meglio l’uso della batteria, si consiglia di caricarla spesso sia dopo l’ utilizzo che in fase di inutilizzo. La negligenza di ricarica può causare la sovrascarica della batteria recandogli Danni.
-
Page 19: Manutenzione
Manutenzione Stoccaggio Non aprire o smontare il monopattino per nessun motivo. L'utente è responsabile eventuali conseguenze. Evitare di posizionare il monopattino per lunghi periodi di tempo alla luce diretta del sole, alla pioggia o in ambienti con forte umidità. Durante lunghi periodi di inattività, eseguire il controllo della batteria, evitare di stare in piedi sul monopattino mentre il cavalletto è... - Page 20 Manutenzione crack sostituire il pacco battena Se il pneumatico anteriore Quando si verifica una riduzione appare crepato, sostituirlo significativa dell’intervallo, immediatamente. sostituire immediatamente la batteria, portare la batteria usata ad un impianto di riciclaggio appropriato. Riciclaggio rifiuti per batterie Le batterie usate non possono essere gettate via in modo casuale per evitare di inquinare l'ambiente.
-
Page 21: Dati Tecnici
DATI TECNICI Caratteristiche Specifiche Dimensione della ruota 10' Inch Potenza motore nominale 350W Voltaggio del motore Capacita' della batteria 36V 7,5AH Input di ricarica 100-240V AC 50-60Hz 1,5A Tempo di ricarica 5-6 Ore Velocità massima 25 Km/h 3 Velocita' 6/20/25 Km/h Display Freni Freno elettronico anteriore,freno... - Page 22 Il prodotto è garantito per un periodo di 2 anni dalla data di acquisto con scontrino, o di 1 anno dalla data di acquisto con fattura. La garanzia ha validità solamente se è comprovata dalla prova d'acquisto valida (scontrino fiscale per il Consumatore), che deve essere presentata all'atto della richiesta di intervento.
- Page 23 CORRETTO SMALTIMENTO DI QUESTO PRODOTTO Attuazione della Direttiva 2006/66/UE Il prodotto funziona con batterie che rientrano nella direttiva europea 2006/66/CE e che non possono essere smaltite con i normali rifiuti domestici. Informarsi sulle normative locali relative alla raccolta differenziata delle batterie: un corretto smaltimento permette di evitare conseguenze negative per l’...
-
Page 24: Dichiarazione Di Conformita
DICHIARAZIONE DI CONFORMITA’ Si dichiara che il prodotto in oggetto è conforme alle direttive EMC 2014/30/EU; LVD 2014/35/EU; MD 2006/42/EC; RoHS 2011/65/EU. Le immagini presenti in questo manuale sono puramente a scopo illustrativo. L’ Azienda declina ogni responsabilità per l’ utilizzo improprio del prodotto. - Page 25 Contents PAGE 2 _______________________ ITA PAGE 23 _____________________ EN The Package contents includes the follwing parts Please contact authorized dealers or after-service center if there is any missing spare parts Electric Scooter Handle bar Installation tool & Screw Charger Brake Lever Locking Clasp User manual (English version) (tools and screws included)
-
Page 26: Product Structure
Product Structure Intelligent Display Power Button Front-light button Handle Mechanical Disc- brake Lever Locking Clasp Steering Column Shock-absorption Pad Lock Hook Folding button Rear LED Brake Light 10-inch front honeycomb tire 10-inch rear honeycomb tire Kick-stand Foot Throttle Charging port Assembly Instructions Check the package contents carefully and make sure all parts are in good condition, then take the scooter... - Page 27 1. Screw the locking clasp with wrench in a clockwise direction till it is fixed. Locking Clasp 2. Screw the brake lever with the allen wrench. Mechanical disk-brake lever 3. Rotate the left handle in a clockwise direction till it is fixed.
- Page 28 Integrated intelligent dashboard Click the left button to turn on Press the left button over 1s to turn off (Non-driving state) The scooter will be shut down automatically after 10 mins of no using. mileage speed Total mileage displayed in non-driving state with unit Km Current speed displayed in driving state with unit Km/h.
-
Page 29: Unfolding The Scooter
Long press Press and hold right button to turn on and turn off the front light Battery display with 4 Bar Unfolding the scooter Step 1: Slightly lift the handlebar up and slide it to the left, until the handlebar comes loose from the hook on the rear fender. - Page 30 Step 2: Turn the handlebars slightly to the left or right to avoid hitting the safety lock, put the foot on the foot pad and then push the steering column to the final position until you hear a click.
-
Page 31: Folding The Scooter
Folding the scooter Step 1: Turn the steering column slightly to the left or right until the folding button is completely away from the safety lock, then press down the folding button. open safety lock Folding button... - Page 32 Step 2: Folding down the steering column, align the locking clasp with the side of the locking hook, then lock the steering column with the locking hook. Checking list before operation The e-scooter involves a few mechanical and electric setting. Before riding, inspect each component of the scooter to ensure normal operation.
- Page 33 How to ride the e-scooter 1. Hold the handle bar with your hands and put your right foot on the accelerator pedal. Then slide your left foot to engine the scooter. 2. The harder you engage the accelerate trigger, the faster scooter runs.
- Page 34 3. Use the handles to change the riding direction. 4. To slow down or stop the scooter, release trigger and hold the brake lever.
- Page 35 Warning Pls make sure ride with helmet and protective gears. Pay attention to obstacles on the road. The wading depth cannot exceed 30cm.
- Page 36 Rapid acceleration Rapid deceleration Do not exceed 15-degree slopes while riding. Do not do Do not ride only by one hand.
- Page 37 Do not play with others while riding. Do not ride up and down stairs.
- Page 38 Do not immerse scooter in water. Do not ride on the motorway.
- Page 39 Do not ride by more than one person. Do not ride on the slippery road and ice-snow road.
-
Page 40: Over Discharge Protection
Over Discharge protection VELOCE PRO scooter has the internal over-discharge protection. When the scooter is on shut-off mode/battery is low, the scooter will power off to active over-discharge protection system to protect the battery bank. -
Page 41: Product Maintenance
Product Maintenance Storage Do not open the kickscooter for any reason. The user is responsible of any after-effect. Avoid placing the scooter in long periods of time in direct sunlight, rain or environments of heavy humidity. During long idle periods, perform battery check and battery charge to ensure batteries fully charge and avoid the battery over-discharge. - Page 42 Maintenance crack replacing battery pack If front tire appears crack , When experience significant replace the front tire reduction in range,replace battery immediately. immediately, please bring used battery to appropriate recycling facility. Recycling of Waste Batteries Waste batteries cannot be discarded casually to avoid polluting the environment.
-
Page 43: After-Sale Service
PARAMETERS Features Spec Wheel size 10' Inch Nominal motor power 350W Motor voltage Battery capacity 36V 7,5AH Charging input 100-240V AC 50-60Hz 1,5A Charging time 5-6 Hours Maximum speed 25 Km/h 3 Speeds 6/20/25 Km/h Display LED display Brakes Front electronic brake,rear disc brake Lights Headlight, rear brake light... -
Page 44: Correct Disposal Of The Product
This product is warranted to be free from defects in materials, workmanship and functionality (aesthetic parts are excluded) for a period of 1 year starting from the date of purchase in case of receipt, for a period of 1 year starting from the date of purchase in case of invoice. -
Page 45: Ec Declaration Of Conformity
To prevent possible harm to the environment of human health from uncontrolled waste disposal, please separated these items from other types of waste and recycle them responsibly to promote the sustainable reuse of material resources. Household users should contact either the retailer where they purchased this product, or their local government office, for details of where and how they can take these items for environmentally safe recycling. - Page 46 power adapter CP4215 AC-DC...
- Page 47 GIVI E-SCOOTER VELOCE PRO https://www.gividistribuzione.com GIVI MONOPATTINO ELETTRICO VELOCE PRO https://www.gividistribuzione.com E-SCOOTER VELOCE PRO GIVI https://www.gividistribuzione.com GIVI E-SCOOTER VELOCE PRO https://www.gividistribuzione.com GIVI E-SCOOTER VELOCE PRO https://www.gividistribuzione.com GIVI E-SCOOTER VELOCE PRO https://www.gividistribuzione.com GIVI E-SCOOTER VELOCE PRO https://www.gividistribuzione.com...
- Page 48 VELOCE PRO MONOPATTINO ELETTRICO CON ACCELERATORE A PEDALE VELOCE PRO...