
Summary of Contents for Navigator LP240BK
- Page 1 NAVIGATOR INFLATABLE BOATS USER MANUAL User Manual Navigator Inflatable Boats 2021 https://www.navigatorboat.com...
-
Page 2: Table Of Contents
Adjusting the pressure in air chambers (including a keel). Configuring the valves: Next steps for boat assembly: Mounting the outboard motor: Disassembly: Cleaning, Maintenance, Repairs Operating the boat: Towing bridle & towing behind: Navigator Inflatable Boats Warranty Terms & Conditions:... -
Page 3: Intro, Regulatory
& hunting, or as an auxiliary craft for powerboats and yachts. This manual has been compiled to help you to operate your Navigator inflatable boat with safety and pleasure in mind. It contains details about your new inflatable boat; the equipment supplied or fitted, its systems and information on its operation and maintenance. -
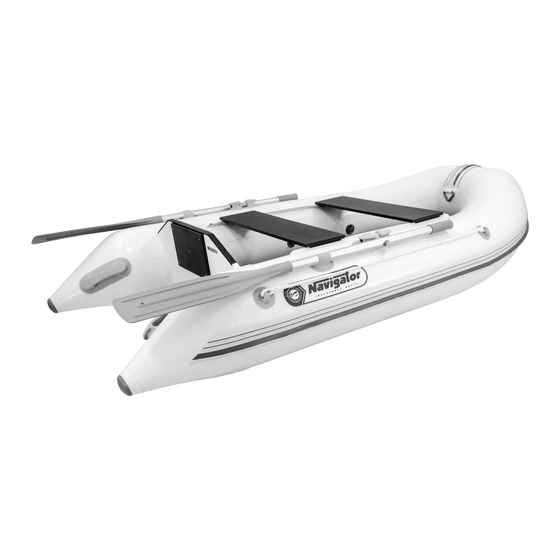
Page 4: Standard Construction Elements
Standard Construction Elements A) Roll-up Inflatable Boats B) Rigid Hull Inflatable Boats... - Page 5 5 - Lifeline; 6 - Carrying handle; 7 - Oarlock; 8 - Hard seat. Standard kit Navigator Roll-up Boats: - 2 Oars with oarlocks - Towing handle under the bow - 2 Movable Seats - Anchor mount D-ring with a rubber bow protector for the rope - Book-type wooden floor.
-
Page 6: Quick Assembly Guide - Flooring
Quick Assembly Guide – Flooring. You should follow the same process for the Book-type floor with the only difference, that you settle the bow and transom blocks of the floor first and allow a pyramid to form from blocks # 2 and #3 naturally, and then you apply some force to let the floor set it. -
Page 7: Quick Assembly Guide - Using The Valves
Quick Assembly Guide – Using the Valves. -
Page 8: Certification, Hin And Manufacturer's Identification Code (Mic)
Certification, HIN and Manufacturer’s Identification Code (MIC) Navigator Inflatable Boats comply with the North American requirements to have a unique registered Hull Identification Number (HIN) – our boats are registered with Transport Canada and due to the bilateral HIN recognition agreement, Canadian HINs are accepted in the US. -
Page 9: Assembly Full Guide
Assembly Full Guide: Assembly & hard deck installation for boats with an inflatable keel. Remove the boat from the packing bag and unfold. Unfold the inflatable keel and position the boat on a safe level surface without sharp objects. Inflate all pressurized compartments, except for the keel, to approximately 20-30% of the recommended pressure. - Page 10 Attach aluminum stringers (C) onto each side of the floor-boards (B) within the recessed portions 2, 3 and 4 of the floor. You can place an oar (A) under the bottom of the boat to raise the floorboards and assist yourself while attaching the stringers (Book-type floors don’t have aluminum stringers on the sides).
-
Page 11: Adjusting The Pressure In Air Chambers (Including A Keel)
Side and Bow/Nose Chambers for all models – 0.22 – 0.25 bar or 3.2 – 3.5 psi Keel: LP240BK, LP270BK, LP290BK, LP320BK – 0.15 – 0.2 bar or 2.17 – 2.9 psi LK330, LK360, LK380, LK400, LK430 – 0.3 – 0.35 bar or 4.35 – 5 psi Proper Inflation Process: Screw the hose with the adapter into the valve you plan to inflate. -
Page 13: Configuring The Valves
(Assembly scheme for book-type floor installation process) For models that have three independent pressurized compartments, in addition to the inflatable keel, the pressure in the left and right cylinders must be brought to 60-70% of the nominal (recommended) pressure, then pump the nose area to the full recommended pressure. - Page 14 chamber up to working air pressure. Once you remove the air pump adaptor from the valve, the pushpin will seal the valve, and the air will not leak. If you want to deflate the boat, press down on the pushpin and turn it in the clockwise direction until it locks in the pressed down...
-
Page 15: Next Steps For Boat Assembly
Next steps for boat assembly: Afterwards, close all air valves with the caps until they stop while making sure that the valve fastening cord does not get into the threads, as this can lead to air leaking from the tubes during operation. Assemble the oars with oarlocks and insert the oar rods into the sockets, fixing the blades in the clips located on the cylinders at the stern of the boat. -
Page 16: Disassembly
Disassembly: Ensure to thoroughly wash and dry the boat before deflation, especially if you’re fishing and have some fish grease on the boat. This would help with: - Rodents that adore chewing on PVC that has a fishy smell - Mold that loves turning your white dinghy into an old slice of bread. The boat is disassembled in exactly the reverse order from the recommended assembly procedure (remove and disassemble the oars and oarlocks, deflate the keel, remove the seats, deflate the tubes, remove the floor, fully deflate the leftover air in... -
Page 17: Cleaning, Maintenance, Repairs
Cleaning, Maintenance, Repairs To ensure a longer lifetime for the inflatable boat, you have to take proper care of it: - Avoid the air chambers to be overinflated, especially when in direct sunlight; - After the operation, it is necessary to clean the dirt and sand from the boat surface dry it thoroughly, if necessary, using soap and a not very rough cloth;... - Page 18 Repairs: - Easiest way to detect punctures and leaks is to use hand soap or a dish detergent mixed with water in a spray bottle. Checking the valves first by spraying around the valve. If you see that bubbles appear, grow and circulate due to the leak, check your valve fitting and base and ensure the valve cap is screwed on tight and the pushpin is in the correct position.
-
Page 19: Operating The Boat
Operating the boat: IT IS PROHIBITED TO: - Operate the boat while being under the influence of alcohol or drugs and without life- saving vests; - Overload the boat above the maximum number of passengers or load capacity; - Use the outboard engine exceeding its power rating; - Use the boat at night, as your boat is not equipped with additional lighting as standard (you may attach navigational lights to make yourself visible at night). - Page 20 Do not pump pressurized compartments in the boat above the recommended pressure, as this leads to a reduction in the service life and can lead to damage (rupture) of the internal partitions or cylinders and then the manufacturer will not be obliged to carry out warranty repairs of your boat.
- Page 21 In case more than two persons will get on the boat, it is important to decide the sitting position of each person in good consideration of the special features of the boat. When the boat is headed up prior to hydroplaning, it is effective to keep the boat’s bow down by the weight of the persons sitting toward the bow side.
-
Page 22: Towing Bridle & Towing Behind
Towing bridle & towing behind: A Towing Line must be rigged to run from the port stern cleat, through the Towing Ring on the Towing Bridle, and back to the starboard stern cleat. At Towing Ring on the Bridle, secure the line with a knot - the run each end of the towing line to the aft corner cleats as described above. -
Page 23: Navigator Inflatable Boats Warranty Terms & Conditions
Some of our customers, who take extra care, use their boats for more than 10 years now. We guarantee that each new inflatable boat "Navigator" is free from defects in material and workmanship, but only if the sale is made by an official dealer authorized by the "Navigator Group"... - Page 24 and deficiencies of any kind, conforms to any sample shown to Buyer and is of acceptable and merchantable quality. Type, features, price, quantity and all other specifications relating to Product shall be determined in the Invoice(s) that are an integral part of this agreement. The copy of the invoice &...
- Page 25 Any units shipped for repair will be the responsibility of the purchaser. Navigator Inflatable Boats will then ship (if required) the repaired unit or repaired parts or new part(s) to the purchaser at the responsibility of the purchaser.
- Page 26 of any parts, or the performance of service under this warranty does not extend the life of the warranty and the boat. RELEASE: Recognizing that boating poses a potential hazard to others. The buyer freely and willingly waives all claims to injury to himself or damage to the purchased boat arising out of the improper use.