HighPoint SSD7202 Quick Installation Manual
2x m.2 port to pcie 3.0x8 nvme raid controller
Hide thumbs
Also See for SSD7202:
- Installation manual (11 pages) ,
- Quick installation manual (11 pages) ,
- Using manual (19 pages)
Advertisement
Quick Links
Advertisement

Related Manuals for HighPoint SSD7202


Summary of Contents for HighPoint SSD7202
- Page 1 SSD7202 2x M.2 Port to PCIe 3.0x8 NVMe RAID Controller Quick Installation Guide V1.04...
- Page 2 Our third-generation NVMe architecture utilizes a PCIe 3.0 x8 host interface to ensure broad compatibility with a wide range of hardware platforms; the SSD7202 can be easily installed into any industry standard PCIe 3.0 x8 or x16 slot, and is ideal for 1U & 2U servers, or compact systems with low-profile requirements and PCIe 3.0 x8 host...
- Page 3 NVMe SSD’s. You must have at least one NVMe SSD installed into the SSD7202 controller. The SSD7202 must be installed into a PCIe 3.0 slot with x8 or x16 lanes. Your motherboard must have a UEFI BIOS with option ROM settings for third party devices (such as the SSD7202, optical drives and USB flash drives).
- Page 4 DVD. This should be inserted into the optical drive when booting the system. Make sure only the SSD7202, the USB flash drive, and the optical drive are installed into the system during this procedure; you must remove all other drives from your system.
- Page 5 You must have at least one NVMe SSD installed into the SSD7202 controller. The SSD7202 must be installed into a PCIe 3.0 slot with x8 or x16 lanes. Windows 10 / Windows 2016 / Windows 2019 or a Linux...
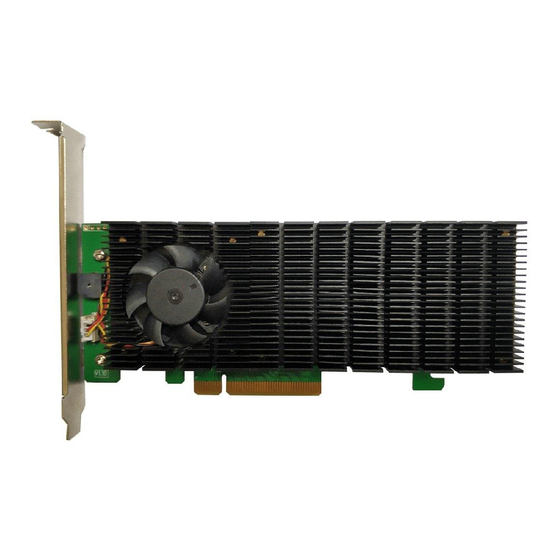
- Page 6 Your motherboard must enable UEFI BIOS settings. Please check the SSD7202 Compatibility List for recommended motherboards. SSD7202 Hardware Front View Integrated low-noise cooling fan Full-length heatsink PCIe x8 host interface Low Profile Bracket...
- Page 7 NVMe Drive Installation Step 1. On the rear of the SSD7202, remove the four screws that secure the unit’s heat sink to the PCB. After removing the screws, carefully remove the heat sink from the SSD7202. Step 2. After removing the casing, carefully turn it over to view the thermal pad.
- Page 8 Step 3. These 2 screws are used to install the NVMe Step 4. Please remove the screws on the right side of SSD7202 Step 5. Gently insert the SSD into the slot. Note: Please make sure all disks are clean before you insert them...
- Page 9 The following example shows two M.2 SSDs installed into Ports 1-2: Step 7. Replace the heat sink after installing all SSDs Step 8. On the rear of the SSD7202, refasten the 4 screws that were removed in step 1.
- Page 10 Make sure the aluminum cover is properly aligned with the controller board (PCB), and that it makes full contact with the thermal pad, before refastening it to the SSD7202. If the cover is improperly installed, thermal pad will be unable to sufficiently cool the NVMe SSD’s and controller componentry, which may result in damage to the...
- Page 11 Resources A variety of manuals, guides and FAQ’s are available for the SSD7202 RAID controller. In addition, we recommend visiting the Software Downloads webpage for the latest drivers, Management WebGUI interface and utility updates. Software Download: Driver, WebGUI, Installation Guide https://highpoint-tech.com/USA_new/series-ssd7202-download.htm...
-
Page 12: Customer Support
Customer Support If you encounter any problems while utilizing the SSD7202 drive, or have any questions about this or any other HighPoint Technologies, Inc. product, feel free to contact our Customer Support Department. Web Support: https://www.highpoint-tech.com/websupport/ HighPoint Technologies, Inc. websites: https://www.highpoint-tech.com...