Table of Contents
Advertisement
Quick Links
Advertisement
Table of Contents

Related Manuals for BTECH FRS-A1

Summary of Contents for BTECH FRS-A1
- Page 1 Operating Manual...
-
Page 2: Fcc Rf Exposure
The FRS-A1 is designed in simplicity for all users. It works on all FRS channels with all bandwidths and privacy tones supported. The FRS-A1 allows you to simultaneously monitor two different FRS channels at once. The FRS-A1 also includes a flashlight, NOAA weather radio receiver, and an FM radio receiver. -
Page 3: Fcc Part 15 Compliance
For body-worn operation, this device has been tested and meets the Industry Canada RF exposure guidelines when used with BTECH accessories supplied or designated for this product. Use of other accessories may not ensure compliance with Industry Canada RF exposure guidelines. -
Page 4: Maintenance Instructions
Maintenance Instructions To help your battery work normally or prolong its life, be sure to observe the following instructions: 1. Accumulated dust on charging connector may affect normal charging. Please use a clean and dry cloth to wipe it on a regular basis. -
Page 5: Maintenance
Never change or replace anything in your radio except the batteries. Care and Safety Your FRS-A1 was designed to fulfill any warranty obligations and to enjoy for many years. As for the device, we recommend you follow these suggestions: • Do not attempt to open the unit. Non-expert handling of the unit may damage it and/or annul the warranty. -
Page 6: Package Contents
FCC guidelines and these international standards. Never allow children to operate the radio without adult supervision and the knowledge of the following guidelines. PACKAGE CONTENTS • 2 FRS-A1 transceivers • 2 Li-Ion battery packs (1500mAh 3.7V) • 1 USB to AC Adaptor •... -
Page 7: Main Features
MAIN FEATURES • 22 FRS Channel transceiver (No license required) • Output power: 2W • 10 Selectable call/call alerts • 7 Channel NOAA Weather Radio • 260 Privacy codes (50 CTCSS Tones and 210 DCS Codes) • 1750Hz tone • FM radio receiver (88-108MHz) •... - Page 8 About the Range Your FRS-A1 Series radio is designed to give you maximum range under optimum conditions. • Maximum Range: Little to no sight obstruction. • Medium Range: Partial obstruction to the line of sight. • Short Range: Major obstruction to line of sight.
-
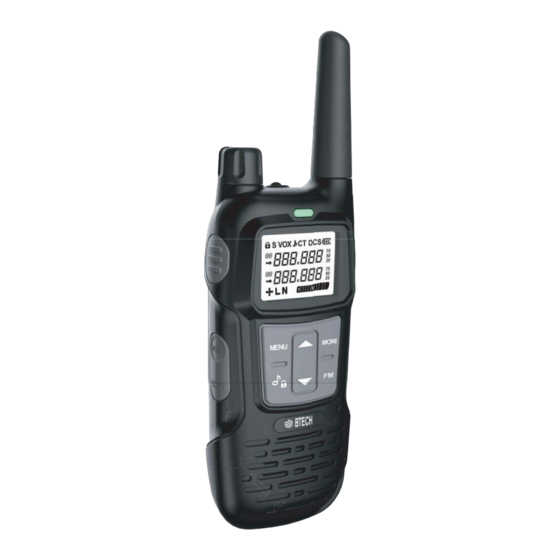
Page 9: Main Controls And Parts Of The Radio
MAIN CONTROLS AND PARTS OF THE RADIO... -
Page 10: Lcd Display
LCD DISPLAY 1. Call Tone (Off, 1–20) 10. Narrowband Indicator (working at 12.5KHz) 2. VOX OFF,1-5 11.CTC Indicator 67.0-254.1 3. Dual Channel Monitor ON/OFF 12.DCS Indicator D023I/N-D754I/N 4. Keypad Lock 13. Battery Indicator (3 Battery Levels) 5. A Channel Number (1-22) or menu number (1- 14. -
Page 11: Charging The Radio
2) The LED will illuminate red while charging, and will illuminate green when fully charged Note: • Use only the supplied battery and AC adapter or approved accessories from BTECH. • Charge time may vary depending on the remaining battery life at the start of charge. -
Page 12: Basic Operations
BASIC OPERATIONS Turning Your Radio On and Off To turn your radio ON, turn the rotary knob clockwise until you feel the knob click. To turn your radio OFF, turn the rotary knob counterclockwise until you feel the knob click. Setting the Volume Increase volume by turning the rotary knob clockwise. -
Page 13: Talking And Listening
The FRS-A1 will indicate if the channel is in use, even if you do not hear the traffic - the LED will illuminate green on the FRS-A1 to indicate that there is activity on the channel. You can hear all channel activity by holding the [MONI] button to open the squelch and hear all traffic. - Page 14 Scanning for Privacy Codes Your FRS-A1 can scan to find the matching tone from another radio if you do not know the tone being used. First select the same FRS channel from the other radio to match the FRS-A1. The green light will illuminate on the FRS-A1 if the channel is active and correct.
-
Page 15: Keypad Lock
tone. Monitor Pressing and holding the [MONI] key will let you hear noise so you can adjust the volume level of the radio when not receiving a signal. This should be used to check activity on your current channel before transmitting. -
Page 16: Noaa Weather Radio
The frequency range to listen to the radio is 87-108MHz. With FRS-A1 turned on, Press [FM] to turn on the radio. Select the desired radio frequency with the [ ]/ [ ] keys. Press the [SCAN] key or hold the keys to automatically search for radio channels. - Page 17 [SCAN] key again, and that will exit the scanning function. NOAA Weather Radio Frequency List: Chan. Freq. Chan. Freq. (MHz) (MHz) WEATHER CH01 162.550 WEATHER CH05 162.450 WEATHER CH02 162.400 WEATHER CH06 162.500 WEATHER CH03 162.475 WEATHER CH07 162.525 WEATHER CH04 162.425 1000Hz, 1450Hz, 1750Hz Tone Burst To send out a tone burst;...
-
Page 18: Working The Menu System
WORKING THE MENU SYSTEM Basic Use Using the menu with arrow keys 1. Press the [MENU] key to enter the menu. 2. Use the [ ] and [ ] keys to navigate between menu items. 3. Once you find the desired menu item, press [MENU] again to select that menu item. 4. - Page 19 Shortcut Menu operations Name Selectable LCD display (Full Name) OFF;67.0…D754N The Privacy Codes is OFF, and the display is OFF. RXCODE When the display is OFF, press key to select CTCSS - Receiver Privacy Codes with priority; When the display is OFF, press key to select DCS with priority.
- Page 20 LIGHT - Back Light BEEP - Keypad Beep *Allows audible confirmation of a key press. OFF will turn off VOX function. VOX - VOX 1: Lowest Sensitivity 5: Highest Sensitivity HIGH - high power transmission; LOW - low power transmission. -Transmit Power *When set to low power, the screen will display the ‘L’...
- Page 21 SC – ADD ADD-Add the current channel to the scan list - Channel Scan DELETE-delete the current channel from the scan list add/delete SAVE OFF: - Battery Saving OFF,30,60 180S *This feature provides a safety switch that limits transmission time to a programmed value. This will promote battery conservation by not allowing you to - Time-Out-Timer make excessively long transmissions and, in the event...
- Page 22 RING OFF - close call tone; - Call Tone Select Select 1-10 process, you can listen to the call tone. VOICE OFF - turn off voice prompts; - Voice Reminding ON- turn on voice prompts. CH NUM: Displays the channel number CH DIS- Channel Display NAME: Displays the channel name Mode...
-
Page 23: Menu Settings
Note: Selecting a privacy code of "OFF" will disable the privacy feature. To communicate between two FRS-A1 radios, all radios in your group must be set to the same channel and privacy code selections. The receiving privacy codes setting steps are as follows: 1. - Page 24 Note: Selecting a privacy code of "OFF" will disable the privacy feature. To communicate between two FRS-A1 radios, all radios in your group must be set to the same channel and privacy code selections. The steps for creating your transmission privacy code settings are as follows: 1.
- Page 25 Squelch level (SQL) - MENU 03 You can adjust the base level of your squelch threshold using this menu. Squelch is used to eliminate unnecessary noise when the radio is receiving interference. Squelch can be used in combination with your selected privacy codes to filter out unwanted interference.
- Page 26 3. Press the key to select the squelch level, and set the selection range to either 0 or 1-9 4. Press the [MENU] key to confirm your selections. 5. Press the [W W X] key to cancel your selections. 6. Press the [PTT] ey to exit the menu mode.
- Page 27 Beep Tone (BEEP) - MENU 05 If you enable this function, every time a key is pressed, you will hear a beep tone. You can set it as follows: 1. Press the [MENU] key to enter the main menu and press the key to enter the MENU 05.
- Page 28 2. Press the [MENU] key again to enter the VOX menu. 3. Press the key to select the VOX switch and sensitivity; and set the selection range to OFF/1~5. Note: Level 5 has low sensitivity and should be used when there is high background noise; Level 1 has high sensitivity and should be used when there is low background noise.
- Page 29 6. Press the [PTT] ey to exit the menu mode. NOTE: In accordance with FCC Rules channels 8 through 14 are set and locked in the Low Power setting; and cannot be changed. However, channels 1 through 7 and 15 through 22 still have the capability to switch between the High/Low Power setting.
- Page 30 - MENU 09 Add or delete a channel from the scanning list. The radio will scan the channels only assigned to the scanning list. The steps for setting this up are as follows: 1. Press the [MENU] key to enter the main menu and press the key to enter the MENU 09, LCD should display as: 2.
- Page 31 3. Press the key to select the power saving mode and set the selection range to ON/OFF. Note: ON-turns on the power saving mode; OFF-turns off the power saving mode. 4. Press the [MENU] key to confirm your selections. 5. Press the [W W X] key to cancel your selections. 6.
-
Page 32: Busy Channel Lockout (Bcl) - Menu
Busy Channel Lockout (BCL) - MENU 12 When this function is active, if you select a busy channel and press the PTT, the transceiver will not transmit. To set the BCL: 1. Press the [MENU] key to enter the main menu, press the key to enter the MENU 12. - Page 33 6. Press the [PTT] ey to exit the menu mode. VOICE Selection (VOICE) - MENU 14 Your FRS-A1 radio has voice prompt function for channel and function operation, you can choose to switch voice function. The setting steps are as follows: 1.
- Page 34 2.2CH DIS Channel display mode setting- MENU 15 The channel display mode of the walkie-talkie has a display mode of channel name, working frequency, and channel number, the set-up steps are as follows: 1. Press the [MENU] key to enter the main menu, press the key to enter the MENU 15, LCD should display as: 2.
- Page 35 2.3CH NAME Channel alias setting- MENU 16 The walkie talkie is allowed to set and display the channel alias, up to 6 digits, which can be letters or numbers. The set-up steps are as follows: 1. Press the [MENU] key to enter the main menu, press the key to enter the MENU 16, LCD should display as:...
- Page 36 Restore Factory Settings (RESET) - MENU 17 Your FRS-A1 radio has a reset function. To reset the radio, proceed as follows: 1. Press the [MENU] key to enter the main menu, press the key to enter the MENU 17. The screen should show RESET.
-
Page 37: Appendix A. - Trouble Shooting Guide
Appendix A. – Trouble shooting guide Phenomena Analysis Solution The battery may be installed improperly. Remove and reattach the battery. The battery power may have run out. Recharge or replace the battery. You cannot turn on the radio. The battery may suffer from poor contact caused by Clean the battery contacts or replace the dirty or damaged battery contacts. -
Page 38: Appendix B. - Technical Specifications
Appendix B. - Technical Specifications General Frequency Range FRS 462.5500 ~ 467.7250 MHz Memory Channel 22 FRS Channels + 7 NOAA Weather Operation Voltage DC3.7V ±10% Battery Capacity 900mAH (Li-Ion) Frequency Stability ±2.5ppm Operating Temperature to +60 Mode of Operation Simplex Antenna Impedance 50ohm... -
Page 39: Appendix C. - Frs Frequency Chart(Mhz)
Appendix C. – FRS Frequency Chart(MHz) CH.No CH.Freq. CH.No CH.Freq. 462.5625 467.6625 462.5875 467.6875 462.6125 467.7125 462.6375 462.5500 462.6625 462.5750 462.6875 462.6000 462.7125 462.6250 467.5625 462.6500 467.5875 462.6750 467.6125 462.7000 467.6375 462.7250... -
Page 40: Appendix D. - Ctcss Table
Appendix D. – CTCSS Table CTCSS CHART (Hz) Number Frequency Number Frequency Number Frequency Number Frequency Number Frequency 67.0 69.3 71.9 74.4 77.0 79.7 82.5 85.4 88.5 91.5 94.8 97.4 103.5 107.2 110.9 114.8 118.8 123.0 127.3 131.8 136.5 141.3 146.2 151.4 156.7... -
Page 41: Appendix E. - Dcs Table
Appendix E. – DCS Table DCS CODE LIST Number Code Number Code Number Code Number Code Number Code D023N D025N D026N D031N D032N D036N D043N D047N D051N D053N D054N D065N D071N D072N D073N D074N D114N D115N D116N D122N D125N D131N D132N D134N D143N... - Page 42 D662N D664N D703N D712N D723N D731N D732N D734N D743N D754N D023I D025I D026I D031I D032I D036I D043I D047I D051I D053I D054I D065I D071I D072I D073I D074I D114I D115I D116I D122I D125I D131I D132I D134I D143I D145I D152I D155I D156I D162I D165I D172I D174I...
- Page 43 FCC Compliance Statements Note: This equipment has been tested and found to comply with the limits for a Class B digital device, pursuant to part 15 of the FCC Rules. These limits are designed to provide reasonable protection against harmful interference in a residential installation. This equipment generates, uses and can radiate radio frequency energy and, if not installed and used in accordance with the instructions, may cause harmful interference to radio communications.
- Page 44 Licensing Information Use our radio in USA is subject to the rules & regulations of FCC. Changes or modifications not expressly approved by our may void the user authority granted by the FCC to operate this radio and should not be made. To comply with FCC requirements, transmitter adjustments should be made only by or under the supervision of a person certified as technically qualified to perform transmitter maintenance and repairs in the private land mobile and fixed services as certified by...
- Page 45 Disclaimer The Company endeavors to achieve the accuracy and completeness of this manual, but no warranty of accuracy or reliability is given. All the specifications and designs are subject to change without notice due to continuous technological development. No part of this manual may be copied, modified, translated, or distributed in any manner without the prior written consent of the Company.