Table of Contents
Advertisement
Quick Links
Advertisement
Table of Contents

Related Manuals for Native Instruments KOMPLETE KONTROL S Series


Summary of Contents for Native Instruments KOMPLETE KONTROL S Series
- Page 2 The information in this document is subject to change without notice and does not represent a commitment on the part of Native Instruments GmbH. The software described by this docu- ment is subject to a License Agreement and may not be copied to other media. No part of this...
- Page 3 6725 Sunset Boulevard 5th Floor Los Angeles, CA 90028 www.native-instruments.com NATIVE INSTRUMENTS K.K. YO Building 3F Jingumae 6-7-15, Shibuya-ku, Tokyo 150-0001 Japan www.native-instruments.co.jp NATIVE INSTRUMENTS UK Limited 18 Phipp Street London EC2A 4NU www.native-instruments.com © NATIVE INSTRUMENTS GmbH, 2016. All rights reserved.
-
Page 4: Table Of Contents
Document Conventions ....................... 16 Installation ....................... 18 Controller Editor as Part of an NI Product Installation ..............18 Downloading the Controller Editor from the Native Instruments Website ........18 Quick Start ........................ 20 Switching your NI Controller to MIDI Mode .................. 21 Loading MIDI Assignments ...................... - Page 5 Table of Contents 4.2.4 Inspector ........................41 The Mapping System ........................48 4.3.1 Assignments ......................48 4.3.2 Pages (or Knob Pages) ....................49 4.3.3 Pad Pages (MASCHINE Controller Family Only) ............49 4.3.4 I/O and Level Pages (MASCHINE STUDIO Only) ............50 4.3.5 Jog Wheel Pages (MASCHINE STUDIO Only) ..............
- Page 6 Table of Contents 5.4.6 Monitor Display Mode ....................67 5.4.7 Settings Display Mode ....................68 Using Your MASCHINE MK2 Controller ............... 70 Basic Controls ..........................70 Assignable Control Elements ...................... 72 Visual Feedback on Your Controller .................... 75 6.3.1 Buttons ........................76 6.3.2 Multicolor Pads ......................
- Page 7 Table of Contents 7.4.2 Control Display Mode ....................91 7.4.3 Template Display Mode ....................92 7.4.4 Setup Display Mode ....................93 Using Your MASCHINE MIKRO MK2 Controller ............. 95 Basic Controls ..........................95 Assignable Control Elements ...................... 97 Visual Feedback on Your Controller .................... 99 8.3.1 Buttons ........................
- Page 8 Table of Contents 9.4.3 Calibration Display Mode ................... 120 9.4.4 Knobs Display Mode ....................121 9.4.5 Pages Display Mode ....................123 9.4.6 Templates Display Mode .................... 124 9.4.7 Monitor Display Mode ....................125 10 Using Your MASCHINE JAM Controller ................ 127 10.1 Basic Controls ..........................
- Page 9 Table of Contents 13.2 Assignable Control Elements ...................... 147 13.3 Visual Feedback on Your Controller .................... 150 13.3.1 Buttons and Pads ...................... 150 13.3.2 7-segment Display ....................152 13.4 Using Two or More TRAKTOR KONTROL F1 Units ................152 14 Using Your TRAKTOR KONTROL Z1 ................153 14.1 Basic Controls ..........................
- Page 10 Table of Contents 17.2.1 Control Elements on the Deck Units ................179 17.2.2 Control Elements on the Mixer ................... 181 17.3 Visual Feedback on Your Controller .................... 183 17.3.1 Buttons and Pads ...................... 184 17.3.2 LOOP Encoder ......................185 17.4 The Displays ..........................
- Page 11 Table of Contents 19.3 Visual Feedback on Your Controller .................... 214 19.3.1 Buttons ........................215 19.3.2 LED Chains ........................ 216 20 Using Your TRAKTOR KONTROL S4 MK2 ..............217 20.1 Basic Controls ..........................217 20.2 Assignable Control Elements ...................... 219 20.2.1 Control Elements on the Left Deck ................
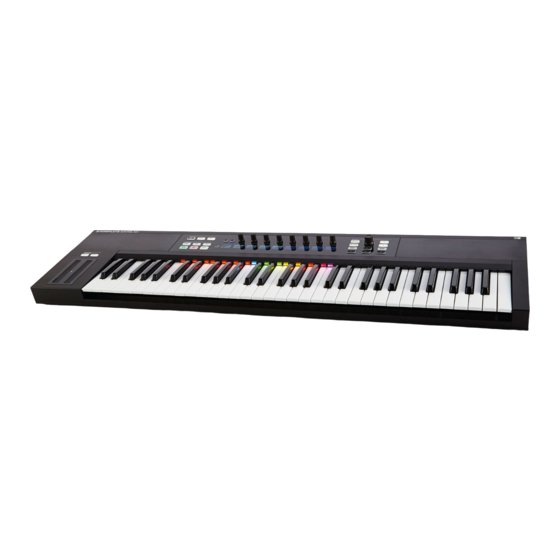
- Page 12 Table of Contents 23 Using Your KOMPLETE KONTROL S-SERIES Keyboard ........... 237 23.1 Basic Controls ..........................237 23.2 Assignable Control Elements ...................... 239 23.3 Defining Key Zones ........................242 23.3.1 Overview of the Keybed Area ..................242 23.3.2 Editing Key Zones ...................... 244 23.4 Visual Feedback on Your Keyboard .....................
- Page 13 Table of Contents 25.2.2.2 Settings for the MASCHINE MIKRO and MASCHINE MIKRO MK2 Controllers ..25.2.2.3 Settings for the MASCHINE STUDIO Controller ...........268 25.2.2.4 Settings for the MASCHINE JAM Controller (1–4) ........270 25.2.2.5 Settings for the TRAKTOR KONTROL X1 and X1 MK2 (1–4) ......271 25.2.2.6 Settings for the TRAKTOR KONTROL F1 (1–4) ..........273 25.2.2.7 Settings for the TRAKTOR KONTROL S2, S2 MK2, S4, S4 MK2 ....275 25.2.2.8 Settings for the TRAKTOR KONTROL S5 ............277...
- Page 14 Table of Contents 25.6.1 MIDI Message Types – Type Menu ................309 25.6.2 Assignments for Buttons ................... 312 25.6.3 Assignments for Key Zones ..................320 25.6.4 Assignments for the Pads – Hit Action ..............321 25.6.5 Assignments for Knobs and the Like ................322 25.6.6 Assignments for the Pads –...
-
Page 15: Welcome To The Controller Editor
About This Manual Welcome to the Controller Editor! This powerful tool turns your Native Instruments hardware controller into a versatile and effi- cient MIDI remote control for your studio and live setup. With the Controller Editor, you can precisely define which MIDI message to send when using your NI controller. -
Page 16: Document Conventions
Controller Editor’s interface. You will also find here a complete list of availa- ble MIDI message types and parameters. This manual generally refers to all Native Instruments hardware controller devices sim- ply as “NI controller.” If any information applies to a specific device only, e.g. the MA- SCHINE controller, this will be mentioned explicitly. - Page 17 Welcome to the Controller Editor! Document Conventions The exclamation mark icon highlights important information that is essential for the giv- en context. The red cross icon warns you of serious issues and potential risks that require your full attention. Furthermore, the following formatting is used: ▪...
-
Page 18: Installation
Apart from being included in the software package of supported NI products, the Controller Editor is also available for download from the Native Instruments website. If your NI controller is already installed on your computer, use the Service Center to download the last driver up- dates. - Page 19 Installation Downloading the Controller Editor from the Native Instruments Website If your NI controller is not installed on your computer yet, you can manually download the hardware drivers for your NI controller along with the Controller Editor. To do this: Open your favorite internet browser and go to the following URL: http://www.native-instruments.com/updates...
-
Page 20: Quick Start
Quick Start Quick Start This chapter provides a hands-on introduction to the Controller Editor. It is assumed herein that the Controller Editor is installed on your computer. See chap- ↑2, Installation for more information. The use of the Controller Editor is straightforward. Most actions can be done either from your NI controller or via the Controller Editor interface, and this in various ways —... -
Page 21: Switching Your Ni Controller To Midi Mode
Indeed, your NI controller can run in two different and mutually exclusive modes: ▪ In Application mode, it controls its dedicated software (e.g. MASCHINE software) via the Native Instruments’ ultra fast high-resolution proprietary NHL protocol. Depending on the respective software, this mode will be called MASCHINE mode, TRAKTOR mode, etc. - Page 22 Quick Start Switching your NI Controller to MIDI Mode NI Controller Switching to/from MIDI Checking that MIDI mode is on mode MASCHINE STUDIO SHIFT + CHANNEL SHIFT button dimly lit MASCHINE JAM SHIFT + Cue button SHIFT button dimly lit TRAKTOR KONTROL S2 SHIFT + SHIFT (on both Both SHIFT buttons dimly lit...
-
Page 23: Loading Midi Assignments
You can also switch all your connected NI controllers to MIDI mode by starting the Controller Editor: Start the Controller Editor by selecting Start > All Programs > Native Instruments > Con- ► troller Editor > Controller Editor (Windows) or Applications > Native Instruments > Con- troller Editor (Mac OS X). -
Page 24: Select The Ni Controller
Quick Start Loading MIDI Assignments The Application Control Bar, at the top of the Controller Editor window. We will use the Application Control Bar to start loading new MIDI assignments. 3.2.1 Select the NI Controller We first have to select the NI controller for which we want to load the MIDI assignments. To select a controller: Click the Device menu (the first control from the left in the Application Control Bar), and ►... -
Page 25: Select A Template
Quick Start Loading MIDI Assignments Next to the Device menu in the Application Control Bar, you can check that the Connect ► button is lit, indicating that the selected NI controller is in MIDI mode (and thus is con- nected to the Controller Editor). The Connect button lights up when your NI controller is in MIDI mode. - Page 26 Quick Start Loading MIDI Assignments The Template list allows you to load the desired Template. From the Hardware Some NI controllers also allow you to select Templates via following shortcuts: NI Controller Template Selection KOMPLETE KONTROL S-SERIES PRESET buttons MASCHINE JAM MASCHINE STUDIO SHIFT + Page buttons MASCHINE MK2...
-
Page 27: Select A Page
Quick Start Loading MIDI Assignments NI Controller Template Selection TRAKTOR KONTROL S4 MK2 TRAKTOR KONTROL S2 TRAKTOR KONTROL S2 MK2 TRAKTOR KONTROL X1 TRAKTOR KONTROL X1 MK2 TRAKTOR KONTROL F1 TRAKTOR KONTROL Z1 TRAKTOR KONTROL Z2 More information on this in the respective controller-specific chapters, later in this man- ual. - Page 28 Quick Start Loading MIDI Assignments Within each Template, some (or all) of the control elements of your NI controller can have mul- tiple assignments, organized into Pages. In the Hardware area, these control elements are indi- cated by a frame surrounding them. The orange frame representing the Knob Page in the Hardware area for the MASCHINE STUDIO controller (detail).
- Page 29 Quick Start Loading MIDI Assignments TRAKTOR KONTROL S2 MK2, S4 (MK2), S5, and S8: the Overview Panel Due to their great size and number of control elements, the TRAKTOR KONTROL S2 MK2, S4 (MK2), S5 and TRAKTOR KONTROL S8 are divided into three parts in the Controller Editor: left Deck, Mixer, and right Deck.
- Page 30 Quick Start Loading MIDI Assignments NI Controller # of Available Pages Page Switch/Selection MASCHINE STUDIO Knob Pages: Unlimited Left/Right Arrow buttons Pad Pages: 8 (if enabled) Group buttons I/O and Level Pages: 8 (if I/O and Level buttons enabled) FUNCTION buttons Jog Wheel Pages: 6 (if enabled) MASCHINE JAM Matrix Pages: 8 (if enabled)
-
Page 31: Ready To Go
Quick Start Loading MIDI Assignments More information on this in the controller-specific chapters, later in this manual. 3.2.4 Ready to Go? If you only plan to use a Template as it is, i.e. without modifying any of its MIDI assignments, you’re done! As you may have noticed, on various NI controllers you can do all this from within your controller —... - Page 32 Quick Start Modifying an Assignment Either way, the control elements selected for editing get surrounded by the red Selection Frame in the Controller Editor window: In the Inspector (the right part of the Controller Editor interface), click the Assign tab: Assign pane opens up and displays all assignments’...
-
Page 33: Organizing Your Assignments
Quick Start Organizing Your Assignments Organizing Your Assignments Thanks to its powerful mapping system, the Controller Editor lets you organize your assign- ments as you like. You can define Templates and Pages to address various situations: For ex- ample, you could define different Pages to control different instruments in your setup. Further- more, you could prepare different Templates for different songs in your live performance, with all necessary Pages inside. -
Page 34: Renaming Templates And
Quick Start Organizing Your Assignments 3.4.2 Renaming Templates and Pages Let’s say you have just defined a Knob Page that controls one of your software synthesizers. You might want to rename it so that you easily remember its purpose: In the Knob Pages list, double-click the Page that you just defined (let’s say Knob Page 3). -
Page 35: Saving And Loading Templates
Quick Start Saving and Loading Templates Saving and Loading Templates Once you have defined a set of assignments that suits your needs, you have the possibility to save it. Actually, you don’t necessarily need to save it, since the Controller Editor automatically saves the changes made to the Template you are working on (and its included Pages and single as- signments). - Page 36 Quick Start Saving and Loading Templates In the Save template dialog that opens, choose the destination and type the name of the Template file to be exported. Please note that the filename that you choose can be differ- ent from the Template’s name inside the Controller Editor. Once this is done, click Save to export the file and you’re done.
-
Page 37: Basic Concepts
Basic Concepts How the Controller Editor Works Basic Concepts In this chapter we will introduce you to the basics of the Controller Editor. You might have al- ready checked the previous chapter, which gives you a first idea of how to use the Controller Editor. - Page 38 Basic Concepts Overview of the User Interface The Controller Editor user interface: the big view (Windows version pictured, with the MASCHINE STUDIO controller in the Hardware area) The user interface is divided into four main areas, namely: (1) Application Menu Bar (2) Application Control Bar (3) Hardware area (4) Inspector...
-
Page 39: Application Menu Bar
Basic Concepts Overview of the User Interface 4.2.1 Application Menu Bar At the top of the Controller Editor window (or at the top of your computer screen on Mac OS X), the Application Menu Bar is similar to the one found with most applications on your operating system. - Page 40 Basic Concepts Overview of the User Interface The Controller depicted in the Hardware area corresponds to the device selected in the Device menu located in the Application Control Bar (see above). Click an assignable control element in the Hardware area to edit its assignment. ►...
-
Page 41: Inspector
Basic Concepts Overview of the User Interface ▪ MASCHINE STUDIO only: If the Jog Wheel Page feature is activated, an additional violet Jog Wheel Page menu allows you to select a particular assignment for the jog wheel and its LED ring. The violet frame highlights the jog wheel. Please refer to section ↑4.3.5, Jog Wheel Pages (MASCHINE STUDIO Only) for more information on this. - Page 42 Basic Concepts Overview of the User Interface Templates pane in the Inspector (here for the MASCHINE controller) Templates pane holds the following elements, from top to bottom: (1) Template list: Shows all available Templates with, for each Template, an index number (not editable) and a name (editable).
- Page 43 Basic Concepts Overview of the User Interface The Pages Pane Pages pane allows you to manage your Pages. Pages are sets of assignments focused on certain areas of your NI controller. Therefore, each NI controller will have different sets of Pa- ges.
- Page 44 Basic Concepts Overview of the User Interface Pages pane in the Inspector for the MASCHINE STUDIO controller. Pages pane holds the following elements: (1) Knob Pages list or Pages list: Shows a list with all available (Knob) Pages with, for each of them, an index number (uneditable) and a name (editable).
- Page 45 Basic Concepts Overview of the User Interface (2) Knob Page Edit menu or Page Edit menu: Provides you with editing functions for the (Knob) Pages like New, Duplicate, etc. For some NI controllers, this Edit menu is replaced with a Shift Mode menu with the two options Gate and Toggle allowing you to choose the behavior of the SHIFT button when switching between Pages from your controller.
- Page 46 Basic Concepts Overview of the User Interface (8) I/O and Level Page Edit menu: Provides you with editing functions for the I/O and Level Pages like New, Duplicate, etc. (9) Jog Wheel Pages button: Activates/deactivates the Jog Wheel Page feature. If the Jog Wheel Page feature is deactivated, the rest of the area is minimized and grayed out.
- Page 47 Basic Concepts Overview of the User Interface Assign pane in the Inspector. Assign pane shows different properties depending on the type of element currently select- (1) Description area: This area is similar for all control elements. It shows the following informa- tion about the currently selected control element: ▪...
-
Page 48: The Mapping System
Basic Concepts The Mapping System (2) Definition area: Defines the MIDI assignment properties for the current control element. Please refer to section ↑25.5.3, Assign Pane in the reference chapter for more information. See also 2 Pages (or Knob Pages) [➙ 49] 2 Pad Pages (MASCHINE Controller Family Only) [➙... -
Page 49: Pages (Or Knob
Basic Concepts The Mapping System 4.3.2 Pages (or Knob Pages) Pages are not available on TRAKTOR KONTROL S2. For some of the control elements, you can have multiple assignments, organized in Pages (also called Knob Pages on specific NI controllers). Those particular control elements are located in the (Knob) Page area —... -
Page 50: I/O And Level Pages (Maschine Studio Only)
Basic Concepts The Mapping System ▪ If activated, you can switch the available Pad Pages via the Pad Page menu (in the Hard- ware area) or via the Pad Page list (in the Inspector). Again, you can do it as well from your NI controller, via the Group buttons (labeled from A to H) or, for MIKRO controllers, via the GROUP button and pads 9–16). -
Page 51: Matrix Pages (Maschine Jam Only)
Basic Concepts The Mapping System ▪ If activated, you can switch the available Jog Wheel Pages by pressing the FUNCTION but- tons (under the jog wheel) on your controller. The lit LED near the jog wheel (EDIT, CHAN- NEL, BROWSE, TUNE, SWING or VOLUME) indicates which Jog Wheel Page is currently active. -
Page 52: Touch Strip Pages (Maschine Jam Only)
Basic Concepts The Mapping System ▪ If activated, you can switch the available I/O and Level Pages by pressing the MST, GRP, or Cue buttons on your controller. The lit button indicates which I/O and Level page is currently active. You can also do this in the Controller Editor via the I/O and Level Page menu (in the Hardware area) or the I/O and Level Page list (in the Inspector). - Page 53 Basic Concepts The Mapping System ternal MIDI-capable device) — only for controllers that are equipped with MIDI ports of course. Switching between different Templates can be used, for example, to address different applica- tions on your computer or different hardware instruments. The Template contains all Page data, including (for each type of Pages) the list of Pages and the index of the last selected Page.
-
Page 54: Configuration
Basic Concepts The Mapping System NI Controller Template File Extension TRAKTOR KONTROL S2 .ncks2 TRAKTOR KONTROL S2 MK2 .ncks2m2 You can switch among the available Templates (either built-in or user-defined) via the Tem- plate list in the Templates pane of the Inspector. This can also be done from some NI control- lers —... - Page 55 Basic Concepts To Sum Up… In fact, the only thing that you can not do from the Controller is modify your assignments… For that, you will need to use the Controller Editor! But thanks to the powerful mapping scheme using Templates and Pages, which is partly mirrored on your NI controller, you can prepare as many assignments as you want and recall them instantly during your live performance.
-
Page 56: Using Your Maschine Controller
Using Your MASCHINE Controller Basic Controls Using Your MASCHINE Controller In this chapter, we will focus on what’s happening on your MASCHINE controller. By reading this, you will learn: ▪ How to use the basic controls on your controller for navigating through the MIDI mapping system. - Page 57 Using Your MASCHINE Controller Basic Controls Selection Command MIDI/ SHIFT + MASCHINE CONTR mode Templates SHIFT + Page buttons Knob Pages Page buttons Pad Pages Group buttons (if activated) Display SHIFT + mode Buttons 1–8 CONTROLLER EDITOR - Manual - 57...
-
Page 58: Assignable Control Elements
Using Your MASCHINE Controller Assignable Control Elements For more information on Templates, Knob Pages, and Pad Pages, see ↑4.3, The Map- ping System. For more information on the display modes, see ↑5.4, The Displays. There you will also learn another way to select and load Templates and Knob Pages from your controller. When your MASCHINE controller is in MIDI mode, its SHIFT button is dimly lit. - Page 59 Using Your MASCHINE Controller Assignable Control Elements The Hardware area representing the MASCHINE controller. In this Hardware area, you will notice the Knob Page menu and its associated Knob Page area (orange frame), the Pad Page menu and its associated Pad Page area (blue frame), and the red Selection Frame on the currently selected control element (pad 10 in the picture above).
- Page 60 Using Your MASCHINE Controller Assignable Control Elements (1) Page buttons and buttons around: In the top left part, you find a set of eight buttons arranged into four rows of two buttons. From these eight buttons, six are freely assignable (CONTROL and STEP, BROWSE...
-
Page 61: Visual Feedback On Your Controller
Using Your MASCHINE Controller Visual Feedback on Your Controller ▪ The Group buttons, labeled A to H, are not assignable if you use the Pad Page feature — they’re used for selecting Pad Pages, see previous section. If you deactivate the Pad Pages, the Group buttons are freely assignable like any other. -
Page 62: Pads
Using Your MASCHINE Controller Visual Feedback on Your Controller The following table indicates you the possible states for the LEDs: Button State LED State Not assigned Assigned – Off state Dimmed Assigned – On state Bright For buttons in Increment mode, the Off state corresponds to the zero value, while the On state corresponds to a value greater than zero. -
Page 63: Knobs
Using Your MASCHINE Controller Visual Feedback on Your Controller ▪ If the Hit action is not assigned but the Press action is assigned to the Note message type, the LED has a low brightness to show the Off state and a high brightness to show the On state. -
Page 64: Knobs Display Mode
Using Your MASCHINE Controller The Displays This screen allows you to select the desired display mode. On the top, you find six fields repre- senting the six display modes, from left to right: MONITOR, SETTINGS, KNOBS, PADS, PAGE, and TEM- PLATE. -
Page 65: Pad Pages Display Mode
Using Your MASCHINE Controller The Displays The Knobs display mode with bars instead of numerical values. You can switch between the two views by holding the SHIFT button and turning Knob 5: Hold SHIFT (thus getting to the switching screen explained ↑5.4.1, Switching Between Display Modes). -
Page 66: Knob Pages Display Mode
Using Your MASCHINE Controller The Displays 5.4.4 Knob Pages Display Mode The Knob Pages display mode allows you to switch between Knob Pages: The Knob Pages display mode allows you to switch between Knob Pages. On the left display, you find the usual general information about the currently loaded Tem- plate, Knob Page and Pad Page. -
Page 67: Template Display Mode
Using Your MASCHINE Controller The Displays 5.4.5 Template Display Mode The Template display mode allows you to switch between Templates. The Template display mode allows you to switch between Templates. On the left display, you find the same general information about the Template, Knob Page and Pad Page currently loaded. -
Page 68: Settings Display Mode
Using Your MASCHINE Controller The Displays The left display shows the usual information about the current Template, Knob Page and Pad Page. The right display shows two lines: ▪ The Control line indicates the control element that you are currently actuating. ▪... - Page 69 Using Your MASCHINE Controller The Displays ▪ In the bottom part of the display, you see the version numbers of the NI Hardware Service and hardware drivers. CONTROLLER EDITOR - Manual - 69...
-
Page 70: Using Your Maschine Mk2 Controller
Using Your MASCHINE MK2 Controller Basic Controls Using Your MASCHINE MK2 Controller In this chapter, we will focus on what’s happening on your MASCHINE MK2 controller. By reading this, you will learn: ▪ How to use the basic controls on your controller for navigating through the MIDI mapping system. - Page 71 Using Your MASCHINE MK2 Controller Basic Controls Selection Command MIDI/MASCHINE SHIFT + CONTROL mode Templates SHIFT + Page buttons Knob Pages Page buttons Pad Pages Group buttons (if activated) Display mode SHIFT + Buttons 3–8 For more information on Templates, Knob Pages, and Pad Pages, see ↑4.3, The Map- ping System.
-
Page 72: Assignable Control Elements
Using Your MASCHINE MK2 Controller Assignable Control Elements When your MASCHINE MK2 controller is in MIDI mode, its SHIFT button is dimly lit. Adjusting Settings for your Controller You can adjust various settings for your MASCHINE MK2 controller by entering its Settings display mode or by going to File >... - Page 73 Using Your MASCHINE MK2 Controller Assignable Control Elements The Hardware area representing the MASCHINE MK2 controller. In this Hardware area, you will notice the Knob Page menu and its associated Knob Page area (orange frame), the Pad Page menu and its associated Pad Page area (blue frame), and the red Selection Frame on the currently selected control element (pad 1 in the picture above).
- Page 74 Using Your MASCHINE MK2 Controller Assignable Control Elements (1) Page buttons and buttons around: In the top left part, you find a set of eight buttons arranged into four rows of two buttons. From these eight buttons, six are freely assignable (CONTROL and STEP, BROWSE...
-
Page 75: Visual Feedback On Your Controller
Using Your MASCHINE MK2 Controller Visual Feedback on Your Controller ▪ The Group buttons, labeled A to H, are not assignable if you use the Pad Page feature — they’re used for selecting Pad Pages, see previous section. If you deactivate the Pad Pages, the Group buttons are freely assignable like any other. -
Page 76: Buttons
Using Your MASCHINE MK2 Controller Visual Feedback on Your Controller 6.3.1 Buttons Basically, each button on your controller can have three states: ▪ Not assigned. ▪ Assigned, in Off state. ▪ Assigned, in On state. The following paragraphs describe how the LED under each button keeps you informed on the button states. - Page 77 Using Your MASCHINE MK2 Controller Visual Feedback on Your Controller ▪ Pad Pages disabled: The Group buttons can be freely assigned. For each of them, you can choose which from the 16 available colors should be used for the On and Off states. With Pad Pages disabled, the Group buttons offer you three Color modes: ▪...
-
Page 78: Multicolor Pads
Using Your MASCHINE MK2 Controller Visual Feedback on Your Controller 6.3.2 Multicolor Pads The sixteen pads of your controller are equipped with RGB LEDs. Their lighting behavior is close to that of multicolor buttons — but since the pads have two functions (Hit and Press), their states are indicated as follows: ▪... -
Page 79: The Displays
Using Your MASCHINE MK2 Controller The Displays The Displays The displays on your MASCHINE MK2 controller can show different parts of your mapping con- figuration, depending on the display mode that is activated. Each display mode modifies the behavior of Buttons 1–8 above the displays and Knobs 1–8 below them. Learn more about the different display modes available on the MASCHINE MK2 controller in the following sections. -
Page 80: Knobs Display Mode
Using Your MASCHINE MK2 Controller The Displays 6.4.2 Knobs Display Mode The Knobs display mode is probably the one you will use the most. In this mode, the displays show the currently loaded Knob Page, with its eight button assignments on the top row and its eight knob assignments on the bottom row: The Knobs display mode mirrors the currently loaded Knob Page. -
Page 81: Pad Pages Display Mode
Using Your MASCHINE MK2 Controller The Displays The new view is displayed. → Note that depending on the assignment properties for each of the Knobs, its displayed value (or bar) can either be going from 0 to 127 or from -63 to 64 (bipolar) — this second setting can be useful for some types of controls (e.g. -
Page 82: Monitor Display Mode
Using Your MASCHINE MK2 Controller The Displays On the right display, you see the list of your Templates, as defined in the Inspector’s Tem- plates pane. Use Button 5 and 6 above the up and down arrows to scroll through the list and find the Template you wish to load next. -
Page 83: Settings Display Mode
Using Your MASCHINE MK2 Controller The Displays This display mode is very useful to monitor what’s going out of your controller, for example for debugging purpose: if something goes wrong somewhere in your MIDI chain, you can check here what is actually sent by your MASCHINE MK2 controller. 6.4.6 Settings Display Mode The Settings display mode allows you to adjust relevant parameters and provides information... -
Page 84: Using Your Maschine Mikro Controller
Using Your MASCHINE MIKRO Controller Basic Controls Using Your MASCHINE MIKRO Controller In this chapter, we will focus on what’s happening on your MASCHINE MIKRO controller. By reading this, you will learn: ▪ How to use the basic controls on your controller for navigating through the MIDI mapping system. - Page 85 Using Your MASCHINE MIKRO Controller Basic Controls Selection Command MIDI/MASCHINE SHIFT + F1 mode Templates SHIFT + Left/ Right Arrow buttons Knob Pages Left/Right Arrow buttons Pad Pages GROUP + pads 9–16 (if activated) Display mode NAV + F1–F3 For more information on Templates, Knob Pages, and Pad Pages, see ↑4.3, The Map- ping System.
-
Page 86: Assignable Control Elements
Using Your MASCHINE MIKRO Controller Assignable Control Elements Adjusting Settings for your Controller You can adjust various settings for your MASCHINE MIKRO controller by entering its Setup display mode or by going to File > Preferences > Maschine Mikro. See ↑7.4.4, Setup Display Mode for more information. - Page 87 Using Your MASCHINE MIKRO Controller Assignable Control Elements In this Hardware area, you will notice the Knob Page menu and its associated Knob Page area (orange frame), the Pad Page menu and its associated Pad Page area (blue frame), and the red Selection Frame on the currently selected control element (pad 1 in the picture above).
-
Page 88: Visual Feedback On Your Controller
Using Your MASCHINE MIKRO Controller Visual Feedback on Your Controller To Sum Up… All control elements on your MASCHINE MIKRO controller are freely assignable to MIDI events (with the limitations due to the type of control element), with the following exceptions: ▪... -
Page 89: Buttons
Using Your MASCHINE MIKRO Controller Visual Feedback on Your Controller ▪ All buttons and pads are equipped with LEDs that inform you about the assignment state of the control element at any time. ▪ The display shows you additional information about the assignments. 7.3.1 Buttons The LEDs below each button can have three states: off, dimmed and bright. -
Page 90: Pads
Using Your MASCHINE MIKRO Controller Visual Feedback on Your Controller 7.3.2 Pads Here are the rules for the pads. Since the pads have two functions (they are pressure-sensi- tive), the states are indicated as follows: ▪ If the pad is not assigned, it is off. ▪... -
Page 91: Control Display Mode
Using Your MASCHINE MIKRO Controller The Display The three tabs at the top of the display on your MASCHINE MIKRO controller when NAV is hold depressed. These tabs allow you to select the desired display mode from the three modes available: Tem- plate, Control, and Setup: To switch to any of the display modes, hold the NAV button and press the desired F1–F3 ►... -
Page 92: Template Display Mode
Using Your MASCHINE MIKRO Controller The Display Each field mirrors the Label Field as defined in the Inspector’s Assign pane for the correspond- ing control element: the name you defined there appears here — if you haven’t defined any name yet for that control element, its label is simply its assigned MIDI message. In the middle of the display, you can see the Template, Knob Page and (possibly) Pad Page that are currently active. -
Page 93: Setup Display Mode
Using Your MASCHINE MIKRO Controller The Display ▪ Unlike the Template list in the Controller Editor interface, you don’t have to open the Con- troller Editor to switch to another Template. ▪ Unlike using the shortcut SHIFT + Left/Right Arrow on your controller, you can quietly choose the next Template to be loaded, even if it’s not the one right after/before the Tem- plate currently loaded. - Page 94 Using Your MASCHINE MIKRO Controller The Display ▪ Below, you see the version number of the NI Hardware Service. CONTROLLER EDITOR - Manual - 94...
-
Page 95: Using Your Maschine Mikro Mk2 Controller
Using Your MASCHINE MIKRO MK2 Controller Basic Controls Using Your MASCHINE MIKRO MK2 Controller In this chapter, we will focus on what’s happening on your MASCHINE MIKRO MK2 controller. By reading this, you will learn: ▪ How to use the basic controls on your controller for navigating through the MIDI mapping system. - Page 96 Using Your MASCHINE MIKRO MK2 Controller Basic Controls Selection Command MIDI/MASCHINE SHIFT + F1 mode Templates SHIFT + Left/ Right Arrow buttons Knob Pages Left/Right Arrow buttons Pad Pages GROUP + pads 9–16 (if activated) Display mode NAV + F1–F3 For more information on Templates, Knob Pages, and Pad Pages, see ↑4.3, The Map- ping...
-
Page 97: Assignable Control Elements
Using Your MASCHINE MIKRO MK2 Controller Assignable Control Elements Adjusting Settings for your Controller You can adjust various settings for your MASCHINE MIKRO MK2 controller by entering its Set- up display mode or by going to File > Preferences > Maschine Mikro MK2. See ↑8.4.4, Setup Display Mode for more information. - Page 98 Using Your MASCHINE MIKRO MK2 Controller Assignable Control Elements In this Hardware area, you will notice the Knob Page menu and its associated Knob Page area (orange frame), the Pad Page menu and its associated Pad Page area (blue frame), and the red Selection Frame on the currently selected control element (pad 11 in the picture above).
-
Page 99: Visual Feedback On Your Controller
Using Your MASCHINE MIKRO MK2 Controller Visual Feedback on Your Controller To Sum Up… All control elements on your MASCHINE MIKRO MK2 controller are freely assignable to MIDI events (with the limitations due to the type of control element), with the following exceptions: ▪... -
Page 100: Buttons
Using Your MASCHINE MIKRO MK2 Controller Visual Feedback on Your Controller ▪ All buttons and pads are equipped with LEDs that inform you about their assignment at any time. Furthermore, the 16 pads and the GROUP button provide RGB LEDs. ▪... - Page 101 Using Your MASCHINE MIKRO MK2 Controller Visual Feedback on Your Controller GROUP Button The GROUP button of your controller is equipped with a RGB LED. This by far extends the monitoring possibilities of this button. Its lighting behavior directly depends on whether the Pad Pages are enabled or not.
-
Page 102: Multicolor Pads
Using Your MASCHINE MIKRO MK2 Controller Visual Feedback on Your Controller For more information on the button modes, LED On menu, and MIDI feedback mode, ↑25.6.2, Assignments for Buttons. Moreover, for the F1–F3 buttons, the particular assignment is shown within the display in Con- trol display mode (see section ↑8.4.2, Control Display Mode). -
Page 103: Switching Between Display Modes
Using Your MASCHINE MIKRO MK2 Controller The Display 8.4.1 Switching Between Display Modes First of all, to switch between display modes, press the NAV button on your MASCHINE MIK- RO MK2 controller and hold it. At the top of the display, you see three tabs: The three tabs at the top of the display on your MASCHINE MIKRO MK2 controller when NAV is hold depressed. -
Page 104: Template Display Mode
Using Your MASCHINE MIKRO MK2 Controller The Display The Control display mode mirrors the loaded Knob Page. In this mode, the F1–F3 buttons and the Control encoder trigger their assigned MIDI messag- Each field mirrors the Label Field as defined in the Inspector’s Assign pane for the correspond- ing control element: the name you defined there appears here —... -
Page 105: Setup Display Mode
Using Your MASCHINE MIKRO MK2 Controller The Display Turn the Control encoder to scroll through the list and find the Template you wish to load next. The selected Template is indicated by a dotted frame. When you have it, press the Control encoder to load the selected Template. Instead of turning the Control encoder, you can also use the Left/Right Arrow buttons to select another Template, then press the Control encoder to load it. - Page 106 Using Your MASCHINE MIKRO MK2 Controller The Display Press the Left/Right Arrow buttons repeatedly to scroll through the available settings. Turn the Control encoder to change the value for a particular setting. The settings are the same as in File > Preferences > Maschine Mikro MK2. These are: ▪...
-
Page 107: Using Your Maschine Studio Controller
Using Your MASCHINE STUDIO Controller Basic Controls Using Your MASCHINE STUDIO Controller In this chapter, we will focus on what’s happening on your MASCHINE STUDIO controller. By reading this, you will learn: ▪ How to use the basic controls on your controller for navigating through the MIDI mapping system. - Page 108 Using Your MASCHINE STUDIO Controller Basic Controls Selection Command MIDI/MASCHINE SHIFT + mode CHANNEL Templates SHIFT + Page buttons Knob Pages Page buttons Pad Pages Group buttons (if activated) Display mode SHIFT + Buttons 3–8 CONTROLLER EDITOR - Manual - 108...
-
Page 109: Assignable Control Elements
Using Your MASCHINE STUDIO Controller Assignable Control Elements For more information on Templates, Knob Pages, Pad Pages, I/O and Level Pages, and Jog Wheel Pages, see ↑4.3, The Mapping System. For more information on the display modes, see ↑9.4, The Displays. - Page 110 Using Your MASCHINE STUDIO Controller Assignable Control Elements The Hardware area representing the MASCHINE STUDIO controller. The MASCHINE STUDIO controller holds the following areas: The names that you see on the device only refer to their original function in the MA- SCHINE software.
- Page 111 Using Your MASCHINE STUDIO Controller Assignable Control Elements (1) Control Buttons: In the top left part, you find a set of ten buttons arranged into five rows of two buttons. From these ten buttons, eight are freely assignable (CHANNEL and PLUG-IN, RANGE and MIX, BROWSE...
- Page 112 Using Your MASCHINE STUDIO Controller Assignable Control Elements including the eight buttons and knob will be visible. This section is headed by the I/O and Lev- el Pages menu. If you deactivate the I/O Level Pages, the eight buttons become freely assigna- ble to MIDI events.
- Page 113 Using Your MASCHINE STUDIO Controller Assignable Control Elements Type of Control Element Assignment Parameters Buttons, Knobs 1–8 (Touch action), jog wheel ↑25.6.2, Assignments for Buttons (Push action), footswitch inputs (both Tip and Ring actions) Pads (Hit action) ↑25.6.4, Assignments for the Pads – Hit Action Pads (Press action) ↑25.6.6, Assignments for the Pads –...
-
Page 114: Visual Feedback On Your Controller
Using Your MASCHINE STUDIO Controller Visual Feedback on Your Controller If this message appears when you connect your MASCHINE STUDIO controller, do the follow- ing to update its firmware: Click the Download button at the bottom of the message. This will automatically start your favourite internet browser and open a page of the Native Instruments website providing a link to the Device Updater. -
Page 115: Buttons
Using Your MASCHINE STUDIO Controller Visual Feedback on Your Controller 9.3.1 Buttons Basically, each button on your controller can have three states: ▪ Not assigned. ▪ Assigned, in Off state. ▪ Assigned, in On state. The following paragraphs describe how the LED under each button keeps you informed on the button states. - Page 116 Using Your MASCHINE STUDIO Controller Visual Feedback on Your Controller ▪ Pad Pages disabled: The Group buttons can be freely assigned. For each of them, you can choose which from the 16 available colors should be used for the On and Off states. With Pad Pages disabled, the Group buttons offer you three Color modes: ▪...
-
Page 117: Multicolor Pads
Using Your MASCHINE STUDIO Controller Visual Feedback on Your Controller 9.3.2 Multicolor Pads The sixteen pads of your controller are equipped with RGB LEDs. Their lighting behavior is close to that of multicolor buttons — but since the pads have two functions (Hit and Press), their states are indicated as follows: ▪... -
Page 118: The Displays
Using Your MASCHINE STUDIO Controller The Displays The Displays The displays on your MASCHINE STUDIO controller can show different parts of your mapping configuration, depending on the display mode that is activated. Each display mode modifies the behavior of Buttons 1–8 above the displays and Knobs 1–8 below them. Learn more about the different display modes available on the MASCHINE STUDIO controller in the following sec- tions. -
Page 119: Settings Display Mode
Using Your MASCHINE STUDIO Controller The Displays Below, a message reminds you that you can switch to another Template simply by pressing the Page buttons, since you are already holding SHIFT (see ↑9.1, Basic Controls). 9.4.2 Settings Display Mode The Settings display mode allows you to adjust a few hardware settings and provides informa- tion about your MASCHINE STUDIO controller. -
Page 120: Calibration Display Mode
Using Your MASCHINE STUDIO Controller The Displays While looking at this sensitivity value, touch any Knob 1–8 under the controller displays. As soon as your pressure on the Knob is detected, the number is highlighted. Apply various pressures on the Knob and readjust the slider accordingly until you are sat- isfied with the sensitivity. -
Page 121: Knobs Display Mode
Using Your MASCHINE STUDIO Controller The Displays ▪ Knob 1 controls the red value for the left screen. ▪ Knob 2 controls the green value for the left screen. ▪ Knob 3 controls the blue value for the left screen. ▪... - Page 122 Using Your MASCHINE STUDIO Controller The Displays This display mode allows you to see which MIDI message is currently assigned to each control element in the loaded Knob Page. In this mode, the 16 control elements around the displays (Buttons 1–8 above and Knobs 1–8 below) trigger the MIDI messages assigned to them. Each field mirrors the Label Field as defined in the Inspector’s Assign pane for the correspond-...
-
Page 123: Pages Display Mode
Using Your MASCHINE STUDIO Controller The Displays Note that depending on the assignment properties for each of the Knobs, its displayed value (or bar) can either be going from 0 to 127 or from -63 to 64 (bipolar) — this second setting can be useful for some types of controls (e.g. -
Page 124: Templates Display Mode
Using Your MASCHINE STUDIO Controller The Displays Actually, this functionality is already available in many ways: in the Controller Editor, you can use the Knob Page menu (in the Hardware area) or the Knob Pages list (in the Inspector’s Pages pane), and on the MASCHINE STUDIO controller you have the Page buttons at your dis- posal. -
Page 125: Monitor Display Mode
Using Your MASCHINE STUDIO Controller The Displays Use Knob 5 to scroll through the list and find the Template you wish to load. When you have made your selection, press Button 6 (LOAD) to load the selected Template. As with the Pages display mode, this functionality is already available in other ways: in the Controller Editor, you can use the Template list (in the Inspector’s Templates pane), and on... - Page 126 Using Your MASCHINE STUDIO Controller The Displays ▪ If the last actuated element is a pad, the second row (Hit) and third row (Press) show the details of the MIDI messages corresponding to the Hit and Press actions on that pad, re- spectively.
-
Page 127: Using Your Maschine Jam Controller
Using Your MASCHINE JAM Controller Basic Controls Using Your MASCHINE JAM Controller In this chapter, we will focus on what’s happening on your MASCHINE JAM controller. By reading this, you will learn: ▪ How to use the basic controls on your controller for navigating through the MIDI mapping system. -
Page 128: Assignable Control Elements
Using Your MASCHINE JAM Controller Assignable Control Elements Selection Command MIDI/MASCHINE SHIFT + Cue mode Matrix Pages Scene buttons (if enabled) I/O and Level Level Meter Pages buttons (if enabled) Touch Strip Group Pages buttons (if enabled) For more information on Matrix Pages, I/O and Level Pages, and Touch Strip Pages, see ↑4.3, The Mapping System. - Page 129 Using Your MASCHINE JAM Controller Assignable Control Elements The Hardware area representing the MASCHINE JAM controller. The MASCHINE JAM controller holds the following areas: The names on the device refer only to their original function in the MASCHINE software. These names are reused here only to describe the interface. (1) Left column: In the left part, you find a column with eleven buttons along with the D-Pad, which includes four more buttons.
- Page 130 Using Your MASCHINE JAM Controller Assignable Control Elements (2) Matrix: The 8x8 matrix holds 64 freely assignable buttons. If the Matrix Pages button is en- abled in the Pages pane of the Inspector, the eight Scene buttons 1–8 above the matrix allow you to select the desired page of assignments for the matrix buttons.
-
Page 131: Visual Feedback On Your Controller
Using Your MASCHINE JAM Controller Visual Feedback on Your Controller Type of Control Element Assignment Parameters Buttons (including D-Pad) ↑25.6.2, Assignments for Buttons Control encoder – Touch action ↑25.6.2, Assignments for Buttons Control encoder – Push action ↑25.6.2, Assignments for Buttons Control encoder –... - Page 132 Using Your MASCHINE JAM Controller Visual Feedback on Your Controller The following paragraphs describe how the LED under each button keeps you informed on the button states. Single-Color Buttons For all buttons except the Scene, matrix, and Group buttons, the LEDs can have three states: off, dimmed and bright.
- Page 133 Using Your MASCHINE JAM Controller Visual Feedback on Your Controller Scene Buttons and Group Buttons By default, the eight Scene buttons 1–8 at the top of your controller, and the eight Group but- tons A–H below the 8x8 matrix have a specific function: They allow you to switch between pa- ges of assignments for the 8x8 matrix buttons and for the Touch Strips, respectively.
-
Page 134: Visual Feedback On The Touch Strips
Using Your MASCHINE JAM Controller Visual Feedback on Your Controller 10.3.2 Visual Feedback on the Touch Strips Each Touch Strip includes a LED chain giving you a direct feedback on the current value for the MIDI message assigned to the strip’s Position action. The state of the LED chain can be controlled in two ways —... -
Page 135: Using Your Traktor Kontrol X1
Using Your TRAKTOR KONTROL X1 Basic Controls Using Your TRAKTOR KONTROL X1 In this chapter, we will focus on what’s happening on your TRAKTOR KONTROL X1. By read- ing this, you will learn: ▪ How to use the basic controls on your controller for navigating through the MIDI mapping system. -
Page 136: Assignable Control Elements
Using Your TRAKTOR KONTROL X1 Assignable Control Elements For more information on the Pages, see ↑4.3, The Mapping System. You cannot switch between Templates from the TRAKTOR KONTROL X1. To do this, you have to use the Controller Editor interface (see ↑3.2, Loading MIDI Assignments). - Page 137 Using Your TRAKTOR KONTROL X1 Assignable Control Elements The Hardware area representing the TRAKTOR KONTROL X1. In this Hardware area, you will notice the Page menu and its associated Page area (orange frame), and the red Selection Frame on the currently selected control element (left Play button in the picture above).
-
Page 138: Visual Feedback On Your Controller
Using Your TRAKTOR KONTROL X1 Visual Feedback on Your Controller The names that you see on the device only refer to their original function in the TRAK- TOR software. The TRAKTOR KONTROL X1 holds the following assignable control elements: ▪ 24 freely assignable buttons. ▪... -
Page 139: Using Two Or More Traktor Kontrol X1 Units
Using Your TRAKTOR KONTROL X1 Using Two or More TRAKTOR KONTROL X1 Units Button State LED State Not assigned Assigned – Off state Dimmed Assigned – On state Bright For buttons in Increment mode, the Off state corresponds to the zero value, while the On state corresponds to a value greater than zero. -
Page 140: Using Your Traktor Kontrol X1 Mk2
Using Your TRAKTOR KONTROL X1 MK2 Basic Controls Using Your TRAKTOR KONTROL X1 MK2 In this chapter, we will focus on what’s happening on your TRAKTOR KONTROL X1 MK2. By reading this, you will learn: ▪ How to use the basic controls on your controller for navigating through the MIDI mapping system. -
Page 141: Assignable Control Elements
Using Your TRAKTOR KONTROL X1 MK2 Assignable Control Elements For more information on the Pages, see ↑4.3, The Mapping System. You cannot switch between Templates from the TRAKTOR KONTROL X1 MK2. To do this, you have to use the Controller Editor interface (see ↑3.2, Loading MIDI Assign- ments). - Page 142 Using Your TRAKTOR KONTROL X1 MK2 Assignable Control Elements The Hardware area representing the TRAKTOR KONTROL X1 MK2. In this Hardware area, you will notice the Page menu including its associated Page area, and the red Selection Frame on the currently selected control element (the Touch Strip in the pic- ture above).
-
Page 143: Visual Feedback On Your Controller
Using Your TRAKTOR KONTROL X1 MK2 Visual Feedback on Your Controller The names that you see on the device only refer to their original function in the TRAK- TOR software. The TRAKTOR KONTROL X1 MK2 holds the following assignable control elements: ▪... - Page 144 Using Your TRAKTOR KONTROL X1 MK2 Visual Feedback on Your Controller On your TRAKTOR KONTROL X1 MK2, all buttons are equipped with LEDs that informs you about the assignment state of the button at any time. The LEDs below each control element can have three states: off, dimmed and bright.
-
Page 145: Using Two Or More Traktor Kontrol X1 Mk2 Units
Using Your TRAKTOR KONTROL X1 MK2 Using Two or More TRAKTOR KONTROL X1 MK2 Units Controlling the LED Chain State of the Touch Strip The state of the LED chain can be controlled in two ways — internally via your actions on the touch strip, or remotely via MIDI feedback. -
Page 146: Using Your Traktor Kontrol F1
Using Your TRAKTOR KONTROL F1 Basic Controls Using Your TRAKTOR KONTROL F1 In this chapter, we will focus on what’s happening on your TRAKTOR KONTROL F1. By read- ing this, you will learn: ▪ How to use the basic controls on your controller for navigating through the MIDI mapping system. -
Page 147: Assignable Control Elements
Using Your TRAKTOR KONTROL F1 Assignable Control Elements For more information on the Pages, see ↑4.3, The Mapping System. You cannot switch between Templates from the TRAKTOR KONTROL F1. To do this, you have to use the Controller Editor interface (see ↑3.2, Loading MIDI Assignments). - Page 148 Using Your TRAKTOR KONTROL F1 Assignable Control Elements The Hardware area representing the TRAKTOR KONTROL F1. In this Hardware area, you will notice the Page menu and its associated Page area (orange frame), and the red Selection Frame on the currently selected control element (first FILTER knob in the picture above).
- Page 149 Using Your TRAKTOR KONTROL F1 Assignable Control Elements The names that you see on the device only refer to their original function in the TRAK- TOR software. The TRAKTOR KONTROL F1 holds the following assignable control elements: ▪ 11 freely assignable buttons. ▪...
-
Page 150: Visual Feedback On Your Controller
Using Your TRAKTOR KONTROL F1 Visual Feedback on Your Controller 13.3 Visual Feedback on Your Controller The fast bidirectional communication between your TRAKTOR KONTROL F1 and the Hardware Service on the software side allows status indications on your controller to be made in real time. - Page 151 Using Your TRAKTOR KONTROL F1 Visual Feedback on Your Controller ▪ Single mode: You can choose a color that will be used bright and dimmed for the On and Off states, respectively. In this mode, the pad’s lighting behaves like the buttons (see table above).
-
Page 152: 7-Segment Display
Using Your TRAKTOR KONTROL F1 Visual Feedback on Your Controller 13.3.2 7-segment Display The 7-segment display next to the encoder knob can display any MIDI Note’ velocity or any MIDI CC value. The displayed value depends on the display’s assignment settings as defined in Assign pane of the Inspector. -
Page 153: Using Your Traktor Kontrol Z1
Using Your TRAKTOR KONTROL Z1 Basic Controls Using Your TRAKTOR KONTROL Z1 In this chapter, we will focus on what’s happening on your TRAKTOR KONTROL Z1. By read- ing this, you will learn: ▪ How to use the basic controls on your controller for navigating through the MIDI mapping system. -
Page 154: Assignable Control Elements
Using Your TRAKTOR KONTROL Z1 Assignable Control Elements 14.2 Assignable Control Elements If you selected the TRAKTOR KONTROL Z1 in the Device menu of the Application Control Bar, this is what the Hardware area looks like: The Hardware area representing the TRAKTOR KONTROL Z1. CONTROLLER EDITOR - Manual - 154... - Page 155 Using Your TRAKTOR KONTROL Z1 Assignable Control Elements In this Hardware area, you will notice the Page menu and its associated Page area, and the red Selection Frame on the currently selected control element (Deck Focus button B in the picture above).
-
Page 156: Visual Feedback On Your Controller
Using Your TRAKTOR KONTROL Z1 Visual Feedback on Your Controller 14.3 Visual Feedback on Your Controller The fast bidirectional communication between your TRAKTOR KONTROL Z1 and the Hardware Service on the software side allows status indications on your controller to be made in real time. - Page 157 Using Your TRAKTOR KONTROL Z1 Visual Feedback on Your Controller ▪ In Toggle mode, both controls are enabled: both your actions on the button and the possi- bly incoming MIDI messages are taken into account to update the button and LED state. ▪...
-
Page 158: Using Your Traktor Kontrol Z2
Using Your TRAKTOR KONTROL Z2 Basic Controls Using Your TRAKTOR KONTROL Z2 In this chapter, we will focus on what’s happening on your TRAKTOR KONTROL Z2. By read- ing this, you will learn: ▪ How to use the basic controls on your controller for navigating through the MIDI mapping system. -
Page 159: Assignable Control Elements
Using Your TRAKTOR KONTROL Z2 Assignable Control Elements You cannot switch between Templates from the TRAKTOR KONTROL Z2. To do this, you have to use the Controller Editor interface (see ↑3.2, Loading MIDI Assignments). When your Z2 is in MIDI mode, the Settings button is lit. Switching Between Pages: Gate vs. - Page 160 Using Your TRAKTOR KONTROL Z2 Assignable Control Elements The Hardware area representing the TRAKTOR KONTROL Z2. In this Hardware area, you will notice the Page menu and its associated Page area (orange frame), and the red Selection Frame on the currently selected control element (Deck Focus button B in the picture above).
-
Page 161: Visual Feedback On Your Controller
Using Your TRAKTOR KONTROL Z2 Visual Feedback on Your Controller The names that you see on the device only refer to their original function in the TRAK- TOR software. The TRAKTOR KONTROL Z2 holds the following assignable control elements: ▪ 28 freely assignable buttons including 8 multicolor buttons. ▪... - Page 162 Using Your TRAKTOR KONTROL Z2 Visual Feedback on Your Controller ▪ Assigned, in Off state. ▪ Assigned, in On state. The following paragraphs describe how the LED under each button keeps you informed on the button states. Single-Color Buttons For all buttons except the Cue/Sample Trigger buttons 1–4 (on either side of your controller), the LEDs can have three states: off, dimmed and bright.
- Page 163 Using Your TRAKTOR KONTROL Z2 Visual Feedback on Your Controller ▪ HSB mode: This mode is only available when the button’s state is controlled via MIDI feed- back (see below). In HSB mode, you can precisely define from within your MIDI target which color the button will use.
-
Page 164: Using Your Traktor Kontrol D2
Using Your TRAKTOR KONTROL D2 Basic Controls Using Your TRAKTOR KONTROL D2 In this chapter, we will focus on what’s happening on your TRAKTOR KONTROL D2. By read- ing this, you will learn: ▪ How to use the basic controls on your controller for navigating through the MIDI mapping system. - Page 165 Using Your TRAKTOR KONTROL D2 Basic Controls Selection Command MIDI/TRAKTOR SHIFT + BACK mode Templates Performance Mode buttons (left/right arrows) Deck DECK button Page SHIFT Display mode Settings button and Display button 1–2 For more information on Templates and Pages, see ↑4.3, The Mapping System.
-
Page 166: Assignable Control Elements
Using Your TRAKTOR KONTROL D2 Assignable Control Elements When your D2 is in MIDI mode, the SHIFT button is lit. Switching Between Pages In MIDI mode, D2 allows you to access four different Pages, organized as Deck A and C, each with “Basic”... - Page 167 Using Your TRAKTOR KONTROL D2 Assignable Control Elements Controls on D2 D2 can be divided into the following areas: (1) FX area: This area holds four FX buttons and four FX knobs, plus the Deck Selector buttons and the SELECT button.
- Page 168 Using Your TRAKTOR KONTROL D2 Assignable Control Elements (3) BROWSE encoder and BACK button: These two control elements are freely assignable. The BACK button offers a button press assignment, while the BROWSE encoder reacts to turning, pushing, and touching, allowing for three different assignments for this encoder. (4) Page area: The Page area holds all Deck controls.
-
Page 169: Visual Feedback On Your Controller
Using Your TRAKTOR KONTROL D2 Visual Feedback on Your Controller Type of Control Element Assignment Parameters BROWSE and Loop encoders – Push action ↑25.6.2, Assignments for Buttons BROWSE and Loop encoders – Touch action ↑25.6.2, Assignments for Buttons Touch Strip – Touch action ↑25.6.2, Assignments for Buttons Touch Strip –... - Page 170 Using Your TRAKTOR KONTROL D2 Visual Feedback on Your Controller Button State LED State Not assigned Assigned – Off state Dimmed Assigned – On state Bright For buttons in Increment mode, the Off state corresponds to the zero value, while the On state corresponds to a value greater than zero.
-
Page 171: Performance Knobs, Slot Volume Faders, And Loop Encoder
Using Your TRAKTOR KONTROL D2 Visual Feedback on Your Controller ▪ In Trigger, Gate, and Increment mode, you can choose which control mode (internal or re- mote via MIDI) you want to use. This is done via the LED On menu in the Assign pane of... -
Page 172: The Display
Using Your TRAKTOR KONTROL D2 The Display 16.4 The Display The display on D2 can show various elements of your MIDI mapping configuration or give you access to settings for your controller, depending on the display mode that is activated. ▪... -
Page 173: Adjust Color And Brightness
Using Your TRAKTOR KONTROL D2 The Display From top to bottom, each display shows the assignment and the state of the following control elements: ▪ 1st row: FX buttons 1–4 above the display. Buttons in Off state are indicated by a dark background, while buttons in On state are highlighted. - Page 174 Using Your TRAKTOR KONTROL D2 The Display To enter or exit Settings display mode, press the Settings button (showing a cog wheel) in ► the top left of the display. The Settings button. The RGB settings let you adjust the color levels, as well as brightness. The various settings and their current values are shown at the bottom of the display: The RGB settings.
-
Page 175: Using Two Traktor Kontrol D2 Units
Using Your TRAKTOR KONTROL D2 Using Two TRAKTOR KONTROL D2 Units You can also adjust the brightness in the Controller Editor by going to File > Preferences > Traktor Kontrol D2 - x. See section ↑25.2.2, Controller Pages for more information. You can cancel your adjustments at any time by doing the following: Turn the BROWSE... -
Page 176: Using Your Traktor Kontrol S5
Using Your TRAKTOR KONTROL S5 Basic Controls Using Your TRAKTOR KONTROL S5 In this chapter, we will focus on what’s happening on your TRAKTOR KONTROL S5. By read- ing this, you will learn: ▪ How to use the basic controls on your controller for navigating through the MIDI mapping system. - Page 177 Using Your TRAKTOR KONTROL S5 Basic Controls Selection Command MIDI/TRAKTOR SHIFT (any Deck) + mode BACK (right Deck) Templates Performance Mode buttons (left/right arrows) Decks DECK buttons Pages (per Deck) SHIFT Display mode Settings button and Display buttons 1–2 CONTROLLER EDITOR - Manual - 177...
- Page 178 Using Your TRAKTOR KONTROL S5 Basic Controls For more information on Templates and Pages, see ↑4.3, The Mapping System. When your S5 is in MIDI mode, both SHIFT buttons are lit (dimly or fully). Switching Between Decks and Pages In MIDI mode, the S5 takes up TRAKTOR’s 4-Deck scheme. In other terms, the available Pa- ges are organized per Deck, Decks A to D providing two Pages each (whose default names are “Basic”...
-
Page 179: Assignable Control Elements
Using Your TRAKTOR KONTROL S5 Assignable Control Elements 17.2 Assignable Control Elements If you selected the TRAKTOR KONTROL S5 in the Device menu of the Application Control Bar, you can choose which part of your controller you want to display in the Hardware area by click- ing its miniature version in the Overview (in the top left corner): Click the desired part of your controller in the Overview to display its details in the Hardware area. - Page 180 Using Your TRAKTOR KONTROL S5 Assignable Control Elements The left Deck Unit on the TRAKTOR KONTROL S5. The Deck Units of the TRAKTOR KONTROL S5 hold the following areas: (1) FX area: This area holds five buttons and four knobs, all of them freely assignable. Further- more, the four FX knobs can be both turned and touched, leading to two different assignments for each knob.
-
Page 181: Control Elements On The Mixer
Using Your TRAKTOR KONTROL S5 Assignable Control Elements (3) Page area: The Page area holds all Deck controls. Apart from the DECK and SHIFT buttons, all these control elements are freely assignable. The Page area is headed by the Page menu. Furthermore, many control elements have multiple functions: ▪... - Page 182 Using Your TRAKTOR KONTROL S5 Assignable Control Elements The Mixer on the TRAKTOR KONTROL S5. The Mixer of the TRAKTOR KONTROL S5 holds the following areas: (1) Channel areas: In each of the four channel strips, all control elements are freely assignable except the FILTER and CUE buttons (at the bottom).
-
Page 183: Visual Feedback On Your Controller
Using Your TRAKTOR KONTROL S5 Visual Feedback on Your Controller Most of the control elements in this area are audio controls related to the audio inter- face of the S5. This is why they are not part of the MIDI mapping system. (3) Crossfader: The crossfader is freely assignable as well. -
Page 184: Buttons And Pads
Using Your TRAKTOR KONTROL S5 Visual Feedback on Your Controller 17.3.1 Buttons and Pads All buttons and pads are equipped with single-color or multicolor LEDs. Basically, each button or pad on your controller can have three states: ▪ Not assigned. ▪... -
Page 185: Loop Encoder
Using Your TRAKTOR KONTROL S5 Visual Feedback on Your Controller ▪ HSB mode: This mode is only available when the pad’s state is controlled via MIDI feed- back (see below). In HSB mode, you can precisely define from within your MIDI target which color the pad will use. -
Page 186: The Displays
Using Your TRAKTOR KONTROL S5 The Displays 17.4 The Displays The displays on your TRAKTOR KONTROL S5 can show various elements of your MIDI map- ping configuration or give you access to settings for your controller, depending on the display mode that is activated. - Page 187 Using Your TRAKTOR KONTROL S5 The Displays By default the name defined in the Label Field is the MIDI message that will be sent by this control element, but you can customize it to your liking, as in the picture above — for more information, see section ↑25.4.1, Label Fields ↑25.5.3, Assign...
-
Page 188: Adjust Color And Brightness
Using Your TRAKTOR KONTROL S5 The Displays 17.4.2 Adjust Color and Brightness The Settings display mode allows you to adjust the displays' color rendition and brightness di- rectly from your S5 device. To enter or exit Settings display mode, press the Settings button (showing a cog wheel) in ►... - Page 189 Using Your TRAKTOR KONTROL S5 The Displays To adjust the red, blue or green level of a particular display, turn the Performance knob 1 ► (RED), 2 (GREEN) or 3 (BLUE) beneath that display. The color levels of that display are adjusted accordingly. →...
- Page 190 Using Your TRAKTOR KONTROL S5 The Displays Turn the BROWSE encoder below to the left display to select Reset or Undo, and press the ► encoder to confirm. ▪ The Reset option will reset all the settings to their default values. ▪...
-
Page 191: Using Your Traktor Kontrol S8
Using Your TRAKTOR KONTROL S8 Basic Controls Using Your TRAKTOR KONTROL S8 In this chapter, we will focus on what’s happening on your TRAKTOR KONTROL S8. By read- ing this, you will learn: ▪ How to use the basic controls on your controller for navigating through the MIDI mapping system. - Page 192 Using Your TRAKTOR KONTROL S8 Basic Controls Selection Command MIDI/TRAKTOR SHIFT (any Deck) + mode BACK (right Deck) Templates Performance Mode buttons (left/right arrows) Decks DECK buttons Pages (per Deck) SHIFT Display mode Settings button and Display buttons 1–2 For more information on Templates and Pages, see ↑4.3, The Mapping System.
- Page 193 Using Your TRAKTOR KONTROL S8 Basic Controls When your S8 is in MIDI mode, both SHIFT buttons are lit (dimly or fully). Switching Between Decks and Pages In MIDI mode, the S8 takes up TRAKTOR’s 4-Deck scheme. In other terms, the available Pa- ges are organized per Deck, Decks A to D providing two Pages each (whose default names are “Basic”...
-
Page 194: Assignable Control Elements
Using Your TRAKTOR KONTROL S8 Assignable Control Elements 18.2 Assignable Control Elements If you selected the TRAKTOR KONTROL S8 in the Device menu of the Application Control Bar, you can choose which part of your controller you want to display in the Hardware area by click- ing its miniature version in the Overview (in the top left corner): Click the desired part of your controller in the Overview to display its details in the Hardware area. - Page 195 Using Your TRAKTOR KONTROL S8 Assignable Control Elements The left Deck Unit on the TRAKTOR KONTROL S8. The Deck Units of the TRAKTOR KONTROL S8 hold the following areas: (1) FX area: This area holds five buttons and four knobs, all of them freely assignable. Further- more, the four FX knobs can be both turned and touched, leading to two different assignments for each knob.
- Page 196 Using Your TRAKTOR KONTROL S8 Assignable Control Elements (2) BROWSE encoder and BACK button: These two control elements are freely assignable. Fur- thermore, the BROWSE encoder can be turned, pushed, and touched, leading to three differ- ent assignments for this encoder. (3) Display area: This area doesn’t hold any MIDI-assignable elements.
-
Page 197: Control Elements On The Mixer
Using Your TRAKTOR KONTROL S8 Assignable Control Elements Type of Control Element Assignment Parameters Slot Volume faders – Touch action ↑25.6.2, Assignments for Buttons BROWSE and Loop encoders – Turn action ↑25.6.7, Assignments for Digital Encoders BROWSE and Loop encoders – Push action ↑25.6.2, Assignments for Buttons BROWSE and Loop encoders –... - Page 198 Using Your TRAKTOR KONTROL S8 Assignable Control Elements The Mixer on the TRAKTOR KONTROL S8. The Mixer of the TRAKTOR KONTROL S8 holds the following areas: (1) Channel areas: In each of the four channel strips, all control elements are freely assignable except the TRAKTOR button (at the top) and the FILTER and CUE buttons (at the bottom).
-
Page 199: Visual Feedback On Your Controller
Using Your TRAKTOR KONTROL S8 Visual Feedback on Your Controller Most of the control elements in this area are audio controls related to the audio inter- face of the S8. This is why they are not part of the MIDI mapping system. (3) Crossfader: The crossfader is freely assignable as well. -
Page 200: Buttons And Pads
Using Your TRAKTOR KONTROL S8 Visual Feedback on Your Controller 18.3.1 Buttons and Pads All buttons and pads are equipped with single-color or multicolor LEDs. Basically, each button or pad on your controller can have three states: ▪ Not assigned. ▪... -
Page 201: Performance Knobs, Slot Volume Faders, And Loop Encoder
Using Your TRAKTOR KONTROL S8 Visual Feedback on Your Controller ▪ HSB mode: This mode is only available when the pad’s state is controlled via MIDI feed- back (see below). In HSB mode, you can precisely define from within your MIDI target which color the pad will use. -
Page 202: The Displays
Using Your TRAKTOR KONTROL S8 The Displays For more information on the displays of your TRAKTOR KONTROL S8, see section ↑18.4, The Displays. ▪ On each Deck Unit, the Loop encoder (the push encoder next to the Slot Volume faders) is equipped with a LED ring that indicates you the state of the encoder’s Push action. - Page 203 Using Your TRAKTOR KONTROL S8 The Displays The display of a Deck Unit in Control display mode. For each control element, the display indicates the element’s name as defined in its Label Field. By default the name defined in the Label Field is the MIDI message that will be sent by this control element, but you can customize it to your liking, as in the picture above —...
-
Page 204: Adjust Color And Brightness
Using Your TRAKTOR KONTROL S8 The Displays ◦ In Single or Dual color mode, the pad’s On state uses the color set in the Color Value parameter (Single mode) or Color On parameter (Dual mode), while the pad’s Off state uses the same color in a darkened version. - Page 205 Using Your TRAKTOR KONTROL S8 The Displays The RGB settings let you adjust the color levels independently for each display as well as the brightness for both displays. The various settings and their current values are shown at the bot- tom of the displays: The RGB settings (here on the right Deck Unit).
- Page 206 Using Your TRAKTOR KONTROL S8 The Displays Turn the BROWSE encoder next to the left display to select Reset or Undo, and press the ► encoder to confirm. ▪ The Reset option will reset all the settings to their default values. ▪...
-
Page 207: Using Your Traktor Kontrol S4
Using Your TRAKTOR KONTROL S4 Basic Controls Using Your TRAKTOR KONTROL S4 In this chapter, we will focus on what’s happening on your TRAKTOR KONTROL S4. By read- ing this, you will learn: ▪ How to use the basic controls on your controller for navigating through the MIDI mapping system. - Page 208 Using Your TRAKTOR KONTROL S4 Basic Controls Selection Command MIDI/TRAKTOR mode SHIFT + BROWSE button Decks Deck Assign buttons (DECK C / DECK D) Pages (per Deck) SHIFT For more information on Pages, see ↑4.3, The Mapping System. You cannot switch between Templates from the TRAKTOR KONTROL S4. To do this, you have to use the Controller Editor interface (see ↑3.2, Loading MIDI Assignments).
-
Page 209: Assignable Control Elements
Using Your TRAKTOR KONTROL S4 Assignable Control Elements Please keep in mind that the DECK C and DECK D buttons are always in Toggle mode: When you press one of them, the Deck controls switch to the alternate Deck until you press the but- ton again. -
Page 210: Control Elements On The Left Deck
Using Your TRAKTOR KONTROL S4 Assignable Control Elements In this Hardware area, you will notice the Page menu and its associated Page area (orange frame) when the left or right Deck is displayed, and the red Selection Frame on the currently selected control element. - Page 211 Using Your TRAKTOR KONTROL S4 Assignable Control Elements The Left Deck on the TRAKTOR KONTROL S4. The Left Deck of the TRAKTOR KONTROL S4 holds the following areas: (1) Page area: The Page area holds all Deck controls. Apart from the Deck Assign (DECK C) and SHIFT buttons, all these control elements are freely assignable: 17 buttons, 2 encoders, 1 fad- er, and 1 jog wheel.
-
Page 212: Control Elements On The Right Deck
Using Your TRAKTOR KONTROL S4 Assignable Control Elements (3) Footswitch input: The footswitch input of your S4 can also be freely assigned to any MIDI event. You will find all details concerning the assignment parameters for the control elements ↑25.6, MIDI Message Parameters. - Page 213 Using Your TRAKTOR KONTROL S4 Assignable Control Elements The Mixer on the TRAKTOR KONTROL S4. The Mixer of the TRAKTOR KONTROL S4 holds the following areas: (1) Channel areas: Each of the four channel strips holds 4 knobs, 3 buttons, 1 encoder, 1 fad- er, and 1 LED chain.
-
Page 214: Assignment Parameters
Using Your TRAKTOR KONTROL S4 Assignable Control Elements (4) BROWSE button: The BROWSE button is freely assignable. (5) Crossfader: The crossfader is freely assignable as well. On the Mixer, the Main section (with the MAIN LEVEL knob and MAIN LEVEL meters), the Master Display (with the Alert, USB, and Preview Play indicators along with the SNAP, MASTER, and QUANT buttons), and the Deck Assignment indicators are exclud- ed from the MIDI mapping scheme. -
Page 215: Buttons
Using Your TRAKTOR KONTROL S4 Visual Feedback on Your Controller 19.3.1 Buttons On your TRAKTOR KONTROL S4, all buttons are equipped with LEDs that inform you about the assignment state of the button at any time. The LEDs below each control element can have three states: off, dimmed and bright. -
Page 216: Led Chains
Using Your TRAKTOR KONTROL S4 Visual Feedback on Your Controller 19.3.2 LED Chains The Mixer of the S4 provides four assignable LED chains that give you additional visual feed- back on your target’s parameters. The feedback provided by each LED chain depends on its assignment settings as defined in the Assign pane of the Inspector. -
Page 217: Using Your Traktor Kontrol S4 Mk2
Using Your TRAKTOR KONTROL S4 MK2 Basic Controls Using Your TRAKTOR KONTROL S4 MK2 In this chapter, we will focus on what’s happening on your TRAKTOR KONTROL S4 MK2. By reading this, you will learn: ▪ How to use the basic controls on your controller for navigating through the MIDI mapping system. - Page 218 Using Your TRAKTOR KONTROL S4 MK2 Basic Controls Selection Command MIDI/TRAKTOR mode SHIFT + BROWSE button Decks Deck Assign buttons (DECK C / DECK D) Pages (per Deck) SHIFT For more information on Pages, see ↑4.3, The Mapping System. You cannot switch between Templates from the TRAKTOR KONTROL S4 MK2. To do this, you have to use the Controller Editor interface (see ↑3.2, Loading MIDI Assign- ments).
-
Page 219: Assignable Control Elements
Using Your TRAKTOR KONTROL S4 MK2 Assignable Control Elements Please keep in mind that the DECK C and DECK D buttons are always in Toggle mode: When you press one of them, the Deck controls switch to the alternate Deck until you press the but- ton again. -
Page 220: Control Elements On The Left Deck
Using Your TRAKTOR KONTROL S4 MK2 Assignable Control Elements In this Hardware area, you will notice the Page menu and its associated Page area (orange frame) when the left or right Deck is displayed, and the red Selection Frame on the currently selected control element. - Page 221 Using Your TRAKTOR KONTROL S4 MK2 Assignable Control Elements The Left Deck on the TRAKTOR KONTROL S4 MK2. The Left Deck of the TRAKTOR KONTROL S4 MK2 holds the following areas: (1) Page area: The Page area holds all Deck controls. Apart from the Deck Assign (DECK C) and SHIFT buttons, all these control elements are freely assignable: 17 buttons, 2 encoders, 1 fad- er, and 1 jog wheel.
-
Page 222: Control Elements On The Right Deck
Using Your TRAKTOR KONTROL S4 MK2 Assignable Control Elements (3) Footswitch input: The footswitch input of your S4 can also be freely assigned to any MIDI event. You will find all details concerning the assignment parameters for the control elements ↑25.6, MIDI Message Parameters. - Page 223 Using Your TRAKTOR KONTROL S4 MK2 Assignable Control Elements The Mixer on the TRAKTOR KONTROL S4 MK2. The Mixer of the TRAKTOR KONTROL S4 MK2 holds the following areas: (1) Channel areas: Each of the four channel strips holds 4 knobs, 3 buttons, 1 encoder, 1 fad- er, and 1 LED chain.
-
Page 224: Assignment Parameters
Using Your TRAKTOR KONTROL S4 MK2 Assignable Control Elements (4) Loop Recorder area: The Loop Recorder area holds 4 buttons and 1 knob. All of them are freely assignable. (5) Preview button: The P button is freely assignable. (6) Crossfader: The crossfader is freely assignable as well. On the Mixer, the Main section (with the MAIN LEVEL knob and MAIN LEVEL meters), the Master Display (with the Alert, USB, and Preview Play indicators along with the SNAP, MASTER, and QUANT buttons), and the Deck Assignment indicators are exclud-... -
Page 225: Buttons
Using Your TRAKTOR KONTROL S4 MK2 Visual Feedback on Your Controller 20.3.1 Buttons On your TRAKTOR KONTROL S4 MK2, all buttons are equipped with LEDs that inform you about the assignment state of the button at any time. The LEDs below each control element can have three states: off, dimmed and bright. -
Page 226: Led Chains
Using Your TRAKTOR KONTROL S4 MK2 Visual Feedback on Your Controller 20.3.2 LED Chains The Mixer of the S4 provides four assignable LED chains that give you additional visual feed- back on your target’s parameters. The feedback provided by each LED chain depends on its assignment settings as defined in the Assign pane of the Inspector. -
Page 227: Using Your Traktor Kontrol S2
Using Your TRAKTOR KONTROL S2 Basic Controls Using Your TRAKTOR KONTROL S2 In this chapter, we will focus on what’s happening on your TRAKTOR KONTROL S2. By read- ing this, you will learn: ▪ How to use the basic controls on your controller for switching your controller to/from MIDI mode. -
Page 228: Assignable Control Elements
Using Your TRAKTOR KONTROL S2 Assignable Control Elements When your S2 is in MIDI mode, both SHIFT buttons are dimly lit (meaning that MIDI mode is on). You cannot switch between Templates from the TRAKTOR KONTROL S2. To do this, you have to use the Controller Editor interface (see ↑3.2, Loading MIDI Assignments). -
Page 229: Visual Feedback On Your Controller
Using Your TRAKTOR KONTROL S2 Visual Feedback on Your Controller On your TRAKTOR KONTROL S2, almost every control element is freely assignable to a MIDI event. The few exceptions are the following: ▪ The SHIFT buttons on the left and right Decks have a special function (switching between MIDI and TRAKTOR modes, see above). -
Page 230: Buttons
Using Your TRAKTOR KONTROL S2 Visual Feedback on Your Controller 21.3.1 Buttons On your TRAKTOR KONTROL S2, all buttons are equipped with LEDs that inform you about the assignment state of the button at any time. The LEDs below each control element can have three states: off, dimmed and bright. -
Page 231: Led Chains
Using Your TRAKTOR KONTROL S2 Visual Feedback on Your Controller 21.3.2 LED Chains The Mixer of the S2 provides two assignable LED chains that give you additional visual feed- back on your target’s parameters. The feedback provided by each LED chain depends on its assignment settings as defined in the Assign pane of the Inspector. -
Page 232: Using Your Traktor Kontrol S2 Mk2
Using Your TRAKTOR KONTROL S2 MK2 Basic Controls Using Your TRAKTOR KONTROL S2 MK2 In this chapter, we will focus on what’s happening on your TRAKTOR KONTROL S2 MK2. By reading this, you will learn: ▪ How to use the basic controls on your controller for switching your controller to/from MIDI mode. -
Page 233: Assignable Control Elements
Using Your TRAKTOR KONTROL S2 MK2 Assignable Control Elements When your S2 is in MIDI mode, both SHIFT buttons are dimly lit (meaning that MIDI mode is on). You cannot switch between Templates from the TRAKTOR KONTROL S2 MK2. To do this, you have to use the Controller Editor interface (see ↑3.2, Loading MIDI Assign- ments). -
Page 234: Visual Feedback On Your Controller
Using Your TRAKTOR KONTROL S2 MK2 Visual Feedback on Your Controller On your TRAKTOR KONTROL S2 MK2, almost every control element is freely assignable to a MIDI event. The few exceptions are the following: ▪ The SHIFT buttons on the left and right Decks have a special function (switching between MIDI and TRAKTOR modes, see above). -
Page 235: Buttons
Using Your TRAKTOR KONTROL S2 MK2 Visual Feedback on Your Controller 22.3.1 Buttons On your TRAKTOR KONTROL S2 MK2, all buttons are equipped with LEDs that inform you about the assignment state of the button at any time. The LEDs below each control element can have three states: off, dimmed and bright. -
Page 236: Led Chains
Using Your TRAKTOR KONTROL S2 MK2 Visual Feedback on Your Controller 22.3.2 LED Chains The Mixer of the S2 provides two assignable LED chains that give you additional visual feed- back on your target’s parameters. The feedback provided by each LED chain depends on its assignment settings as defined in the Assign pane of the Inspector. -
Page 237: Using Your Komplete Kontrol S-Series Keyboard
Using Your KOMPLETE KONTROL S-SERIES Keyboard Basic Controls Using Your KOMPLETE KONTROL S-SERIES Keyboard In this chapter, we will focus on what’s happening on your KOMPLETE KONTROL S-SERIES keyboard. By reading this, you will learn: ▪ How to use the basic controls on your keyboard for navigating through the MIDI mapping system. - Page 238 Using Your KOMPLETE KONTROL S-SERIES Keyboard Basic Controls Selection Command MIDI / KOMPLETE KONTROL SHIFT + INSTANCE mode Templates PRESET buttons Pages Page buttons Keybed range OCT-/OCT+ buttons The name of the current Template is shown in the bottom row of the leftmost display. See section ↑23.4.1, Visual Feedback on the Displays for more info.
-
Page 239: Assignable Control Elements
Using Your KOMPLETE KONTROL S-SERIES Keyboard Assignable Control Elements The buttons in the TRANSPORT section on your keyboard. These MCU messages are sent on a virtual port of your keyboard labeled “Komplete Kontrol DAW.” For this to work, you have to configure your DAW so that it listens to control surface messages on this virtual port. - Page 240 Using Your KOMPLETE KONTROL S-SERIES Keyboard Assignable Control Elements The Hardware area representing the KOMPLETE KONTROL S-SERIES keyboard. In this Hardware area, you will notice the red Selection Frame on the currently selected control element (Knob 4 in the picture above). The names that you see on the device only refer to their original function.
- Page 241 Using Your KOMPLETE KONTROL S-SERIES Keyboard Assignable Control Elements (2) Pedal and footswitch inputs: Both the pedal (EXPRESSION) and stereo footswitch (SUS- TAIN) inputs (on the rear panel of your keyboard) can be assigned to MIDI messages. Further- more, the SUSTAIN input is a stereo input: You can assign messages to the tip and ring inputs independently.
-
Page 242: Defining Key Zones
Using Your KOMPLETE KONTROL S-SERIES Keyboard Defining Key Zones ▪ Aftertouch messages are always sent, even if your keys are not assigned (Key Zone disa- bled, see section ↑23.3.2, Editing Key Zones). ▪ Keys send monophonic Aftertouch, i.e. Channel Pressure messages. In other words, the Af- tertouch value is applied to the whole keybed. - Page 243 Using Your KOMPLETE KONTROL S-SERIES Keyboard Defining Key Zones The Keybed area lets you easily create and modify your Key Zones. The Keybed area shows a 128-key keybed along with a few additional elements: ▪ Each existing Key Zone is shown with its color and borders on the keybed: ▪...
-
Page 244: Editing Key Zones
Using Your KOMPLETE KONTROL S-SERIES Keyboard Defining Key Zones ▪ Under the keybed, the Key Zone field displays the name of the selected Key Zone: By default, the Key Zone’s label indicates the first and last key of the Zone (see picture above), but you can modify it to your liking by clicking the field, typing a new name and pressing [Enter] on your computer keyboard. - Page 245 Using Your KOMPLETE KONTROL S-SERIES Keyboard Defining Key Zones The assignment parameters for the selected Key Zone(s) are available in the Assign pane of the Inspector. These parameters are described in detail in section ↑25.6.3, Assign- ments for Key Zones. Resizing Key Zones To resize a Key Zone, click its lower or upper border and drag your mouse horizontally.
- Page 246 Using Your KOMPLETE KONTROL S-SERIES Keyboard Defining Key Zones To split an existing Key Zone, hover your mouse within the Key Zone over the key at ► which you want to split it, right-click ([Ctrl]-click on Mac OS X) and select Split key zone in the context menu.
-
Page 247: Visual Feedback On Your Keyboard
Using Your KOMPLETE KONTROL S-SERIES Keyboard Visual Feedback on Your Keyboard On the Light Guide of your KOMPLETE KONTROL S-SERIES keyboard, a disabled Key Zone will be indicated by unlit LEDs for the corresponding keys. For more info on the Light Guide behavior in MIDI mode, see section ↑23.4.2, Visual Feedback on the Light... -
Page 248: Visual Feedback On The Displays
Using Your KOMPLETE KONTROL S-SERIES Keyboard Visual Feedback on Your Keyboard 23.4.1 Visual Feedback on the Displays The nine displays on your keyboard provide following information: ▪ Display 1 (leftmost display) shows: ◦ Top row: [current Page number] / [total number of Pages]. ◦... -
Page 249: Visual Feedback On The Touch Strips
Using Your KOMPLETE KONTROL S-SERIES Keyboard Visual Feedback on Your Keyboard 23.4.3 Visual Feedback on the Touch Strips Each Touch Strip is equipped with a two-colored (blue and white) LED chain that shows the position of the current value on the scale at any time (this position can also change over time, i.e. -
Page 250: Visual Feedback On The Buttons
Using Your KOMPLETE KONTROL S-SERIES Keyboard Visual Feedback on Your Keyboard The various modes of the Touch Strip not only affect the LED behavior but also the MIDI val- ues actually sent. You will find all details on this in section ↑25.6.10, Assignments for Touch Strips (KOMPLETE KONTROL S-SERIES). -
Page 251: Stand-Alone Operation
Using Your KOMPLETE KONTROL S-SERIES Keyboard Stand-alone Operation You can adjust the brightness of the buttons’ On and Off states in File > Preferences > Komplete Kontrol S - x. For more information, see section ↑25.2.2, Controller Pages. 23.5 Stand-alone Operation In addition to working in a computer-based music production environment, your KOMPLETE KONTROL S-SERIES keyboard can also be used as a regular MIDI keyboard and controller without a computer attached. - Page 252 Using Your KOMPLETE KONTROL S-SERIES Keyboard Stand-alone Operation Click the Download button at the bottom of the message. This will automatically start your favorite internet browser and open a page of the Native Instruments website providing a link to the Device Updater application. Click the link to download the archive containing the Device Updater application to your computer.
- Page 253 Using Your KOMPLETE KONTROL S-SERIES Keyboard Stand-alone Operation You can change any assignments in the default 'Template 1' in the Templates pane of the In- spector. Then, while the KOMPLETE KONTROL S-SERIES keyboard is connected: Right-click the Template 1 entry (Ctrl-click on Mac OS X). ►...
-
Page 254: Using Two Or More Komplete Kontrol S-Series Units
Using Your KOMPLETE KONTROL S-SERIES Keyboard Using Two or More KOMPLETE KONTROL S-SERIES Units 23.6 Using Two or More KOMPLETE KONTROL S-SERIES Units You can use up to four KOMPLETE KONTROL S-SERIES units simultaneously. This allows you to further extend the number of parameters you can control in your target(s). For more informa- tion on how to set up more than one KOMPLETE KONTROL S-SERIES for use with the same computer, please refer to chapter ↑24, Using Two or More Units of the Same... -
Page 255: Using Two Or More Units Of The Same Type
Using Two or More Units of the Same Type Using Two or More Units of the Same Type For some NI controllers, the Controller Editor allows you to connect more than one device to the same computer and use them simultaneously for controlling various MIDI targets. This can be useful if you wish to control virtual decks of a DJ software or any other application requiring an instant access to many parameters. -
Page 256: Renaming The Units
Using Two or More Units of the Same Type Renaming the Units 24.1 Renaming the Units We assume here that only one KOMPLETE KONTROL S-SERIES unit is currently connected to your computer. We will rename this unit before connecting an additional one. To rename the connected unit, proceed as follows: If the Controller Editor is not currently open, start it. - Page 257 Using Two or More Units of the Same Type Renaming the Units Click the Komplete Kontrol S - 1 tab on the left to display the settings for that unit: At the bottom of the page, the Device Name menu reads the current name assigned to your KOMPLETE KONTROL S-SERIES keyboard.
-
Page 258: Accessing Templates And Pages Of A Particular Unit
Using Two or More Units of the Same Type Accessing Templates and Pages of a Particular Unit Click the Device Name menu and select another name from the available entries (for ex- ample Komplete Kontrol S - 2). Upon your selection, a dialog warns you that you changed the device name: Follow the instructions in the warning dialog: unplug the unit, then reconnect it. -
Page 259: Resolving Device Conflicts
Using Two or More Units of the Same Type Resolving Device Conflicts 24.3 Resolving Device Conflicts If you connect an additional unit with the same name as one of the already connected unit(s), a warning dialog will inform you about the device (name) conflict: This message will appear if you connect at least two units of the same type without having renamed your devices before- hand. -
Page 260: Reference
Reference The Application Menu Bar Reference This chapter systematically describes all the user interface elements of the Controller Editor. The Controller Editor is the “control tower” of your NI controller’s remote control system. It stores the links between hardware actions (what you do on your NI controller) and MIDI events (what you want to achieve within a specific piece of MIDI-capable software or hardware). -
Page 261: View Menu
Reference The Application Menu Bar You can also use the Save Configuration… command as a backup function: Save your Configuration file somewhere else (hard drive, USB key…), and you will be able to load it again. There is no Save entry in the File menu. -
Page 262: Help Menu
This web page provides you with useful information about NI prod- ucts, among them the Controller Editor. ▪ Visit Native Instruments on the web…: Opens the Native Instruments home page in your web browser. ▪ About…: Opens the About screen (like clicking the Native Instruments logo). This dialog contains valuable information about the software such as its version number. -
Page 263: General Page
Reference The Preferences Window Preferences window with, on the left, the General tab at the top and a few controller tabs underneath (General page displayed). ▪ The first page is the General page: It is always available and provides general settings com- mon to all controllers. -
Page 264: Controller
Reference The Preferences Window and the Inspector’s Assign pane (where you can see or modify the corresponding assign- ments) — instead, as soon as you actuate the desired control element on your NI control- ler, it is automatically selected in the Controller Editor (the red Selection Frame focuses on it) and its assignment is automatically shown in the Assign pane of the Inspector. - Page 265 Reference The Preferences Window A controller page of the Preferences window (here the Maschine Studio page). On the left, you can see one or more tabs under the General tab. Their labels mirror the names of all NI devices currently connected to your computer. On the left of the Preferences window, click the desired tab to display the settings for that...
-
Page 266: 25.2.2.1 Settings For The Maschine And Maschine Mk2 Controllers
Reference The Preferences Window 25.2.2.1 Settings for the MASCHINE and MASCHINE MK2 Controllers For the MASCHINE and MASCHINE MK2 controllers, the settings are exactly the same as those available on the displays of your controller in Settings display mode. As a reminder, these settings are the following: Section/control Description... -
Page 267: 25.2.2.2 Settings For The Maschine Mikro And Maschine Mikro Mk2 Controllers
Reference The Preferences Window 25.2.2.2 Settings for the MASCHINE MIKRO and MASCHINE MIKRO MK2 Controllers For the MASCHINE MIKRO and MASCHINE MIKRO MK2 controllers, the settings are exactly the same as those available on the display of your controller in Setup display mode. As a re- minder, these settings are the following: Section/control Description... -
Page 268: 25.2.2.3 Settings For The Maschine Studio Controller
Reference The Preferences Window 25.2.2.3 Settings for the MASCHINE STUDIO Controller In the Preferences window the page for the MASCHINE STUDIO controller offers following set- tings: Section/control Description Pads section Sensitivity slider Changes the sensitivity of the pads. Touch Sensitivity section Knobs slider Adjusts the touch sensitivity of Knobs 1–8. - Page 269 Reference The Preferences Window On the left, your touch is not detected; on the right, it is detected! While looking at this sensitivity value, touch any Knob 1–8 under the controller displays. As soon as your pressure on the Knob is detected, the number turns red. Apply various pressures on the Knob and readjust the slider accordingly until you are sat- isfied with the sensitivity.
-
Page 270: Settings For The Maschine Jam Controller (1-4)
Reference The Preferences Window 25.2.2.4 Settings for the MASCHINE JAM Controller (1–4) In the Preferences window the pages for the MASCHINE JAM controller offer following set- tings: Section/control Description Status section Device Name menu Allows to select a different name for the connected MASCHINE JAM controller. -
Page 271: Settings For The Traktor Kontrol X1 And X1 Mk2 (1-4)
Reference The Preferences Window See also 2 Settings Display Mode [➙ 119] 2 Calibration Display Mode [➙ 120] 25.2.2.5 Settings for the TRAKTOR KONTROL X1 and X1 MK2 (1–4) In the Preferences window the pages for the TRAKTOR KONTROL X1 (MK2) offer following settings: Effect Knobs Section Description... - Page 272 Reference The Preferences Window Status Section Description Device Name menu Allows to select a different name for the connected TRAKTOR KONTROL X1 controller. This is useful when using more than one X1 unit simultaneously. See chapter ↑24, Using Two or More Units of the Same Type for more information.
-
Page 273: Settings For The Traktor Kontrol F1 (1-4)
Reference The Preferences Window 25.2.2.6 Settings for the TRAKTOR KONTROL F1 (1–4) In the Preferences window the pages for the TRAKTOR KONTROL F1 offer following settings: Knobs Section Description Recalibrate button Allows you to recalibrate the four FILTER knobs at the top of the F1. - Page 274 Reference The Preferences Window Status Section Description Device Name menu Allows to select a different name for the connected TRAKTOR KONTROL F1 controller. This is useful when using more than one F1 unit simultaneously. See chapter ↑24, Using Two or More Units of the Same Type for more information.
-
Page 275: 25.2.2.7 Settings For The Traktor Kontrol S2, S2 Mk2, S4, S4 Mk2
Reference The Preferences Window 25.2.2.7 Settings for the TRAKTOR KONTROL S2, S2 MK2, S4, S4 MK2 In the Preferences window the pages for the TRAKTOR KONTROL S2 (MK2) / S4 (MK2) offer following settings: Knobs Section Description FX Recalibrate button Allows you to recalibrate the FX knobs. - Page 276 Reference The Preferences Window Footswitch Section (S4/ Description S4 MK2 only) Active menu Select here the type of wiring used by the footswitch currently connected to the FOOTSWITCH socket. You can choose between active ring (Ring) and active tip (Tip) wiring. Status Section Description Start in MIDI-Mode...
-
Page 277: 25.2.2.8 Settings For The Traktor Kontrol S5
Reference The Preferences Window 25.2.2.8 Settings for the TRAKTOR KONTROL S5 In the Preferences window the page for the TRAKTOR KONTROL S5 offers following settings: Knobs Section Description FX Recalibrate button Allows you to recalibrate the FX knobs. Click Recalibrate start the calibration process, then follow the on-screen instructions. - Page 278 Reference The Preferences Window LEDs Section Description On-State Brightness slider Sets the brightness for the On state of the buttons on your controller. Off-State Brightness slider Sets the brightness for the Off state of the buttons on your controller. Status Section Description Start in MIDI-Mode check...
-
Page 279: 25.2.2.9 Settings For The Traktor Kontrol S8
Reference The Preferences Window 25.2.2.9 Settings for the TRAKTOR KONTROL S8 In the Preferences window the page for the TRAKTOR KONTROL S8 offers following settings: Knobs Section Description FX Recalibrate button Allows you to recalibrate the FX knobs. Click Recalibrate start the calibration process, then follow the on-screen instructions. - Page 280 Reference The Preferences Window LEDs Section Description On-State Brightness slider Sets the brightness for the On state of the buttons on your controller. Off-State Brightness slider Sets the brightness for the Off state of the buttons on your controller. Status Section Description Start in MIDI-Mode check...
-
Page 281: Settings For The Traktor Kontrol D2 (1-2)
Reference The Preferences Window 25.2.2.10 Settings for the TRAKTOR KONTROL D2 (1–2) In the Preferences window the pages for the TRAKTOR KONTROL D2 offer following settings: Knobs Section Description Recalibrate button Allows you to recalibrate the four knobs of the D2. To start the calibration process, click Recalibrate. - Page 282 Reference The Preferences Window Status Section Description Device Name menu Allows to select a different name for the connected TRAKTOR KONTROL D2 controller. This is useful when using more than one D2 unit simultaneously. See chapter ↑24, Using Two or More Units of the Same Type for more information.
-
Page 283: 25.2.2.11 Settings For The Traktor Kontrol Z1
Reference The Preferences Window 25.2.2.11 Settings for the TRAKTOR KONTROL Z1 In the Preferences window the page for the TRAKTOR KONTROL Z1 offers following settings: Knobs Section Description Recalibrate button Allows you to recalibrate all knobs. Click Recalibrate to start the calibration process, then follow the on-screen instructions. -
Page 284: 25.2.2.12 Settings For The Traktor Kontrol Z2
Reference The Preferences Window 25.2.2.12 Settings for the TRAKTOR KONTROL Z2 In the Preferences window the page for the TRAKTOR KONTROL Z2 offers following settings: Knobs Section Description Recalibrate button Allows you to recalibrate all knobs. Click Recalibrate to start the calibration process, then follow the on-screen instructions. -
Page 285: Settings For The Komplete Kontrol S-Series Keyboards (1-4)
Reference The Preferences Window 25.2.2.13 Settings for the KOMPLETE KONTROL S-SERIES Keyboards (1–4) In the Preferences window the pages for the KOMPLETE KONTROL S-SERIES keyboards offer the following settings: LEDs Section Description On-State Brightness slider Sets the brightness for the On state of the TRANSPOSE (OCT- and OCT+), TRANSPORT, and PRESET... -
Page 286: The Application Control Bar
Reference The Application Control Bar Sustain Pedal Section Description Pedal Mode menu Allows you to choose between Switch Continuous mode for the SUSTAIN input. Use Switch mode when connecting a footswitch for standard on/off sustain pedal functionality. Use Continuous mode when connecting a continuous expression pedal for half-damper sustain pedal functionality. -
Page 287: Device Menu
Reference The Application Control Bar The Application Control Bar contains some important features of the Controller Editor. The next sections describe each of its elements in detail. 25.3.1 Device Menu The Device menu. The Device menu informs you which NI controller’s assignments you are working on. Further- more, it allows you to switch to another NI controller in order to display and edit its assign- ments. -
Page 288: Connect Button
Reference The Application Control Bar Worth to note is that all NI controllers currently in MIDI mode are still active, no matter which controller is displayed in the Controller Editor. 25.3.2 Connect Button The Connect button. Connect button allows you to “call” your NI controller, in case it is currently controlling its dedicated software (i.e. -
Page 289: Midi Activity Indicator
Reference The Application Control Bar Here are the possible states for the Connect button: NI Controller Connect Button MIDI mode active MIDI mode inactive Off (click it to switch your controller to MIDI mode) Not connected / not installed Grayed out (inactive) To sum up, the Connect button always shows you the state of your NI controller. -
Page 290: The Hardware Area
Reference The Hardware Area When you click the NI Logo, located on the far right of the Application Control Bar, the About screen opens. This About screen provides you with some interesting information about your Controller Editor installation, including the version number and the credits. The About screen can also be opened by selecting the About…... - Page 291 Reference The Hardware Area For every control element of the Hardware area that can be assigned to some MIDI message, you find a Label Field above or below it. This field mirrors the Label Field located in the upper part of the Assign pane in the Inspector, so that you can see all control elements along with their names.
-
Page 292: Selection Frame
Reference The Hardware Area 25.4.2 Selection Frame The Selection Frame highlights the control element(s) currently focused. The Selection Frame is a red frame highlighting the currently selected control element(s). Whenever you select another control element in the Hardware area (or, with the Touch Select option activated in the Preferences, on your NI controller), the Selection Frame highlights this control element. - Page 293 Reference The Hardware Area Page Areas The Page area holds all control elements included in a Page (here the Knob Page area on the MASCHINE STUDIO control- ler). Inside the Hardware area, one or more colored frames highlight some of the control elements. These frames define the various page areas, which hold all control elements included in the corresponding paging system: ▪...
-
Page 294: The Inspector
Reference The Inspector As a short reminder: The control elements located in a Page area can have multiple as- signments, which are grouped on so-called Pages — with, on each Page, one assign- ment for one control element (for a general explanation of the Controller Editor’s map- ping system, see section ↑4.3, The Mapping System). - Page 295 Reference The Inspector From the Application Control Bar’s Device menu, select the NI controller which you want to work with. If you have only one Controller installed, it is automatically selected. Choose a Template. This can be done for example via the Templates pane of the Inspector (see below).
-
Page 296: Templates Pane
Reference The Inspector 25.5.1 Templates Pane Templates pane allows you to select and manage your Templates. The Templates can be used to store a whole set of assignments and Pages, for example for a specific use: a particular hardware instrument, a particular software configuration for a live set, a particular song of your set, etc. - Page 297 Reference The Inspector Each entry in the Template list has two elements: the Template number and the Template name. The Template number is not editable — it defines the order of appearance of the Tem- plate in the list. The Template name is editable: To rename the Template, double-click its name (it is then highlighted), type a new name, ►...
- Page 298 Reference The Inspector ▪ Export: Opens a dialog allowing you to export the selected Template as a file on your hard drive. Select the destination and type the name of the Template file to be exported. Please note that the filename that you choose can be different from the Template’s name inside the Controller Editor.
- Page 299 Reference The Inspector The menu contains two new factory Templates. Template Properties There is no Template Properties area for the TRAKTOR KONTROL X1/X1 MK2/F1/S2/ S2 MK2/D2/S5/S8/Z1/Z2,and KOMPLETE KONTROL S-SERIES. The Template Properties area contains settings for the Template selected in the Template list: The Template Properties on the Templates pane (here for the MASCHINE controller).
- Page 300 Reference The Inspector ▪ Internal: The MIDI messages are routed through the internal MIDI port. This way, they can target other MIDI-capable applications running on your computer (provided that these ap- plications are listening to this MIDI port — this has to be set in the target application’s preferences).
-
Page 301: Pages Pane
Reference The Inspector When Host Transport Control is active and your controller is focused on a MASCHINE plug-in instance in your host environment, the following happens: ▪ On your controller, the buttons sending MIDI messages are dimmed to indicate that they are in MIDI mode. - Page 302 Reference The Inspector Page List(s) Pages pane has some similarities with the Templates pane explained above. The Pages pane holds one or more Page lists — one list for each type of Pages available on the selected NI controller. These lists display all Pages available in the current Template: A Page list (here the Knob Pages list of a MASCHINE controller).
- Page 303 Reference The Inspector This can be useful in a live situation, for example if you plan to use several Pages for different parts of a song, and you need to have them in a specific order: When they are well ordered, you can easily switch to the previous/next one by using the Page buttons or the dedicated buttons on your NI controller.
- Page 304 Reference The Inspector The button switches on and the rest of the area is activated. → To deactivate a paging functionality, click its Enable button again. ► The button switches off and the rest of the area becomes minimized and grayed out. →...
-
Page 305: Assign Pane
Reference The Inspector ods described in this manual), go back to the Inspector’s Pages pane, in the Page list se- lect the entry below which you want to insert the copied Page, and use the Paste command (see below). ▪ Paste: Inserts the Page stored in the clipboard below the Page currently selected in the list. The inserted Page is then automatically loaded. - Page 306 Reference The Inspector Click the control element in the Hardware area or touch it on your NI controller — provid- ed that the Touch Select option is activated in the Preferences window. Assign pane then displays the assignment properties for that control element. →...
- Page 307 Reference The Inspector ▪ MASCHINE STUDIO only: If any of Knob 1–8 or Button 1–8 (below or above the displays) is selected, the second line allows you to enable/disable the MCU Mode check box. MCU Mode check box allows you to set your MASCHINE STUDIO controller displays to MCU mode in order to receive Mackie Control feedback from your DAW while keeping the original assignment of the Buttons and Knobs in the Knob Page area.
- Page 308 Reference The Inspector To reset a Label Field to its default name, clear the field, then press the [Enter] key on your computer keyboard. The Definition Area Below the Description area, the assignment properties explicitly define what has to be sent when you actuate the control element on your NI controller: this is called the Definition area.
-
Page 309: Midi Message Parameters
Reference MIDI Message Parameters 25.6 MIDI Message Parameters You will find here the description of all possible parameters to be found within the Definition area of the Inspector’s Assign pane, for all kinds of control elements and all NI controllers. We will first give a few general rules valid for various sorts of control elements. - Page 310 Reference MIDI Message Parameters All other parameters displayed in the Assign pane’s Definition area depend both on the type of control element that you are working on, and on the MIDI message type selected in this Type menu. Below is a list of all possible MIDI message types to be found in the Type menu.
- Page 311 Reference MIDI Message Parameters held down. The MIDI note is specified via the Note parameter. The pressure values to be sent are specified in various ways, depending on the type of the selected control element (see next sections). ▪ Channel Pressure: Sends a MIDI Channel Pressure message (also called Channel After- touch).
-
Page 312: Assignments For Buttons
Reference MIDI Message Parameters tween two positions in the song or sequence. The position(s) in the song or sequence can be specified in various ways, depending on the type of control element (see below). The position in the song is counted in MIDI beats. ▪... - Page 313 Reference MIDI Message Parameters NI Controller Control elements TRAKTOR KONTROL X1 MK2 Buttons, Push Encoders (Touch and Push actions), Touch Strip (Touch action) TRAKTOR KONTROL F1 Buttons, pads, encoder knob (Push action) TRAKTOR KONTROL Z1 Buttons, encoder knob (Push action) TRAKTOR KONTROL Z2 Buttons, encoders (Push action) TRAKTOR KONTROL S2 (MK2) / S4...
- Page 314 Reference MIDI Message Parameters Mode Menu Mode menu for buttons. For the button-like control elements listed in the above table, and only for some of the MIDI message types available for these control elements, you can choose from different behaviors for the way the data is sent.
- Page 315 Reference MIDI Message Parameters ▪ Inc (Increment): In Increment mode, each action on the control element increases/decreas- es the parameter value. Two numeric fields Range From define the min and max values of the interval, respectively, each of them going from 0 to 127 (by default, 0 for the min and 127 for the max).
- Page 316 Reference MIDI Message Parameters Action On Menu For the Toggle, Trigger, and Increment modes, an Action on menu at the bottom of the Defini- tion area allows you to choose when the message has to be sent. Action on menu. The two options proposed by the Action on menu are:...
- Page 317 Reference MIDI Message Parameters NI Controller Control elements TRAKTOR KONTROL Z2 Cue/Sample Trigger buttons (1–4) on either side MASCHINE JAM Matrix buttons, Scene buttons (1–8), Group buttons (A– MASCHINE STUDIO Pads, GROUP buttons MASCHINE MK2 Pads, Group buttons (A–H) MASCHINE MIKRO MK2 Pads, GROUP buttons For these control elements, you can define which color(s) should be used for the On and Off states.
- Page 318 Reference MIDI Message Parameters ▪ Dual: You can choose a color for the On state and another color for the Off state. Both col- ors will be used at full brightness. The Color On Color Off menus allow you to choose both colors from color pickers.
- Page 319 Reference MIDI Message Parameters Parameter MIDI Val- Device 1 (de- Device 2 * Device 3 * Device 4 * fault) 0–127 Channel 1 Channel 4 Channel 7 Channel 10 Saturation 0–127 Channel 2 Channel 5 Channel 8 Channel 11 Brightness 0–127 Channel 3 Channel 6...
-
Page 320: Assignments For Key Zones
Reference MIDI Message Parameters 25.6.3 Assignments for Key Zones The assignments described here are valid for the Key Zones defined for the KOMPLETE KON- TROL S-SERIES keyboards. For more info on defining Key Zones for your keyboard, please re- fer to section ↑23.3, Defining Key Zones. -
Page 321: Assignments For The Pads - Hit Action
Reference MIDI Message Parameters Click the Color menu and select the desired color from the color picker that opens: ► The selected color is applied to the Key Zone, as shown at the bottom of the Hardware → area. On your keyboard, the Light Guide mirrors this color above the keys in that Key Zone. -
Page 322: Assignments For Knobs And The Like
Reference MIDI Message Parameters Additionally, the pads of the MASCHINE MK2 and MASCHINE MIKRO MK2 controllers are equipped with multicolor LEDs. You can define which color will be used for each pad state. Please refer to section ↑25.6.2, Assignments for Buttons above for more information on this. -
Page 323: Assignments For The Pads - Press Action
Reference MIDI Message Parameters NI Controller Control elements TRAKTOR KONTROL S8 Deck Units: FX and Performance knobs (Turn action), Slot Volume faders (Slide action) Mixer: channel knobs, channel faders, and crossfader TRAKTOR KONTROL D2 Deck Unit: FX and Performance knobs (Turn action), Slot Volume faders (Slide action) For these control elements, the Type... -
Page 324: Assignments For Digital Encoders
Reference MIDI Message Parameters Type menu offers the following entries: Note, Control Change, Poly Pressure (default set- ting), Channel Pressure, Pitchbend (very useful for bending the tuning of sounds by pressure!), and Off. For a general description of these MIDI message types, see ↑25.6.1, MIDI Message Types –... - Page 325 Reference MIDI Message Parameters NI Controller Control elements MASCHINE JAM Control encoder (Turn action) MASCHINE STUDIO Jog wheel (Turn action) MASCHINE MK2 Control encoder (Turn action) MASCHINE MIKRO (MK2) Control encoder (Turn action) TRAKTOR KONTROL X1 Push Encoders (Turn action) TRAKTOR KONTROL X1 MK2 Push Encoders (Turn action) TRAKTOR KONTROL F1...
- Page 326 Reference MIDI Message Parameters If the values set in the Range From Range To fields are equal, they turn red to indi- cate a possible mistake when entering the values! ▪ A numeric field Step defines the increment to add (or to subtract if negative) for each step of control element (it goes from -128 to 127, with 1 as default value).
-
Page 327: Assignments For Analog Encoders
Reference MIDI Message Parameters The appropriate mode mostly depends on the requirements of your target! Please refer to your target’s documentation to know which mode is best suited. Note (Relative) For the type Note (Relative), two Note parameters define the MIDI note numbers triggered when turning the control counter-clockwise and clockwise, respectively (both ranges from MIDI Note C-2 to G8). - Page 328 Reference MIDI Message Parameters For all types except Control Change and the MCU types, you find following parameters: ▪ Two numeric fields labeled Range From define the min and max values of the inter- val, respectively. Both numeric fields go from 0 to 127 (by default, 0 for the min and 127 for the max), except for the type Pitchbend, for which they go from -1.00 to 1.00.
-
Page 329: Assignments For Touch Strips - Position Action
Reference MIDI Message Parameters ▪ Relative (Offset): This mode is similar to the Relative mode explained above, with the differ- ence that here the values sent for the “+1” and “-1” messages are 65 and 63, respectively — in other terms, they are centered around 64 instead of 0. This is well suited for some particular software implementations. - Page 330 Reference MIDI Message Parameters The assignments described in this section are valid for the Position action of the Touch Strip(s) available on the TRAKTOR KONTROL devices (X1 MK2, S5, S8, and D2) and on the MASCHINE JAM controller. The Touch Strips available on the KOMPLETE KON- TROL S-SERIES have different assignment parameters which are described in section ↑25.6.10, Assignments for Touch Strips (KOMPLETE KONTROL S-SERIES).
- Page 331 Reference MIDI Message Parameters LED Mode menu allows you to adjust how the LEDs should represent the MIDI value, inde- pendently of its origin (this is set via the LED On menu described above). Depending on the NI device, following LED modes are available: LED Mode Menu –...
- Page 332 Reference MIDI Message Parameters LED Mode Menu – MASCHINE JAM The current value is represented by a single LED. Receiving a MIDI value of 0 will result in the bottom LED being illuminated, whereas a MIDI value of 127 would result in the topmost LED being illuminated. A MIDI value of 64 would result in the center LED being illuminated.
-
Page 333: Assignments For Touch Strips (Komplete Kontrol S-Series)
Reference MIDI Message Parameters Color Value Menu (MASCHINE JAM only) Color Value menu. For the MASCHINE JAM controller, a Color Value menu allows you to choose the color of the LED chain from the seventeen (sixteen colors + white) available in the picker. See also 2 MIDI Message Types –... - Page 334 Reference MIDI Message Parameters If the values set in the Range From Range To fields are equal, they turn red to indi- cate a possible mistake when entering the values! For a general description of these MIDI message types, see ↑25.6.1, MIDI Message Types –...
- Page 335 Reference MIDI Message Parameters ▪ Ball: This mode simulates a ball (the current MIDI value) that would be attracted by the gravity of your finger. If you put your finger at a particular location on the strip, the ball will move from its current position towards your finger.
-
Page 336: 25.6.11 Assignments For Led Chains And 7-Segment Displays
Reference MIDI Message Parameters LED Controls and Visual Feedback The LED chain next to the Touch Strip provides an intuitive visual feedback for each of the behaviors described above. Depending on the mode selected for the Touch Strip, its LED chain can be further adjusted via the Display LED Mode... - Page 337 Reference MIDI Message Parameters The LED chains and 7-segment displays don’t send any MIDI message, but are used for dis- playing MIDI values instead: the Assign pane allows you to define the MIDI message they should react to. For these control elements, the Type menu offers the following entries: Note, Control Change, and Off.
- Page 338 Reference MIDI Message Parameters LED Mode menu allows you to adjust how the LEDs should represent the MIDI value, inde- pendently of its origin (this is set via the LED On menu described above). Following LED modes are available: LED Mode Menu The current value is represented by a single LED.