
Related Manuals for Costway HW67778


Summary of Contents for Costway HW67778
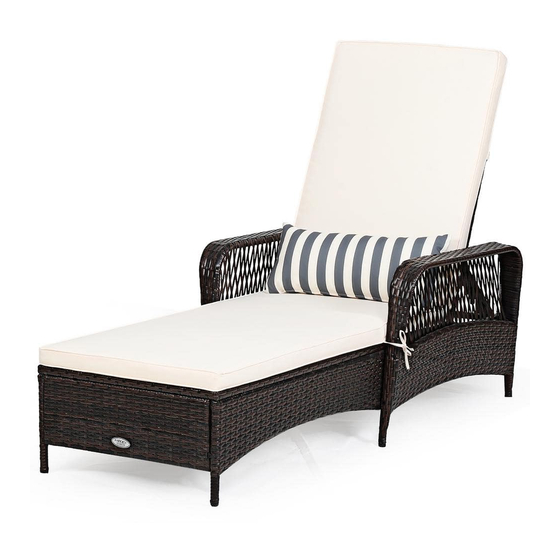
- Page 1 USER’S MANUAL Rattan Sun Lounger HW67778 THIS INSTRUCTION BOOKLET CONTAINS IMPORTANT SAFETY INFORMATION. PLEASE READ AND KEEP FOR FUTURE REFERENCE.
- Page 2 Contact our friendly customer service department for help first. Read each step carefully before starting. It is very important to ensure each step followed in correct order, otherwise assembly difficulties may occur. Most of board parts are labeled or stamped on the raw edges. Have a check to make sure all parts are included.
- Page 3 Notice: 1. 50% Tighten before fixing all screws, Allen wrench is recommended instead of an electric drill. 2. Place the item on a flat ground to adjust and make sure it remains stable 3. Tighten up all screws with tools gradually. 4.
- Page 4 Part & Hardware List Right Frame (1pc) Left Frame (1pc) Side Right Frame (1pc) Side Left Frame (1pc) Front Frame (1pc) Seat Frame (1pc) Right Arm (1pc) Back Frame (1pc) Back side Frame (1pc) Left Arm (1pc) Seat Cushion (1pc) Pillow (1pc) Bolt M6 x 20 mm (2 pcs) Bolt M6 x 30 mm (12 pcs)
- Page 5 STEP 2 STEP 1 Connect Left Frame (B) & Side Left Frame (D) Connect Right Frame (A) & Side Right Frame (C) with Bolt (2) & Washers (5) with Bolt (2) & Washers (5) STEP 3 Connect part from STEP 1 & Front Frame (E) & Back side Frame (G) with Bolt (2) & Washers (5)
- Page 6 STEP 4 Connect part from STEP 2 & STEP 3 with Bolt (2) & Washers (5) STEP 5 Connect part from STEP 4 & Seat Frame (F) with Bolt (2), (3) & Washers (5)
- Page 7 STEP 6 Connect part from STEP 5 & Back Frame (H) with Bolt (1) & Washers (5) STEP 7 Connect part from STEP 6 & Left Arm (J) with Bolt (2), (3), (4) & Washers (5)
- Page 8 STEP 8 Connect part from STEP 7 & Right Arm (I) with Bolt (2), (3), (4) & Washers (5) STEP 9 Backrest tilt angle can be adjusted...
- Page 9 STEP 10 Put on Seat Cushion (K) & Pillow (L) to Complete Sun lounger STEP 11 FINISH...