Table of Contents
Advertisement
Quick Links
Advertisement
Table of Contents

Related Manuals for Optoma DLP ZU1900


Summary of Contents for Optoma DLP ZU1900
- Page 1 Projector ®...
-
Page 2: Table Of Contents
TABLE OF CONTENTS SAFETY ....................5 Important safety instructions...................... 5 Light Intensity Hazard Distance ....................6 Laser radiation safety information ..................... 6 Product safety labels ......................... 7 Light beam related safety labels ................... 7 Copyright ........................... 8 Disclaimer ..........................8 Trademark recognition ....................... - Page 3 Contrast ..........................48 Sharpness ........................... 48 Gamma ..........................48 Dynamic Contrast ........................ 49 Color Settings ........................49 Wall Color ..........................50 3D Setup ..........................50 Save to User ........................52 Apply to User ........................52 Reset ........................... 52 Display menu ..........................53 Aspect Ratio ........................
- Page 4 Image size and projection distance ..................95 Projector dimensions and ceiling mount installation ..............98 IR remote codes ........................99 Troubleshooting ........................101 LED status indicators....................... 102 Specifications .......................... 103 Optoma global offices ......................119 RS232 protocol function list English...
-
Page 5: Safety
‡ Do not attempt to service the unit yourself. Opening or removing covers may expose you to dangerous voltages or other hazards. Please call Optoma before you send the unit for repair. ‡ See projector enclosure for safety related markings. -
Page 6: Light Intensity Hazard Distance
‡ Disconnect the power plug from the AC outlet if the product will not be used for a long period of time. ‡ Do not setup the projector in places where it might be subjected to vibration or shock. ‡ Do not touch the lens with bare hands. -
Page 7: Product Safety Labels
Additional warning against eye exposure for close exposures less than 1 m. FDA laser variance (US projectors only) Optoma Technology Inc. 47697 Westinghouse Drive, Fremont, CA 94539, USA This product complies with performance standards for laser products under 21 CFR Part 1040 except with respect to those... -
Page 8: Copyright
Copyright This publication, including all photographs, illustrations and software, is protected under international copyright laws, with all rights reserved. Neither this manual, nor any of the material contained herein, may be reproduced without written consent of the author. © Copyright 2021 Disclaimer The information in this document is subject to change without notice. -
Page 9: Declaration Of Conformity For Eu Countries
Declaration of conformity for EU countries ‡ EMC Directive 2014/30/EU (including amendments) ‡ Low Voltage Directive 2014/35/EU ‡ Radio Equipment Directive 2014/53/EU (if product has RF function) ‡ RoHS Directive 2011/65/EU WEEE Disposal instructions Do not throw this electronic device into the trash when discarding. To minimize pollution and ensure utmost protection of the global environment, please recycle it. -
Page 10: Introduction
(**) For European warranty Information, please visit www.optoma.com. Please scan the OPAM warranty QR code or visit the following URL: https://www.optoma.com/us/support/warranty-and-return-policy/ Please scan the QR code or visit the following URL: https://www.optoma.com/support/download Optional accessories Optional lens A11 Optional lens A18... -
Page 11: Product Overview
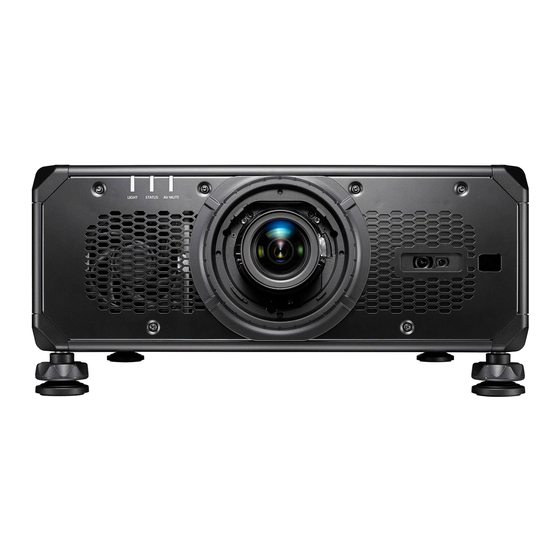
INTRODUCTION Product overview Front view Item Item Status LED Front IR sensor Cooling air vents (intake) Camera window Projection lens Adjustment feet Rear view Item Item Top IR sensor Power switch Cooling air vents (exhaust) Fuse Kensington lock AC input (C20 inlets) English... - Page 12 INTRODUCTION Bottom view Item Security bar English...
- Page 13 INTRODUCTION Side view REMOTE IN REMOTE OUT Item Item Cooling air vents (intake) Built-in keypad Input/Output (I/O) panel Note: Do not block projector intake or outlet air vents. English...
-
Page 14: Connections
INTRODUCTION Connections Side I/O panel REMOTE IN REMOTE OUT Item Item ETHERNET 10. HDBaseT 11. DISPLAYPORT 12. HDMI-1 IN RS232-IN 13. HDMI-2 IN RS232-OUT 14. HDMI OUT 3D SYNC IN 15. VGA-IN 3D SYNC OUT 16. DVI-D REMOTE IN 17. 3G-SDI OUT REMOTE OUT 18. -
Page 15: Keypad
INTRODUCTION Keypad Item Item Power key MENU SHUTTER ENTER AUTO EXIT Arrow keys 10. ZOOM INPUT 11. LENS FOCUS English... -
Page 16: Remote Control
INTRODUCTION Remote control Item Item Item Power On Bright. (brightness) 17. ID Number Keys 10. Left Shift (horizontal) 18. Input Info 11. Left Shift (vertical) 19. Exit Auto 12. Keystone (horizontal) 20. Pattern Enter 13. Keystone (vertical) 21. Contr. (Contrast) Arrow Keys 14. -
Page 17: Setup And Installation
SETUP AND INSTALLATION Installing the projection lens Before setting up the projector, install the projection lens in to the projector. IMPORTANT! ‡ Before installing or replacing the lens, make sure the projector’s power switch is turned off. ‡ During lens installation, do not adjust the lens shift, zoom, or focus either using the remote control or the projector keypad. -
Page 18: Adjusting The Projector Position
SETUP AND INSTALLATION Adjusting the projector position When you select a position for the projector, consider the size and shape of your screen, the location of your power outlets, and the distance between the projector and the rest of your equipment. Follow these general guidelines: ‡... -
Page 19: Hanging Application
SETUP AND INSTALLATION ‡ Allowing proper space around the projector is critical for air circulation and cooling. For 360° installations and multiple projectors, make sure to leave at least 600mm (23.6”) space around the air intakes and outlet of the projector. Air Inlet Air Outlet 600 mm / 23.6 inches... -
Page 20: Boresight Adjustment
SETUP AND INSTALLATION Boresight adjustment Only apply a boresight adjustment in case the overall focus of the projected image is not equally sharp. The boresight adjustment helps to balance the tilt of the lens mount to sharpen the unfocused sections of the image. It tilts the lens holder to parallel the lens plane and the DMD plane. - Page 21 SETUP AND INSTALLATION Use the L-shape screwdriver to adjust the three boresight screws. Zoom the lens to its widest opening. Adjust the focus control to search for the best sharpness of the projected image. Zone A/C boresight adjustment. If zone A is in focus on the screen, please check the focal plane of zone C. ‡...
- Page 22 SETUP AND INSTALLATION Zone D/E boresight adjustment. If zone E is in focus on the screen, please check the focal plane of zone D. ‡ If clear position is just on the screen then no need to adjust. ‡ If clear position is out of the screen (close to the projector), rotate screw CCW and then screw &...
- Page 23 SETUP AND INSTALLATION After the above adjustment of the viewing axis, the projected image from zone A to zone I still cannot achieve a clear focus on the screen. Please remove the PJ-lens then turn the boresight screws counterclockwise to the end (STOP), and then turn clockwise 2 circles to the design value position. Repeat steps 2 to 6 above to adjust.
-
Page 24: Connecting Sources To The Projector
SETUP AND INSTALLATION Connecting sources to the projector REMOTE IN REMOTE OUT Item Item RJ-45 Cable 10. Power Cord USB Power Cable 11. 3G-SDI Cable HDMI Dongle 12. 3G-SDI Cable 12V Trigger Cable 13. DVI-D Cable RS-232 Cable 14. VGA Cable RS-232 Cable 15. -
Page 25: Adjusting The Projector Image
SETUP AND INSTALLATION RS232 Pin assignments Pin No. Signal Pin No. Signal Adjusting the projector image Image height The projector is equipped with adjustable feet to change the image height. Locate the adjustable foot you wish to adjust on the underside of the projector. Rotate the adjustable foot clockwise or counterclockwise to raise or lower the projector. -
Page 26: Remote Setup
SETUP AND INSTALLATION Remote setup Installing / replacing the batteries Two AAA size batteries are supplied for the remote control. Remove the battery cover on the back of the remote control. Insert AAA batteries in the battery compartment as illustrated. Replace back cover on remote control. - Page 27 SETUP AND INSTALLATION Effective range The Infra-Red (IR) remote control sensors are located on the front and top sides of the projector. To have the remote control function correctly, be sure to hold the remote control at an angle of ±30° horizontally or angle of ±20°...
- Page 28 SETUP AND INSTALLATION Wired remote Remote In connector is designed to work with Wired Remote or IR Keypad with longer range and provides fast, easy set-up and reliable individual control of a specific projector. Remote Out connector sends the IR control signal to the next projector when using multiple projectors.
-
Page 29: Using The Projector
USING THE PROJECTOR Powering on / off the projector Powering on Securely connect the AC power cord and signal/source cable to the projector. Set the power switch to the “I“ (ON) position and wait until the power button “ ” on the projector keypad is solid orange. -
Page 30: Selecting An Input Source
USING THE PROJECTOR Powering off Turn off the projector by pressing the power button “ ” on the projector keypad or the OFF button “ ” on the remote control. A message will pop up to confirm that you want to turn off the projector. Press the power button or the OFF button again to confirm, otherwise the warning message disappears after 10 seconds and the projector remains on. -
Page 31: Menu Navigation And Features
USING THE PROJECTOR Menu navigation and features The projector has multilingual on-screen display (OSD) menus that allow you to make image adjustments and change a variety of settings. To open the OSD menu, press the Menu key on the remote control or projector keypad. To select a main menu or submenu, use the p and q buttons to highlight it. -
Page 32: Osd Menu Tree
USING THE PROJECTOR OSD menu tree Main Menu Sub Menu 2 Sub Menu 3 Sub Menu 4 Sub Menu 5 Sub Menu 6 Values Image Picture Mode Presentation Bright Super Bright (depends on model) Cinema sRGB DICOM SIM. Blending 2D High Speed User Dynamic Range HDR Auto... - Page 33 USING THE PROJECTOR Main Menu Sub Menu 2 Sub Menu 3 Sub Menu 4 Sub Menu 5 Sub Menu 6 Values Image Color Settings Color 0~100 Tint 0~100 Color Temperature Warm Standard Cool White Balance Red Gain 0-100 Green Gain 0-100 Blue Gain 0-100...
- Page 34 USING THE PROJECTOR Main Menu Sub Menu 2 Sub Menu 3 Sub Menu 4 Sub Menu 5 Sub Menu 6 Values Image Wall Color Blackboard Light Yellow Light Green Light Blue Pink Gray 3D Setup 3D Mode Active 3D Passive 3D 3D Format Auto Frame Packing...
- Page 35 USING THE PROJECTOR Main Menu Sub Menu 2 Sub Menu 3 Sub Menu 4 Sub Menu 5 Sub Menu 6 Values Display Aspect Ratio Auto 16:9 16:10 Native Digital Zoom Proportional Horizontal 50%~400% Vertical 50%~400% Horizontal Shift 0~100 Vertical Shift 0~100 Reset Yes / Cancel (Dialog box)
- Page 36 USING THE PROJECTOR Main Menu Sub Menu 2 Sub Menu 3 Sub Menu 4 Sub Menu 5 Sub Menu 6 Values Display Geometric Advanced Warp Black Level Area Bottom Correction Enable Edit Area Add Point Remove Point Brightness Brightness 0~255 Green 0~255 Blue...
- Page 37 USING THE PROJECTOR Main Menu Sub Menu 2 Sub Menu 3 Sub Menu 4 Sub Menu 5 Sub Menu 6 Values Display PIP/PBP Screen Main Source HDMI1 HDMI2 DVI-D DisplayPort 3G-SDI HDBaseT Sub Source HDMI1 HDMI2 DVI-D DisplayPort 3G-SDI HDBaseT Swap Size Small...
- Page 38 USING THE PROJECTOR Main Menu Sub Menu 2 Sub Menu 3 Sub Menu 4 Sub Menu 5 Sub Menu 6 Values Input Backup Input Auto Switch Settings Current Signal (read only) First Input HDMI1 HDMI2 HDBaseT DisplayPort Second Input HDMI1 HDMI2 HDBaseT DisplayPort...
- Page 39 USING THE PROJECTOR Main Menu Sub Menu 2 Sub Menu 3 Sub Menu 4 Sub Menu 5 Sub Menu 6 Values Device Language English Setup Deutsch Français Italiano Español Português Polski Nederlands Norsk 繁體中文 簡体中文 日本語 한국어 Русский Magyar ไทย Projection Ceiling Auto...
- Page 40 USING THE PROJECTOR Main Menu Sub Menu 2 Sub Menu 3 Sub Menu 4 Sub Menu 5 Sub Menu 6 Values Device Schedule Monday / Tuesday Schedule Enable Setup / Wednesday / Thursday / Friday / Event 01-16 Time 00:00 ~ 23:59 Saturday / Sunday Function Off / Power Settings / Input...
- Page 41 USING THE PROJECTOR Main Menu Sub Menu 2 Sub Menu 3 Sub Menu 4 Sub Menu 5 Sub Menu 6 Values Device Date and Time Time Zone UTC+06:30 Setup UTC+06:00 UTC+05:45 UTC+05:30 UTC+05:00 UTC+04:30 UTC+04:00 UTC+03:30 UTC+03:00 UTC+02:00 UTC+01:00 UTC+00:00 UTC-01:00 UTC-02:00 UTC-03:00...
- Page 42 USING THE PROJECTOR Main Menu Sub Menu 2 Sub Menu 3 Sub Menu 4 Sub Menu 5 Sub Menu 6 Values Device Shutter Fade-In 0.5~5s Setup Fade-Out 0.5~5s Startup Shutter Off Shutter On Security Security Security Timer Month 0-35 0-29 Hour 0-23 Change Password...
- Page 43 USING THE PROJECTOR Main Menu Sub Menu 2 Sub Menu 3 Sub Menu 4 Sub Menu 5 Sub Menu 6 Values Device Reset Reset OSD Yes / Cancel (Dialog box) Setup Reset to default Yes / Cancel (Dialog box) Reset Selective Image Yes / Cancel (Dialog box) Display...
- Page 44 USING THE PROJECTOR Main Menu Sub Menu 2 Sub Menu 3 Sub Menu 4 Sub Menu 5 Sub Menu 6 Values Communi- Email Email 1 Email 1 Address (read only) cation Notification Email 2 Email 1 Address (read only) Event Fan Error Off/Email Power On/Off...
- Page 45 USING THE PROJECTOR Main Menu Sub Menu 2 Sub Menu 3 Sub Menu 4 Sub Menu 5 Sub Menu 6 Values Communi- Baud Rate Serial Port Out 57600 cation 115200 Reset Yes / Cancel (Dialog box) Information Device Regulatory Serial Number Projection Hours System Status Standby Mode...
- Page 46 USING THE PROJECTOR Main Menu Sub Menu 2 Sub Menu 3 Sub Menu 4 Sub Menu 5 Sub Menu 6 Values Information Backup Input Current Signal Backup Input Status Backup Input Change First Input Resolution Horz Refresh Color Space Second Input Resolution Horz Refresh Color Space...
-
Page 47: Image Menu
USING THE PROJECTOR Image menu Learn how to configure image settings. Submenus ‡ Picture Mode ‡ Dynamic Range ‡ Brightness ‡ Contrast ‡ Sharpness ‡ Gamma ‡ Dynamic Contrast ‡ Color Settings ‡ Wall Color ‡ 3D Setup Picture Mode Picture Mode menu provides various functions to optimize the projected image to achieve the best image quality in all kinds of surroundings, in consideration of factors such as input source, screen color, and ambient lighting. -
Page 48: Dynamic Range
USING THE PROJECTOR User Image settings saved by the user. Dynamic Range Configure the HDR setting and its effect when displaying video from 4K Blu-ray players and streaming devices. Enable or disable HDR processing. HDR Picture Mode ‡ Bright: Select this mode for more saturated colors. ‡... -
Page 49: Dynamic Contrast
USING THE PROJECTOR Dynamic Contrast Set up Dynamic Contrast to maximize the contrast for dark content. Dynamic Black Enable this function to automatically adjust the contrast ratio for video sources. It improves the black level in dark scenes by reducing the light output. ‡... -
Page 50: Wall Color
USING THE PROJECTOR White Balance Adjust the white balance of the projected image via gain and offset. Gain and offset are individual controls for each RGB channels used to set greyscale. The Gains calibrate the color of the dark parts and Bias calibrate the white parts. - Page 51 USING THE PROJECTOR 3D Tech Select a proper 3D technology according to how the 3D sync signal is processed. ‡ DLP-Link: Select DLP-Link when the 3D sync signal is generated by the DLP Link technology built into the projector. DLP Link works only with the glasses that are compatible with DLP 3D technology and the 3D function is enabled ‡...
-
Page 52: Save To User
USING THE PROJECTOR If neither of the two methods described above solved the problem, please use another 3D IR emitter/3D RF emitter or try any of the following two methods. ‡ Use a wired remote-in cable for the IR control. REMOTE IN REMOTE OUT ‡... -
Page 53: Display Menu
USING THE PROJECTOR Display menu Learn how to configure the settings to properly project images according to your installation circumstances. Submenus ‡ Aspect Ratio ‡ Digital Zoom ‡ Image Shift ‡ Geometric Correction ‡ Edge Mask ‡ Freeze Screen ‡ Test Pattern ‡... -
Page 54: Geometric Correction
USING THE PROJECTOR Geometric Correction Configure the geometric settings to reshape the image for different projection surfaces. Warp Control Configure warp settings. Select between Basic, Advanced, and AP. ‡ Basic: Configure keystone, pincushion, 4-corner settings. ‡ Advanced: Set the grid color and grid background, as well as configure warp and blend settings. ‡... - Page 55 USING THE PROJECTOR ‡ 4-Corner: Reshape the image by moving the 4 corners of the image to have it fit a specific projection surface. Advanced Warp Configure advanced warp settings. Grid Color: Select a grid color for warp and blend pattern between Green, Magenta, Red, and Cyan. ‡...
-
Page 56: Edge Mask
USING THE PROJECTOR Note: After adding or removing a control point, press Enter to move to the next point counterclockwise. ± Brightness: Adjust the brightness of the selected area. ± Red/Green/Blue: Adjust each color individually of the selected area. Reset: Reset the black level to factory default values either on the Bottom or on the Top area or ±... -
Page 57: Reset
USING THE PROJECTOR Location Adjust the location of the sub image. In the layout chart below, the “P” indicates the main image: ‡ PBP Layout PBP Layout PBP, Main Left PBP, Main Right PBP, Main Top PBP, Main Bottom ‡ PIP Layout PIP Size PIP Layout... -
Page 58: Input Settings Menu
USING THE PROJECTOR Input Settings menu Learn how to configure the projector input settings. Submenus ‡ Auto Source ‡ Active Inputs ‡ Latency Adjustment ‡ Backup Input ‡ ‡ HDMI ‡ HDBaseT Auto Source When Auto Source is enabled, the projector automatically detects and selects the input signal. Once an input source is selected, press the Input button on the remote control or keypad to switch to other available sources. -
Page 59: Vga
USING THE PROJECTOR Backup Input Status Display the function status. The Backup Input Status is active when meeting the following conditions: ‡ Auto Switch is checked. ‡ The two sources are with the same timing specification. ‡ The two sources are active. ‡... -
Page 60: Device Setup Menu
USING THE PROJECTOR Device Setup menu Learn how to configure the system settings for the projector. Submenus ‡ Language ‡ Projection ‡ Lens Settings ‡ Auto Image Setup ‡ Schedule ‡ Date and Time ‡ Power Settings ‡ Light Source Settings ‡... -
Page 61: Active Image Setup
USING THE PROJECTOR Note: A11 floating ring ‡ For better optical performance, manually adjust the floating ring before adjusting Zoom & Focus. ‡ Floating ring’s label scale shows the projection distance. ‡ The projection distance is from the projector lens to the screen. For example, if the distance between the screen and the projector lens is 2.1m, adjust the floating ring scale to “2.10”... -
Page 62: Schedule
The functions in the Active Image Setup menu are available for the projections from 100” to 300” and imaging range needs to cover the entire projection screen. It is recommended to use the Optoma Visual Suite software for seamless setups and calibration. ‡... - Page 63 USING THE PROJECTOR Event 01 Monday Time 08:00 Schedule Enable Event Power Settings 08:00 Power On 08:01 HDMI 1 Reset 08:01 Normal Mode Power On - - : - - - - - - - - - - - - - - - : - - - - - - - - - - - - - Standby (0.5W)
-
Page 64: Date And Time
USING THE PROJECTOR ‡ Copy Events To: Copy the events setup for the day to another day. Monday Tuesday Schedule Enable Schedule Enable 08:00 Power On 08:00 Power On 08:01 HDMI 1 08:01 HDMI 1 08:01 Normal Mode 08:01 Normal Mode - - : - - - - - - -- - - - - - - - : - -... -
Page 65: Power Settings
USING THE PROJECTOR Power Settings Configure the projector’s power settings. Power Mode (Standby) Setup the projector’s standby mode. ‡ Eco: Minimum power consumption (< 0.5 Watt) which does not allow network control. ‡ Active: Low power consumption (< 2 Watt) which allows the LAN module to enter sleep mode and supports to be woken by Wake on LAN (WoL). -
Page 66: Shutter
USING THE PROJECTOR Shutter Set up the shutter behavior. Fade-In This function allows the fading-in effect when turning off the shutter. The length of the fading effect can be adjusted from 0s to 5s. Fade-Out This function allows the fading-out effect when turning on the shutter. The length of the fading effect can be adjusted from 0s to 5s. -
Page 67: Logo Setup
USING THE PROJECTOR Logo Setup Set up the logo for the startup screen. Change Logo Change the logo for the startup screen. Apart from the Default logo, user can select from Neutral, User Logo, and Captured Logo. ‡ Default: The projector default logo. ‡... -
Page 68: Communication Menu
USING THE PROJECTOR Communication menu Communication menu is used to configure the settings that allow the projector to communicate with other projectors or control devices. Submenus ‡ Projector ID ‡ Remote Setup ‡ Network Setup ‡ Email Notification ‡ Control ‡... -
Page 69: Network Setup
USING THE PROJECTOR Network Setup Configure the projector’s network settings. LAN Interface To avoid clash, specify the LAN interface to RJ-45 or HDBaseT. MAC Address Display the MAC address. (Read only) Network Status Display the network connection status. (Read only) DHCP Turn on DHCP to automatically acquire IP address, subnet mask, gateway, and DNS. -
Page 70: Baud Rate
Control the projector with web browser. (Port: 80) For more information, refer to “Using the web control panel” on page 71. Optoma Management Suite (OMS) Control the projector with OMS. For more information, please visit https://www.optoma.com. Reset Reset the control functions to default factory values. Projector... -
Page 71: Using The Web Control Panel
USING THE PROJECTOR Using the web control panel The Web control panel allows the user to configure various projector settings using a web browser from any personal computer or mobile devices. System Requirements To use the web control panel, make sure your devices and software meet the minimum system requirements. ‡... - Page 72 USING THE PROJECTOR Accessing the web control panel When network is available, connect the projector and the computer to the same network. Use the projector address as the web URL to open the web control panel in a browser. Check the projector address using the OSD menu. ‡...
-
Page 73: Using Rs232 Command By Telnet
USING THE PROJECTOR Using RS232 command by Telnet This projector supports using RS232 commands through Telnet connection. Set up a direct connection between the projector and computer. Refer to Directly connect the projector to a computer on page 72. Disable the firewall on the computer. Open the command dialogue on the computer. -
Page 74: Additional Information
ADDITIONAL INFORMATION Compatible resolutions Timing table Signal Signal Type Resolution Aspect Ratio V Sync (Hz) Format YPbPr 640 x 350 16:10 640 x 400 1.33 640 x 480 720 x 400 800 x 600 1.33 SVGA 832 x 624 1.33 848 x 480 1024 x 768 1.33... - Page 75 ADDITIONAL INFORMATION Signal Signal Type Resolution Aspect Ratio V Sync (Hz) Format YPbPr WUXGA RB 1920 x 1200RB 16:10 2560 x 1440RB 1.78 16:9 SDTV (480i) 720 x 480 59.94 SDTV (480i) 720 x 480 SDTV (576i) 720 x 576 1.25 EDTV (480p) 720 x 480...
- Page 76 ADDITIONAL INFORMATION Signal Signal Type Resolution Aspect Ratio V Sync (Hz) Format YPbPr Frame Packing 1280 x 720 1.78 16:9 59.94 (720p) Side by Side 1920 x 1080 1.78 16:9 59.94 (1080i) Side by Side 1920 x 1080 1.78 16:9 (1080p) Mandatory 3D 59.9...
- Page 77 ADDITIONAL INFORMATION HDMI 1/HDMI 2 Signal Aspect V Sync YCbCr Signal Type Resolution YCbCr 4:4:4 Format Ratio (Hz) 4:2:2 8 bit 10 bit 12 bit 8 bit 10 bit 12 bit 8 bit 640 x 350 16:10 640 x 400 1.33 640 x 480 720 x 400...
- Page 78 ADDITIONAL INFORMATION HDMI 1/HDMI 2 Signal Aspect V Sync YCbCr Signal Type Resolution YCbCr 4:4:4 Format Ratio (Hz) 4:2:2 8 bit 10 bit 12 bit 8 bit 10 bit 12 bit 8 bit 2560 x 1440RB 1.78 16:9 SDTV (480i) 720 x 480 59.94 SDTV (480i)
- Page 79 ADDITIONAL INFORMATION HDMI 1/HDMI 2 Signal Aspect V Sync YCbCr Signal Type Resolution YCbCr 4:4:4 Format Ratio (Hz) 4:2:2 8 bit 10 bit 12 bit 8 bit 10 bit 12 bit 8 bit Frame Packing 1280 x 720 1.78 16:9 59.94 (720p) Side by Side...
- Page 80 ADDITIONAL INFORMATION Signal Aspect V Sync YCbCr Signal Type Resolution YCbCr 4:4:4 Format Ratio (Hz) 4:2:2 8 bit 10 bit 12 bit 8 bit 10 bit 12 bit 8 bit 640 x 350 16:10 640 x 400 1.33 640 x 480 720 x 400 800 x 600 1.33...
- Page 81 ADDITIONAL INFORMATION Signal Aspect V Sync YCbCr Signal Type Resolution YCbCr 4:4:4 Format Ratio (Hz) 4:2:2 8 bit 10 bit 12 bit 8 bit 10 bit 12 bit 8 bit 2560 x 1440RB 1.78 16:9 SDTV (480i) 720 x 480 59.94 SDTV (480i) 720 x 480...
- Page 82 ADDITIONAL INFORMATION Signal Aspect V Sync YCbCr Signal Type Resolution YCbCr 4:4:4 Format Ratio (Hz) 4:2:2 8 bit 10 bit 12 bit 8 bit 10 bit 12 bit 8 bit Frame Packing 1280 x 720 1.78 16:9 59.94 (720p) Side by Side 1920 x 1080 1.78 16:9...
- Page 83 ADDITIONAL INFORMATION 3G-SDI Signal Type Signal Format Resolution Aspect Ratio V Sync (Hz) YCbCr 4:2:2 10 bit 640 x 350 16:10 640 x 400 1.33 640 x 480 720 x 400 800 x 600 1.33 SVGA 832 x 624 1.33 848 x 480 1024 x 768 1.33...
- Page 84 ADDITIONAL INFORMATION 3G-SDI Signal Type Signal Format Resolution Aspect Ratio V Sync (Hz) YCbCr 4:2:2 10 bit SDTV (480i) 720 x 480 59.94 SDTV (480i) 720 x 480 SDTV (576i) 720 x 576 1.25 EDTV (480p) 720 x 480 59.94 EDTV (480p) 720 x 480 EDTV (576p)
- Page 85 ADDITIONAL INFORMATION 3G-SDI Signal Type Signal Format Resolution Aspect Ratio V Sync (Hz) YCbCr 4:2:2 10 bit Frame Packing 1280 x 720 1.78 16:9 59.94 (720p) Side by Side 1920 x 1080 1.78 16:9 59.94 (1080i) Side by Side 1920 x 1080 1.78 16:9 (1080p)
- Page 86 ADDITIONAL INFORMATION HDBaseT Signal Aspect YCbCr Signal Type Resolution Sync YCbCr 4:4:4 Format Ratio 4:2:2 (Hz) 8 bit 10 bit 12 bit 8 bit 10 bit 12 bit 8 bit 640 x 350 16:10 640 x 400 1.33 640 x 480 720 x 400 800 x 600 1.33...
- Page 87 ADDITIONAL INFORMATION HDBaseT Signal Aspect YCbCr Signal Type Resolution Sync YCbCr 4:4:4 Format Ratio 4:2:2 (Hz) 8 bit 10 bit 12 bit 8 bit 10 bit 12 bit 8 bit 2560 x 1440RB 1.78 16:9 SDTV (480i) 720 x 480 59.94 SDTV (480i) 720 x 480...
- Page 88 ADDITIONAL INFORMATION HDBaseT Signal Aspect YCbCr Signal Type Resolution Sync YCbCr 4:4:4 Format Ratio 4:2:2 (Hz) 8 bit 10 bit 12 bit 8 bit 10 bit 12 bit 8 bit Frame Packing 1280 x 720 1.78 16:9 59.94 (720p) Side by Side 1920 x 1080 1.78 16:9...
- Page 89 ADDITIONAL INFORMATION DisplayPort Signal Aspect V Sync YCbCr Signal Type Resolution YCbCr 4:4:4 Format Ratio (Hz) 4:2:2 8 bit 10 bit 12 bit 8 bit 10 bit 12 bit 8 bit 640 x 350 16:10 640 x 400 1.33 640 x 480 720 x 400 800 x 600 1.33...
- Page 90 ADDITIONAL INFORMATION DisplayPort Signal Aspect V Sync YCbCr Signal Type Resolution YCbCr 4:4:4 Format Ratio (Hz) 4:2:2 8 bit 10 bit 12 bit 8 bit 10 bit 12 bit 8 bit 2560 x 1.78 16:9 1440RB SDTV (480i) 720 x 480 59.94 SDTV (480i) 720 x 480...
- Page 91 ADDITIONAL INFORMATION DisplayPort Signal Aspect V Sync YCbCr Signal Type Resolution YCbCr 4:4:4 Format Ratio (Hz) 4:2:2 8 bit 10 bit 12 bit 8 bit 10 bit 12 bit 8 bit 23.98 Frame Packing 1920 x 1080 1.78 16:9 (1080p) Frame Packing 1280 x 720 1.78...
- Page 92 ADDITIONAL INFORMATION EDID table Established Timing: Standard Timing: Detail Timing: 720 x 400 @70Hz 1440 900 @75Hz 1920 1200 @59Hz 400 @88Hz 1280 800 @75Hz 1920 1080 @60Hz 480 @60Hz 1280 1024 @60Hz 480 @67Hz 1360 765 @60Hz 480 @72Hz 1440 900 @60Hz 480 @75Hz...
- Page 93 ADDITIONAL INFORMATION HDMI 1.4 Established Timing: Standard Timing: Detail Timing: 720 x 400 @70Hz 1024 768 @120Hz 1920 1200 @59Hz 400 @88Hz 1280 800 @75Hz 1920 1080 @60Hz 480 @60Hz 1280 1024 @60Hz 480 @60Hz 480 @67Hz 1360 765 @60Hz 480 @60Hz 480 @72Hz 600 @120Hz...
- Page 94 ADDITIONAL INFORMATION HDMI 2.0 Established Timing: Standard Timing: Detail Timing: 720 x 400 @70Hz 1024 768 @120Hz 1920 1200 @59Hz 400 @88Hz 1280 800 @75Hz 1920 1080 @60Hz 480 @60Hz 1280 1024 @60Hz 480 @60Hz 480 @67Hz 1360 765 @60Hz 480 @60Hz 480 @72Hz 600 @120Hz...
-
Page 95: Image Size And Projection Distance
ADDITIONAL INFORMATION Image size and projection distance Platform WUXGA (16:10) 0.96” Projection Lens Throw Ratio Spec.(Wide/Tele) 0.65 0.75 0.84 1.02 1.02 1.36 1.50 2.00 2.00 4.00 4.00 7.20 10.8 Zoom Ratio 1.15x 1.2x 1.33x 1.25x 1.33x 1.8x 1.5x Throw Distance 0.67 16.51 0.90... - Page 96 ADDITIONAL INFORMATION Projection distance The distance between the projector and its screen determines the approximate size of the image. The farther the projector is from the screen, the larger the projected image will be. The image size also varies depending on the aspect ratio, zoom and other settings.
- Page 97 ADDITIONAL INFORMATION Optical Lens Shift Range Mechanical Shift Range Projection Lens ∆Ho ∆Vo Max. of ∆Hm Max. of ∆Vm A20, A21, A22, A23, A27 120% 120% lmage circle V: Height of the projected image H: Width of the projected image ∆V ∆V Projected image...
-
Page 98: Projector Dimensions And Ceiling Mount Installation
ADDITIONAL INFORMATION Projector dimensions and ceiling mount installation If you wish to use a third party ceiling mount kit, please ensure the screws used to attach a mount to the projector meet the following specifications: ‡ Screw type: M8*1.25P x4 ‡... -
Page 99: Ir Remote Codes
ADDITIONAL INFORMATION IR remote codes Address Data Repeat Key Legend Description Format Position Byte 1 Byte 2 Byte 3 Byte 4 Press to turn on the projector. ON ( Press to turn off the projector. OFF ( Use as numeric keypad number “1”. Use as numeric keypad number “2”. - Page 100 ADDITIONAL INFORMATION Address Data Repeat Key Legend Description Format Position Byte 1 Byte 2 Byte 3 Byte 4 Use as numeric keypad number “7”. Use as numeric keypad number “8”. Use as numeric keypad number “9”. Press to display source image information. Info ( Use as numeric keypad number “0”.
-
Page 101: Troubleshooting
ADDITIONAL INFORMATION Troubleshooting If you experience a problem with your projector, please refer to the following information. If a problem persists, please contact your local reseller or service center. Image problems No image appears on-screen ‡ Ensure all the cables and power connections are correctly and securely connected as described in the Setup and Installation section. -
Page 102: Led Status Indicators
ADDITIONAL INFORMATION LED status indicators The LED status indicators are located on the rear of the projector. Each LED is defined below. Light Status AV Mute Message Green Orange Green Orange Green Orange Standby State Power on Flashing (Warm up) Power on &... -
Page 103: Specifications
ADDITIONAL INFORMATION Specifications Optical Description Resolution WUXGA (1920 x 1200) Lens Power Zoom/Focus and full lens shift Image size (diagonal) 50”~500” Please refer to “Throw Distance” spec. in “Image size and projection distance” on Projection distance page 95. Electrical Description 2 x HDMI In (version 2.0) (with locking screw) 1 x DisplayPort 1.2a 1 x DVI-D... - Page 104 ADDITIONAL INFORMATION RS232 protocol function list Baud Rate : 115200 (default, depends on user setting) Data Bits: 8 Parity: None 115200 (default, depends on user setting) Stop Bits: 1 Flow Control : None None UART16550 FIFO: Disable None Disable Write Command Projector ID Command Lead Code...
- Page 105 ADDITIONAL INFORMATION Character to HEX table Character Space CR (Enter) e.g. ASCII to HEX RS232 Command RS232 Protocol Function List Main Menu: Image Main Menu: Image Write Command Read Command Command Response Command Response Level 2 Level 3 Level 4 Level 5 Option / Value Step...
- Page 106 ADDITIONAL INFORMATION Main Menu: Image Write Command Read Command Command Response Command Response Level 2 Level 3 Level 4 Level 5 Option / Value Step Pass Set Para. Fail Pass Fail Value Blue Offset 0-100 ~XX29 0~100 White Enhancement 0-10 ~XX34 0~10 Color Space...
- Page 107 ADDITIONAL INFORMATION Main Menu: Display Main Menu: Display Write Command Read Command Command Response Command Response Level 2 Level 3 Level 4 Level 5 Level 6 Option / Value Step Pass Set Para. Fail Pass Fail Value Aspect Ratio Auto ~XX60 ~XX127 ~XX60...
- Page 108 ADDITIONAL INFORMATION Main Menu: Display Write Command Read Command Command Response Command Response Level 2 Level 3 Level 4 Level 5 Level 6 Option / Value Step Pass Set Para. Fail Pass Fail Value Overlap Grid Number ~XX169 ~XX169 ~XX169 ~XX169 ~XX169 Gamma...
- Page 109 ADDITIONAL INFORMATION Main Menu: Display Write Command Read Command Command Response Command Response Level 2 Level 3 Level 4 Level 5 Level 6 Option / Value Step Pass Set Para. Fail Pass Fail Value Test Pattern ~XX195 Green Grid ~XX195 Magenta Grid ~XX195 White Grid...
- Page 110 ADDITIONAL INFORMATION Main Menu:Input Settings Main Menu:Input Settings Write Command Read Command Command Response Command Response Level 2 Level 3 Level 4 Step Option / Value Pass Set Para. Fail Pass Fail Value Auto Source ~XX563 ~XX563 Active Inputs ~XX408 HDMI1 ~XX408 HDMI2...
- Page 111 ADDITIONAL INFORMATION Main Menu:Device Setup Main Menu:Device Setup Write Command Read Command Command Response Command Response Level 2 Level 3 Level 4 Level 5 Option / Value Step Set Para. Fail Pass Fail Pass Value Language English ~XX70 Deutsch ~XX70 Français ~XX70 Italiano...
- Page 112 ADDITIONAL INFORMATION Main Menu:Device Setup Write Command Read Command Command Response Command Response Level 2 Level 3 Level 4 Level 5 Option / Value Step Pass Set Para. Fail Pass Fail Value Event 01-16 Time 00:00 ~ 23:59 Wednesday / ~XX471 dhhmmnnaabb Function...
- Page 113 ADDITIONAL INFORMATION Main Menu:Device Setup Write Command Read Command Command Response Command Response Level 2 Level 3 Level 4 Level 5 Option / Value Step Set Para. Fail Pass Fail Pass Value UTC+07:00 ~XX482 UTC+06:30 ~XX482 UTC+06:00 ~XX482 UTC+05:45 ~XX482 UTC+05:30 ~XX482 UTC+05:00...
- Page 114 ADDITIONAL INFORMATION Main Menu: Communication Main Menu: Communication Write Command Read Command Level 2 Level 3 Level 4 Option / Value Step Command Response Command Response Pass Set Para. Fail Pass Fail Value Projector ID 0-99 ~XX79 00~99 ~XX558 O k 00~99 Remote Remote Code 0-99...
- Page 115 ADDITIONAL INFORMATION Main Menu: Communication Write Command Read Command Level 2 Level 3 Level 4 Option / Value Step Command Response Command Response Pass Set Para. Fail Pass Fail Value Email 1 Address (read only) ~XX443 n@nnnn.nnnn.nnnn Event Fan Error Off/Email ~XX463 Power On/Off...
- Page 116 ADDITIONAL INFORMATION Other RS232 Other RS232 Write Command Read Command Command Response Command Response Level 1 Level 2 Level 3 Set Para. Fail CMD Value Fail Pass Other Items Power Off ~XX00 ~XX124 Power On ~XX00 ~XX124 Re-Sync ~XX01 AV Mute ~XX02 ~XX355 ~XX02...
- Page 117 Level 3 Set Para. Fail CMD Value Fail Pass Red/Warning. About to trigger shutdown ~XX159 Device Type Projector ~XX149 Model Name Optoma SVGA ~XX151 Optoma XGA ~XX151 Optoma WXGA ~XX151 Optoma 1080P ~XX151 Optoma WUXGA ~XX151 Optoma UHD ~XX151 Camera Status...
- Page 118 ADDITIONAL INFORMATION Other RS232 Write Command Read Command Command Response Command Response Level 1 Level 2 Level 3 Set Para. Fail CMD Value Fail Pass Phosphor Wheel Index ~XX529 0000~9999 ~XX531 0000~9999 Remote Control Simulation Power ~XX140 Power Off ~XX140 ~XX140 Left ~XX140...
-
Page 119: Optoma Global Offices
Optoma global offices For service or support, please contact your local office. Japan 東京都足立区綾瀬 3-25-18 Optoma Technology, Inc. 888-289-6786 株式会社オーエス 47697 Westinghouse Drive. 510-897-8601 info@os-worldwide.com コンタク トセンター: Fremont, Ca 94539 services@optoma.com 0120-380-495 www.os-worldwide.com Taiwan Canada Optoma Technology, Inc. 888-289-6786 12F., No.213, Sec. 3, Beixin Rd., +886-2-8911-8600 47697 Westinghouse Drive. - Page 120 www.optoma.com...