Brother P-touch PT-2730 Service Manual
Hide thumbs
Also See for P-touch PT-2730:
- Guía del usuario (96 pages) ,
- User manual (88 pages) ,
- Software installation manual (1 page)
Table of Contents
Advertisement
Quick Links
Advertisement
Table of Contents
Troubleshooting

Related Manuals for Brother P-touch PT-2730


Summary of Contents for Brother P-touch PT-2730
- Page 1 P-touch SERVICE MANUAL MODEL: PT-2730...
- Page 2 PREFACE This publication is a service manual covering the specifications, theory of operation, disassembly/reassembly procedure, and troubleshooting the Brother PT-2730. It is intended for service personnel and other concerned persons to accurately and quickly provide after-sale service for our PT-2730.
-
Page 3: Table Of Contents
CONTENTS CHAPTER I SPECIFICATIONS 1.1 Mechanical Specifications ......................I-1 1.1.1 External Appearance ......................I-1 1.1.2 Keyboard ..........................I-1 1.1.3 Display..........................I-1 1.1.4 Printing Mechanism......................I-2 1.1.5 Tape Cutter ..........................I-2 1.2 Electronics Specifications......................I-7 1.2.1 Character Generator......................I-7 1.2.2 Power Supply........................I-7 1.3 Key Commands for Special Functions ..................I-7 1.3.1 Initializing..........................I-7 CHAPTER II THEORY OF OPERATION 2.1 Main Mechanisms........................ - Page 4 [ 5 ] Installing the LCD Module ASSY, the Main PCB ASSY and the PCB Holder ..III-29 [ 6 ] Installing the Cassette PCB ASSY ................III-32 [ 7 ] Installing the Power PCB ASSY .................. III-34 [ 8 ] Assembling the Cassis ASSY..................III-35 [ 9 ] Installing the Chassis ASSY..................
-
Page 5: Chapter I Specifications
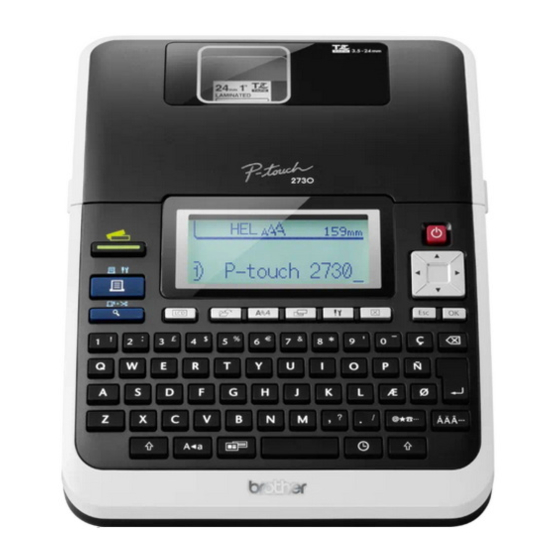
CHAPTER I SPECIFICATIONS 1.1 Mechanical Specifications 1.1.1 External Appearance Unit: mm Figure 1.1-1 External Appearance (1) Dimensions (W x D x H) 177 x 238 x 70 mm (incl. keys, cutter lever and bottom feet) (2) Weight - Machine proper Approx. -
Page 6: Printing Mechanism
1.1.4 Printing Mechanism (1) Print speed 10 mm/second (2) Print head 10 mm/second - Type Thermal print head - Heat generator Consists of 128 heating elements vertically aligned - Size of a heating element 0.18 mm wide by 0.127 mm high (3) Character size Point Character height... - Page 7 PT-2730 USA Figure 1.1-2 Key Arrangement (1) I - 3...
- Page 8 PT-2730 UK Figure 1.1-3 Key Arrangement (2) I - 4...
- Page 9 PT-2730 DEU Figure 1.1-4 Key Arrangement (3) I - 5...
- Page 10 PT-2730 FRA Figure 1.1-5 Key Arrangement (4) I - 6...
-
Page 11: Electronics Specifications
1.2 Electronics Specifications 1.2.1 Character Generator (1) Internal font HELSINKI, BRUSSELS, US, FLORIDA, BELGIUM, SAN DIEGO, LOS ANGELS, CALGARY (2) Text buffer 280 characters (3) File memory 2800 characters 1.2.2 Power Supply (1) Power supply Two types (dry cells, AC adapter) (2) Battery type 8 alkaline dry cells (AA) (3) Service life of batteries... -
Page 12: Chapter Ii Theory Of Operation
CHAPTER II THEORY OF OPERATION 2.1 Main Mechanisms 2.1.1 Roller Holder ASSY Setting & Retracting Mechanism This mechanism consists of the roller release lever, roller holder release rod, and roller holder ASSY. The roller holder ASSY supports the platen roller and the tape feed sub roller so that they can move perpendicularly to the head ASSY and the tape feed roller, respectively, as well as rotating freely. -
Page 13: Tape & Ribbon Feed Mechanism
2.1.2 Tape & Ribbon Feed Mechanism This mechanism consists of the tape feed motor (DC motor), gear train, and roller holder ASSY. ■ Structure of Thermal Head When you load a tape cassette and close the cassette cover, the tape feed roller inside the cassette and the tape feed sub roller in the roller holder ASSY sandwich the tape (the laminate tape or adhesive tape when using laminated tape cassettes) inbetween, as described in Subsection 2.1.1. - Page 14 ■ Adhesive tape Feeding (only for laminated tape cassettes) A laminated tape cassette contains both a transparent laminate tape roll and a separate adhesive tape roll. When a transparent laminate tape and an adhesive tape pass through the contact point (between the tape feed roller and tape feed sub roller), they are then bonded together into a single, printed tape.
-
Page 15: Automatic Tape Cutter Mechanism
2.1.3 Automatic Tape Cutter Mechanism This mechanism consists of the cutter fixed blade and the cutter movable blade driven by the cutter motor. Upon completion of printing and tape feeding, the CPU activates the cutter motor (DC motor) whose clockwise rotation is transmitted via the cutter double gears to the cutter moving gear. -
Page 16: Roller Holder Assy & Cassette Cover Interlocking Mechanism
2.1.4 Roller Holder ASSY & Cassette Cover Interlocking Mechanism Closing the cassette cover pushes down the roller release lever and brings the top of the lever into the hooked section provided on the inside of the cassette cover. As described in Subsection 2.1.1 "Roller Holder ASSY Setting & Retracting Mechanism", the roller release lever shifts the roller holder release rod so that the roller holder ASSY is pressed towards the head ASSY side. -
Page 17: Outline Of Control Electronics
2.2 Outline of Control Electronics 2.2.1 Configuration Fig. 2.2-1 shows a block diagram of the control electronics of this machine. The control electronics consists of four printed circuit boards (main PCB, power supply PCB, key PCB, and cassette sensor PCB), two DC motors (tape feed motor and cutter motor), thermal print head ASSY, backlight module, sensors and encode. - Page 18 Encode (Photo interrupter x 2) (Encode disk gear x 1) Backlight module (COG holder) Tape feed motor L C D Power supply PCB AC jack Thermal print head AC adapter USB cable Cutter sensor USB harness USB jack Cutter motor K,R,W,G Br,B,O Power supply haeness...
-
Page 19: Main Pcb
2.2.2 Main PCB [ 1 ] Block Diagram Fig. 2.2-2 shows a block diagram of the main PCB. The main PCB consists of the following: ■ CPU ■ Oscillation circuit ■ Flash ROM ■ Reset circuit ■ Power ON/OFF circuit and power saving circuit ■... -
Page 20: 2 ] Cassette Sensor
[ 2 ] Cassette Sensor The sensor circuit consists of a 7-switch cassette sensor (SW1 through SW7). Loading a tape cassette turns on some of those seven switches on the cassette sensor while keeping other switches off depending upon the ID encoding holes provided in the tape cassette currently loaded. -
Page 21: Chapter Iiidisassembly & Reassembly
CHAPTER III DISASSEMBLY & REASSEMBLY ■ Safety Precautions (1) The disassembly or reassembly work should be carried on a grounded antistatic sheet. Otherwise, the LSIs and electronic parts may be damaged due to the electricity charged in your body. (2) When transporting PCBs, be sure to wrap them in conductive sheets such as aluminum foil. - Page 22 ■ Lubrication Points List Roller holder ASSY Grease to be used: Silicon grease G501 (half of a rice-sized) Chassis ASSY Cutter ASSY Grease to be used: Silicon grease G501 (half of a rice-sized) Figure 3.1 Lubrication Points III - 2...
-
Page 23: Disassembly/Reassembly
3.1 Disassembly/Reassembly 3.1.1 Disassembly Procedure [ 1 ] Removing the Tape Cassette and the Cassette Cover ASSY (1) Open the cassette cover ASSY. (2) Remove the tape cassette. (3) Pull the arms outwards, and remove the cassette cover ASSY from the main body. (4) Remove the screw from the cassette cover. -
Page 24: 2 ] Removing The Battery Lid And The Dry Cells
[ 2 ] Removing the Battery Lid and the Dry Cells (1) Turn the machine upside down. (2) Press the section "A" of the battery lid to release the latch, and remove the battery lid. "A" Battery lid Figure 3.1-2 Removing the Battery Lid (3) Remove the eight dry cells. -
Page 25: 3 ] Removing The Bottom Cover, The Blind Cover And The Battery Terminals
[ 3 ] Removing the Bottom Cover, the Blind Cover and the Battery Terminals (1) Remove the six screws. Screws Screws Bottom cover Figure 3.1-4 Removing the Screw (2) Open the bottom cover from the upper cover. NOTE: Do not pull the bottom cover away from the upper cover. Those covers are connected with the lead wires. - Page 26 (3) Release the three hooks to remove the blind cover from the bottom cover. (4) Remove the battery terminal 2730, the positive battery and the negative battery from the bottom cover. (5) Press the locking pawls on the two battery terminal 2030 with the tip of the flat screwdriver, and remove them from the inside of the bottom cover.
-
Page 27: 4 ] Removing The Chassis Assy
[ 4 ] Removing the Chassis ASSY CAUTION: When handling the PCBs, put on the grounding wrist band. Failure to do so might break LSIs and other electronic devices. (1) Disconnect the head ASSY FPC, the full cutter sensor connector and the photo interrupter connector from the main PCB ASSY. - Page 28 (3) Remove the three screws, and remove the chassis ASSY from the upper cover. Screws Chassis ASSY Upper cover Figure 3.1-8 Removing the Chassis ASSY III - 8...
-
Page 29: 5 ] Disassembling The Chassis Assy
[ 5 ] Disassembling the Chassis ASSY (1) Remove the retaining ring. (2) Unhook the lever release spring from the section "A" where the spring is fixed, and remove the lever release spring from the roller release lever. (3) Remove the roller release lever from the chassis ASSY. Chassis ASSY Lever release spring Roller release lever... - Page 30 (4) Remove the retaining ring. (5) Pull the end of the roller holder release spring out of the section "B" which is the hole provided on the chassis ASSY. (6) Remove the roller holder ASSY and the roller holder release rod from the chassis ASSY.
- Page 31 (8) Remove the screw, and remove the head ASSY from the chassis ASSY. NOTE: Do not touch the thermal head. Screw Thermal head Head ASSY Chassis ASSY Figure 3.1-11 Disassembling the Chassis ASSY (3) III - 11...
- Page 32 (9) Remove the two screws, and remove the photo interrupter ASSY from the chassis ASSY. Chassis ASSY Screws Photo interrupter ASSY Figure 3.1-12 Disassembling the Chassis ASSY (4) (10) Remove the encode gear from the chassis ASSY. Chassis ASSY Encode gear Figure 3.1-13 Disassembling the Chassis ASSY (5) III - 12...
- Page 33 (11) Remove the two screws, and remove the DC motor ASSY from the chassis ASSY. DC motor ASSY Chassis ASSY Screws Figure 3.1-14 Disassembling the Chassis ASSY (6) (12) Remove the screw, and remove the cutter ASSY from the chassis ASSY. NOTE: When removing the cutter ASSY, be careful not to cut your finger with the cutter.
- Page 34 (13) Remove the washer, and remove the cutter moving gear from the chassis ASSY. (14) Remove the two cutter double gears from the chassis ASSY. Chassis ASSY Cutter moving gear Washer Cutter double gears Figure 3.1-16 Disassembling the Chassis ASSY (8) (15) Remove the two screws, and remove the cutter motor ASSY from the chassis ASSY.
- Page 35 (16) Remove the screw, and remove the full cutter sensor PRO ASSY from the chassis ASSY. Full cutter sensor PRO ASSY Screw Chassis ASSY Figure 3.1-18 Disassembling the Chassis ASSY (10) (17) Remove the actuator from the chassis ASSY. Actuator Chassis ASSY Actuator Figure 3.1-19 Disassembling the Chassis ASSY (11)
-
Page 36: 6 ] Removing The Power Pcb Assy
[ 6 ] Removing the Power PCB ASSY CAUTION: When handling the PCBs, put on the grounding wrist band. Failure to do so might break LSIs and other electronic devices. (1) Disconnect the two connectors of the power PCB ASSY from the main PCB ASSY. -
Page 37: 7 ] Removing The Cassette Pcb Assy
[ 7 ] Removing the Cassette PCB ASSY CAUTION: When handling the PCBs, put on the grounding wrist band. Failure to do so might break LSIs and other electronic devices. (1) Unsolder the battery terminal 2730 lead and the eight cassette PCB leads from the main PCB ASSY. -
Page 38: 8 ] Removing The Pcb Holder, The Main Pcb Assy And The Lcd Module Assy
[ 8 ] Removing the PCB Holder, the Main PCB ASSY and the LCD Module ASSY CAUTION: When handling the PCBs, put on the grounding wrist band. Failure to do so might break LSIs and other electronic devices. (1) Disconnect the connector of the LCD module ASSY from the main PCB ASSY. (2) Unlock the lock, and disconnect the LCDM flat cable from the main PCB ASSY. - Page 39 (3) Remove the two screws, and remove the PCB holder from the upper cover. (4) Remove the two screw, and remove the main PCB ASSY from the PCB holder Screw Screws PCB holder Screw Main PCB ASSY Upper cover Figure 3.1-23 Removing the PCB Holder and the Main PCB ASSY III - 19...
- Page 40 (5) Remove the LCD module ASSY from the upper cover. LCD module ASSY Upper cover Figure 3.1-24 Removing the LCD Module ASSY III - 20...
-
Page 41: 9 ] Removing The Frame Cover
[ 9 ] Removing the Frame Cover (1) Release the six hooks to remove the frame cover from the upper cover. Frame cover Upper cover Hooks Hooks Hooks Figure 3.1-25 Removing the Frame Cover III - 21... -
Page 42: 10 ]Removing The Rubber 68 Key
[ 10 ]Removing the Rubber 68 Key (1) Remove the rubber 68 key from the upper cover. Rubber 68 key Upper cover Figure 3.1-26 Removing the Rubber 68 Key III - 22... -
Page 43: 11 ] Removing The Lcd Panel
[ 11 ] Removing the LCD Panel (1) Remove the LCD panel from the upper cover. Upper cover LCD panel Figure 3.1-27 Removing the LCD Panel III - 23... -
Page 44: 12 ]Removing The Anti Static Brush
[ 12 ]Removing the Anti Static Brush (1) Remove the anti static brush from the upper cover. Anti static brush Upper cover Figure 3.1-28 Removing the Anti Static Brush III - 24... -
Page 45: Reassembly Procedure
3.1.2 Reassembly Procedure [ 1 ] Installing the Anti Static Brush (1) Attach the anti static brush to the upper cover. Anti static brush Upper cover Figure 3.1-29 Installing the Anti Static Brush III - 25... -
Page 46: 2 ] Installing The Lcd Panel
[ 2 ] Installing the LCD Panel (1) Attach the LCD panel to the upper cover. Upper cover Boss Boss LCD panel Figure 3.1-30 Installing the LCD Panel III - 26... -
Page 47: 3 ] Installing The Rubber 68 Key
[ 3 ] Installing the Rubber 68 Key (1) Set the rubber 68 key to the upper cover. NOTE: Make sure that the rubber 68 key is fitted over the two bosses. Rubber 68 key Upper cover Bosses Figure 3.1-31 Installing the Rubber 68 Key III - 27... -
Page 48: 4 ] Installing The Frame Cover
[ 4 ] Installing the Frame Cover (1) Set the frame cover to the upper cover, and secure it with the six hooks. NOTE: Make sure that the frame cover is fitted over the four bosses. Frame cover Upper cover Boss Hooks Boss... -
Page 49: 5 ] Installing The Lcd Module Assy, The Main Pcb Assy And The Pcb Holder
[ 5 ] Installing the LCD Module ASSY, the Main PCB ASSY and the PCB Holder CAUTION: When handling the PCBs, put on the grounding wrist band. Failure to do so might break LSIs and other electronic devices. (1) Set the LCD module ASSY to the upper cover. NOTE: Make sure that the LCD module ASSY is fitted over the two bosses. - Page 50 (2) Set the main PCB ASSY to the PCB holder, and secure it with the two screws. (3) Set the PCB holder to the upper cover, and secure it with the two screws. NOTE: When assembling the PCB holder, be careful to handle the LCDM flat cable. NOTE: When wiring, pass the lead wires through the guide as shown the below figure.
- Page 51 (4) Connect the LCDM flat cable to the main PCB ASSY, and lock it. (5) Connect the connector of the LCD module ASSY to the main PCB ASSY. NOTE: When wiring, pass the lead wires through the guide as shown the below figure. LCDM flat cable Connector (LCD module ASSY)
-
Page 52: 6 ] Installing The Cassette Pcb Assy
[ 6 ] Installing the Cassette PCB ASSY CAUTION: When handling the PCBs, put on the grounding wrist band. Failure to do so might break LSIs and other electronic devices. (1) Solder the eight cassette PCB leads and the battery terminal 2730 lead to the main PCB ASSY. - Page 53 (2) Set the cassette PCB ASSY to the upper cover, and hang the hook of the upper cover on the cassette PCB ASSY. (3) Secure the cassette PCB ASSY to the upper cover with the screw. NOTE: When wiring, pass the lead wires through the guides as shown the below figure. Screw Upper cover Cassette PCB ASSY...
-
Page 54: 7 ] Installing The Power Pcb Assy
[ 7 ] Installing the Power PCB ASSY CAUTION: When handling the PCBs, put on the grounding wrist band. Failure to do so might break LSIs and other electronic devices. (1) Set the power PCB ASSY to the upper cover with the screw. (2) Connect the two connectors of the power PCB ASSY to the main PCB ASSY. -
Page 55: 8 ] Assembling The Cassis Assy
[ 8 ] Assembling the Cassis ASSY (1) Set the actuator into the chassis ASSY. Actuator Chassis ASSY Actuator Figure 3.1-39 Assembling the Chassis ASSY (1) (2) Secure the full cutter sensor PRO ASSY onto the chassis ASSY with the screw. Full cutter sensor PRO ASSY Screw Chassis ASSY... - Page 56 (3) Secure the cutter motor ASSY onto the chassis ASSY with the two screws. Chassis ASSY Cutter motor ASSY Screws Figure 3.1-41 Assembling the Chassis ASSY (3) (4) Set the cutter double gear "A" into the chassis ASSY. (5) Set the cutter double gear "B" into the chassis ASSY. (6) Set the cutter moving gear into the chassis ASSY.
- Page 57 (8) Put the section "A" of the chassis ASSY through the hole on the cutter ASSY. (9) Secure the cutter ASSY onto the chassis ASSY with the screw. Bosses Chassis ASSY Screw "A" Cutter ASSY Figure 3.1-43 Assembling the Chassis ASSY (5) (10) Secure the DC motor ASSY onto the chassis ASSY with the two screws.
- Page 58 (11) Set the encode gear into the chassis ASSY. NOTE: When assembling the encode gear, be careful not to push it into the chassis ASSY too much. Chassis ASSY a-a: The same height Chassis ASSY Encode gear Encode gear Figure 3.1-45 Assembling the Chassis ASSY (7) (12) Secure the photo interrupter ASSY onto the chassis ASSY with the two screws.
- Page 59 (13) Put the head ASSY flat cable through the section "B" which is the hole provided on the chassis ASSY. (14) Secure the head ASSY with the screw while aligning the head ASSY with the boss on the chassis ASSY. NOTE: Be sure that the boss on the chassis ASSY is placed on the center of the long hole on the head ASSY.
- Page 60 (15) Set the roller holder release spring into the roller holder ASSY. (16) Set the roller holder release rod into the roller holder ASSY. (17) Set the roller holder release rod and the roller holder ASSY onto the chassis ASSY. (18) Hook the roller holder release spring into the section "C"...
- Page 61 (20) Set the roller release lever into the chassis ASSY. (21) Set the lever release spring into the roller release lever. (22) Hook the lever release spring into the section "D" of the chassis ASSY where the spring is fixed. (23) Set the retaining ring.
-
Page 62: 9 ] Installing The Chassis Assy
[ 9 ] Installing the Chassis ASSY (1) Set the chassis ASSY to the upper cover with the three screws. Screw Chassis ASSY Upper cover Figure 3.1-50 Installing the Chassis ASSY III - 42... - Page 63 CAUTION: When handling the PCBs, put on the grounding wrist band. Failure to do so might break LSIs and other electronic devices. (2) Solder the two DC motor leads and the two cutter motor leads to the main PCB ASSY. (3) Hang the full cutter sensor leads on the hook “a”, and connect the full cutter sensor connector to the main PCB ASSY (4) Connect the head ASSY FPC and the photo interrupter connector to the main PCB...
-
Page 64: 10 ]Installing The Battery Terminals, The Blind Cover And The Bottom Cover
[ 10 ]Installing the Battery Terminals, the Blind Cover and the Bottom Cover (1) Set the two battery terminal 2030 to the backside of the bottom cover, and secure the two battery terminal 2030 with the locking pawl. (2) Set the battery terminal 2730, the positive battery terminal and the negative battery terminal to the inside of the bottom cover. - Page 65 (4) Set the bottom cover to the upper cover with the six screws. Screws Screws Bottom cover Figure 3.1-53 Installing the Bottom Cover III - 45...
-
Page 66: 11 ] Installing The Dry Cells And The Battery Lid
[ 11 ] Installing the Dry Cells and the Battery Lid (1) Set the eight dry cells. Dry cells Figure 3.1-54 Installing the Dry Cells (2) Set the battery lid. Battery lid Figure 3.1-55 Installing the Battery Lid III - 46... -
Page 67: 12 ]Installing The Cassette Cover Assy And The Tape Cassette
[ 12 ]Installing the Cassette Cover ASSY and the Tape Cassette (1) Tighten the screw to the cassette cover ASSY. (2) Pull the arms outwards, and set the cassette cover ASSY to the main body. (3) Set the tape cassette to the main body. (4) Close the cassette cover ASSY. -
Page 68: Final Check And Inspection Mode
3.2 Final Check and Inspection Mode ■ After completion of reassembling (1) Check that each rubber key works correctly with light touch. (2) To memory, press the [ON/OFF] key with both the [Space] and [BS] keys held down. When releasing those keys, be sure to release the [ON/OFF] key first and then release the [Space] and [BS] keys. -
Page 69: Inspection Mode
3.3 Inspection Mode 3.3.1 Write setting mode ([1] key) [ 1 ] Head Rank Set mode Check the head rank (“A” or “B” or “C”) stamped on the FPC of the head ASSY. Head ASSY Figure 3.3-1 Press the [OK] / [ENTER] key from the state of “Figure 3.2-1”, or press the [1] key, and display the “Figure 3.3-2”. -
Page 70: 2 ] County Set Mode
[ 2 ] County Set mode Press the [OK] / [ENTER] key from the state of “Figure 3.3-3”, and the “Figure 3.3-4” will be displayed. COUNTRY SET Figure 3.3-4 Shift to the “Figure 3.3-5” by pressing the [OK] / [ENTER] key. The current specification is displayed in the lower right on the LCD. -
Page 71: 3 ] Check Lcd Indication Mode
[ 3 ] Check LCD Indication mode Europe/ North America specifications: Press the [OK] / [ENTER] key from the state of “Figure 3.3-5”, and the LCD check 1 (Figure 3.3-6) will be displayed. Enable the ON/OFF of the backlight only on this mode. Check the ON/OFF of the backlight with below key. - Page 72 Shift to the “LCD CONTRAST SET” mode (Figure 3.3-10) by pressing the below key. * Europe/North America specifications: [OK] / [ENTER] LCD CONTRAST SET Figure 3.3-10 Switch the value to “-10, -9, -8, -7, -6, -5, -4, -3, -2, -1, 0, +1, +2, +3, +4, +5, +6, +7, +8, +9, +10”...
-
Page 73: Inspect Cassette Sensor Switch Mode ([3] Key)
3.3.2 Inspect cassette sensor switch mode ([3] key) - Press the below key, and the “Figure 3.3-11” will be displayed. * Europe/North America specifications: [3] CASSETTE Figure 3.3-11 Outline of “inspect cassette sensor switch mode” - Check the pressing of the seven sensor switches (cassette sensor 1, 2. 3, 4, 5, 6 and the cover sensor). - Page 74 Shift to the “Figure 3.3-13” by pressing / releasing the cassette sensor 1. When press the sensor other than 1 in the state of “Figure 3.3-12”, the “Figure 3.3-19” will be displayed. CASSETTE Figure 3.3-13 Shift to the “Figure 3.3-14” by pressing / releasing the cassette sensor 2. When press the sensor other than 2 in the state of “Figure 3.3-12”, the “Figure 3.3-19”...
- Page 75 When the NG is judged in either sensor, the “Figure 3.3-19” will be displayed. Return to the first inspection. (Shift to the “Figure 3.3-13” by pressing / releasing the cassette sensor 1 in the state of the “Figure 3.3-19”.) CASSETTE Figure 3.3-19 NG Judgment Display Example After completion of checking of all cassette sensors, the “Figure 3.3-20”...
- Page 76 Check that the printing result (the second line of “Figure 3.3-21”) corresponds with the head rank stamped on the FPC. After printing the “Figure 3.3-21”, shift to the “Print 1 mode” (Figure 3.3-28). When the head rank is not set, the “Figure 3.3-23” will be displayed and the tape is not printed.
-
Page 77: Inspect Key Mode ([4] Key)
3.3.3 Inspect key mode ([4] key) Press the [4] key, and the “Figure 3.3-24” will be displayed. Figure 3.3-24 Start the “Inspect key mode” by pressing the below key. (display the “Figure 3.3-25”) * Europe/North America specifications: [OK] / [ENTER] Press the upper left key ([Label Collection] key: the key name is different for specifications.) to start checking key. - Page 78 Figure 3.3-27 Key Depressing Order III - 58...
-
Page 79: Print 1 Mode ([5] Key)
3.3.4 PRINT 1 mode ([5] key) Use the “24mm laminate black ink ribbon tape”. After completion of printing of the “Figure 3.3-21”, display the “Figure 3.3-28” by pressing the [5] key. PRINT 1 Figure 3.3-28 Start the printing by pressing the below key. The display is the “Figure 3.3-28”. Shift to the “CUT mode”... -
Page 80: Cut Mode ([6] Key)
3.3.5 CUT mode ([6] key) After completion of “PRINT 1 mode”, display the “Figure 3.3-31” by pressing the [6] key. FEED&CUT Figure 3.3-31 Set the cassette for cut inspection to the machine. Perform the tape feeding by pressing the below key. (display the “Figure 3.3-32” while feeding.) * Europe/North America specifications: [OK] / [ENTER] FEED Figure 3.3-32... -
Page 81: Check Encoder Read Mode ([E] Key)
3.3.6 Check encoder read mode ([E] key) The tape cassette does not use. Close the cassette cover and perform in the state that the release lever is locked. This mode serves to check whether the encoder read and the phase difference. Display the “Figure 3.3-34”... - Page 82 If all checks are OK, the “Figure 3.3-37” will be displayed. If there is NG, the “Figure 3.3-38” will be displayed. ENCORDER Figure 3.3-37 NG F 1 2 3 4 O X X X X Figure 3.3-38 III - 62...
-
Page 83: Write Serial No. Mode ([U] Key)
3.3.7 Write serial No. mode ([U] key) Press the [U] key from the state of “Figure 3.2-1”, and the current USB ID will be displayed. (Figure 3.3-39) USB ID DSP B00000001 Figure 3.3-39 In this state, display the “Figure 3.3-40” by pressing the [2], [7], [3] and [0] keys in this order. -
Page 84: Troubleshooting For The Test Mode
3.4 Troubleshooting for the Test Mode [ 1 ] LCD Indication Check mode III - 64... -
Page 85: 2 ] Cassette Sensor Switch Check Mode
[ 2 ] Cassette Sensor Switch Check mode III - 65... - Page 86 III - 66...
-
Page 87: 3 ] Key Check Mode
[ 3 ] Key Check mode III - 67... -
Page 88: 4 ] Print Check Mode
[ 4 ] Print Check mode [ 5 ] Cut Check mode III - 68... - Page 89 III - 69...
-
Page 90: 6 ] Encode Reading Check Mode
[ 6 ] Encode Reading Check mode III - 70... -
Page 91: 7 ] Dc Motor Rotation Adjustment Mode
[ 7 ] DC Motor Rotation Adjustment mode [ 8 ] Head Rank Set mode HEAD X Set the head rank Did you set the head rank? in the inspection mode. Replace the main PCB. III - 71... -
Page 92: Chapter Iv Troubleshooting
CHAPTER IV TROUBLESHOOTING 4.1 Overview This section gives the service personnel some of the troubleshooting procedures to be followed if an error or malfunction occurs with this machine. It is impossible to anticipate all of the possible troubles which may occur in future and determine the troubleshooting procedures, so this chapter covers some sample troubles. -
Page 93: Troubleshooting Flows
4.3 Troubleshooting Flows [ 1 ] Tape feeding failure IV - 2... - Page 94 IV - 3...
-
Page 95: 2 ] Printing Failure
[ 2 ] Printing failure IV - 4... - Page 96 IV - 5...
-
Page 97: 3 ] Powering Failure (Nothing Appears On The Lcd And The Backlight Does Not Light
[ 3 ] Powering failure (Nothing appears on the LCD and the backlight does not light.) IV - 6... - Page 98 IV - 7...
-
Page 99: 4 ] No Key Entry Possible
[ 4 ] No key entry possible [ 5 ] Tape cutting failure IV - 8... -
Page 100: 6 ] Interface Port Failure
[ 6 ] Interface port failure [ 7 ] LCD indication error or backlight error IV - 9... -
Page 101: 8 ] Tape Cassette Type Not Identified
[ 8 ] Tape cassette type not identified IV - 10... -
Page 102: Appendix 1Circuit Diagrams
APPENDIX 1 CIRCUIT DIAGRAMS Main PCB circuit diagram (1/2) ■ A - 1... - Page 103 Main PCB circuit diagram (2/2) ■ A - 2...
- Page 104 Key PCB circuit diagram ■ A - 3...
- Page 105 Sep. 2010 SM-PT037...