Advertisement
Available languages
Available languages
Quick Links
ENGLISH
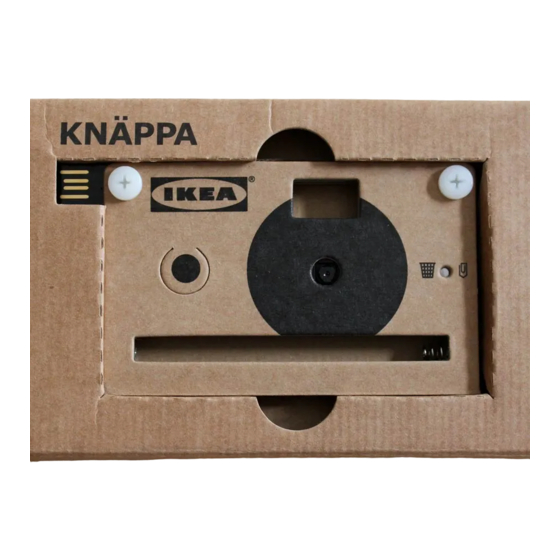
KNÄPPA
Desi gn and Quality
IKEA of Sweden
LR03 • AAA
© Inter IKEA Systems B.V. 2012
1
5s
PUTTING THE CAMERA TOGETHER
Please refer to the assembly instructions. The
2 AAA/LR03 batteries need to be inserted as
shown before assembling the camera.
TURNING THE CAMERA ON
Hold down the power/shutter button with your
finger for about 5 seconds. This is on the front
of the camera under the IKEA logo.
Check that the LED on the back of the camera
next to the viewfinder. A green light indicates
the camera is on.
TAKING A PICTURE
When the LED is green push the power/shutter
button firmly (about 2 seconds) until the LED
starts to blink green.
The LED will blink green for about 8 seconds
while the picture data is being processed. The
camera will not take another picture while the
LED is blinking. Once the LED stops blinking it
is ready to take the next picture.
TURNING THE CAMERA OFF
Hold down the power/shutter button with your
finger for about 5 seconds until the green LED
goes out. The camera will also turn itself off
after about 30 seconds if it is not used.
CONNECTING YOUR CAMERA TO A
COMPUTER
Connect the camera to your a computer using
the built-in USB connector. The IKEA logo
should face up when plugging the camera into
a USB port. Once connected the camera will
appear:
- on a Mac desktop as a folder.
- as a new device in 'My Computer' on a
Windows PC.
The camera does not need to be switched on
to transfer pictures.
2
DELETING PICTURES FROM THE CAMERA
If the LED on the camera flashes red, the
camera's internal memory is full. Before you
can take more pictures, you need to make
room for new pictures by deleting older ones.
To delete pictures make sure the camera is
turned on. Then use a paperclip to press the
delete button on the front of the camera for
about 5 seconds. Note! This will delete all the
pictures on the camera. Please back-up all the
pictures on a computer before pressing the
delete button.
LOW BATTERY
The LED on the camera will shine red when
the camera's battery power is low. You need to
replace the batteries as soon as you can.
BATTERY REPLACEMENT
Remove the plastic nuts and bolts at the top
of the camera, a place them in a safe place.
Remove the old batteries and then replace
making sure that the + and – symbols match
on the new batteries and circuit board. Then
reassemble.
This device complies with part 15 of the FCC Rules. Operation is subject to the following two conditions: (1) This
device may not cause harmful interference, and (2) this device must accept any interference received, including
interference that may cause undesired operation.
Changes or modifications not expressly approved by the party responsible for compliance could void the user's
authority to operate the equipment.
NOTE: This equipment has been tested and found to comply with the limits for a Class B digital device, pursuant to
part 15 of the FCC Rules. These limits are designed to provide reasonable protection against harmful interference
in a residential installation. This equipment generates, uses and can radiate radio frequency energy and, if not
installed and used in accordance with the instructions, may cause harmful interference to radio communications.
However, there is no guarantee that interference will not occur in a particular installation. If this equipment does
cause harmful interference to radio or television reception, which can be determined by turning the equipment off
and on, the user is encouraged to try to correct the interference by one or more of the following measures:
—Reorient or relocate the receiving antenna.
—Increase the separation between the equipment and receiver.
—Connect the equipment into an outlet on a circuit different from that to which the receiver is connected.
—Consult the dealer or an experienced radio/ TV technician for help.
3
TIPS
• To make sure that your pictures are not
blurred hold the camera still for about 3
seconds while pushing the power/shutter
button to make sure your pictures are not
blurry.
• To help keep the camera steady, rest it on
something to help keep it stable.
• To improve picture quality avoid low light
levels.
Advertisement

Related Manuals for IKEA KNAPPA


Summary of Contents for IKEA KNAPPA
- Page 1 5 seconds. This is on the front delete button on the front of the camera for something to help keep it stable. of the camera under the IKEA logo. about 5 seconds. Note! This will delete all the • To improve picture quality avoid low light Check that the LED on the back of the camera pictures on the camera.
-
Page 2: Aufnahmen Machen
Aufnahmen können erst gemacht werden, schließen. 5 Sekunden gedrückt halten. Dieser befindet wenn alte Fotos gelöscht worden sind. sich vorn an der Kamera unter dem IKEA-Logo. Zum Löschen von Fotos muss die Kamera TIPPS Die LED auf der Rückseite der Kamera neben eingeschaltet sein. - Page 3 à la réception des émissions radio ou de télévision, identifiables en allumant et éteignant successivement l’appareil, il est recommandé à l’utilisateur de tenter de résoudre ce problème au moyen d’une ou Le logo IKEA doit être face en avant au moment plusieurs des mesures suivantes : de connecter l’appareil à...
- Page 4 5 seconden ingedrukt. Deze knop zit aan een rood licht knippert, is de geheugenkaart Verwijder de kunststof moertjes en boutjes de voorzijde van de camera onder het IKEA vol. Voordat u nieuwe foto’s kunt maken, moet aan de bovenzijde van de camera, en leg ze op vignet.
- Page 5 Du behøver ikke at tænde kameraet for at — Øg afstanden mellem udstyret og modtageren. overføre billeder. — Tilslut udstyret til en anden kontakt end den, som modtageren er tilsluttet. — Kontakt forhandleren eller en erfaren radio/TV-tekniker for at få hjælp. © Inter IKEA Systems B.V. 2012...
- Page 6 —Øke avstanden mellom utstyret og mottakeren. for å overføre bilder. —Kople utstyret til en stikkontakt på en annen kurs enn enn den mottakeren er tilkoplet. —Kontakte forhandleren eller en erfaren radio/TV-tekniker for å få hjelp. © Inter IKEA Systems B.V. 2012...
- Page 7 Windows PC:llä. – Kytke laite piirin eri liitäntään kuin mihin vastaanotin on kytketty. – Käänny myyjän tai pätevän radio/TV-asentajan puoleen saadaksesi apua ongelman ratkaisemisessa. Kameran virran ei tarvitse olla kytkettynä päälle kuvien siirtämistä varten. © Inter IKEA Systems B.V. 2012...
- Page 8 — Öka avståndet mellan utrustningen och mottagaren. för att överföra bilder. — Ansluta utrustningen till ett nätuttag som är skilt från den krets som mottagaren är ansluten till. — Kontakta återförsäljaren eller en erfaren radio/tv-tekniker för hjälp. © Inter IKEA Systems B.V. 2012...
- Page 9 POZNÁMKA: Toto zařízení bylo testováno a shledáno ve shodě s rámcem pro digitální aparáty třídy B podléhající IKEA nahoře. Při napojení se objeví: pravidlům FCC, část 15. Tento rámec je zkonstruován tak, aby tvořil dostatečnou ochranu před škodlivými interferencemi v domácích instalacích.
- Page 10 IKEA. Después —Reoriente o reubique la antena receptora.
-
Page 11: Sostituzione Delle Batterie
Non c’è comunque nessuna garanzia che in una particolare installazione non si verifichi un’interferenza. Se l’apparecchio dovesse gravemente interferire con la ricezione radio o televisiva, riscontrabile spegnendo e riaccendendo marchio IKEA deve essere rivolto verso l’alto. l’apparecchio, l’utente è pregato di cercare di porre rimedio all’interferenza con uno o più dei seguenti provvedimenti: Una volta effettuato i collegamento la –... - Page 12 • Az elmosódások elkerülése érdekében a LR03 • AAA gombot körülbelül 5 másodpercig. Ez a A fényképek törléséhez kapcsolja be a bekapcsoló/exponáló gomb lenyomásakor fényképezőgép elején, az IKEA logó alatt fényképezőgépet. Egy kiegyenesített körülbelül 3 másodpercig tartsa található. gemkapoccsal tartsa lenyomva a mozdulatlanul a fényképezőgépet.
- Page 13 5 sekund. Przycisk ten znajduje jest pełna. Aby wykonać kolejne zdjęcia, złóż aparat. się z przodu aparatu, pod logo IKEA. należy zrobić na nie miejsce poprzez usunięcie Sprawdź, czy dioda LED znajdująca się z tyłu starych zdjęć.
- Page 14 Ligue a câmara ao seu computador usando o causar interferências que prejudiquem as comunicações de rádio. Porém, não há garantia de que não ocorram conector USB incorporado. O logotipo IKEA interferências em qualquer instalação em particular. Se o equipamento causar interferências que prejudiquem a deve ficar para cima quando ligar a câmara a...
- Page 15 5 secunde. Acest buton aparatului pentru cca. 5 secunde. Atenție! • Pentru a evita ca fotografia să fie neclară, se află pe frontul aparatului, sub inscripția IKEA. Prin această operație se vor șterge toate țineți aparatul nemișcat timp de cca.
- Page 16 Toto zariadenie vytvára, využíva a môže vyžarovať IKEA otočené nahor. Po pripojení sa fotoaparát energiu rádiovej frekvencie a v prípade, že nie je nainštalované a používané v súlade s návodom, môže spôsobovať...
- Page 17 –Свързване на апаратурата към контакт от верига, различна от тази, на която е свързан приемникът. - като нова устройствена част в “My Computer”/ © Inter IKEA Systems B.V. 2012 –Помощна консултация с търговския доставчик или с опитен радио-/ телевизионен техник.
- Page 18 USB ulaz, pojavit će se logotip u pojedinim instalacijama. Ako ova oprema uzrokuje štetnu interferenciju u radio ili televizijskom prijemu, što IKEA. Kad se priključi, fotoaparat će se pojaviti: se može utvrditi uključivanjem i isključivanjem opreme, korisniku savjetujemo da interferenciju pokuša ispraviti primjenom jedne ili više od sljedećih mjera:...
- Page 19 δευτερόλεπτα. Αυτό είναι στο μπροστινό μέρος Αν το LED στην κάμερα αναβοσβήνει κόκκινο, μπαταρίες και αντικαταστήστε τις προσέχοντας της κάμερας κάτω από το λογότυπο IKEA. είναι γεμάτη η εσωτερική μνήμη της. Πριν ότι τα σύμβολα + και - των νέων μπαταριών...
- Page 20 — Изменить положение принимающей антенны. Подключенная камера отображается — Увеличить расстояние между оборудованием и приемником. следующим образом. — Подключить оборудование и приемник к разным розеткам. © Inter IKEA Systems B.V. 2012 — Обратиться к дилеру или к опытному специалисту по радио- или телевизионному оборудованию.
- Page 21 USB priključka. Oznaka štetnog ometanja radio ili TV prijema, što se može utvrditi uključivanjem i isključivanjem opreme, korisniku se IKEA bi trebala da bude okrenuta na gore savetuje da pokuša da otkloni smetnje preduzimanjem jedne ili više sledećih mera:w prilikom uključivanja fotoaparata u USB ulaz.
- Page 22 Ta oprema proizvaja, uporablja in lahko oddaja radiofrekvenčno energijo, ki lahko, če oprema ni priključujete na vhod USB, mora biti logotip nameščena v skladu z navodili, IKEA obrnjen navzgor. Ko je povezava povzroči škodljive motnje radijske komunikacije. Vendar pa ne moremo zagotoviti, da ne bo prišlo do motenj pri vzpostavljena, bo fotoaparat: posameznih namestitvah.
-
Page 23: Fotoğraf Çekme
LR03 • AAA boyunca basılı tutun. Düğme makinenin tarafındaki silme düğmesine yaklaşık 5 saniye • Fotoğraf kalitesini iyileştirmek için loş ışık ön tarafında, IKEA logosunun altında yer basmak için bir ataç kullanın. Dikkat! Bu işlem seviyelerinden kaçının. almaktadır. makinedeki tüm fotoğrafları silecektir. Silme Makinenin arka tarafında, kadrajın yanındaki... - Page 24 す。 上記の制限は、 住宅地区で使用した場合に、 有害な電波干渉に対する合理的な保護を提供することを目的としてい トに接続する時に、 IKEA ロゴが上を向くようにしま ます。 本装置は無線周波を生成、 使用、 および放射する可能性があるため、 使用説明書に従って設置および使用しな す。 カメラを接続すると、 カメラは以下のように表示 ければ、 無線通信に有害な電波干渉を及ぼすことがあります。 ただし、 特定の設置状況で電波干渉が起きないという されます。 保証はありません。 本装置が、 テレビやラジオの受信障害の原因となっているかどうかは、 装置の電源を一旦切り再度 電源を入れ直すことで確認できます。 本装置が受信障害の原因である場合は、 以下の対処法を いくつか行なって受信 障害の是正を試みてください。 - 受信アンテナの向きや場所を変える。 - 本装置と他の機器との距離を離す。 - 受信機が接続されている回路とは異なる回路のコンセントに本装置を接続する。 - 販売店または経験豊富なラジオ/テレビ技術者に相談する。 © Inter IKEA Systems B.V. 2012...
- Page 25 号,并且 (2) 此设备必须接受所收到的干扰信号, 包括可能会引起不必要操作的干扰信号。 未经过合规责任方明确认可而对设备进行更改或改动, 可能会使用户操作该设备的权限无效。 备注:此设备已经过测试,符合 FCC 规则第 15 部分B 级数码设备的各项限制条件。 这些限制条件旨在为家庭 设备提供合理保护 ,使其免遭有害干扰。 此设备会产生、 使用并可发出射频能量,如果未按照指令进行安装和 使用, 可能 会对无线电通信造成有害干扰。 但是,并不保证在某种特定装置中不会产生干扰。 如果该设备对无线电或电视 信号接收造成有害干扰(由设备的开启和关闭状态决定) ,建议用户可以通过采取以下一种或多种措施来尝试 消除干扰: - 转动接收天线的方向或重新定位接收天线。 - 增加设备与接收器之间的间隔距离。 - 将设备连接至与接收器的连接插座不同的另一插座。 - 咨询经销商,或求助于有经验的无线电/TV 技术人员。 © Inter IKEA Systems B.V. 2012...
- Page 26 擾, 且 (2) 本裝置必須接受所收到之干擾, 包括可能導致非正常操作之干擾。 未獲規範責任方明確核可之變更或修改 , 可能損害用戶使用該設備之權利。 附註:本設備已經過測試 , 且根據美國聯邦通訊委員會 (FCC) 規範第 15 條, 發現符合 B 級數位裝置之限制。該等 限制旨為居住地區提供合理防護,以防止產生有害干擾。 本設備會產生、使用且放射無線電頻率,如未依照說明書 進行安裝與使用, 可能 對無線電通訊造成有害干擾。然而,無法保證採用何種安裝方式得完全避免干擾。如果本設備對無線電或電視接 收造成有害干擾,而導致必須關閉或開啟本設備, 用戶可嘗試使用下列一或數種方法,以避免干擾: —— 重新調整或安置接收天線。 —— 使本設備遠離其他信號接收設備。 —— 該設備連接的線路插座,與其他信號接收設備連接的線路插座不同。 —— 如需協助,請洽詢經銷商或合格的無線電 / 電視機技師。 © Inter IKEA Systems B.V. 2012...
-
Page 27: Bahasa Malaysia
Logo IKEA seharusnya menghala ke atas langkah berikut, atau lebih: semasa memasukkan kamera ke dalam port —Ubah arah atau ubah lokasi antena penerima. - Page 28 تأكد من تشغيل الكاميرا لحذف الصور. ثم استخدم مشبك .شيء للمساعدة في الحفاظ عليها مستقرة .)IKEA( ثوان. هذا موجود على واجهة الكاميرا تحت شعار ايكيا .للضغط على زر الحذف الموجود في واجهة الكاميرا لمدة 5 ثوان • لتحسين جودة الصورة التي يمكن تجنب ضوء المستويات...
- Page 29 AAA/LR03 จำ า นวน 2 ก ้อนตามท ี ่ แ สดงในภาพก่ อ นประกอบ โลโก ้ IKEA ควรห ั น หน ้ า ข ึ ้ น เม ื ่ อ เส ี ย บกล ้องเข ้ า ก ั บ พอร ์ ต...