Table of Contents
Advertisement
Quick Links
Advertisement
Table of Contents

Related Manuals for Asus P5V900


Summary of Contents for Asus P5V900
- Page 1 V-Series P5V900 ASUS PC (Desktop Barebone)
- Page 2 Product warranty or service will not be extended if: (1) the product is repaired, modified or altered, unless such repair, modification of alteration is authorized in writing by ASUS; or (2) the serial number of the product is defaced or missing.
-
Page 3: Table Of Contents
Table of contents Notices ... vi Safety information ...vii About this guide ...viii System package contents ... x Chapter 1: System Introduction Welcome! ... 1-2 Front panel (external) ... 1-2 Rear panel ... 1-4 Internal components ... 1-7 Chapter 2: Basic Installation Preparation ... - Page 4 Managing and updating your BIOS ... 5-2 5.1.1 ASUS Update utility ... 5-2 5.1.2 Creating a bootable floppy disk ... 5-5 5.1.3 ASUS EZ Flash 2 utility ... 5-6 5.1.4 AwardBIOS Flash utility ... 5-7 5.1.5 Saving the current BIOS file ... 5-9 5.1.6 ASUS CrashFree BIOS 2 utility ...
- Page 5 Table of contents 5.2.4 Menu items ... 5-13 5.2.5 Sub-menu items ... 5-13 Configuration fields ... 5-13 5.2.6 5.2.7 Pop-up window ... 5-14 5.2.8 General help ... 5-14 Main menu ... 5-15 5.3.1 System Time ... 5-15 5.3.2 System Date ... 5-15 5.3.3 Primary IDE Master/Slave ...
-
Page 6: Notices
Notices Federal Communications Commission Statement This device complies with Part 15 of the FCC Rules. Operation is subject to the following two conditions: • This device may not cause harmful interference, and • This device must accept any interference received including interference that may cause undesired operation. -
Page 7: Safety Information
Safety information Electrical safety • To prevent electrical shock hazard, disconnect the power cable from the electrical outlet before relocating the system. • When adding or removing devices to or from the system, ensure that the power cables for the devices are unplugged before the signal cables are connected. -
Page 8: About This Guide
About this guide Audience This guide provides general information and installation instructions about the ASUS V-Series P5V900 barebone system. This guide is intended for experienced users and integrators with hardware knowledge of personal computers. How this guide is organized This guide contains the following parts:... -
Page 9: Conventions Used In This Guide
Refer to the following sources for additional information and for product and software updates. ASUS Websites The ASUS websites worldwide provide updated information on ASUS hardware and software products. Refer to the ASUS contact information. Optional Documentation Your product package may include optional documentation, such as warranty flyers, that may have been added by your dealer. -
Page 10: System Package Contents
System package contents Check your V-Series P5V900 system package for the following items. If any of the items is damaged or missing, contact your retailer immediately. Item description ASUS V-Series P5V900 barebone system with • ASUS motherboard • 300 W (peak) PFC power supply unit •... - Page 11 Chapter 1 This chapter gives a general description of the ASUS V-Series P5V900. The chapter lists the system features including introduction on the front and rear panel, and internal components.
-
Page 12: Chapter 1: System Introduction
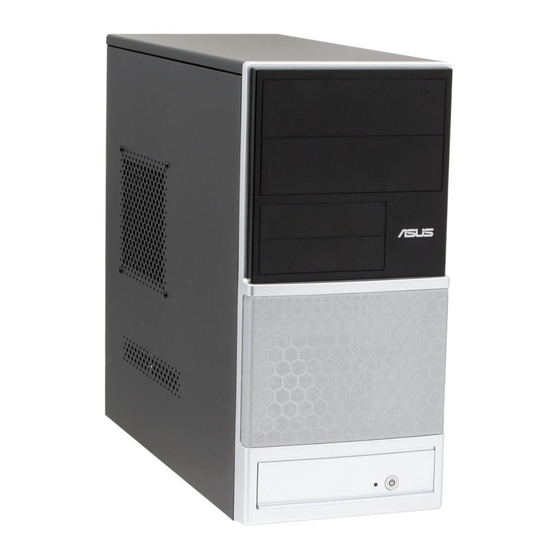
Welcome! Thank you for choosing the ASUS V-Series P5V900! The ASUS V-Series P5V900 is an all-in-one barebone system with a versatile home entertainment feature. The system comes in a stylish casing and powered by the ASUS motherboard that supports the Intel... - Page 13 USB 2.0 devices such as a mouse, printer, scanner, camera, PDA, and others. Headphone port. This Line In (green) port connects a headphone with a stereo mini-plug. Microphone port. This Mic (pink) port connects a microphone. ASUS V-Series P5V900...
-
Page 14: Rear Panel
Rear panel The system rear panel includes the power connector and several I/O ports that allow convenient connection of devices. Power connector. This connector is for the power cable and plug. Voltage selector. This switch allows you to adjust the system input voltage according to the voltage supply in your area. - Page 15 2, 4, or 6-channel configuration. Audio 2, 4, or 6-channel configuration Port Headset 2-speaker Light Blue Line In Lime Line Out Pink Mic In ASUS V-Series P5V900 4-speaker 6-speaker Surround Out Surround Out Front Speaker Out Front Speaker Out Mic In Center/Bass...
-
Page 16: Voltage Selector
Voltage selector The PSU has a 115 V/230 V voltage selector switch located beside the power connector. Use this switch to select the appropriate system input voltage according to the voltage supply in your area. If the voltage supply in your area is 100-127 V, set this switch to 115 V. If the voltage supply in your area is 200-240 V, set this switch to 230 V. -
Page 17: Internal Components
5.25-inch optical drive bays Hard disk drive bay Floppy disk drive bay Power supply unit CPU socket DIMM sockets ASUS V-Series P5V900 ASUS motherboard Chassis fan 10. PCI Express x16 slot 11. PCI Express x1 slot 12. PCI slots 13. Metal bracket lock... - Page 18 Chapter 1: System introduction...
- Page 19 Chapter 2 This chapter provides step-by-step instructions on how to install components in the system.
-
Page 20: Chapter 2: Basic Installation
Preparation Before you proceed, make sure that you have all the components you plan to install in the system. Basic components to install 1. Central Processing Unit (CPU) 2. DDR2 Dual Inline Memory Module (DIMM) 3. Expansion card(s) 4. Hard disk drive 5. -
Page 21: Removing The Side Cover And Front Panel Assembly
Swing the front panel assembly to the right, until the hinge-like tabs on the right side of the assembly are exposed. Remove the front panel assembly, then set aside. Air duct Chassis tab holes ASUS V-Series P5V900... -
Page 22: Central Processing Unit (Cpu)
CPU socket and the socket contacts are not bent. Contact your retailer immediately if the PnP cap is missing, or if you see any damage to the PnP cap/socket contacts/motherboard components. ASUS will shoulder the cost of repair only if the damage is shipment/ transit-related. •... - Page 23 Position the CPU over the socket, making sure that the gold triangle is on the bottom-left corner of the socket then fit the socket alignment key into the CPU notch. ASUS V-Series P5V900 PnP cap Load plate CPU notch Alignment key Gold...
-
Page 24: Installing The Cpu Fan And Heatsink Assembly
Apply Thermal Interface Material on the CPU before closing the load plate. DO NOT eat the Thermal Interface Material. If it gets into your eyes or touches your skin, make sure to wash it off immediately, and seek professional medical help. Close the load plate (A), then push the load lever (B) until it snaps into the retention tab. - Page 25 CPU Fan Connector Do not forget to connect the CPU fan connector! Hardware monitoring errors can occur if you fail to plug this connector. ASUS V-Series P5V900 CPU_FAN CPU FAN PWR CPU FAN IN...
-
Page 26: Installing A Dimm
Install only identical (the same type and size) DDR2 memory modules. • Install only ASUS-certified memory modules. Refer to the DDR2 Qualified Vendors List on the next page for details. • Always install DIMMs with the same CAS latency. For optimum compatibility, we recommend that you obtain memory modules from the same vendor. - Page 27 Heat-Sink Package 256MB Patriot PM32M16D2B-3.7KC 512MB Patriot PM64M8D2B-3.7KC 1024MB Patriot PM64M8D2B-3.7KC 512MB UMAX U2S12D30TP-5C 512MB Veritech VTD264M8PC6G 1024MB Veritech VTD264M8PC6G ASUS V-Series P5V900 Side(s) Component KVR533D2N4/256 KVR533D2N4/512 KVR533D2N4/1G HYS64T32000HU-3.7-A HYS64T64000HU-3.7-A HYS64T128020HU-3.7-A HYS64T256020HU-3.7-A HYS64T32000HU-3.7-B HYS64T64000HU-3.7-B HYS64T128020HU-3.7-B HYMP564U648-C4 HYMP512U648-C4 HYMP512U648-C4 HYMP564U64AP8-C3 HYMP512U64AP8-C3 EBE51UD8ABFA-5C...
-
Page 28: Dimm Support
DDR2-667 Size Vendor 512MB KINGSTON E5108AE-6E-E 1024MB KINGSTON E5108AE-6E-E 512MB KINGSTON E5108AE-6E-E 256MB KINGSTON HYB18T256800AF3 256MB Qimonda HYB18T512160AF-3S 512MB Qimonda HYB18T512800AF3S 1024MB Qimonda HYB18T512800AF3S 256MB Qimonda HYB18T512160BF-3S 512MB Qimonda HYB18T512800BF3S 1024MB Qimonda HYB18T512800BF3S 256MB SAMSUNG K4T51163QC-ZCE6 512MB SAMSUNG ZCE6K4T51083QC 1024MB SAMSUNG ZCE6K4T51083QC 512MB... -
Page 29: Installing A Ddr2 Dimm
Support the DIMM lightly with your fingers when pressing the retaining clips. The DIMM might get damaged when it flips out with extra force. Remove the DIMM from the socket. ASUS V-Series P5V900 Unlocked retaining clip Locked Retaining Clip DDR2 DIMM notch... -
Page 30: Expansion Slots
Expansion slots In the future, you may need to install expansion cards. The following sub-sections describe the slots and the expansion cards that they support. Make sure to unplug the power cord before adding or removing expansion cards. Failure to do so may cause you physical injury and damage motherboard components. -
Page 31: Standard Interrupt Assignments
When using PCI cards on shared slots, ensure that the drivers support “Share IRQ” or that the cards do not need IRQ assignments. Otherwise, conflicts will arise between the two PCI groups, making the system unstable and the card inoperable. ASUS V-Series P5V900 shared — —... -
Page 32: Pci Express X1 Slot
2.6.3 PCI Express x1 slot This motherboard supports PCI Express x1 network cards, SCSI cards and other cards that comply with the PCI Express specifications. The figure shows a network card installed on the PCI Express x1 slot. 2.6.4 PCI slots The PCI slots support cards such as a LAN card, SCSI card, USB card, and other cards that comply with PCI... -
Page 33: Installing An Optical Drive
Connect one end of the IDE ribbon cable to the IDE interface at the back of the optical drive, matching the red stripe on the cable with Pin 1 on the IDE interface. ASUS V-Series P5V900 IDE ribbon cable Power cable 2-15... - Page 34 Connect the other end of the IDE ribbon cable to the secondary IDE connector (labeled SEC_IDE) on the motherboard. See page 4-7 for the location of this connector. Remove the dummy drive slot cover from the front panel. Replace the front panel. 2-16 Chapter 2: Basic installation...
-
Page 35: Installing A Hard Disk Drive
With the HDD label side up, carefully insert the drive into the 3.5-inch bay and push the drive into the bay until its screw holes align with the holes on the drive bay. Secure the drive with two screws on both sides. ASUS V-Series P5V900 2-17... - Page 36 Connect one end of the Serial ATA cable to the SATA connector at the back of the drive, then connect the other end to a Serial ATA connector on the motherboard. See page 4-6 for the location of the Serial ATA connectors. Connect a 15-pin Serial ATA power plug from the power supply unit to the 15-pin power connector at the back of the drive.
- Page 37 IDE ribbon cable to the IDE connector on the second (Slave) IDE hard disk drive. Connect a 4-pin power plug from the power supply unit to the power connector at the back of the drive(s). ASUS V-Series P5V900 Power cable 2-19...
-
Page 38: Installing A Floppy Disk Drive
2.9 Installing a floppy disk drive The V-Series P5V900 system comes with one 3.25-inch drive bay for a floppy disk drive. To install a floppy disk drive: Remove the front panel cover. Carefully insert the floppy disk drive into the floppy drive bay until the screw holes align with the holes on the bay. -
Page 39: 2.10 Re-Connecting Cables
Power Switch Power LED Connect the reset button, power switch, power LED, and HDD LED cables to their respective leads in the system panel connector on the motherboard. System Panel Connector ASUS V-Series P5V900 PLED SPEAKER RESET IDE_LED PWRSW Requires an ATX power supply... -
Page 40: Reinstalling The Front Panel Assembly
2.11 Removing the bay covers and reinstalling the front panel assembly and side cover If you installed an optical and/or floppy disk drive, remove the bay cover(s) on the front panel assembly before reinstalling it to the chassis. To do this: Locate the bay cover locks. - Page 41 Chapter 3 This chapter helps you power up the system and install drivers and utilities from the support CD.
-
Page 42: Chapter 3: Starting Up
Screen display and driver options may not be the same for different operating system versions. • The contents of the support CD are subject to change at any time without notice. Visit the ASUS website for updates. 2000/XP operating systems ® Press to turn ON the system... -
Page 43: Running The Support Cd
CD to locate the file ASSETUP.EXE from the BIN folder. Double-click the ASSETUP.EXE to run the CD. ASUS InstAll - Installation Wizard for Drivers Automatically installs all the necessary drivers for this motherboard. VIA 4 in 1 Chipset Drivers Installs the VIA 4 in 1 driver. -
Page 44: Utilities Menu
This utility helps you keep your computer in healthy operating condition. ASUS Update The ASUS Update utility allows you to update the motherboard BIOS in a Windows environment. This utility requires an Internet connection either through ®... -
Page 45: Make Disk
Make VIA VT8237 RAID Driver Disk Make the VIA VT8237 RAID Driver Disk. 3.3.4 Manual Intel LGA775 CPU install User’s Manual Install the Intel LGA775 CPU install user manual. VIA VT8237 RAID User’s Manual Install the VIA VT8237 RAID user manual. ASUS V-Series P5V900... -
Page 46: Asus Contact Information
3.3.5 ASUS Contact information Click the Contact tab to display the ASUS contact information. You can also find this information on the inside front cover of this user guide. Chapter 3: Starting up... -
Page 47: Software Information
Autorun feature. If Autorun is not enabled in your computer, browse the contents of the support CD to locate the setup.exe file from the ASUS PC Probe II folder. Double-click the setup.exe file to start installation. - Page 48 Button Function Opens the Configuration window Opens the Report window Opens the Desktop Management Interface window Opens the Peripheral Component Interconnect window Opens the Windows Management Instrumentation window Opens the hard disk drive, memory, CPU usage window Shows/Hides the Preference section Minimizes the application Closes the application Sensor alert...
-
Page 49: Hardware Monitor Panels
You can also adjust the threshold values using the Config window. You cannot adjust the sensor threshold values in a small monitoring panel. ASUS V-Series P5V900 Small display Click to increase value Click to... -
Page 50: Dmi Browser
Monitoring sensor alert The monitor panel turns red when a component value exceeds or is lower than the threshold value. Refer to the illustrations below. Large display WMI browser Click to display the WMI (Windows Management Instrumentation) browser. This browser displays various Windows management information. - Page 51 Click a hard disk drive to display the information on the right panel. The pie chart at the bottom of the window represents the used (blue) and the available HDD space. ASUS V-Series P5V900 to display the Usage browser. 3-11...
-
Page 52: Configuring Pc Probe Ii
Memory usage The Memory tab shows both used and available physical memory. The pie chart at the bottom of the window represents the used (blue) and the available physical memory. Configuring PC Probe II Click to view and adjust the sensor threshold values. The Config window has two tabs: Sensor/Threshold and Preference. - Page 53 Chapter 4 This chapter gives information about he motherboard that comes with the system. This chapter includes the motherboard layout, jumper settings, and connector locations.
-
Page 54: Chapter 4: Motherboard Info
Introduction The V-Series P5V900 barebone system comes with an ASUS motherboard. This chapter provides technical information about the motherboard for future upgrades or system reconfiguration. Motherboard layout PS/2KBMS T : Mouse KBPWR B: Keyboard USB12 ATX12V LAN2_USB34 AUDIO PCIEX1_1 AD1985A... -
Page 55: Jumpers
6. Hold down the <Del> key during the boot process and enter BIOS setup to re-enter data. Clear RTC RAM Except when clearing the RTC RAM, never remove the cap on CLRTC jumper default position. Removing the cap will cause system boot failure. ASUS V-Series P5V900 CLRTC Normal Clear RTC (Default) - Page 56 USB device wake-up (3-pin USBPW12, USBPW34, USBPW56, USBPW78) Set these jumpers to +5V to wake up the computer from S1 sleep mode (CPU stopped, DRAM refreshed, system running in low power mode) using the connected USB devices. Set to +5VSB to wake up from S3 and S4 sleep modes (no power to CPU, DRAM in slow refresh, power supply in reduced power mode).
- Page 57 Space Bar). This feature requires an ATX power supply that can supply at least 1A on the +5VSB lead, and a corresponding setting in the BIOS. Keyboard Power Setting XSW (3-pin XSW1,2,3,4) XSW Setting ASUS V-Series P5V900 KBPWR +5VSB (Default) XSW1-4...
-
Page 58: Connectors
Connectors Floppy disk drive connector (34-1 pin FLOPPY) This connector is for the provided floppy disk drive (FDD) signal cable. Insert one end of the cable to this connector, then connect the other end to the signal connector at the back of the floppy disk drive. Pin 5 on the connector is removed to prevent incorrect cable connection when using a FDD cable with a covered Pin 5. -
Page 59: Ide Connectors
Use the 80-conductor IDE cable for Ultra DMA 133/100/66 IDE devices. If any device jumper is set as “Cable-Select”, make sure all other device jumpers have the same setting. ASUS V-Series P5V900 NOTE: Orient the red markings (usually zigzag) on the ID ribbon cable to PIN 1. - Page 60 CPU and Chassis Fan connectors (4-pin CPU_FAN, 3-pin CHA_FAN) The fan connectors support cooling fans of 350 mA~740 mA (8.88 W max.) or a total of 1 A~2.22 A (26.64 W max.) at +12V. Connect the fan cables to the fan connectors on the motherboard, making sure that the black wire of each cable matches the ground pin of the connector.
- Page 61 This connector allows you to receive stereo audio input from sound sources such as a CD-ROM, TV tuner, or MPEG card. Auxiliary Audio Connector Enable the CD-IN function in the audio utility when using this connector. ASUS V-Series P5V900 ATX12V +3 Volts +12V DC...
- Page 62 Front panel audio connector (10-1 pin AAFP) This connector is for a chassis-mounted front panel audio I/O module that supports either HD Audio or legacy AC’97 audio standard. Front Panel Audio Connector We recommend that you connect a high-definition front panel audio module to this connector to avail of the motherboard’s high-definition audio capability.
- Page 63 This connector is for a serial (COM) port. Connect the serial port module cable to this connector, then install the module to a slot opening at the back of the system chassis. COM Port Connector ASUS V-Series P5V900 CHASSIS (Default) COM2...
- Page 64 12. System panel connector (10-1 pin PANEL) This connector supports several chassis-mounted functions. System Panel Connector The sytem panel connector is color-coded for easy connection. Refer to the connector description below for details. • System power LED (2-pin PLED) This 2-pin connector is for the system power LED. Connect the chassis power LED cable to this connector.
- Page 65 Chapter 5 This chapter tells how to change system settings through the BIOS Setup menus and describes the BIOS parameters.
-
Page 66: Managing And Updating Your Bios
BIOS in the future. Copy the original motherboard BIOS using the ASUS Update or Award BIOS Flash utilities. 5.1.1 ASUS Update utility The ASUS Update is a utility that allows you to manage, save, and update the motherboard BIOS in Windows allows you to: •... -
Page 67: Updating The Bios Through The Internet
Updating the BIOS through the Internet To update the BIOS through the Internet: Launch the ASUS Update utility from the Windows Start > Programs > ASUS > ASUSUpdate > ASUSUpdate. The ASUS Update main window appears. Select Update BIOS from... -
Page 68: Updating The Bios Through A Bios File
Updating the BIOS through a BIOS file To update the BIOS through a BIOS file: Launch the ASUS Update utility from the Windows clicking Start > Programs > ASUS > ASUSUpdate > ASUSUpdate. The ASUS Update main window appears. Select Update BIOS from a file option from the drop-down menu, then click Next. -
Page 69: Creating A Bootable Floppy Disk
D: is your optical drive. e. Press <Enter>, then follow screen instructions to continue. Copy the original or the latest motherboard BIOS file to the bootable floppy disk. ASUS V-Series P5V900 desktop, then select My Computer. ® 2000: ®... -
Page 70: Asus Ez Flash 2 Utility
5.1.3 ASUS EZ Flash 2 utility The ASUS EZ Flash 2 feature allows you to update the BIOS without having to go through the long process of booting from a floppy disk and using a DOS-based utility. The EZ Flash 2 utility is built-in the BIOS chip so it is accessible by pressing <Alt>... -
Page 71: Awardbios Flash Utility
AwardBIOS Flash Utility. Follow these instructions to update the BIOS using this utility. Download the latest BIOS file from the ASUS web site. Rename the file to V-P5V900.BIN and save it to a floppy disk. Save only the updated BIOS file in the floppy disk to avoid loading the wrong BIOS file. -
Page 72: Restart The System
BIOS file. Remove the floppy disk then press <F1> to restart the system. AwardBIOS Flash Utility for ASUS V1.17 (C) Phoenix Technologies Ltd. All Rights Reserved For P4M900-8237A-P5VD2-VM Flash Type - Winbond W39V040C/FC (4MB) File Name to Program: V-P5V900.bin... -
Page 73: Saving The Current Bios File
BIOS file to the floppy disk, then returns to the BIOS flashing process. ASUS V-Series P5V900 AwardBIOS Flash Utility for ASUS V1.17 (C) Phoenix Technologies Ltd. All Rights Reserved For P4M900-8237A-P5VD2-VM Flash Type - Winbond W39V040C/FC (4MB) File Name to Program: V-P5V900.bin... -
Page 74: Asus Crashfree Bios 2 Utility
5.1.6 ASUS CrashFree BIOS 2 utility The ASUS CrashFree BIOS 3 is an auto recovery tool that allows you to restore the BIOS file when it fails or gets corrupted during the updating process. You can update a corrupted BIOS file using the motherboard support CD or the floppy disk that contains the updated BIOS file. -
Page 75: Bios Setup Program
The BIOS setup screens shown in this section are for reference purposes only, and may not exactly match what you see on your screen. • Visit the ASUS website (www.asus.com) to download the latest BIOS file for this motherboard. ASUS V-Series P5V900 5-11... -
Page 76: Bios Menu Screen
The BIOS setup screens shown in this chapter are for reference purposes only, and may not exactly match what you see on your screen. • Visit the ASUS website (www.asus.com) to download the latest BIOS information. 5-12 Configuration fields Phoenix-Award BIOS CMOS Setup Utility... -
Page 77: Legend Bar
A configurable field is enclosed in brackets, and is highlighted when selected. To change the value of a field, select it then press <Enter> to display a list of options. ASUS V-Series P5V900 Function Displays the General Help screen Loads setup default values... -
Page 78: Pop-Up Window
5.2.7 Pop-up window Select a menu item then press <Enter> to display a pop-up window with the configuration options for that item. Main Advanced Power System Time System Date Legacy Diskette A: Primary IDE Master Primary IDE Slave Secondary IDE Master Secondary IDE Slave First SATA Master Second SATA Master... -
Page 79: Main Menu
ESC: Exit 5.3.1 System Time [xx:xx:xx] Allows you to set the system time. 5.3.2 System Date [Day xx/xx/xxxx] Allows you to set the system date. ASUS V-Series P5V900 Boot Exit 15 : 30 : 36 Tue, Mar 28 2006 [Disabled]... -
Page 80: Primary Ide Master/Slave
5.3.3 Primary IDE Master/Slave While entering Setup, the BIOS automatically detects the presence of IDE devices. There is a separate sub-menu for each IDE device. Select a device item then press <Enter> to display the IDE device information. Main Primary IDE Master Access Mode Capacity Cylinder... - Page 81 FDISK, to partition and format new IDE hard disk drives. This is necessary so that you can write or read data from the hard disk. Make sure to set the partition of the Primary IDE hard disk drives to active. ASUS V-Series P5V900 5-17...
-
Page 82: Sata 1/2
5.3.4 SATA 1/ 2 While entering Setup, the BIOS automatically detects the presence of Serial ATA devices. There is a separate sub-menu for each SATA device. Select a device item then press <Enter> to display the SATA device information. Main First SATA Master Extended IDE Drive Access Mode... -
Page 83: Hdd Smart Monitoring
Incorrect field values can cause the system to malfunction. Phoenix-Award BIOS CMOS Setup Utility Main Advanced Power CPU Configuration Chipset PCIPnP Onboard Device Configuration USB Configuration ASUS V-Series P5V900 Boot Tools Exit Select Menu Item Specific Help Adjust system frequency/ voltage. 5-19... -
Page 84: Cpu Configuration
5.4.1 CPU Configuration Advanced CPU Type Intel Genuine Processor CPU Speed 3.80GHz Cache RAM 2048K Current FSB Frequency Delay Prior to Thermal Thermal Management TM2 Bus Ratio TM2 Bus VID Limit CPUID MaxVal Enhanced C1 (C1E) Excute Disable Bit Enhanced Intel SpeedStep(tm) Tech.[Disabled] CPU L1 &... -
Page 85: Chipset
Select which graphics controller to use as the primary boot device. Configuration options: [PCI] [PCI-E] VGA Share Memory Size [64M] Sets the VGA Share Memory Size. Configuration options: [Disabled] [16M] [32M] [64M] ASUS V-Series P5V900 [PCI-E] [64M] -/+: Change Value Enter: Select Sub-menu... -
Page 86: Pcipnp
5.4.3 PCIPnP Advanced Plug & Play O/S Resources Controlled By IRQ Resources Assign IRQ For VGA ** PCI Express relative items ** Maximum Payload Size Plug & Play O/S [No] When set to [No], the BIOS configures all the devices in the system. When set to [Yes] and if you install a Plug and Play operating system, the operating system configures the Plug and Play devices not required for boot. -
Page 87: Onboard Device Configuration
Onboard LAN Boot ROM [Disabled] Enable/Disable the bootrom of the onboard LAN. Configuration options: [Enabled] [Disabled] Serial Port1 Address [3F8/IRQ4] Enable/Disable the bootrom of the onboard LAN. Configuration options: [Enabled] [Disabled] ASUS V-Series P5V900 Item Specific Help [Enabled] [IDE] Press [Enter] to set [Auto]... -
Page 88: Usb Configuration
Parallel Port Address [378/IRQ7] Select parallel port address. Configuration options: [Disabled] [378/IRQ7] [278/IRQ5] [3BC/IRQ7] Parallel Port Mode [Bi-Directional] Select parallel port mode. Configuration options: [Normal] [EPP] [ECP] [Bi- Directional] ECP Mode Use DMA [3] Select ECP Mode use DMA. Configuration options: [1] [3] 5.4.5 USB Configuration The items in this menu allows you to change the USB-related features. -
Page 89: Power Menu
Allows you to enable or disable the Advanced Configuration and Power Interface (ACPI) support in the Application-Specific Integrated Circuit (ASIC). When set to Enabled, the ACPI APIC table pointer is included in the RSDT pointer list. Configuration options: [Disabled] [Enabled] ASUS V-Series P5V900 Boot Tools Exit [S1&S3]... -
Page 90: Apm Configuration
5.5.3 APM Configuration Power Up By PS/2 Mouse Power Up By PS/2 Keyboard Power on By PCI/PCIE Devices Power on By External Modem Power On By RTC Alarm Date (of Month) Alarm Time (hh:mm:ss) Alarm Restore on AC Power Loss PWR Button <... - Page 91 4 seconds. When sets to [Suspend], the system will go to Suspend when power button is pressed. Configuration options: [Suspend] [Instant-Off] HPET Support [Enabled] Allows you to enable or disable HPET support. Configuration options: [Enabled] [Disabled] ASUS V-Series P5V900 5-27...
-
Page 92: Hardware Monitor
5.5.4 Hardware Monitor The items in this sub-menu displays the hardware monitor values automatically detected by the BIOS. Select an item then press <Enter> to display the configuration options. Power Q-Fan Controller Vcore Voltage 3.3V Voltage 5V Voltage 12V Voltage CPU Temperature M/B Temperature CPU Fan Speed... - Page 93 CPU Fan Speed warning [ 800 RPM] Allows you to disable or set the CPU fan warning speed. Configuration options: [Disabled] [800 RPM] [1200 RPM] [1600 RPM] ASUS V-Series P5V900 5-29...
-
Page 94: Boot Menu
Boot menu The Boot menu items allow you to change the system boot options. Select an item then press <Enter> to display the sub-menu. Main Advanced Power Boot Device Priority Boot Settings Configuration Security ↑↓ : Select Item F1:Help →←: Select Menu ESC: Exit 5.6.1 Boot Device Priority... -
Page 95: Boot Settings Configuration
Selects power on state for NumLock. Configuration options: [Off] [On] Typematic Rate Setting [Disabled] Keystrokes repeat at a rate determined by the keyboard controller - when enabled, the typematic rate and typematic delay can be selected. Configuration options: [Disabled] [Enabled] ASUS V-Series P5V900 Boot [Enabled] [Enabled] [Disabled]... -
Page 96: Security
OS Select for DRAM > 64MB [Non-OS2] Set this item to OS2 only when you are running on an OS/2 operating system with an installed RAM of greater than 64 KB. Configuration options: [Non-OS2] [OS2] Full Screen LOGO [Enabled] Allows you to enable or disable the full screen logo display feature. Configuration options: [Disabled] [Enabled] Halt On [All, But Keyboard] Allows you to error report type. -
Page 97: Tool Menu
Select [Setup] to require the password before entering the BIOS Setup. Select [System] to require the password before entering the system. Configuration options: [Setup] [System] Tool menu Press Enter to run ASUS EZ Flash 2. Phoenix-Award BIOS CMOS Setup Utility Main Advanced... -
Page 98: Asus Ez Flash 2
System Date, System Time, and Password, the BIOS asks for a confirmation before exiting. ASUS EZ Flash 2 Press Enter to run ASUS EZ Flash 2 utility. Load Setup Defaults This option allows you to load the default values for each of the parameters on the Setup menus.