Table of Contents
Advertisement
Quick Links
Advertisement
Table of Contents

Summary of Contents for NASA Hasselblad 500 EL/M
- Page 2 Training and Man-Machine Divisions at the Johnson Space Center of the National Aeronau- tics and Space Administration. As a guidebook for the NASA Photography Training Program, it not only describes the operation of the Hassel- blad 500 EL/M cameras used on the U. S. Space...
-
Page 3: Table Of Contents
Table of Contents Camera Controls ..................... 2 Film Magazine Controls ................... 2 Viewfinder Controls ..................3 The EL/M Power Supply .................. 4 Releasing the Camera ..................4 Remote Operation ................... 5 Camera Steadiness ..................5 Operating Modes ..................... 6 Film Magazines ................... 6, 7 Film Magazine with Databack................ -
Page 4: Camera Controls
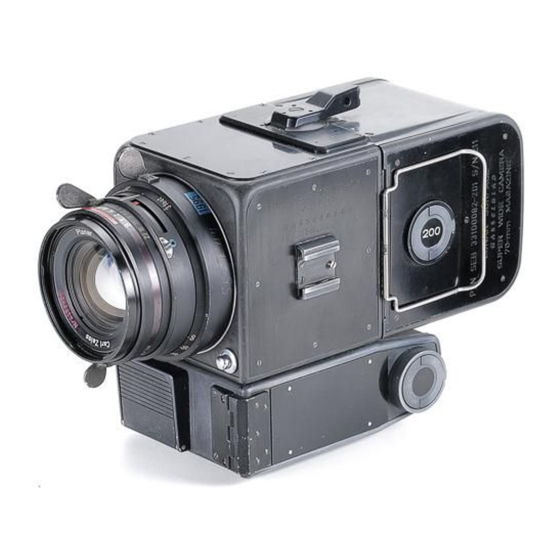
Hasselblad 500 EL/M Camera Camera Controls: 1) Operate Push button 2) Mode Selector (taped) 3) Lens Cocking Tool (Under tape) 4) Remote Connector 5) Battery Compartment 6) Battery Compartment Lock 7) Lens Release Button Film Magazine Controls: 8) Magazine Release Button... -
Page 5: Viewfinder Controls
Viewfinder Controls: 13) Prism Viewfinder 14) Diopter Correction Eyepiece 15) Lock for Correction Eyepiece 16) Rubber Eyecup... -
Page 6: The El/M Power Supply
The EL/M Releasing the Camera Power Supply The electric film advance is powered by teries (A) are inserted with the (+) end first The image is recorded on the film by two 6V rechargeable nickel cadmium (Fig. 2). Properly inserted, the batteries pressing the operate push button. -
Page 7: Remote Operation
Remote Operation Camera Steadiness Camera can also be released with remote The camera must be perfectly steady 5. Pressing the operate push button cable, Remove socket cover (Fig. 3) by when the exposure is made. Camera mo- slowly and gently so you are hardly turning it counter clockwise and attach tion while the film is being exposed can aware when the exposure is made... -
Page 8: Operating Modes
Operating Modes Film Magazines 1) The mode selector is set at 0 at launch To attach a film magazine to the cam- OPERATlNG SIGNALS: (Fig. 13) and taped over (Fig. 7). Do not remove era body, hook the magazine onto the the tape and change the setting except two lower support catches (E) (Fig. - Page 9 FIGURE 9 FIGURE 10 FIGURE 11 FIGURE 9a FIGURE 12 FIGURE 13...
-
Page 10: Film Magazine With Databack
Film Magazines with Permanently Attached Databack with Databacks Databack Removable Module Some or all film magazines used on your Proper operation is indicated by a green The electronics module is removed by de- mission may be equipped with a databack. LED at rear. -
Page 11: Changing Lenses
Changing Lenses To remove a lens, press lens release b) Lenses can be attached only if the camera body is cocked and the shutter in the lens is button (7) and turn lens counterclockwise also cocked (open). (Shaft J) in lens is op- about 1/10 turn (Fig. -
Page 12: Lenses
Lenses Lens Controls Hasselblad cameras may be equipped 17) Focusing Ring with distance engravings with either "C" lenses or "CF" lenses. The 18) Lock for "F" setting ("CF" lens only) "c" lenses have a VXM lever on the left 19) Aperture Setting Ring with aperture engravings side (Fig. - Page 13 C Lenses FIGURE 23 FIGURE 24 FIGURE 25 CF Lenses FIGURE 26 FIGURE 27 FIGURE 28...
-
Page 14: Viewing
Viewing Diopter Adjustment The prism viewfinder (13) provides a The prism viewfinder is equipped with an NOTE: It is recommended that you remove your eyeglasses. Eyeglasses prevent the close magnified, upright and laterally correct adjustable eyepiece (14) (Fig. 29). It may contact between eye and eyepiece. -
Page 15: Focusing
Focusing The prism finder is also used for focusing NOTES: a) With the 250mm lens, one of the range finder the lens (setting the lens for the camera to fields remains dark. Focusing must be done in subject distance). The groundglass screen the microprism or groundglass area. -
Page 16: Focusing Suggestions
Focusing Suggestions Depth of Field 1) For fast and accurate focusing, turn Theoretically, on Iy subjects that are the focusing ring quickly back and forth exactly at the focused distance (Fig. 37) over the point of sharpness making appear sharp on the film. Sharpness smaller and smaller back and forth gradually falls off in front of and beyond movements until the point of sharp-... -
Page 17: Depth Of Field At Different Apertures
Depth of Field at different apertures FIGURE 38 FIGURE 39 FIGURE 40 Large Aperture gives Small aperture gives Large aperture gives shallow depth of field great depth of field shallow depth of field FIGURE 41 Small aperture gives great depth of field FIGURE 37... -
Page 18: Depth Of Field With Different Lenses
Depth of Field with Different Lenses Depth of field also varies with lens focal NOTE: Sharpness beyond the depth of field range falls off more rapidly with the longer length. The 50mm lens (Fig. 43) has lenses. Backgrounds are blurred more with the more depth of field than the 100mm (Fig. -
Page 19: Focusing For Depth Of Field
Focusing for Depth of Field If subjects at different distances are to be NOTE: If the two distances cannot be placed within the depth of field range (because of recorded sharply, set the lens for depth of exposure requirements), decide whether it is field. - Page 20 Focusing for Depth of Field FIGURE 47 8' is the closest subject distance FIGURE 48 14' is the distance set on lens...
-
Page 21: Use Of Lenses
Use of Lenses Three different focal length lenses are used on Hasselblad. The focal length engraved on the lens determines the angle of view and thus the size of the area included in the picture. 1) The 100mm Planar has a diagonal angle of view of 43°. - Page 22 Use of Lenses The cargo bay area photographed with different focal length lenses. The 100mm (1) records the area as normally seen, the 50mm wide angle (2) makes it appear longer and the 250mm telephoto (3) magnifies the distant details. The use of different focal length lenses to photograph the earth - 100mm (1), 250mm telephoto (2).
- Page 23 The 50mmm wide angle used in (1) made the church appear to be far away from the sign. With the telephoto (2), used from a longer distance, the sign is recorded of equal size but the church appears much closer. This size relationship between fore and background is known as perspective and is determined by the camera/subject distance.
-
Page 24: Lens Aperture
Lens Aperture The lens aperture indicates the diameter appears darker than normal, the aperture may have stopped down accidentally. If so, re-open of the diaphragm opening. It changes by it by doing the following: For "C" lenses. Turn turning the aperture ring. In addition to the aperture ring until the maximum aperture depth of field it also controls the amount of (smallest f#) is opposite the white index. -
Page 25: Shutter Speed
Shutter Speed Setting Aperture & Shutter Speed There is also a shutter in each lens. It On some "C" lenses and on all "CF" You can set the aperture separately by opens and closes when the release is lenses, aperture and shutter speed rings pressing the cross coupling lever (24) to depressed. -
Page 26: Changing Aperture & Shutter Speed
Exposure Changing Aperture & Exposure from charts Shutter Speed The film in the camera must receive a With the aperture and shutter speed rings A general exposure setting can be used to specific amount of light to produce a interlocked, all combinations give the photograph any part of the earth but only properly exposed image. -
Page 27: The Exposure Meter
The Exposure Meter MEMORY CLEAR ASA/TIME SELECT TRIGGER VIEWFINDER DISPLAY ILLUMINATION BUTTON OFF/ON SWITCH 10 SHADOW BUTTON 11 AVERAGING BUTTON 12 HIGHLIGHT BUTTON 14 ASA/TIME INCREASE BUTTON 15 ASA/TIME DECREASE BUTTON 16 VIEWFINDER EYEPIECE 18 EV/ F NO. SELECT BUTTON 19 RECALL (MEMORY) 20 MEMORY NOTE: The meter is battery powered. -
Page 28: Asa/Shutter Speed Setting
ASA/Shutter Speed Viewfinder Operating Meter Setting Before you use the exposure meter ascer- Adjust the viewfinder to your eyesight by To take a meter reading, place the 10 tain that it is set for the ASA rating of the turning the eyepiece guard (16) until the circle over the area you want to measure film in the camera and the shutter speed 10 circle engraving appears sharp. -
Page 29: Determining Lens Settings With Exposure Meter
Determining Lens Settings with Exposure Meter If an "E" (error) appears in the number A basic understanding of light measuring the amount of light reflected off the very display, it means the range of the meter will help you to use the exposure meter small area inside the circle in the meter has been exceeded. - Page 30 Determining Lens Settings with Exposure Meter continued reflects more or less. If you set the lens for For shuttle space photography, the following corrections should be used. These correc- the white reading (f/22 1/125), white would tions will produce slightly underexposed transparencies which are desired for duplica- be recorded as gray, not white.
-
Page 31: Exposing For Sun Or Shade
Exposing for Sun Exposing for Slides High Contrast Scenes or Shade? Frequently some areas included in a Slides look best when exposed for the Slides exposed for the lighted area, as photograph are in sunlight, some in the lighted areas even though there may explained, usually look best. -
Page 32: Exposure Techniques
Exposure techniques It is impossible to have "perfect" exposure for The spotmeter reading can vary within several the shaded cargo bay and sunlit earth at the f stops depending whether it is pointed at dark same time. Since the cargo bay with the Orbital or light colored subjects. -
Page 33: Composition
Composition The effectiveness of an image is greatly 2) Balance. determined by the arrangement of lines, An important subject, dominant line, shapes, and colors within the square area. shape on one side of the image, or This is known as composition. Evaluate on top or bottom must be balanced by the arrangement of these elements on the a second, somewhat less dominant... - Page 34 Composition continued 4) Rule of thirds. 6) Diagonals. 8) Attention creating elements. In scenes including more than one Horizontals are static, diagonals are In any image the eye is attracted by: important element, place the most dynamic. Framing the outline of the important line, shape and color ap- earth, features on the earth, or parts of a) The brightest area, regardless how...
- Page 35 FIGURE 70 FIGURE 71 FIGURE 72 FIGURE 73 FIGURE 74...
-
Page 36: Obtaining The Most Effective Images
Obtaining the Most Effective Images The effectiveness of the image depends Backlight: The sun shining towards the Sun Protection: Direct sunlight should on sharpness, correct exposure, good camera, can be even more effective - but never shine directly on the lens. It pro- composition and lighting. - Page 37 Obtaining the Most Effective Images The sharpness and contrast of the image is decreased immensely when recorded through dirty, greasy glass. Clean the win- dows in the shuttle before you photograph through them. Clean the lens surfaces with the lens cleaning kit. Don't just clean the front element, but the rear element as well, especially when changing lenses.
- Page 38 Obtaining the Most Effective Images continued The effectiveness, sharpness and three dimen- Sunlight reflected on water surfaces can pro- sional feeling that a low sun angle creates is duce a most striking image. beautifully illustrated in this view of the Kam- chatka peninsula in the U.S.S.R.
- Page 39 The future possibilities in space are beautifully documented in this Hasselblad photograph of an untethered space walker. The diagonal earth line creates a more dynamic image. © 1984 Victor Hasselblad Inc./NASA Published and Printed in USA.