Cortex DMIX-300 Product Manual
Hide thumbs
Also See for DMIX-300:
- Feature descriptions (1 page) ,
- Product manual (31 pages) ,
- Using (2 pages)

Related Manuals for Cortex DMIX-300


Summary of Contents for Cortex DMIX-300
- Page 1 All manuals and user guides at all-guides.com dMIX300 Digital Music Control Station product manual. Now that you Own it... Read it!
-
Page 2: Table Of Contents
Operating Conditions....................6 Legal Info.........................6 Setup Guide & Parts Diagram................7 Front & Rear Panel Connections..............7 Top Panel & Functions..................8-9 Using the Dmix-300...................10 Preparing for Use..................10 Selecting Devices & Database Creation...........11 Database Creation (continued)..............12 File Browser & Search Options..............13 Search Options (continued)..............14-15 Info Button &... -
Page 3: Warnings And Weee
All manuals and user guides at all-guides.com IMPORTANT WARNING & SAFETY INSTRUCTIONS P L E A S E R E A D P R I O R T O O P E R A T I N G T H I S D E V I C E ! CAUTION: This product satisfies FCC regulations POWER SOURCES: This product should be operated SERVICING: Do not attempt to service this product... -
Page 4: Introduction
Foreword Thank you for purchasing our Cortex Dmix-300. We are confident that the Cortex platform of products will not only make your life easier through the use of the latest advancements in cross-platform connectivity and sound reproduction but will raise the bar for DJ and pro audio products. With the proper care &... -
Page 5: Features
The backlit 20 Character LCD screen shows a variety of information, including track titles, times, pitch, setup options, waveforms, hot starts, Located at the top of the Dmix-300 is an Ipod dock. When used in con- loops and search parameters. This display allows more extensive visuali- junction with the USB port on the back, the Dmix-300 can be used as an zation of parameters than a conventional CD player. -
Page 6: Compatibility And Recommended Peripherals
Cleaning the Unit When using writable storage devices, such as hard drives, and hard- To clean the Dmix-300, use only a dry soft cloth and/or compressed air. drive-based music players (iPod, Zen), certain maintenance might be If the unit is soiled with stubborn dirt, we suggest using a 2:1 solution of required. -
Page 7: Care And Maintenance
There are even Spanish and French language versions, to make operating the Dmix-300 easier than ever! Additionally, please also download our FREE Cortex Database Creation Software, which allows you to... -
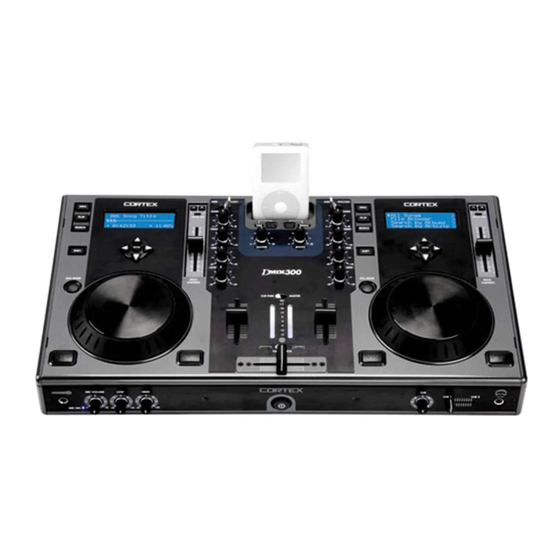
Page 8: Setup Guide & Parts Diagram
Dmix 300 Manual All manuals and user guides at all-guides.com Parts Diagram and Functions Rear Panel Front Panel 1. Power Button 5. Master, Booth and Record Outputs Press and hold the Power Button for 1 second to boot up the unit. To turn The Dmix 300 has three outputs, Master, Booth and Record. -
Page 9: Top Panel & Functions
PLAY mode. When the LED indicator is flashing, These buttons allow the user to navigate through menus and features of it indicates that the unit is in PAUSE mode. the Dmix-300. Depending on the mode of the unit, the buttons may 9. Info/Play/Search Buttons serve different purposes. - Page 10 Dmix 300 Manual All manuals and user guides at all-guides.com Parts Diagram and Functions Top Panel-Mixer Section 12.Line Fader 19. VU meter The Line Faders on each channel are used to control volume. Use these The VU meter displays the current volume of either the Master output in conjunction with the Gain and EQ on each channel to control the or Cue output, depending on the position of the Master/Cue switch.
-
Page 11: Using The Dmix-300
Dmix 300 Manual All manuals and user guides at all-guides.com Preparing for Use STEP ONE Connect the DC adapter to the DC Inlet, found on the rear of the unit. Fasten the Security Clamp (found directly below the DC Inlet jack) on top of the cable, so that it is not possible for the cable to become dislodged. -
Page 12: Selecting Devices & Database Creation
If it is the first time you are using that particular unit with the Dmix-300, the unit will prompt you to per- form indexing, so that you can search for any song within seconds. If you already have used the storage device with the Dmix-300, skip to STEP TWO - VERIFICATION. -
Page 13: Database Creation (Continued)
Dmix 300 Manual All manuals and user guides at all-guides.com Database Creation (continued) p r e s s E n t e r t o STEP TWO - VERIFICATION ( CONTINUED If you select ‘YES’ at the prompt to verify, you will have the option to s e l e c t d i r t o v e r i f y either verify the entire database, or to verify a single directory at a S h i f t + E n t e r t o... -
Page 14: File Browser & Search Options
A w e s o m e S n a k e s - V e n o When you Search by Songs, you will see presented with all of the track titles in the database that has been created by the Dmix-300 or the helper software application. -
Page 15: Search Options (Continued)
I n p u t S e a r c h S t r i n g : One of the most convenient features of the Dmix-300 is string search, which allows you to find a specified word or string of words within the database. - Page 16 Using the Dmix-300 All manuals and user guides at all-guides.com Search Options (continued) SEARCH OPTIONS ( CONTINUED P r o c e s s i n g Once you press Enter twice, the unit will begin processing your search. Depending on the size of your library, this may take awhile.
-
Page 17: Info Button & Track Attributes
You will find that the Info Button, located to the top right of each jog wheel, will become an indispensable part of using the Dmix-300. Despite the Dmix-300 being able to display an adequate amount of information on the LCD, not every attribute of each track can be dis- played all at once. -
Page 18: Play Mode & Single Auto Cue
Progress Indicator Section Five: Play Mode The Play Mode is the heart of the Cortex Dmix-300. Just like conven- P O S i s R u i n i n g M y L i f e tional CD players, the Dmix-300 allows you to select multiple pitch + 1 : 0 8 : 2 2 ranges, memorize cue points, and frame accurate searching. -
Page 19: Options And Shuffle Mode
Section Six: Edit Mode E d i t M e n u The Edit Mode on the Dmix-300 is the command center for the unit. In O p t i o n s Edit Mode, the user can edit options for how the unit functions, playlists P l a y l i s t E d i t o r and choose the active device. -
Page 20: Time Display And Pitch Control
- 3 : 3 2 : 5 7 6 . 1 5 % track by a desired percentage. The Dmix-300 offers Pitch Ranges of 4, 8, 16, and 24%, in order to provide a wide level of flexibility when manipulating digital music files. In all modes, 0.05% Pitch Resolution can be achieved, allowing for a more precise level of adjustment. -
Page 21: Jog Mode, Scratch And Playlist Support
Apple Playlist Support The Dmix-300 has support for both Itunes playlists that are contained on an Ipod, as well as playlists created within the DBSE software and stored directly to an Ipod or Mass Storage Device. From the main menu both types of playlists are accessible at any time. -
Page 22: Cue Points And Cue Memorization
H o w I E a t M y P e a s Section 10: Setting and Memorizing Cue Points With the Dmix-300, creating and memorizing cue points is quick and easy. By default, when there is no Cue Point set (or memorized), pressing the Cue >... -
Page 23: Device Menu
G e n e r i c - F l a s h D i s k other side!” This simply means that if you intend to remove the device from the Dmix-300, you must eject both sides before unplugging it. 4. When the display reads “The device can be safely removed,” you may Fig 10.2 - Selecting another device using the Keypad/Jog Wheel... -
Page 24: Mixer Section
Dmix 300 Manual All manuals and user guides at all-guides.com Mixer Section DMIX 300 MIXER SECTION The integrated mixer section in the Dmix 300 is split into 5 sections-the Input/Output section, Gain/EQ, Faders Microphone and Cue. Over the next few pages we will go over the basics of each section and how to use your Dmix 300 to both play songs internally as well as hook up external equipment. -
Page 25: Mixer Section (Cont)
Fader Curve Switch, located above the Cross Fader. The Crossfader is user relaceable, and can be ordered from any Authorized Cortex dealer or from our own Tech Support department. VU Meter The VU meter can be used to view the volume level of both the Master output of your Dmix 300 as well as the individual channel output. -
Page 26: Firmware Updates
# # # # # # # # # # # # # # # # # # # # # 2. Place the file in the root directory of your external USB storage device. 3. Connect the USB storage device to the Dmix-300, and select it from the Device Menu (during startup). Make sure your Dmix-300 is connected to a stable power source, where there is no potential of the unit losing power Fig 12.2 - Updating the firmware in 8 stages... -
Page 27: Error Messages/Troubleshooting
Some devices require proprietary hardware device drivers. Although with the introduction of USB, this is less common, it still sometimes presents an issue. These devices are not compatible with the Dmix-300. - Device has been removed while before using the eject procedure... -
Page 28: Technical Specifications
RMA clearly written on the outer carton: Do not, under any circumstance, ship your product to GCI without first For support or repair outside of the USA, please visit the Cortex web- calling the Technical Support Department at the number listed above. -
Page 29: Warranty Information
There are no obligations of liability on the part of GCI, Cortex, or any of its retailers for consequential damages arising out of or in connection with the use or performance of the product or other indirect damages with respect to loss of property, revenues, profit, or costs of removal, installation, or reinstallation. - Page 30 All manuals and user guides at all-guides.com cortex-pro.com Cortex is a division of GCI Technologies...