Table of Contents
Advertisement
Quick Links
QUESTIONS OR COMMENTS?
COUNTRY
MEXICO
0800-124-421 (Demais cidades e regiões)
BRAZIL
4004-0000 (Capitais e grandes centros)
COSTA RICA
DOMINICAN
REPUBLIC
ECUADOR
EL SALVADOR
GUATEMALA
HONDURAS
JAMAICA
NICARAGUA
PANAMA
PUERTO RICO
TRINIDAD
& TOBAGO
VENEZUELA
COLOMBIA
Sin costo en todo el pais 01 8000 112 112
CHILE
BOLIVIA
080077708 Desde teléfonos fijos ó públicos
PERU
7116800 Desde teléfonos celulares
ARGENTINE
URUGUAY
PARAGUAY
CALL
01-800-SAMSUNG(726-7864)
00-800-1-SAMSUNG (726-7864)
1-800-751-2676
1-800-SAMSUNG (72-6786)
8000-SAMSUNG (726-7864)
1-800-299-0033
800-2791-9111
1-800-SAMSUNG (726-7864)
001-800-5077267
800-0101
1-800-682-3180
1-800-SAMSUNG(726-7864)
0-800-SAMSUNG (726-7864)
Bogotá en el 600 12 72
Y desde tu celular #726
800-SAMSUNG(726-7864)
[HHP] 02-24828200
800-10-7260
0800-555-SAMSUNG(7267)
0800-SAMS(7267)
0800-11-SAMS(7267)
OR VISIT US ONLINE AT
www.samsung.com/mx/support
www.samsung.com/br/support
www.samsung.com/latin/support (Spanish)
www.samsung.com/latin_en/support (English)
www.samsung.com/latin/support (Spanish)
www.samsung.com/latin_en/support (English)
www.samsung.com/latin/support (Spanish)
www.samsung.com/latin_en/support (English)
www.samsung.com/latin/support (Spanish)
www.samsung.com/latin_en/support (English)
www.samsung.com/latin/support (Spanish)
www.samsung.com/latin_en/support (English)
www.samsung.com/latin/support (Spanish)
www.samsung.com/latin_en/support (English)
www.samsung.com/latin_en/support (English)
www.samsung.com/latin/support (Spanish)
www.samsung.com/latin_en/support (English)
www.samsung.com/latin/support (Spanish)
www.samsung.com/latin_en/support (English)
www.samsung.com/latin/support (Spanish)
www.samsung.com/latin_en/support (English)
www.samsung.com/latin/support (Spanish)
www.samsung.com/latin_en/support (English)
www.samsung.com/latin/support (Spanish)
www.samsung.com/latin_en/support (English)
www.samsung.com/co/support
www.samsung.com/cl/support
www.samsung.com/cl/support
www.samsung.com/pe/support
www.samsung.com/ar
www.samsung.com/uy
www.samsung.com/py
Advertisement
Table of Contents

Related Manuals for Samsung AR MSSP Series


Summary of Contents for Samsung AR MSSP Series
- Page 1 COUNTRY CALL OR VISIT US ONLINE AT MEXICO 01-800-SAMSUNG(726-7864) www.samsung.com/mx/support 0800-124-421 (Demais cidades e regiões) BRAZIL www.samsung.com/br/support 4004-0000 (Capitais e grandes centros) www.samsung.com/latin/support (Spanish) COSTA RICA 00-800-1-SAMSUNG (726-7864) www.samsung.com/latin_en/support (English) DOMINICAN www.samsung.com/latin/support (Spanish) 1-800-751-2676 REPUBLIC www.samsung.com/latin_en/support (English) www.samsung.com/latin/support (Spanish) ECUADOR 1-800-SAMSUNG (72-6786) www.samsung.com/latin_en/support (English)
- Page 2 Air conditioner User & installation manual ARMSSP • Thank you for purchasing this Samsung air conditioner. • Before operating this unit, please read this user manual carefully and retain it for future reference.
-
Page 3: Table Of Contents
Contents Safety Information Safety Information At a Glance Indoor Unit Overview Display Remote Control Overview Inserting batteries Remote Control Operation Operation modes Controlling temperature Controlling fan speed Controlling air flow direction Power Smart Features Cooling Operation Cool mode 2-Step cooling function Dehumidifying Operation Dry mode Air Purifying Operation... - Page 4 Installation Safety Information on Installation Preparation Step 1.1 Choosing the installation location Step 1.2 Checking and preparing accessories and tools Step 1.3 Drilling a hole through the wall Step 1.4 Taping the pipes, cables, and drain hose Indoor Unit Installation Step 2.1 Connecting the power and communication cables (assembly cable) Step 2.2 Optional: Extending the power cable Step 2.3 Installing and connecting the drain hose...
-
Page 5: Safety Information
If you have any questions, call your nearest contact centre or find help and information online at www.samsung.com. WARNING Hazards or unsafe practices that may result in severe personal injury or death. - Page 6 The installation of this appliance must be performed by a qualified technician or service company. • Failing to do so may result in electric shock, fire, explosion, problems with the product, or injury and may also void warranty on the installed product. Install an Isolation Switch next to the Air Conditioner (but not on the panels of the Air Conditioner) and circuit breaker dedicated to the air conditioner.
- Page 7 Install your appliance on a level and hard floor that can support its weight. • Failing to do so may result in abnormal vibrations, noise, or problems with the product. Install the drain hose properly so that water drains correctly. • Failing to do so may result in water overflowing and property damage.
- Page 8 CAUTION When not using the air conditioner for a long period of time or during a thunder/lightning storm, cut the power at the circuit breaker. • Failing to do so may result in electric shock or fire. FOR USING WARNING If the appliance is flooded, please contact your nearest service centre.
- Page 9 Do not touch the circuit breaker with wet hands. • This may result in electric shock. Do not turn the air conditioner off with the circuit breaker while it is operating. • Turning the air conditioner off and then on again with the circuit breaker may cause a spark and result in electric shock or fire.
- Page 10 • Do not use any fuse (such as cooper, steel wire, etc.) other than the standard fuse. • Failing to do so may result in electric shock, fire, problems with the product, or injury. CAUTION Do not place objects or devices under the indoor unit. • Water dripping from the indoor unit may result in fire or property damage.
- Page 11 • As well as being harmful to humans, it may also result in electric shock, fire or problems with the product. Do not drink the water from the air conditioner. • The water may be harmful to humans. Do not apply a strong impact to the remote control and do not disassemble the remote control.
- Page 12 • Failing to do so may result in electric shock or fire. CAUTION Take care when cleaning the surface of the heat exchanger of the outdoor unit since it has sharp edges. • This should be done by a qualified technician. Please contact your installer or service centre.
-
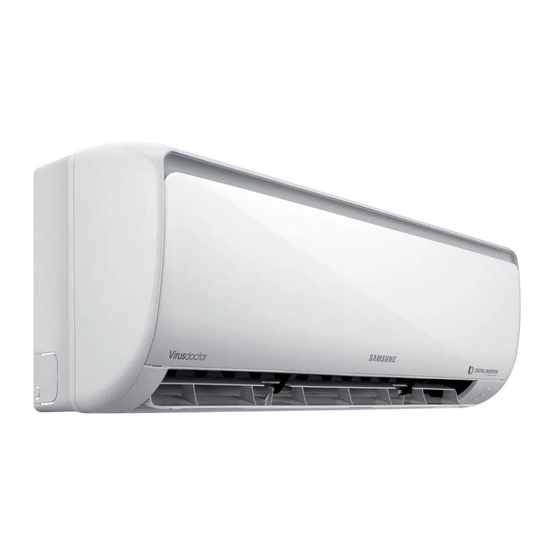
Page 13: At A Glance
Indoor Unit Overview The actual product may differ slightly from the image depicted below. 01 Air intake 05 Room temperature sensor 02 Air filter 06 Display 03 Air flow blade (up and down) 07 Power button / Remote control receiver 04 Air flow blade (left and right) Display 01 Virus Doctor indicator... -
Page 14: Remote Control Overview
Remote Control Overview 01 Set temperature indicator 02 Timer option indicator 03 Operation mode indicator 04 Options indicator 05 Low battery indicator 06 Transmit indicator 07 Fan speed indicator 08 Vertical air swing indicator 09 Settings indicator 10 Power button 11 Temperature button 12 Options button 13 Timer button... -
Page 15: Remote Control Operation
Remote Control Operation You can use the air conditioner easily by selecting a mode and then by controlling the temperature, fan speed, and air direction. Operation modes You can change the current mode between Auto, Cool, Dry, Fan, and Heat by pressing the button. -
Page 16: Controlling Fan Speed
Controlling fan speed You can select the following fan speeds in each mode: Mode Available fan speeds Auto/Dry (Auto) (Auto), (Low), (Med), (High), Cool/Heat (Turbo) (Low), (Med), (High), (Turbo) Controlling air flow direction Keep the vertical air flow in a constant direction by stopping the movements of the vertical air flow blade. -
Page 17: Power Smart Features
Cooling Operation The smart and powerful cooling functions of the Samsung air conditioner keep an enclosed space cool and comfortable. Cool mode Use the Cool mode to stay cool in hot weather. ► ► Select Cool. NOTE • For comfort, keep the temperature difference between the indoor and outdoor air within 5 °C in the Cool mode. -
Page 18: Dehumidifying Operation
Air Purifying Operation The air purification function of the Samsung air conditioner keeps the air in an enclosed space purified. Virus doctor function Use the Virus doctor function to purify your room with negative ions produced by the air conditioner . -
Page 19: Heating Operation
Heating Operation The heating functions of the Samsung air conditioner keep an enclosed space warm and comfortable. Heat mode Use the Heat mode to stay warm. ► ► Select Heat. NOTE • While the air conditioner warms up, the fan may not operate for about 3 to 5 minutes at the beginning to prevent cold blasts. -
Page 20: Quick Smart Features
Quick Smart Features There is a variety of extra functionality provided by the Samsung air conditioner. Auto mode Use the Auto mode when you want the air conditioner to automatically control the operation. The air conditioner will provide the most comfortable atmosphere that it can. -
Page 21: Fast Function
Fast function Use the Fast function to quickly cool or heat your room. This function is the most powerful cooling and heating function provided by the air conditioner. You can select this function both in the Cool and Heat modes. In the Cool or Heat mode ►... -
Page 22: Beep Sound Function
Beep sound function Use the Beep sound function to turn on or off the beep sound that plays when you press a button on the remote control. ► ► ► Select Beep. Quiet function Use the Quiet function to reduce operating noise. You can select this function both in the Cool and Heat modes. -
Page 23: Energy-Saving Features
Energy-Saving Operation Single user function Use the Single user function to reduce electricity consumption while staying cool or warm. You can select this function in the Cool and Heat modes. ► In the Cool or Heat mode NOTE • When the Single user function starts, the pattern appears on the remote control for a few seconds, and vertical air swing begins automatically. -
Page 24: Timed On/Timed Off Function
Timed on/Timed off function Use the Timed on/Timed off to turn on or off the air conditioner after the time that you set. ► (Select On or Off among On, Off, and ► (Set the on/off time.) • Press the (Timer) button to change the current function between On, Off, and (good’sleep). -
Page 25: Good'sleep Function
good’sleep function Use the good'sleep function to get a good sleep at night and to save energy. You can select this function both in the Cool and Heat modes. (Select among ► ► In the Cool or Heat mode On, Off, and (Set the ►... -
Page 26: Cleaning And Maintenance
Cleaning at a Glance Running Auto clean Cleaning duration (minutes) Auto (Cool), Cool, Auto (Heat), Indoor unit display Heat, Fan NOTE • When you set the Auto clean timer, Clean blinks and then disappears on the remote control display. The Timer ( ) indicator also appears on the indoor unit display. - Page 27 • Do not use sulphuric acid, hydrochloric acid, or organic solvents (such as thinner, kerosene, and acetone) to clean the surfaces. Do not put any stickers on it as this can damage the surface of the air conditioner. • When you clean and inspect the heat exchanger on the outdoor unit, contact the local service centre for help.
-
Page 28: Troubleshooting
Troubleshooting If the air conditioner operates abnormally, refer to the following chart to save time and unnecessary expenses. Problem Solution • Check the power status, then operate the air conditioner again. • Switch on the circuit breaker, plug in the power cord, then operate the air conditioner The air again. - Page 29 Problem Solution • Check whether the air conditioner is running the defrost function. When ice forms in winter or the outdoor temperature is too low, the air conditioner runs the defrost function automatically. While this function is running, the indoor fan stops and warm air does not come out.
- Page 30 Problem Solution • Replace the batteries in the remote control with new ones. • Make sure that nothing is blocking the The remote remote control sensor. control does not • Check whether there are strong lighting work. apparatus near the air conditioner. Strong light which comes from fluorescent bulbs or neon signs may interrupt the electric waves.
- Page 31 Problem Solution • When refrigerant flow changes, noise may Noise is be generated, depending on the status generated. of the air conditioner. This is a normal operation. • If may not be a fire but it can be a steam Smoke is generated from the outdoor heat exchanger generated from...
-
Page 32: Installation
• This manual explains how to install an indoor unit refrigerant tubes. with a split system with two SAMSUNG units. The use of other types of units with different control systems • Upon receipt, inspect the product to verify that it has may damage the units and invalidate the warranty. - Page 33 • Verify that the air conditioner is connected to the power perform anti-corrosion treatment such as R-Pro supply in accordance with the instructions provided in the supplied by SAMSUNG (Code : MOK-220SA) or wiring diagram included in the manual. commercial water repellent grease and wax, etc., based on the product condition.
-
Page 34: Preparation
Preparation Step 1.1 Choosing the installation CAUTION location • Comply with the length and height limits described in the figure above. Overview of installation location requirements Minimum clearances for the outdoor unit 100 mm or more Wall 125 mm or more 125 mm Minimum clearance in mm or more... -
Page 35: Step 1.2 Checking And Preparing Accessories And Tools
When installing more than 1 outdoor unit Step 1.2 Checking and preparing (5 cases) accessories and tools (Unit: mm) Accessories Accessories in the indoor unit package 1500 3000 3000 Installation plate (1) Remote control (1) Remote control battery Manual user & install (1) CAUTION • If the outdoor unit is installed with any insufficient clearance, it may generate sound and affect the whole... -
Page 36: Step 1.3 Drilling A Hole Through The Wall
Optional accessories NOTE Insulated assembly pipe, • A flare nut is attached to the end of each pipe of an Insulated assembly pipe, Ø 9.52 mm (1) Ø 6.35 mm (1) evaporator or a service port. Use flare nuts when 09/12... -
Page 37: Step 1.4 Taping The Pipes, Cables, And Drain Hose
2. Drill the hole. CAUTION Left • Be sure to drill only one hole. Right • Make sure that the hole slants downwards so that the Rear right or left drain hose slants downwards to drain water well. Wall Bottom right <Possible directions of the pipe bundle>... -
Page 38: Indoor Unit Installation
Indoor Unit Installation Step 2.1 Connecting the power and • When performing electrical and earthing works, be sure to comply with the 'technical standards of communication cables (assembly electrical installations' and the 'wiring regulations' in cable) the local regulations. • Tighten the terminal block screw to 1.2-1.8 N•m (12- 18 kgf•cm). -
Page 39: Step 2.2 Optional: Extending The Power Cable
Step 2.2 Optional: Extending the 4. Using a compressor, compress the two points and flip it over and compress power cable another two points in the same location. 1. Prepare a compressor and the following • The compression dimension should be 8.0. tools. -
Page 40: Step 2.3 Installing And Connecting The Drain Hose
WARNING CAUTION • In case of extending the electric wire, please DO NOT • Make sure that the indoor unit is in upright position use a round-shaped pressing socket. when you pour water to check for leakage. Make sure that the water does not overflow onto the electrical –... -
Page 41: Step 2.5 Optional: Changing The Direction Of The Drain Hose
Step 2.5 Optional: Changing the • The larger one is for the gas refrigerant direction of the drain hose A short liquid refrigerant pipe and a short gas refrigerant pipe are already fitted to the air conditioner. The connection procedure for the refrigerant pipes varies according to the Drain pan outlet exit position of each pipe when facing the wall: Rubber cap... -
Page 42: Step 2.7 Shortening Or Extending The Refrigerant Pipes (Assembly Pipe)
NOTE Flare nut • The pipe will be insulated and fixed permanently into position after finishing the installation and the gas leak test. For further details. see Step 4.1 Performing the gas leak tests on page 46. Indoor outlet pipe Connecting pipe (Unit: mm) CAUTION... -
Page 43: Step 2.8 Fixing The Installation Plate
When fixing the indoor unit on a window frame NOTE 1. Determine the positions of the wooden • Excessive torque may cause gas leakage. When extending the pipe with welding or brazing, ensure uprights to be attached to the window that nitrogen is used during the welding or brazing frame. -
Page 44: Outdoor Unit Installation
Outdoor Unit Installation Step 3.1 Fixing the outdoor unit in NOTE place • Make sure that the wall can support the weights of the rack and the outdoor unit. • Install the rack close to the column as much as possible. -
Page 45: Step 3.3 Evacuating The Air
1. Leave the system in the standby mode. WARNING • Do not turn on the system! This is necessary for better vacuum operation (full OPEN position of Control box Electronic Expansion Valve). Remove the screw for 2. Connect the charging hose of the low the control box cover pressure side of manifold gauge to a gas service port as seen in the picture. -
Page 46: Step 3.4 Adding Refrigerant
Step 3.4 Adding refrigerant If you use a pipe longer than the length specified in the piping codes and standards, you must add 15g of refrigerant R-410A for each extra metre. If you use a pipe shorter than the length specified in the piping codes and standards, the evacuating time is normal. -
Page 47: Installation Inspection
Installation Inspection Step 4.1 Performing the gas leak tests 1. Before inspecting the leakage, use a torque wrench to close the cap for the stop valve. Test parts for (Comply with a tightening torque for each size of the diameter, and tighten the cap firmly to indoor unit prevent any leakage.) Tightening torque for body cap... - Page 48 valve on the low pressure side. WARNING 6. Stop operation of the air conditioner by • After installing the product, be sure to perform leak pressing the (Power) button on the tests on the piping connections. After pumping down indoor unit or remote control. refrigerant to inspect or relocate the outdoor unit, be sure to stop the compressor and then remove the 7.