Cuisinart SS-20 Series Instruction Booklet
Hide thumbs
Also See for SS-20 Series:
- Instruction booklet (16 pages) ,
- Quick reference manual (2 pages) ,
- User manual
Chapters
Table of Contents

Related Manuals for Cuisinart SS-20 Series


Summary of Contents for Cuisinart SS-20 Series
- Page 1 INSTRUCTION BOOKLET ® ™ Cuisinart Thermal Coffee Center SS-20 Series For your safety and continued enjoyment of this product, always read the instruction book carefully before using.
-
Page 2: Important Safeguards
When storing in any manner. Return appliance to the nearest in an appliance garage always unplug the Cuisinart Repair Center for examination, repair, unit from the electrical outlet. Not doing and electrical or mechanical adjustment. - Page 3 WARNING: RISK OF FIRE NOTICE OR ELECTRIC SHOCK This appliance has a polarized plug (one blade is wider than the other). To reduce the risk of The lightning flash with arrowhead electric shock, this plug will fit into a polarized outlet only one way.
-
Page 4: Table Of Contents
Charcoal Water Filter ....8 the tap, it won’t taste good in your drink. Cuisinart includes charcoal water filters in 10-Cup Coffeemaker Instructions its water reservoirs to remove chlorine, Setting Up Your 10-Cup Coffeemaker . -
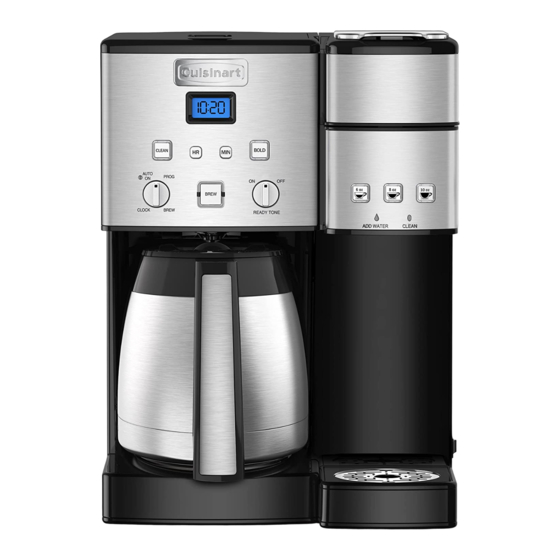
Page 5: Features And Benefits
10-CUP COFFEEMAKER FEATURES AND BENEFITS Coffeemaker Reservoir Cover Resting Plate Flips back for easy filling. Scratch resistant with nonstick coating. Coffeemaker Water Charcoal Water Filter Reservoir (not shown) Eliminates chlorine, bad tastes and With water level indicator window. odors from tap water. Showerhead (not shown) 10. - Page 6 SINGLE-SERVE COFFEEMAKER FEATURES AND BENEFITS 15. Brewer Handle 22. Charcoal Water Filter Holder 23. Charcoal Water Filter 16. Brew Head 24. Reservoir Lid 17. Brewing Chamber Holds Removable Capsule Holder or 25. 40-Ounce Water Reservoir reusable filter cup. 26. Removable Capsule Holder 18.
-
Page 7: Control Panel
GETTING TO KNOW YOUR CONTROL PANEL 10-CUP COFFEEMAKER CONTROLS Detailed programming and use instructions are on pages 8–10. 1. Power Switch (not shown) 7. Function Knob Located on the right side of your brewer. a. PROG Use to turn your Coffeemaker on and off. Select to program Auto On time. -
Page 8: Charcoal Water Filter
Be sure the PM indicator is on if a PM time is desired. Replacement filters can be purchased in stores, To finish setting the clock, turn the Function by calling Cuisinart Consumer Service, or at knob to any other setting or simply wait until www.cuisinart.com the numbers stop blinking. -
Page 9: Brewing Coffee
SETTING THE AUTO-ON TIME inserted in the basket. It may help to fold and flatten the seams of a paper filter beforehand. When you turn the Function knob to PROG, Add 1 level scoop of ground coffee per cup. the previously selected Auto On time, or the Adjust the amount according to taste. -
Page 10: 10-Cup Coffeemaker Cleaning
10-CUP COFFEEMAKER To clean: 1. Fill the water reservoir to capacity with a CLEANING AND mixture of ⁄ white vinegar and ⁄ water. MAINTENANCE 2. Press and hold the CLEAN button. When the CLEAN LED indicator flashes, Always turn unit off and remove the plug the coffeemaker is in Clean mode. -
Page 11: Setting Up Your Single-Serve
SETTING UP YOUR 6. Place mug on the drip tray. 7. Press the 10 oz. cup button. Light will SINGLE-SERVE flash slowly and the hot water will start to dispense momentarily. COFFEEMAKER 8. The one-time cleaning process is INITIAL CLEANING complete. -
Page 12: Brewing With A Reusable Filter Cup
® ® Try the Cuisinart HomeBarista Reusable Caution: There is very hot water in the Filter Cup included with your brewer for your capsule chamber during the brewing favorite coffee or tea. -
Page 13: Single-Serve Cleaning And Maintenance
2b. Follow brewing instructions on page 11. 2. Cleaning the Funnel – To remove funnel from capsule holder, hold funnel in left hand, twist NOTE: To cancel brewing, simply press the bottom away from you slightly and pull away selected brew size once again and the brewing from capsule holder to remove. - Page 14 ® CLEANING THE HOMEBARISTA 4. Discard contents of mug into the sink. REUSABLE FILTER CUP 5. Repeat until ADD WATER light comes on. Simply dispose of coffee grounds, then hand- 6. When descaling is complete, all LED lights wash both the filter cup and filter, or clean on top will be on.
-
Page 15: Warranty
To obtain a return This warranty is available to consumers only. shipping label, email us at ® You are a consumer if you own a Cuisinart https://www.cuisinart.com/ customer-care/ Thermal Coffee Center ™ that was purchased at product-return. - Page 17 MANUAL DE INSTRUCCIONES ® ™ Cuisinart Thermal Coffee Center Serie SS-20 Para su seguridad y para disfrutar plenamente de este producto, siempre lea cuidadosamente las instrucciones antes de usarlo.
-
Page 18: Medidas De Seguridad Importantes
24. No haga funcionar el aparato debajo o dentro de un armario/gabinete. Siempre desconecte 7. El uso de accesorios/aditamentos no el aparato antes de guardarlo en un recomendados por Cuisinart puede provocar armario/gabinete. Dejar el aparato conectado heridas. presenta un riesgo de incendio, especialmente 8. - Page 19 ADVERTENCIA: RIESGO AVISO DE INCENDIO O El cable de este aparato está dotado de una clavija polarizada (una pata es más ancha que DESCARGA ELÉCTRICA la otra). Como medida de seguridad, se podrá enchufar de una sola manera en la toma de El símbolo representado por un corriente polarizada.
-
Page 20: Instrucciones De Desembalaje
Panel de control ......7 sabor, el café tendrá mal sabor. Por eso Cuisinart equipó esta cafetera con un filtro Filtro de agua de carbón ....8 de agua de carbón que elimina el cloro y el... -
Page 21: Piezas Y Características
PIEZAS Y CARACETRÍSTICAS DE LA CAFETERA DE 10 TAZAS (1.45 L) Tapa del depósito de agua Placa Articulada, para facilitar el llenado. Revestimiento antiadherente a prueba de rayas. Depósito de agua (no ilustrado) Con indicador de nivel de agua. Filtro de agua de carbón Elimina el cloro, el mal olor y sabor del Rociador de agua (no ilustrado) agua corriente. - Page 22 PIEZAS Y CARACETRÍSTICAS DE LA CAFETERA MONODOSIS 22. Soporte del filtro de agua de carbón 15. Asa 23. Filtro de agua de carbón 16. Tapa de la cámara de preparación 24. Tapa del depósito de agua 17. Cámara de preparación Para cápsulas monodosis desechable o 25.
-
Page 23: Panel De Control
PANEL DE CONTROL CONTROLES DE LA CAFETERA DE 10 TAZAS (1.45 L) Véase las instrucciones detalladas de programación en las páginas 8–10. 1. Botón de encendido/apagado 7. Selector de función (no ilustrado) a. PROG Ubicado en el costado derecho de la unidad. Permite programar el encendido automático. -
Page 24: Filtro De Agua De Carbón
Filtros de repuesto están disponibles en las tiendas, en en incrementos de una hora o de un minuto. nuestro sitio Web www.cuisinart.com, o llamando a Al mantener el botón oprimido, la hora nuestro servicio postventa al 1-800-726-0190. -
Page 25: Preparación
Agarre el portafiltros por el asa y álcelo. Instale ENCENDIDO AUTOMÁTICO un filtro de papel n.° 4 o un filtro permanente “12:00” (la hora de encendido automático por Cuisinart ® . Asegúrese de que el filtro está defecto) o la hora de encendido automático completamente abierto y debidamente previamente fijada aparecerá... -
Page 26: Limpieza Y Mantenimiento
Para eliminar el sarro FUNCIÓN DE PAUSA AL SERVIR Cuando usa agua dura, depósitos de calcio/sarro ™ pueden acumularse en las partes internas de su BREW PAUSE cafetera. Aunque el calcio/sarro no es tóxico, La función Brew Pause ™ (pausa al servir) puede afectar el rendimiento del aparato. -
Page 27: Preparación De La Cafetera Monodosis
PREPARACIÓN DE LA 6. Coloque una taza en la bandeja de goteo 7. Presione el botón de preparación para 10 CAFETERA MONODOSIS onzas (295 ml); la luz parpadeará lentamente y el agua empezará a bajar LIMPIEZA INICIAL poco después.. Limpie el sistema interno antes del primer 8. -
Page 28: Preparación Con Cápsula Reutilizable
® Pruebe la cápsula reutilizable Cuisinart preparación HomeBarista ® para preparar su café o té favoritos. -
Page 29: Limpieza Y Mantenimiento De La Cafetera
2b. Siga las instrucciones de preparación del 2. Limpieza del embudo del porta-cápsulas – café en la página 11. Para retirar el embudo del porta-cápsulas, sostenga el embudo con una mano mientras NOTA: para cancelar, simplemente presione el gira ligeramente la parte inferior y jala el porta- botón de preparación otra vez;... - Page 30 4. Limpieza de la aguja perforadora – La aguja NOTA: siempre retire el filtro de agua de carbón perforadora, ubicada dentro de la cámara de del soporte antes de eliminar el sarro. preparación, deberá limpiarse en caso de Prepare lo siguiente: atascamiento, usando un sujetapapeles u otro objeto similar.
-
Page 31: Garantía
Le aconsejamos que llene el formulario de causados por accesorios, piezas o reparaciones registro disponible en www.cuisinart.com a fin no autorizados por Cuisinart, así como los daños de facilitar la verificación de la fecha de compra causados por el uso de un convertidor de voltaje. - Page 32 ©2020 Cuisinart East Windsor, NJ 08520 Imrpeso en China 18CE053315 F IB-15192-ESP-B...