Table of Contents
Advertisement
E
As an
that this product meets the
energy efficiency.
P
PC
S
®
NERGY
TAR
Partner, Panasonic has determined
E
NERGY
CD Stereo System
S
TAR
®
guidelines for
Before connecting, operating or adjusting this product, please read these
instructions completely.
Please keep this manual for future reference.
For U.S.A. only
The servicenter list and warranty can be found
on pages 15 and backcover.
Operating Instructions
SC-AK100
Model No.
RQT6351-1P
Advertisement
Table of Contents

Related Manuals for Panasonic SC-AK100


Summary of Contents for Panasonic SC-AK100
-
Page 1: Operating Instructions
As an NERGY that this product meets the energy efficiency. ® Partner, Panasonic has determined NERGY ® guidelines for Before connecting, operating or adjusting this product, please read these instructions completely. Please keep this manual for future reference. For U.S.A. only The servicenter list and warranty can be found on pages 15 and backcover. -
Page 2: Table Of Contents
IMPORTANT SAFETY INSTRUCTIONS ... 3 Listening caution ... 4 Supplied accessories ... 4 The remote control ... 4 Set-up ... 5 SC-AK100 Front panel controls ... 6 SA-AK100 The radio: manual tuning ... 7 SB-AK100 The radio: preset tuning... 7 CDs ... -
Page 3: Important Safety Instructions
The model number and serial number of this product can be found on either the back or the bottom of the unit. Please note them in the space provided below and keep for future reference. MODEL NUMBER SERIAL NUMBER IMPORTANT SAFETY INSTRUCTIONS Read these operating instructions carefully before using the unit. -
Page 4: Listening Caution
Please check and identify the supplied accessories. Use numbers indicated in parentheses when asking for replacement parts. (Only for U.S.A.) To order accessories contact 1-800-332-5368 or web site (http://www.panasonic.com). AC power supply cord ... 1 pc. (RJA0065-1D) FM indoor antenna ... 1 pc. (RSA0006-J) Remote control transmitter ... -
Page 5: Set-Up
Set-up Connect the AC power supply cord only after all other connections have been made. Preparation Twist and pull off the vinyl tip of the antenna wires and speaker cords. FM indoor antenna Adhesive tape Fix where reception is best. AM loop antenna Stand the antenna up on its base. -
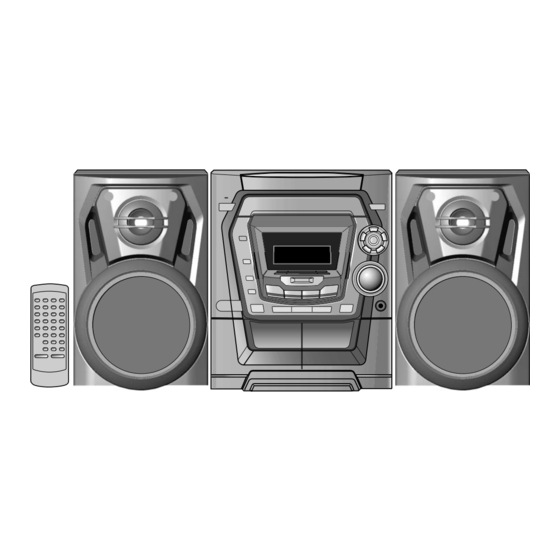
Page 6: Front Panel Controls
Front panel controls Main unit SUPER SOUND EQ Remote control SLEEP SLEEP CL CLOCK AUTO OFF TO OFF DISPLAY AY DISP DIMMER DIMMER PLAY AY MODE TUNER TUNER TAPE TAPE S. S.SOUND D EQ PRESET T EQ VOLUME VOLUME RQT6351 1 AC supply indicator (AC IN) 2 Standby/on switch (f f f f f /I, POWER) 3 Display button (DISPLAY) ... -
Page 7: The Radio: Manual Tuning
The radio: manual tuning Press [TUNER/BAND] to select band. The unit comes on. Every time you press the button: Press [PLAY MODE] on the remote control to select “MANUAL”. Every time you press the button: MANUAL PRESET Hold down [g/REW/3] or [4/FF/f] for a moment to search for a station. -
Page 8: Cds
CD selection Choose CDs with this mark: Do not: • use irregularly shaped CDs. • attach extra labels and stickers. • use CDs with labels and stickers that are coming off or with adhesive exuding from under labels and stickers. •... -
Page 9: Starting Play From A Specific Track
1 • PLAY MODE Starting play from a specific track Remote control only Press [DISC] and (within 10 seconds) disc. Select the track with the numbered buttons. To select track 10 or over, press [ 10] then the two digits. Play starts from the selected track. -
Page 10: Cassettes
Cassettes DECK 1/2 DEMO You can use either deck 1 or deck 2 for tape playback. Use normal position tapes. High position and metal position tapes can be played, but the unit will not be able to do full justice to the characteristics of these tapes. Press [TAPE :]. -
Page 11: Optional Antenna Connections
Recording If the tape finishes before the CD The CD continues playing. Press [L/–DEMO] to stop it. To record on the other side of the tape Turn the tape over and press [a REC]. Reducing noise when recording AM Remote control only Hold down [PLAY MODE] while recording. -
Page 12: Turning The Demo Function Off
Turning the demo function off DEMO A demonstration of the display is shown if you have not set the clock. You can reduce the power consumed in standby mode by turning it off. During standby mode Hold down [L/–DEMO] until “NO DEMO” is displayed. Every time you hold down the button: NO DEMO (off) DEMO ON (on) -
Page 13: Using The Timers
Using the timers SLEEP – AUTO OFF • 3 Using the play/record timer Remote control only You can set the timer to come on at a certain time to wake you up (play timer) or to record a radio station or from the aux source (record timer). -
Page 14: Troubleshooting Guide
Before requesting service, make the below checks. If you are in doubt about some of the check points, or if the remedies indicated in the chart do not solve the problem: In the U.S.A., contact the Panasonic Customer Call Center at 1-800-211-7262, or e-mail consumerproducts@panasonic.com, or web site (http://www.panasonic.com). -
Page 15: Product Service
Servicenter List (ONLY FOR U.S.A.) Product information For product information or assistance with product operation: In the U.S.A., contact the Panasonic Customer Call Center at 1-800-211-7262, or e-mail consumerproducts@panasonic.com, or web site (http://www.panasonic.com). In Canada, contact Panasonic Canada Inc. Customer Care Centre at 905-624-5505, web site (www.panasonic.ca), or an authorized... -
Page 16: Specifications
Servicenter Directory. Or call toll free, 1-800-211-7262 to locate a PASC authorized Servicenter. Carry-in or mail-in service in Puerto Rico can be obtained during the war- ranty period by calling the Panasonic Sales Company telephone number listed in the Servicenter Directory.