LG PREMTB001 Owner's Manual
Hide thumbs
Also See for PREMTB001:
- Owners and installation manual (45 pages) ,
- Owners & installation manual (6 pages) ,
- Engineering product data book (48 pages)
Table of Contents
Advertisement
Available languages
Available languages
Advertisement
Table of Contents

Related Manuals for LG PREMTB001


Summary of Contents for LG PREMTB001
- Page 1 OWNER’S MANUAL CONDITIONER Please read this manual carefully before operating your set and retain it for future reference. CEILING CASSETTE - 1WAY *MFL67798212* www.lg.com MFL67798212 Copyright © 2020 LG Electronics Inc. All Rights Reserved. Rev.00_062620...
-
Page 2: Table Of Contents
Table of contents TABLE OF CONTENTS SAFETY PRECAUTIONS PRIOR TO OPERATION Preparing for Operation Usage Cleaning and Maintenance Service PART DESCRIPTION Operation Indicator Lamp Name and Function of Wireless Remote Controller Name and function of wired remote controller(Accessory) INSTALLATION INSTRUCTIONS How to insert the Batteries Wireless Remote Controller Maintenance Operating Method... -
Page 3: Safety Precautions
Safety Precautions Safety Precautions To prevent injury to the user or other people and property damage, the following instructions must be followed. n Incorrect operation due to ignoring instruction will cause harm or damage. The seriousness is classified by the following indications. WARNING This symbol indicates the possibility of death or serious injury. - Page 4 Safety Precautions • Be sure the installation area does not deteriorate with age. - If the base collapses, the air conditioner could fall with it, causing property damage, product failure, and personal injury. Operation • Do not let the air conditioner run for a long time when the humidity is very high and a door or a window is left open.
- Page 5 - It may cause corrosion on the product. Corrosion, particularly on the condenser and evaporator fins, could cause product malfunction or inefficient operation. • If anyone other than a licensed professional installs, repairs, or alters LG Electronics air conditioning products, the warranty is voided. ...
- Page 6 Safety Precautions • Do not drink the water drained from the product. - It is not sanitary and could cause serious health issues. • Use a firm stool or ladder when cleaning or maintaining the product. - Be careful and avoid personal injury. •...
-
Page 7: Prior To Operation
Prior to Operation Prior to Operation Preparing for Operation 1. Contact an installation specialist for installation. 2. Use a dedicated circuit. Usage 1. Being exposed to direct airflow for an extended period of time could be hazardous to your health. Do not expose occupants, pets, or plants to direct airflow for extended periods of time. -
Page 8: Part Description
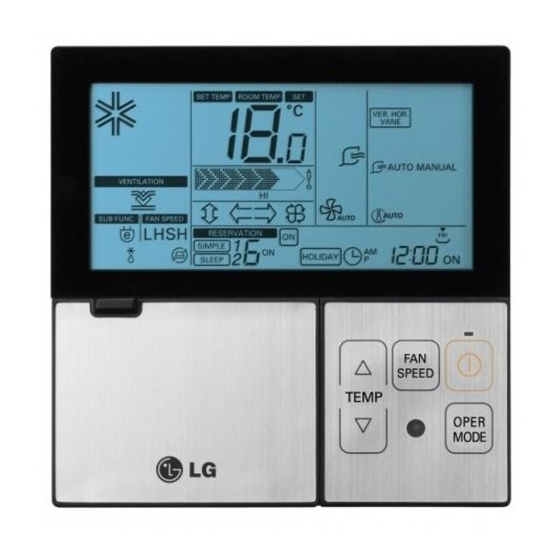
Part Description Part Description LCD Screen Accessory Holder(1 EA) Fixing Screw (2 EA) ˚C / ˚F (5 s) (3 s) Manual AAA(1.5 V) Batteries(2 EA) Wireless Remote Controller Operation Indicator Lamp Lamp Forced operation Button Description Lamp Color Cooling mode Green Heating mode Green... -
Page 9: Name And Function Of Wireless Remote Controller
Part Description Name and Function of Wireless Remote Controller 1. VANE ANGLE Button Used to set each vane angle. 2. FUNCTION SETTING Button Used to set or clear Auto Clean, Smart Clean, Electric heater or Individual vane angle control. 3. ON/OFF Button Used to turn on/off the unit. -
Page 10: Name And Function Of Wired Remote Controller(Accessory)
※ Some functions may not be operated and displayed depending on the product type. ※ It will display strange value to the room temperature if wired remote controller is not connected. Model : PREMTB001 (White Color) PREMTBB01 (Black Color) 10 Indoor Unit... -
Page 11: Installation Instructions
Installation Instructions Installation Instructions How to insert the Batteries 1. Remove the battery cover by pulling it according to the arrow direction. 2. Insert new batteries making sure that the (+) and (-) of battery are installed correctly. 3. Reattach the cover by sliding it back into position. 1. -
Page 12: Installer Setting - Setting Address Of Central Control
Installation Instructions Installer Setting - Setting Address of Central Control With the MODE button pressed, press the RESET button. By using the TEMPERATURE SETTING button, set the indoor unit address. - Setting range : 00 ~ FF Group No. Indoor Unit No. After setting the address, press the ON/OFF button toward the indoor unit 1 time. -
Page 13: Installer Setting -How To Enter Installer Setting Mode
Installation Instructions Installer Setting -How to enter installer setting mode CAUTION Installer setting mode is to set the detail function of the remote controller. If the installer setting mode is not set correctly, it can cause problems to the product, user injury or property damage. -
Page 14: Installer Setting - Installer Setting Code Table
Installation Instructions Installer Setting - Installer Setting Code Table Installer Setting Code Table Function Function Code Setting Value Remote Controller LCD 0 : Set to Master Mode Override 1 : Set to Slave 1 : Standard 2 : Low Ceiling Height Selection 3 : High 4 : Super High... -
Page 15: Owner's Instruction
Owner's Instruction Owner's Instruction Cooling Mode - Standard Operation Press the ON/OFF button. The unit will respond with beep sound. Press MODE button to select Cooling Mode. Set the desired temperature by pressing TEMP To raise the temperature button. Press ROOM TEMPERATURE CHECKING ˚C / ˚F (5 s) button to check the room temperature. -
Page 16: Auto Operation Mode
Owner's Instruction Auto Operation Mode Press the ON/OFF button. The unit will respond with beep sound. Press MODE button to select Auto Operation Mode. Set the desired temperature. ˚C / ˚F (5 s) <For Cooling Model> The temperature and fan speed are automatically set by the electronic controls based on the actual room temperature. -
Page 17: Dehumidification Mode
Owner's Instruction Dehumidification Mode Press the ON/OFF button. The unit will respond with beep sound. Press MODE button to select Dehumidification Mode. Set the fan speed. You can select the fan speed in four steps - low, medium, high, or chaos. Each time the button is pressed, the fan ˚C / ˚F (5 s) speed mode is shifted. -
Page 18: Heating Mode
Owner's Instruction Heating Mode This Function is only for H/P model. Press the ON/OFF button. The unit will respond with beep sound. Press MODE button to select Heating Mode. Set the desired temperature by pressing TEMP button. Press ROOM TEMPERATURE CHECKING button to check the room ˚C / ˚F (5 s) temperature. -
Page 19: Fan Mode
Owner's Instruction Fan Mode Press the ON/OFF button. The unit will respond with beep sound. Press MODE button to select Fan Mode. Set the fan speed again. You can select the fan speed in four ˚C / ˚F (5 s) steps–low, medium, high, or chaos. -
Page 20: Temperature Setting/Room Temperature Checking
Temperature Setting/Room Temperature checking Temperature Setting/Room Temperature checking We can simply adjust the desired temperature • Press the buttons to adjust the desired temperature : Increase Temp. per one time pressing : Decrease Temp. per one time pressing Room temp: Indicate the current room temperature Set temp: Indicate the temperature that user want to set <Cooling Mode>... -
Page 21: Airflow Setting
Airflow Setting Airflow Setting Up/Down Airflow Direction Control (Optional) The up/down airflow (Vertical Airflow) can be adjusted by using the remote controller. 1. Press the ON/OFF button to start the unit. 2. Press UP/DOWN AIRFLOW button and the louvers will swing up and down. Press the UP/DOWN AIRFLOW button again to set the vertical louver at the desired airflow direction. -
Page 22: Sub Function
Sub function Sub function Auto Clean (Optional) This function operate when the unit is turned off. Press the FUNCTION SETTING button 1 time. Auto Clean symbol will blink. Press the SET/CLEAR button to reserve or cancel the Auto Clean function. If the Auto Clean function is reserved, whenever the unit is turned off, the indoor fan is still running for about 30 minutes internally without cooling or dehumidification operation. -
Page 23: Individual Vane Angle Control (Optional)
Sub function Individual vane angle control (Optional) It is the function that can control 4 vane angles individually in the ceiling type 4Way cassette product group. This Funcion is only for 4Way cassette model. Press the VANE ANGLE button, Individual vane angle control symbol will blink. -
Page 24: Timer
Timer Timer Setting the Current Time 1. Press the SET / CLEAN button for 3 seconds. 2. Press TIME SETTING buttons until the desired time is set. (If you press down the button for a long time, it will change quickly in the units of 10 minutes) 3. -
Page 25: Off Timer Setting
Timer Off Timer Setting 1. Press the OFF button. Timer OFF 2. Press TIME SETTING buttons until the desired time is set. 3. Press the SET / CLEAR button. To cancel the Timer Setting • If you wish to cancel all timer setting, press the CLEAR ALL button. •... -
Page 26: Operating Instructions
Operating Instructions Operating Instructions Forced Operation Operation procedures when the remote control can't be used. Press the tact switch (forced operation) for 2 seconds. If you want to stop operation, press again the tact switch. In case the power comes on again after power failure on the forced operation mode, the operating conditions are automatically set as follows: During forced operation, the initial mode continues. -
Page 27: Maintenance And Service
Maintenance and Service Maintenance and Service CAUTION Before performing any maintenance, turn off the main power to the system. Grille, Case, and Remote Control o Turn the system off before cleaning. To clean, wipe with Air outlet a soft, dry cloth. Do not use bleach or abrasives. •... -
Page 28: When The Air Conditioner Is Not Going To Be Used For A Long Time
Maintenance and Service When the air conditioner is not going to be used for a long time. When it is not going to be used for When the air conditioner is to be used again. a long time. Operate the air conditioner at the Clean the air filter and install it in the following settings for 2 to 3 hours. -
Page 29: Before You Call For Service
Maintenance and Service Before you call for service... Troubleshooting Tips! Save time and money! Check the following points before requesting repairs or service..If the malfunction persist, please contact your dealer. The air conditioner The room has a It seems that Air conditioner does does not operate. - Page 30 30 Indoor Unit...
- Page 31 KHÍ Vui lòng đọc kỹ hướng dẫn này trước khi vận hành thiết bị của bạn và giữ lại để tham khảo về sau. ÂM TRẦN CASSETTE 1 HƯỚNG THỔI www.lg.com/vn Copyright © 2020 LG Electronics Inc. All Rights Reserved...
- Page 32 Mục lục MỤC LỤC CHU Y AN TOAN TRUOC KHI VAN HANH Chuẩn bị vận hành Cách sử dụng Vệ sinh và bảo trì Bảo dưỡng MO TẢ BỌ PHẠ N Đèn hiển thị hoạt động Tên và chức năng của bộ điều khiển từ xa không dây Tên và...
- Page 33 Chú ý an toàn Chú ý an toàn Để tránh gây thương tích cho người sử dụng hoặc những người khác và tránh gây thiệt hại cho tài sản, cần phải tuân thủ các hướng dẫn sau đây. n Việc vận hành không đúng cách do bỏ qua hướng dẫn sẽ gây tổn hại hoặc thiệt hại. Mức độ...
- Page 34 Chú ý an toàn • Không được lắp đặt sản phẩm trên bệ lắp đặt hư hỏng. - Điều này có thể gây ra tổn thương, tai nạn hoặc làm hư hỏng sản phẩm. • Cần đảm bảo khu vực lắp đặt không xuống cấp theo thời gian. - Nếu đế...
- Page 35 động không hiệu quả. • Sản phẩm điều hòa không khí của LG Electronics sẽ không được bảo hành trong trường hợp được lắp đặt, sửa chữa, thay thế bởi kỹ thuật viên không có chứng nhận đào tạo về...
- Page 36 Chú ý an toàn • Sử dụng dẻ lau mềm để vệ sinh. Không được sử dụng chất tẩy rửa, dung môi đậm đặc v.v. - Có nguy cơ xảy ra cháy nổ, điện giật, hoặc làm hư hỏng các bộ phận nhựa của sản phẩm.
- Page 37 Trước khi vận hành Trước khi vận hành Chuẩn bị vận hành 1. Liên hệ với kỹ thuật viên lắp đặt để lắp đặt sản phẩm. 2. Sử dụng mạch chuyên dụng. Cách sử dụng 1. Việc tiếp xúc với luồng không khí trực tiếp trong một khoảng thời gian dài có thể gây nguy hại cho sức khỏe của bạn.
- Page 38 Mô tả bộ phậ n Mô tả bộ phậ n Màn hình LCD Phụ kiện Giá đỡ (1 cá i ) Đinh ốc (2 EA) ˚C / ˚F (5 s) (3 s) Hướng dẫn sử dụng AAA(1,5 V) Pin(2 cụ c ) Bộ...
- Page 39 Mô tả bộ phậ n Tên và chức năng của bộ điều khiển từ xa không dây 1. Nú t VANE ANGLE Dù n g để cài đặt mối góc cánh quạt. 2. Nú t FUNCTION SETTING Dù n g để cài đặt hoặc hủ y bỏ các chế độ Vệ sinh Tự...
- Page 40 ※Một số chức năng có thể không hoạt động và không được hiển thị tùy thuộc loại sản phẩm. ※Nó sẽ hiển thị giá trị khác thường cho nhiệt độ trong phòng nếu chưa kết nối bộ điều khiển từ xa có dây. Dòng máy : PREMTB001 (Màu Trắng) PREMTBB01 (Màu Đen)
- Page 41 Hướ n g dẫ n lắ p đặ t Hướ n g dẫ n lắ p đặ t Cách lắp pin 1. Tháo nắp pin bằng cách kéo nó theo hướng mũi tên. 2. Lắp pin mới, đảm bảo rằng đầu (+) và (-) của pin được lắp chính xác.
- Page 42 Hướ n g dẫ n lắ p đặ t Cà i đặ t lắ p đặt - Cài đặt địa chỉ bộ Điều Khiển Trung Tâm Khi nhấn nút MODE, nhấn nút RESET. Bằng cách sử dụng nút TEMPERATURE SETTING, cài đặt đị a chỉ thiế t bị bên trong.
- Page 43 Hướ n g dẫ n lắ p đặ t Cà i đặ t lắ p đặ t – Cá c h và o chế độ cà i đặ t lắ p đặ t THẬN TRỌNG Chế độ cà i đặ t lắ p đặ t dù n g để cà i đặ t chứ c năng chi tiế t cho điề u khiể n từ xa. Nế...
- Page 44 Hướ n g dẫ n lắ p đặ t Cà i đặ t lắ p đặ t – Bả n g mã cà i đặ t lắ p đặ t Bả n g mã cà i đặ t lắ p đặ t Chức năng Mã...
- Page 45 Hướng dẫn sử dụng Hướng dẫn sử dụng Chế độ Làm mát - Vận hành tiêu chuẩn Nhấn nút BẬ T /TẮ T . Thiết bị sẽ phát ra tiếng bíp. Nhấn nút MODE để chọn Chế độ Làm mát. Cài đặt nhiệt độ...
- Page 46 Hướng dẫn sử dụng Chế độ Vận hành Tự động Nhấn nút BẬ T /TẮ T . Thiết bị sẽ phát ra tiếng bíp. Nhấn nút MODE để chọn Chế độ Vận hành Tự động. Chọn nhiệt độ mong muốn. ˚C / ˚F (5 s) <Dù...
- Page 47 Hướng dẫn sử dụng Chế độ Hú t ẩm Nhấn nút BẬ T /TẮ T . Thiết bị sẽ phát ra tiếng bíp. Nhấn nút MODE để chọn Chế độ Hú t ẩm. Cài đặt tốc độ quạt. Bạn có thể chọn tốc độ quạt theo 4 nấ c - thấp, trung bình, cao, hoặc hỗ...
- Page 48 Hướng dẫn sử dụng Chế độ sưởi ấm Chức năng này chỉ dành cho cấu hình H/P. Nhấn nút ON/OFF. Thiết bị này sẽ phản ứng với tiếng bíp. Nhấn nút MODE để chọn chế độ Sưởi ấm. Đặt nhiệt độ mong muốn bằng cách nhấn nút TEMP. Nhấn nút ROOM TEMPERATURE CHECKING để...
- Page 49 Hướng dẫn sử dụng Chế độ Quạt Nhấn nút BẬ T /TẮ T . Thiết bị sẽ phát ra tiếng bíp. Nhấn nút MODE để chọn Chế độ Quạt. Cài đặt tốc độ quạt lầ n nữ a . Bạn có thể chọn tốc độ quạt theo 4 nấ c ˚C / ˚F (5 s) - thấp, trung bình, cao, hoặc hỗ...
- Page 50 Cài đặt Nhiệt độ/Kiểm tra Nhiệt độ Trong phòng Cài đặt Nhiệt độ/Kiểm tra Nhiệt độ Trong phòng Chúng ta có thể điều chỉnh nhiệt độ mong muốn một cách đơn giản • Nhấn cá c nút nà y để điều chỉnh nhiệt độ mong muốn. : Tăng nhiệ...
- Page 51 Cài đặt Hướ n g luồng không khí Cài đặt Hướ n g luồng không khí Điều Chỉnh Hướng luồng không khí Lên/Xuống (Tù y chọ n ) Có thể điều chỉnh hướ n g luồng không khí lên/xuống (hướ n g dọ c ) bằng cách sử dụng điều khiển từ xa. 1.
- Page 52 Chứ c năng phụ Chứ c năng phụ Vệ sinh tự độ n g (Tù y chọ n ) Thự c hiệ n chứ c năng nà y sau khi đã tắ t thiế t bị . Nhấ n nú t FUNCTION SETTING 1 lầ n . Biể...
- Page 53 Chứ c năng phụ Điều chỉ n h góc cánh quạt riêng lẻ (Tù y chọ n ) Chức năng nà y có thể điều chỉ n h 4 góc cánh quạt riêng lẻ ở nhóm sản phẩm hộp 4 chiều loại gắn trần.
- Page 54 Bộ hẹn giờ Bộ hẹn giờ Cài đặt thời gian hiện tại 1. Nhấ n nú t SET / CLEAN khoả n g 3 giây. 2. Nhấn nút TIME SETTING cho đến khi thời gian mong muốn được cài đặt. (Nế u bạ n nhấ n giữ nú t quá...
- Page 55 Bộ hẹn giờ Cà i đặ t tắ t hẹ n giờ 1. Nhấn nút OFF. 2. Nhấn nút TIME SETTING cho đến khi thời gian mong muốn được cài đặt. 3. Nhấn nút SET/CLEAR. Để hủy Cà i đặ t hẹn giờ. •...
- Page 56 Hướng dẫn Vận hành Hướng dẫn Vận hành Vận hành Cưỡng bức Các quy trình vận hành khi không thể sử dụng điều khiển từ Bấm công tắc (vận hành cưỡng bức) khoả n g 2 giây. Nếu bạn muốn dừng vận hành, nhấn lại công tắc. Trong trường hợp có...
- Page 57 Bảo trì và bảo dưỡng Bảo trì và bảo dưỡng THẬN TRỌNG Trước khi thực hiện bảo trì, hãy tắt nguồn điện chính vào hệ thống. Lưới, Vỏ và Điều khiển Từ xa Cửa thông khí o Tắt hệ thống trước khi vệ sinh. Để vệ sinh, lau bằng dẻ lau mềm và...
- Page 58 Bảo trì và bảo dưỡng Khi không định sử dụng điều hòa không khí trong một thời gian dài. Khi không định sử dụng điều hòa không khí Khi dự định sử dụng lại điều hòa không khí. trong một thời gian dài. Chạy điều hòa không khí...
- Page 59 Bảo trì và bảo dưỡng Trước khi bạn gọi bảo dưỡng... Hướng dẫn Xử lý sự cố! Tiết kiệm thời gian và tiền bạc! Hãy kiểm tra các mục sau trước khi yêu cầu sửa chữa hay bảo dưỡng..Nếu chưa khắc phục được trục trặc, hãy liên hệ với đại lý bán hàng của bạn. Điều hòa không khí...
- Page 60 Địa chỉ : PT. LG ELECTRONICS VIETNAM Lô CN2, Khu công nghiệp Tràng Duệ, Xã Lê Lợi, huyện An Dương, thành phố Hải Phòng, Việt Nam...