Advertisement
Quick Links
OPERATING INSTRUCTIONS
WARNING
Risk of Fire or Electric Shock
•
Turn off power at circuit breaker and test that power is off before wiring.
•
Wire in accordance with all national and local electrical codes.
•
Connect to copper conductors only.
NOTICE
•
No user-serviceable parts.
SPECIFICATIONS
Clock Input: 120VAC, 60Hz
Switch Rating: 20A @ 120 VAC, 60Hz
1HP @ 120 VAC
1350 W Tungsten
Environmental Ratings:
Operating Humidity: 0 - 95% RH,
non-condensing
Wiring Connections: Three #14AWG lead wires
Wiring Diagrams/Diagramas de Cableado/Diagrammes de câblage
Directives De Fonctionnment
AVERTISSEMENT
•
Couper le courant au disjoncteur et vérifier que le circuit est hors tension avant de câbler.
•
Procédez au câblage conformément à tous les codes nationaux et locaux en matière d'électricité.
•
Raccorder exclusivement à des conducteurs en cuivre.
AVIS
•
Aucune pièce réparable par l'utilisateur.
CARACTÉRISTIQUES
Entrée d'horloge : 120 V c.a., 60 Hz
Caractéristiques des interrupteurs : 20 A sous 120 V c.a., 60 Hz
1 HP sous 120 V c.a.
1350 W tungstène
Évaluation environnementale:
Niveau d'humidité de fonctionnement : 0 - 95 % RH,
sans condensation
Connexions de câblage : Trois (3) fils 14AWG
Standard Installation/Instalación estándar/Installation normale
HOT (BLACK)
CALIENTE (NEGRO)
CHAUD (NOIR)
NEUTRAL (WHITE)
NEUTRAL (BLANCO)
NEUTRE (BLANC)
Risque d'incendie ou de choc électrique
Installation Instructions
1. Check the input and output ratings on unit to make sure this product is suitable for your appli-
cation.
2. Wire in accordance with all national and local electrical codes (see wiring diagrams below).
3. Verify that all connections are secure. Double check all twist-on wire connectors.
4. Mount timer into wall box using the supplied screws.
5. Mount wall plate onto timer using the supplied screws.
Programming Instructions
:
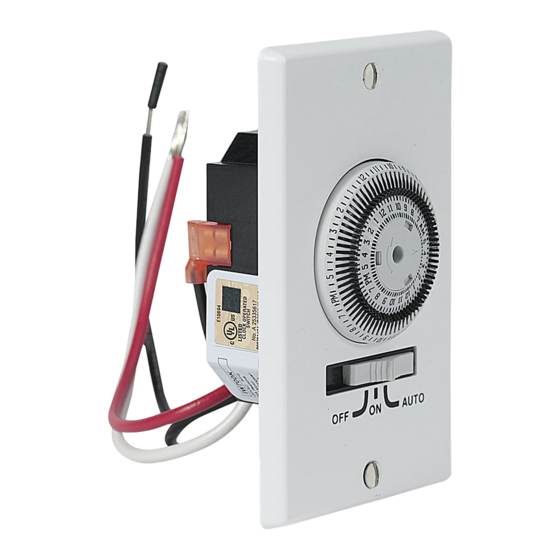
The timer dial contains 72 trippers, each representing a 20 minute timer interval.
Setting the clock time
:
Rotate the dial gradually clockwise until the current time is aligned with the triangle marker at
the 3 o'clock position. NOTICE! Do not rotate the dial counter-clockwise. Doing so
will damage the timer.
Programming the timer
:
Move the slide switch to the right AUTO position. Move the tripper, corresponding to the start
of the desired ON time, inward. Move each adjacent tripper inward until the desired OFF time is
reached. Repeat for all desired ON/OFF cycles.
Manual Override Instructions:
The slide switch provides manual operation of the load, overriding the timer programming. If set to
the OFF position, the load will be continuously off. If set to the ON position the load will be continu-
ously on. For automatic on/off function, set the switch to the AUTO position.
LOAD
LOAD (RED)
CARGA
CARGA (ROJO)
CHARGE
CHARGE (ROUGE)
Minuterie murale encastrée
Directives d'installation
1. Vérifiez le régime nominal d'entrée et de sortie de l'unité pour vous assurer que le produit con-
vient à votre application.
2. Procédez au câblage conformément à tous les codes nationaux et locaux en matière d'électricité
(reportez-vous aux diagrammes de câblage ci-dessous).
3. Assurez-vous que toutes les connexions sont bien serrées. Vérifiez à nouveau tous les connect-
eurs à torsion.
4. Montez la minuterie sur la boîte murale à l'aide des vis fournies.
5. Fixez la plaque murale à la minuterie à l'aide des vis fournies.
Directives de programmation
:
Le cadran de la minuterie contient 72 déclencheurs, chacun représentant un intervalle de 20 min-
utes sur la minuterie.
Réglage de l'heure
:
Tournez le cadran graduellement dans le sens horaire jusqu'à ce que l'heure actuelle soit alignée
sur le repère en triangle à la position 3 heures. AVIS! Ne tournez pas le cadran dans le
sens antihoraire. Cela aurait pour effet d'endommager la minuterie.
Programmation de la minuterie
Déplacez l'interrupteur à glissière vers la position AUTO (à droite). Déplacez le déclencheur,
correspondant à l'heure de début (ON), vers l'intérieur. Déplacez ensuite chaque déclencheur
adjacent vers l'intérieur jusqu'à ce que l'heure d'arrêt (OFF) soit atteinte. Répétez la procédure
pour tous les cycles de marche et d'arrêt (ON/OFF) désirés.
Directives de priorité manuelle:
L'interrupteur à glissière permet le fonctionnement manuel de la charge, modifiant la programma-
tion de la minuterie. Si la minuterie est régléeà la position d'arrêt ( OFF ), la charge sera coupée de
façon continue. Si elle est réglée à la position de marche (ON), la charge sera sous tension (ON) de
façon continue. Pour le fonctionnement en mode automatique (marche/arrêt), réglez l'interrupteur à
la position AUTO.
In-Wall Timer
MODEL: IW700K
Modèle IW700K
:
Advertisement

Related Manuals for Intermatic IW700K


Summary of Contents for Intermatic IW700K
- Page 1 In-Wall Timer MODEL: IW700K OPERATING INSTRUCTIONS Installation Instructions 1. Check the input and output ratings on unit to make sure this product is suitable for your appli- WARNING Risk of Fire or Electric Shock cation. 2. Wire in accordance with all national and local electrical codes (see wiring diagrams below).
- Page 2 LIMITED ONE-YEAR WARRANTY If within the warranty period specified, this product fails due to a defect in material or workmanship, Intermatic Incorporated will repair or replace it, at its sole option, free of charge. This warranty is extended to the original household purchaser only and is not transferable. This warranty does not apply to: (a) damage to units caused by accident, dropping or abuse in handling, acts of God or any negligent use;...