Lorex L4248 Series User Manual
Hide thumbs
Also See for L4248 Series:
- Quick start manual (51 pages) ,
- Quick start manual (54 pages) ,
- Installation manual (11 pages)
Table of Contents
Advertisement
Advertisement
Table of Contents

Related Manuals for Lorex L4248 Series


Summary of Contents for Lorex L4248 Series
- Page 1 User Manual L4248 Series...
- Page 3 User Manual L4248 Series #LX400115; r. 4.0/58631/58631; en-US...
- Page 4 Thank you for purchasing this product. Lorex Technology is committed to providing our customers with a high quality, reliable security solution. This manual refers to the following models: L4248 For the latest online manual, downloads and product updates, and to learn about our complete line of accessory products, please visit our website at: lorex.com...
-
Page 5: Table Of Contents
Changing Passwords ..............32 10.2 Adding a New User ..............32 10.3 Setting User Permissions..............33 Pairing Cameras .................35 11.1 Pairing Cameras with Lorex Cirrus..........35 11.2 Pairing Cameras using the Recorder Interface ........36 Storage.....................38 12.1 Configuring Storage Overwrite ............38 12.2 Formatting Storage Devices ............39 Using the Main Menu................40... - Page 6 Lorex Player 11 Interface Overview..........65 Smart Home & Voice Assistance .............66 DDNS Setup (Advanced)...............67 18.1 STEP 1: Port Forwarding .............67 18.2 STEP 2: Create a LOREX Account..........67 18.3 STEP 3: Add Your Address............67 18.4 STEP 4: Activate Your Warranty ............67 18.5 STEP 5: Sign Up for a DDNS Account ..........68...
-
Page 7: Important Safeguards
Important Safeguards In addition to the careful attention devoted to quality standards in the manufacturing process of your product, safety is a major factor in the design of every instrument. However, safety is your responsibility too. This sheet lists important information that will help to ensure your enjoyment and proper use of the product and accessory equipment. -
Page 8: Service
Important Safeguards 6. Overloading: Do not overload wall outlets or extension cords as this can result in the risk of fire or electric shock. Overloaded AC outlets, extension cords, frayed power cords, damaged or cracked wire insulation, and broken plugs are dangerous. They may result in a shock or fire hazard. -
Page 9: Use
Important Safeguards 2. Conditions Requiring Service: Unplug this product from the wall outlet and refer servicing to qualified service personnel under the following conditions: • When the power supply cord or plug is damaged. • If liquid has been spilled or objects have fallen into the product. •... -
Page 10: Package Contents
Package Contents U424AA – 2K Wire-Free Security Camera (x1)* Re-chargeable Battery Pack (x1)* Camera Antenna (x1)* L4248 – 2K Network Video Re- Charging Adapter & Cable (x1)* NVR Power Adapter (x1) corder (NVR) (x1) USB Mouse (x1) Ethernet Cable (x1) HDMI Cable (x1) Mounting Bracket (x1)* Allen Key (x1) - Page 11 Package Contents NOTE Hard drive size, number of channels, and camera configuration may vary by model. Check your package to con- firm that you have received the complete system, including all components shown above. #LX400115; r. 4.0/58631/58631; en-US...
-
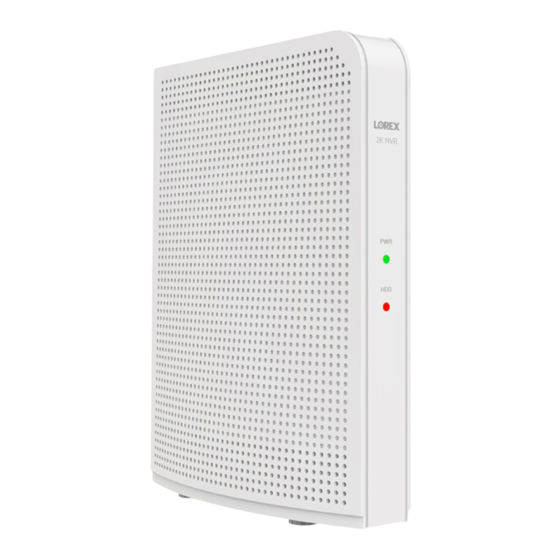
Page 12: Recorder Overview
Recorder Overview 3.1 Front Panel 1. Power status indicator (blue) Operating correctly. 2. HDD status indicator (red) Hard disk drive installed. 3.2 Back Panel #LX400115; r. 4.0/58631/58631; en-US... - Page 13 Recorder Overview 3. QR code QR code to setup the NVR on the Lorex Home app. 4. HDMI port Port for the HDMI cable to view the system interface on an HDMI monitor or TV. 5. Ethernet port Port for the Ethernet cable that connects to your net- work for local and remote connectivity.
-
Page 14: Basic Setup
Basic Setup 4.1 STEP 1: Initial Setup Before you begin, you will need to prepare the wire-free cameras and battery packs. The camera battery comes partially charged (due to safety regulations). Please, fully charge the battery before use and setup. You can charge the battery pack inside or outside of the camera. To prepare the cameras: 1. - Page 15 Basic Setup 3. Insert the battery pack into the bottom of the camera. NOTE You will hear a “beep” when the power pack is properly inserted. If you do not hear this alert, remove the power pack by pushing in on the battery release tabs then re-insert. U424AA Series To charge the camera battery pack: 1.
-
Page 16: Step 2: Setting Up The Recorder
Basic Setup 2. Using the provided battery charging adapter and cable, connect the camera to a nearby outlet. U424AA Series 3. (OPTIONAL) Push in on the battery release tabs to remove the battery pack from the cam- era and then connect the battery to a nearby outlet. U424AA Series 4.2 STEP 2: Setting Up the Recorder To set up the recorder:... -
Page 17: Step 3: App Setup
4. Connect the included power adapter to the recorder. Wait a few minutes for the system to start 4.3 STEP 3: App Setup Connect to your system using the free Lorex Cirrus app for smartphones and tablets (iOS and Android). To connect to the Lorex Cirrus app: 1. -
Page 18: Step 4: Installing The Cameras
5. Enter the following: 6. Tap Save. 7. Add the cameras to the recorder through the Lorex Cirrus app or the recorder interface. See 11.1 Pairing Cameras with Lorex Cirrus or 11.2 Pairing Cameras using the Recorder Inter- face, page 36, for full details. -
Page 19: Mounting The Cameras
Basic Setup • Position the camera no more than 20ft (6.1m) away from the area you wish to monitor. • Install the camera within range of the wireless receiver (noted in the camera’s specifications). • For best performance, position the camera so that objects of interest will move from side-to- side across the camera image, rather than moving towards or away from the camera. - Page 20 Basic Setup 5. Orient the camera fastener upwards, then align the camera’s mounting plate slots to the tabs in the mounting bracket. Push in and slide down to secure in place. U424AA Series 6. Insert the security screw through the fastener on the top of the camera base and mounting bracket, then tighten with the screwdriver.
-
Page 21: Optimizing Motion Detection
Customize motion detection settings to ensure motion events are being recorded and reduce false alarms. To optimize motion detection: 1. Open the Lorex Cirrus app. 2. Select your recorder from the list of devices. 3. From the Live View, tap to select a channel. -
Page 22: Quick Access To System Information
Basic Setup c. Motion Zone: Tap to configure the motion zone. Motion will only be detected in areas highlighted in blue. • Tap to configure which areas of the camera image will be enabled for motion detec- tion. A blue grid will appear over the camera’s live view, letting you know that mo- tion detection is active for the entire image. -
Page 23: Using The Mouse
Using the Mouse The recorder is designed for mouse navigation. Connect the included mouse to one of the USB ports on the recorder. To use the USB mouse: 1. Left Button: • During live viewing in split-screen view, double-click on a channel to view it in full- screen. -
Page 24: Using The Recorder's On-Screen Display
Using the Recorder’s On-Screen Display Use the system’s on-screen display to navigate menus and configure options and settings. 6.1 Using the Taskbar The Taskbar along the bottom of the recorder’s main display allows you to access the Main Menu and control basic functions of the recorder. To use the Taskbar: •... -
Page 25: Using The On-Screen Keypads
Using the Recorder’s On-Screen Display 2. Pair: Click to pair a wire-free camera to the selected channel. For more information on pair- ing, see 11 Pairing Cameras, page 35. NOTE If a camera is already paired to the selected channel, the new pairing process will override it. 6.3 Using the On-Screen Keypads The Full Keypad is used to input alphanumeric characters, such as in user name or password fields. - Page 26 Using the Recorder’s On-Screen Display 1. Using the mouse, click on a field where numeric characters are entered, such as the date or time fields. • The Number Keypad opens: • Click to move the cursor between letters. • Click to backspace / delete numbers.
-
Page 27: Recording
By default, the system is set to record motion events from all connected cameras. It is recom- mended that you use the Lorex Cirrus app to optimize camera motion detection regions so that only objects of interest will trigger recording (see 4.4.3 Optimizing Motion Detection, page 15 for details). -
Page 28: Configuring Manual Recording
Recording 2. From the list of channels, find the camera you want to configure. 3. Click the drop-down arrow, then select a period of time the camera will record video for when motion is detected. 4. (OPTIONAL) Click the drop-down arrow beside Camera Recording Time to select a peri- od of time for all connected cameras. - Page 29 Recording 1. From the Live View screen, click > Setup > Recording > Schedule. 2. Click the drop down next to Channel to select a channel. 3. Click or click-and-drag over existing bars to remove sections from the recording schedule. For blank areas of the schedule, click or click-and-drag to add sections to the recording schedule.
-
Page 30: Playback
Playback You can view and back up recorded video on the recorder. To access playback: • Right-click in the Live View screen to open the Taskbar, then click • Right-click in the Live View screen to open the Taskbar, click , then click 8.1 Using Playback Play back video recordings from a specific date and time. - Page 31 Playback 1. Event List: Shows all video clips that fit your original search criteria. Double-click any event to begin playback, or check multiple events to perform a backup. 2. Backup and Playback Buttons: • Click to play the currently selected video clip. •...
-
Page 32: Search & Backup
Search & Backup You can back up video recordings and snapshots to a USB flash drive (not included) connected to the recorder. You can back up video directly from Playback mode, which is helpful if you do not know the time frame you want to back up. -
Page 33: Video Clip Backup
Search & Backup 7. Select a file type for your backup files. Click Save. 9. The backup drive menu appears (see 9.2 Drive Menu Controls, page 29 for an overview of drive menu controls). • Navigate to the folder you want the backup files to be saved in. •... - Page 34 Search & Backup 1. Open the Playback menu: • Right-click in the Live View screen to open the Taskbar, then click • Right-click in the Live View screen to open the Taskbar, click , then click 2. Select a channel you would like to backup a video clip from, and begin playback at the de- sired start time for the backup file.
-
Page 35: Drive Menu Controls
Search & Backup 7. The backup drive menu appears (see 9.2 Drive Menu Controls, page 29 for an overview of drive menu controls). • Navigate to the folder you want the backup files to be saved in. • Click OK to begin. •... - Page 36 Search & Backup 1. Connected Drives: USB flash drives (not included) connected to the system are shown here. Click to open. 2. Refresh Contents 3. Viewing Buttons: Files appear in a list view by default. Use the viewing buttons to toggle between list view ( ) and thumbnail 4.
- Page 37 Search & Backup 14. Format: Click to format the currently selected USB drive. When first connecting a USB flash drive (not included) to the system, it is recommended to format the drive so it is ready for use with the recorder. CAUTION Formatting will erase all data saved to the drive.
-
Page 38: Managing Users, Passwords And Permissions
Managing Users, Passwords and Permissions The system supports the following account types: • ADMIN — System Administrator: The administrator has full control of the system, and can change both administrator and user passwords and enable/disable password protection. • USER — Normal User: Users only have access to live viewing, search, playback, and other functions. -
Page 39: Setting User Permissions
Managing Users, Passwords and Permissions 1. From the Live View screen, click > Setup > User. 2. Click one of the user accounts that is currently disabled. 3. Click 4. Select ON from the drop-down next to User Enable. 5. Click the field next to User Name to change the user name for the account. 6. - Page 40 Managing Users, Passwords and Permissions 3. Click 4. Edit the user permissions to your preference: • Check the boxes next to any system menus or capabilities you would like the user to access. • Click All to check all boxes. •...
-
Page 41: Pairing Cameras
(max. 8 cameras per sys- tem), follow the instructions below. • To pair cameras to your system using the Lorex Cirrus, see 11.1 Pairing Cameras with Lorex Cirrus, page 35. -
Page 42: Pairing Cameras Using The Recorder Interface
Pairing Cameras 4. Press and hold the pairing button on the back of the camera until the red LED lights stop flashing, then release the pairing button. U424AA Series NOTE A “Pairing success!” message will appear on screen. If you do not see this message, repeat the steps above. 11.2 Pairing Cameras using the Recorder Interface 1. - Page 43 Pairing Cameras 2. Press and hold the pairing button on the back of the camera until the red LED lights stop flashing, then release the pairing button. NOTE A “Pairing success!” message will appear on screen. If you do not see this message, repeat the steps above. U424AA Series #LX400115;...
-
Page 44: Storage
Storage Your recorder has multiple storage options for video files. Depending on your system configura- tion, your recorder may have come with a pre-installed hard drive or a pre-inserted microSD card. You may also connect a USB storage device to the USB port labelled Storage on your recorder for redundant storage. -
Page 45: Formatting Storage Devices
Storage 12.2 Formatting Storage Devices Formatting deletes all saved files from the selected storage device. It is recommended to format any newly-installed storage device before recording. To format storage: 1. From the Live View screen, click > Setup > Device > Storage. 2. -
Page 46: Using The Main Menu
Using the Main Menu Use the Main Menu to access the full feature set of the recorder. To open the Main Menu: 1. Click on the Main Menu button ( ) on the Taskbar from the Live View screen. 2. Click to make a selection. If prompted, enter the user name (default: admin) and your secure password. -
Page 47: Settings Menu
Using the Main Menu To copy channel settings to another channel: 1. Set your preferences for one channel and click Save. 2. Use the drop-down next to Copy to select the channel you wish to copy settings from. 3. Do one of the following: •... -
Page 48: Enabling / Disabling Cameras
Using the Main Menu 3. Click the icon under Setup. 4. Enter a channel name of your choice (e.g., Back Yard Camera). This name will appear on the camera image in live viewing and in recordings. 5. Select the check box next to Show Name to display the channel name 6. -
Page 49: Enabling Audio
Using the Main Menu 1. From the Live View screen, click > Setup > Camera > Camera Setup. 2. From the channel row, look at the Camera Firmware description to see the current firm- ware version for the specific channel. 13.2.4 Enabling Audio The included cameras support audio recording, but must be enabled through the recorder inter- face. -
Page 50: Changing The Cursor Hidden Delay And Speed
Using the Main Menu 1. From the Live View screen, click > Setup > System > General > Output Configuration. 2. Use the drop-down next to Output Resolution to select the resolution of your monitor or TV. (OPTIONAL) If you are experiencing cropping of the recorder’s display, it is recommended that you check the Automatic Detection box to optimize your display. -
Page 51: Configuring Basic Network Settings
Using the Main Menu 1. From the Live View screen, click > Setup > System > General > Output Configuration. 2. Click-and-drag the slider next to Transparency to adjust the transparency of the Taskbar and menu screens. 3. Click Save. 13.2.8 Configuring Basic Network Settings The basic network menu allows you to change port numbers if needed and configure the network protocol type (DHCP or static). -
Page 52: Setting Up Email Notifications
13.2.9 Setting up Email Notifications You can configure the system to send email notifications about important activity from your se- curity system. To have the option of using Lorex’s free email server (recommended) or using a different one. • For instructions on enabling email notifications using the Lorex server, see 13.2.9.1 Email Notifications —... -
Page 53: Setting An E-Mail Schedule
Prerequisites: • You must enable e-mail notifications for the e-mail schedule to take effect. • To enable e-mail notifications using the default Lorex e-mail server, see 13.2.9.1 Email Noti- fications — Using the Lorex server (recommended), page 46. • To enable e-mail notifications using custom mail server information, see 13.2.9.2 Email Noti- fications —... -
Page 54: Configuring Motion Detection Settings
Using the Main Menu To set an e-mail schedule: 1. From the Live View screen, click > Setup > Network > Email. 2. Use the drop-down next to Channel to select a channel to set the e-mail schedule for. 3. Select Motion to edit the motion notification schedule (represented by yellow bars), or Warning to edit the system warning notification schedule (orange bars). - Page 55 Using the Main Menu 1. From the Live View screen, click > Setup > Alarm > Alarm Setup. 2. Use the drop-down next to Channel to select the channel you want to configure motion de- tection options for. 3. Use the drop-down next to Detection to choose between Motion or Person detection, or to turn OFF detection.
-
Page 56: Setting A Notification Schedule
• Your devices must have push notifications enabled and motion detection configured to re- ceive motion detection notifications, see 13.2.11 Configuring Motion Detection Settings, page 48 to configure motion detection settings and Lorex Cirrus App — Push Notifications to ena- ble push notifications. -
Page 57: Configuring System Warning Settings
Using the Main Menu 1. From the Live View screen, click > Setup > Alarm > Deterrence. 2. Use the drop-down next to Channel to select a channel to set the deterrence schedule for. 3. Click or click-and-drag over existing bars to remove sections from the deterrence schedule. For blank areas of the schedule, click or click-and-drag to add sections to the notification schedule. -
Page 58: System Menu
Using the Main Menu 3. Click Save. 4. (OPTIONAL) Use the drop-down beside the features then select ON or OFF to select or de- select all check boxes. 13.3 System Menu Change general system information such as date, time and region, edit passwords and permis- sions, and more. -
Page 59: Changing On-Screen Language
Using the Main Menu 1. From the Live View screen, click > Setup > General. 2. Click the field next to Device Name and then use the on-screen keyboard to change the re- corder’s device name. 3. Click Save. 13.3.3 Changing On-Screen Language Change the language of on-screen text for the recorder. -
Page 60: Configuring Menu Time-Out Option
Using the Main Menu 1. From the Live View screen, click > Setup > General. 2. Use the dropdown next to Video Format to select either NTSC or PAL. 3. Click Save. The system will reboot to properly set the new video output mode. 13.3.5 Configuring Menu Time-out Option By default, system menus are set to time-out after a set time period, taking you back to the main menu if there is no activity. -
Page 61: Configuring Ntp
Using the Main Menu 1. From the Live View screen, click > Setup > General> Date and Time. 2. Click the check box beside Enable DST to enable or disable DST. 3. Select the time difference to use for DST from the drop-down next to Time Offset. 4. -
Page 62: View System Information
Using the Main Menu 1. From the Live View screen, click > Setup > General > Date and Time. 2. Click the check box beside Enable NTP to enable or disable NTP. 3. Select the desired NTP server from the drop-down next to Server Address (we recommend using the default ntp.lorexddns.net). -
Page 63: Logs - Searching And Backing Up
Using the Main Menu To view system information: From the Live View screen, click > Setup > System > Information. From the Live View, click on the Taskbar along the bottom of the screen. 13.3.9 Logs — Searching and Backing Up The system log shows you important system events, such as motion alarms and system warnings. -
Page 64: Maintenance Menu
Using the Main Menu 1. From the Live View screen, click > Setup > System > Maintenance > Log. 2. Click next to Start Date field to choose the starting date for your search from the on- screen calendar. 3. Click next to End Date field to choose the end date for your search from the on-screen calendar. -
Page 65: Manual Firmware Upgrade
Using the Main Menu 13.4.1 Manual Firmware Upgrade The system supports automatic firmware upgrades over the network to ensure your unit is always up-to-date. It is recommended to always use automatic upgrade unless directed to perform a manual upgrade by technical support. Prerequisites: •... -
Page 66: Exporting System Settings
Using the Main Menu 13.4.3 Exporting System Settings You can export the main menu settings you have configured to a USB flash drive (not included). Exporting system settings lets you to quickly apply your settings to another recorder. Prerequisites: • You must connect a USB flash drive to one of the recorder’s USB ports. To export system settings: 1. -
Page 67: Ipc Upgrade
Using the Main Menu 3. The drive menu appears and displays the contents of the USB flash drive. • Navigate to the system settings file you want to import, then click OK to begin. • A warning message appears to inform you the system will reboot in order to properly im- port your saved settings. -
Page 68: Connecting To Your System Using Pc Or Mac
Connecting to Your System Using PC or MAC You can connect to you security system over the Internet using our free Lorex Client 13 for PC and Mac computers. Securely connect to your system from anywhere with no recurring fees for live viewing. -
Page 69: Connecting To Your System Using Smartphone Or Tablet Apps
Connecting to Your System Using Smartphone or Tablet Apps You can connect to you security system over the Internet using our free Lorex Cirrus app for iPhone®, iPad®, and Android™ smartphones / tablets. Securely connect to your system from anywhere with no recurring fees for live viewing. -
Page 70: Viewing Backed Up Video On Pc/Mac
MP4 file type, which can be played by most video player software. PC Users have the option of using the Lorex Player 11 software, which is automatically saved to your backup USB flash drive when you perform a video backup. Lorex Player 11 is capable of playing LF files. -
Page 71: Lorex Player 11 Interface Overview
10. Take Snapshot 11. Hide/Show Playlist 12. Mute/Unmute and Volume Bar 13. Add File 14. Remove File 15. Delete File 16. Playlist 17. Advanced Menu NOTE *Watermark is only available for specific Lorex Player 11 versions. #LX400115; r. 4.0/58631/58631; en-US... -
Page 72: Smart Home & Voice Assistance
For compatibility information, as well as full instructions on setup and use, visit lorex.com/SmartHome. To enable Smart Home services on the recorder: 1. From the Live View, click >... -
Page 73: Ddns Setup (Advanced)
2. Select Create an Account. NOTE If you have already set up an account, select I Have a LOREX Account and log in. Proceed directly to 18.3 STEP 3: Add Your Address, page 67. 3. Enter basic information for account setup. -
Page 74: Step 5: Sign Up For A Ddns Account
DDNS Setup (Advanced) To activate your product warranty: 1. From your LOREX account, click the WARRANTIES tab. 2. Click Activate Warranty. 3. Select your address from the dropdown under Your Address. Enter the rest of your product information (attaching bill of sale optional). -
Page 75: Step 6: Enable Ddns On The Recorder
DDNS setup. 18.6 STEP 6: Enable DDNS on the recorder The primary connectivity option for this recorder uses Lorex Client 13 to connect to your system over the Internet without requiring port forwarding or DDNS registration. Lorex DDNS is available as an optional connectivity option. - Page 76 DDNS Setup (Advanced) • You must create a free Lorex DDNS account. See 18.5 STEP 5: Sign Up for a DDNS Account, page 68 for full setup instructions. To configure DDNS settings: 1. From the Live View, click > Setup > Network > DDNS.
-
Page 77: Troubleshooting
Troubleshooting When a malfunction occurs, it may not be serious or difficult to correct. The following chart con- tains solutions to most common problems. Please refer to the topics below before calling Lorex Technical Support. Error Solutions No picture from cameras •... - Page 78 Troubleshooting Error Solutions There is no picture on moni- • Power off the monitor/TV and the recorder. Power on the monitor/TV, and tor/TV after connecting it to then power on the recorder. the recorder. • Ensure that the monitor/TV is set to the input channel that the recorder is connected to.
-
Page 79: Technical Specifications
Technical Specifications 20.1 Wire-Free Recorder (L4248 Series) 20.1.1 System Operating System Embedded Linux 6 / 8 Channels Number of Channels 20.1.2 Inputs/Outputs VGA OUT HDMI 1920×1080, 1440×900, 1280×1024, 1280×720, Video Output Resolution 1024×768 Ethernet 8P8C 10/100 Base-T USB 2.0 20.1.3 Playback & Display... -
Page 80: General
2. Compatible with certain Lorex wire-free cameras only. For a list of compatible cameras please visit www.lorex.com/compatibility Recording time may vary based on recording reso- lution and quality, lighting conditions and movement in the scene. - Page 82 Legal disclaimer As our product is subject to continuous improvement, Lorex Corporation & subsidiaries reserve the right to modify product design, specifications & prices without notice and without incurring any obligation.E&OE.