Table of Contents
Advertisement
Quick Links
Advertisement
Table of Contents
Troubleshooting

Related Manuals for Printekmobile I80 Series

Summary of Contents for Printekmobile I80 Series
- Page 1 I80 Series Operator’s Manual Thermal Printer I www.printek.com ...
- Page 2 This device fulfills the European standards requirements by complying with the Directive relating to electromagnetic compatibility and relating to low-voltage electrical equipment. Furthermore it fulfills the requirements for RoHS and R&TTE if applicable. Conformity with the above mentioned Directives is indicated by the CE symbol attached to the device. Note: Conformity may be affected by: - using interface cables not complying with the specifications - non-observance of important instructions in the operator´s manual...
- Page 3 MPE. *It is desirable that it should be installed and operated keeping the radiator at least 20cm or more from person’s body. *This last sentence is basically unnecessary, but it can be also possible to describe. When installing in portable equipment (equipment for which the spaces between human body and antenna are used within 20cm): This equipment complies with FCC radiation exposure limits set forth for an uncontrolled environment and meets the FCC radio frequency RF exposure guidelines.
- Page 4 Canadian Department of Communications Radio Interference Statement This device complies with Industry Canada license‐exempt RSS standard(s). Operation is subject to the following two conditions: 1) this device may not cause interference; 2) this device must accept any interference, including interference that may cause undesired operation of the device. Under Industry Canada regulations, this radio transmitter may only operate using an antenna of a type and maximum (or lesser) gain approved for the transmitter by Industry Canada. To reduce potential radio interference to other users, the antenna type and its gain should be so chosen that the equivalent isotropically radiated power (e.i.r.p.) is not more than that necessary for successful 2 communication. Maximum power output plus maximum antenna gain of the EUT is: 4.5W/m , Limit is 10Wm . Le présent appareil est conforme aux CNR d'Industrie Canada applicables aux appareils radio exempts de licence. L'exploitation est autorisée aux deux conditions suivantes : (1) l'appareil ne doit pas produire de brouillage, et (2) l'utilisateur de l'appareil doit accepter tout brouillage radioélectrique subi, même si le brouillage est susceptible d'en compromettre le fonctionnement. Conformément à la réglementation d'Industrie Canada, le présent émetteur radio peut fonctionner avec une antenne d'un type et d'un gain maximal (ou inférieur) approuvé pour l'émetteur par Industrie Canada. Dans le but de réduire les risques de brouillage radioélectrique à l'intention des autres utilisateurs, il faut choisir le type d'antenne et son gain de sorte que la puissance isotrope rayonnée équivalente (p.i.r.e.) ne dépasse pas l'intensité nécessaire à l'établissement d'une communication satisfaisante. La puissance de sortie maximale plus 2 2 gain d'antenne maximal du EUT est : 4.5W/m Limite est 10W/m IV www.printek.com...
-
Page 5: Table Of Contents
TABLE OF CONTENTS TABLE OF CONTENTS ..........................V Introduction..............................1 Printer Features ............................2 Quick Start Instructions ..........................3 A. Paper Load ( Media 8.5’’) ........................3 B. Power On ............................4 C. - Page 6 B. Android Tablets & Smart phones ..................... 33 I. Bluetooth ............................. 33 C. Apple™ Tablets & Smartphones ..................... 33 I. Bluetooth ............................. 33 Media ................................33 A. Standard Media ..........................33 B.
-
Page 7: Introduction
Thank you for purchasing the I80 Series mobile thermal printer also referred to in this manual as the “I80”. The I80 series prints on special thermal media supplied in roll form up to 8 inches wide. All models are equipped with a USB port which supports cabled communications. All models support an optional internal Bluetooth or Wi-Fi interface. -
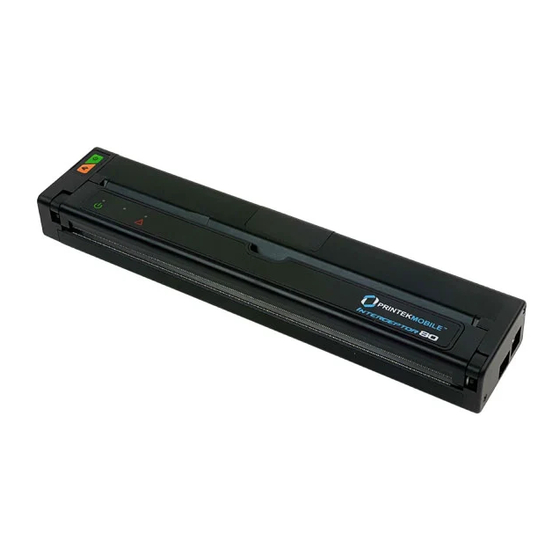
Page 8: Printer Features
Printer Features Control Panel Status LEDs Paper Door Power Port USB Data Port I80 features: Easy-to-read control face Printer can use single sheet paper, roll paper or black mark paper. ... -
Page 9: Quick Start Instructions
Quick Start Instructions A. Paper Load ( Media 8.5’’) Roll Paper – Open the paper door by inserting your finger into the cutout in the paper door and gently pulling the door toward the front of the printer. Insert the leading edge of the paper roll into the printer with the coated side down. -
Page 10: Power On
Close the paper door and push the paper feed button to insure the paper is under the roller and able to advance. If the printer is properly configured for Black Mark paper the paper should advance until the black mark is detected by the printer. Single Sheet Paper - ... -
Page 11: Control Panel
C. Control Panel Control Panel Power Up Press & Release Power Down Press & Hold Power Button Toggle IP over USB Press twice on/off Advance paper Press once Paper Feed Button Print Setup Report Press twice Power & Status Alert Indication (Green/Red) (Yellow) -
Page 12: Performing A Printer Self-Test
D. Performing a Printer Self-Test Before you connect the printer to the computer, make sure that the printer is in proper working order. You can do this by printing a configuration status page. 1. Make sure the media is properly loaded, the top cover of the printer is closed and the printer is power on. -
Page 13: Configuration
Configuration Configuration of the I80 printer is done through a built-in web page. This allows you to configure the printer from any device that has a browser and is compatible with your I80 communication capabilities. 1. Turn the printer ON. 2. - Page 14 This is an overview of the printer configuration. To return the printer to normal operating mode, double-click the Power button. The POWER LED will be returned to a solid light. At the top of the Main Page are selections to access the sub-menus. www.printek.com...
-
Page 15: Connectivity Parameters
A. Connectivity Parameters This page allows you to setup the connection to your printer. Depending on the optional interface installed, you will see either Bluetooth Config or WI-FI Config. In the detailed descriptions, an asterisk (*) indicates the factory default value. Bluetooth Config: Paired Mode: Possible values: UnPaired, Paired*... - Page 16 Note that this feature is only available if Pairing Mode is set to “Paired”. The PIN value must exactly match the PIN value set in the Bluetooth manager on the host computer. Connection: Possible Values: Printer*, Personal Area Network This feature selects the role of the printer’s interface in the Bluetooth network. In Printer mode, the printer behaves as a regular Bluetooth device.
-
Page 17: Image Parameters
B. Image Parameters This page allows you to make selections about the image to be printed. Current Emulation: ESCPOS is the default emulation in I80 Possible Values: PRINTEK, ZPL, CPCL, ESCPOS*, IPL, AUTOIMAGE, PDF, POSTSCRIPT, IMAGE The I80 printer is capable of using several different emulation modes. This feature sets the family of printer commands that may be used by a host application program to control the various capabilities of the printer. - Page 18 Default Font: The I80 has the ability to use True Type Fonts. All True Type Fonts loaded into printer memory are listed here. When using emulations that do not specify the font for each line of text, select the font you would like to use as the default font.
-
Page 19: Device Config
C. Device Config This page allows you to set certain hardware parameters on the printer. Units Select between inches or millimeters. If you change units, do so before entering other settings. Max Paper Speed Possible values: 25.4 to 76.2 mm, Default = 76.2 When using labels or heavy paper stock, you may need to decrease the paper speed to prevent paper jams. - Page 20 Paper Sensor Threshold When using paper with a black on the front adjust this setting to insure the paper stops at the black mark. 1. Set paper sensor threshold: white paper has relatively smaller sensor brightness while black paper has relatively bigger sensor brightness.
-
Page 21: Fonts
Paper Sensitivity This is a locked value. These settings are supplied by the paper manufacturer. The default settings cover most grades of paper. If you are using non-standard paper consult the paper manufacturer for recommended settings. Power sleep Possible values: Disabled, 10, 30, 60, 120, 180 minutes. Default value is Disabled. This timer will turn the printer off if it has not been used for the time set. -
Page 22: Image Config
E. Image Config User Define ESCPOS fonts Enter Image Config – Current Emulation to set ESCPOS emulation fonts. User Define Western Fonts Font A: Font A: Letters and numbers print in FontA by default. The parameter of FontA is 12 * 24. For letters you could choose among three types of typeface: art font, Song, equal-line face. - Page 23 Equal-line face Numbers Normal Bank OKI number Use system default Font B: Letters and numbers print in FontB by default. The parameter of FontA is 9 * 17. font and cannot be changed. Printout: fontA: fontB: User-defined: Users could change the size and font, using the system font and uploaded fonts. (If the command entails changing the font, the printer will use specific font.) User-defined: 9 pounds.
- Page 24 Font B: set in default. Parameters: 32 * 32. Use system default font and cannot be changed. Printout: User-defined: Users could change the size and font, using the system font and uploaded fonts. (If the command entails changing the font, the printer will use specific font.) User-defined size:9 pounds Western Font File: STHUPO.TTF User Define PRINTEK Fonts...
- Page 25 OCRA:OCRA.ttf: 1B 40 2F 2A 2D 30 31 32 Printout: 33 34 35 36 37 38 39 3B 3A 3C 3D 3E 3F 40 41 42 43 44 45 46 47 48 49 4A 4B 4C 4D 4E 4F 50 51 52 53 54 55 56 57 58 59 5A 0D 0A User Define ZPL Fonts (1)...
- Page 26 ^CWL,R:simhei.ttf ^FO10,10 ^ALN,70,30 ^FDABCD123^FS User Define CPCLFonts (1) Use TEXT command to define font. (2) TEXT command: {command} {font} {size} {x} {y} {data}, {font}:font name/number; {size}:font size; {x}:horizontal position; {y}:vertical position; {data}:printing data; eg:TEXT 1 1 20 5 0123456789ABCDEFG Sample: eg1: Printout:...
-
Page 27: Graphics
F. Graphics This menu will allow you to load a graphics file into printer memory for use in creating your output. For instance, logos can be stored for recall and use by your host program (see Integrator’s Guide for more details). Upload File Select the graphics file to load into printer memory. -
Page 28: Update Printer Firmware, Upload Files To Printer Memory
You must set each of these values before selecting Upload Logo or the default values will be associated with your image. Current Logo Mapping Once uploaded into the printer memory, your image and settings will be displayed here. Logo upload procedure: 1. Choose logo file, 2. Set the width, 3. choose the index. 4. Upload it Delete logo procedure: 1. -
Page 29: Reset Printer Configuration To Factory Defaults (Safe Mode)
Printer Application Updates, OEM information and Manuals and more can be uploaded here. Contact Printek retailer for more information. H. Reset Printer Configuration to Factory Defaults (Safe Mode) Printer to Factory Defaults: Printer settings can be restored to factory configurations. Device Config to Factory Defaults: Printer settings can be restored to factory configurations. -
Page 30: Printing Modes
Printing Modes There are two fundamental printing modes with mobile printers. A. ASCII Based Print Jobs The host sends the print job as a series of lines of characters, some of which represent the text to be printed, while other portions are command codes which tell the printer which font to use, where to locate the text, what barcodes to use, etc. -
Page 31: Printer
Integrating the Printer into your Business Applications Step by Step – Creating a Link from Host to Printer Windows Desktop Computers Print Drivers You may download the appropriate Windows driver from our website. Install the printer driver by the standard method for your version of Windows. a) Connect the printer to the PC using a USB-C cable before using the automatic install. - Page 32 b) Select installing language. c) In the popup window, select Next to proceed. It pops out the tab ‘Please select installation method’. Click OK for automatic installation; click Cancel for manual installation. d) For automatic installation, the system chooses PRINTEK I80; for manual installation please choose I80.
- Page 33 e) For automatic installation, the system chooses USBxxx port that Windows assigned to the printer when it was connected through the USB connection. If you are not connected to a USB connection to your host system select the correct port. See below to determine the COM port Windows assigned to your connection if you are connected through a Bluetooth connection.
- Page 34 f) Click Next to proceed. www.printek.com...
- Page 35 g) Click Finish to proceed. h) Click Install to proceed. Installation successfully. www.printek.com...
-
Page 36: Bluetooth - General
Bluetooth – General a) Turn on the printer. Make sure Bluetooth on your host device is turned ON. b) Your host Bluetooth manager may automatically scan for new devices, or you may need to tell it to scan. The discover name of the I80 printer will be “I80-xxxxxxxxxxx”, where xxxxxxxxxxxx = the Printer Serial Number. - Page 37 Windows 7 – a) Open Devices and Printers b) The printer should be displayed by the discover name. c) Right click on the printer icon. d) Select Properties. e) Select the Services tab. a. Uncheck Generic Access Profile b. Uncheck Generic Attribute Profile c.
- Page 38 www.printek.com...
-
Page 39: Android Tablets & Smart Phones
Printek offers a variety of media types. See Appendix C for detailed descriptions and ordering information. You may also visit our website or contact your PrintekMobile sales representative for a complete and up to date description of our consumables and accessory products. B. Black Mark Media Position For automatic ticket printing, the Black Mark should be positioned as shown in the figure below. - Page 40 automatically position the output for tear-off and printing following a Form Feed command or by pressing the Paper Feed button. For non-automatic paper positioning, refer to the Integrator’s Guide for sensing and positioning commands. www.printek.com...
-
Page 41: Maintenance And Troubleshooting
Maintenance and Troubleshooting A. Cleaning In normal environments, the printer should be cleaned after printing a few rolls of paper or if there are voids in the printout. For optimum performance and life, you should clean the Print Head and Platen Roller whenever you load new paper. -
Page 42: Troubleshooting
B. Troubleshooting When encountering problems, the cause may be the printer or may sometimes be due to other problems with your system. Please review the following tables to solve common problems you may encounter with your printer. You may also visit www.printek.com for additional “FAQ’s” that may assist you. -
Page 43: Fault Description And Resolution
Fault Description and Resolution Problem Possible Cause Solution Printer will not turn on AC adaptor not plugged in Insure plug is fully into connector. Printer turns itself off Electrostatic discharge May occur in extreme low humidity conditions. Turn printer back on with power button Poor print quality Print head dirty... -
Page 44: Obtaining Service
C. Obtaining Service If service is required for your printer, please contact the company where you purchased your printer. If they are unable to assist you, contact Printek retailer to obtain a Return Authorization Number. Printers without Return Authorization will not be accepted. www.printek.com... -
Page 45: Appendix
APPENDIX A. Appendix A – I80 Printer Specifications Printing Specifications Print Media Operator Controls and Printing Method: Direct thermal. Paper Type: Direct Thermal Roll, Indicators Fanfold and Cut sheet. Printing Resolution: 203 dpi (8 dots per 3 LED indicators for general fault, mm). -
Page 46: Glossary Of Terms
Glossary of Terms 802.11 Wireless networking communication standards created by IEEE. Ad-Hoc A Wi-Fi network consisting of only stations (no access point). Same as Peer-to- Peer. authentication The process a Wi-Fi station uses to identify itself to another station. Bluetooth A definition for short range radio frequency communications. - Page 47 margin An area along any edge of a form where data may not be printed. Peer-to-Peer A network consisting of only stations (no access point or central server). Same as Ad-Hoc. reset Initialization of various operating features of the printer to the value or state assumed when the printer is powered on.
-
Page 48: Index
Index 802.11, 30 Contrast, 14 Front Paper Sensor Threshold, 14 Add Enterprise Network, 11 Control Panel, 6 Gap Paper Sensor Add Personal Network, 11 CPCL, ii, 12 Threshold, 14 Address Method, 10 cpi, 30 GateWay, 10 Ad-Hoc, 30 Current Emulation, 12 General Error Conditions, 25 Alert, 6 Current Logo Mapping, 16... - Page 49 Obtaining Service, 26 reset, 31 Upload Digital Certificate, 12 Paired Mode, 8 Role Policy, 9 Upload File, 16 pairing code, 19 Safety Information, 24 Upload Font File, 15 Paper Energy Values, 14 Self-Test, 6, 24 USB, 19, 31 Paper Feed Button, 6 server, 31 USB port, 2, 19 Paper Load, 4...