
Related Manuals for Theben 850 9 133


Summary of Contents for Theben 850 9 133
- Page 1 309 362 03 OT remote control for ventilation 850 9 133 Installation and operating instructions Remote control...
-
Page 2: Table Of Contents
Contents Basic safety instructions Delete all switching times Screen and push buttons Viewing switching times Connection/installation/dismantling Reducing ventilation for several days Reset Setting the holiday program Info button i Ending/deleting holiday program Factory setting Viewing Holiday program Initial start-up Changing ventilation manually User operating level Operating level for Setting programs... -
Page 3: Basic Safety Instructions
Basic safety instructions WARNING Danger of death through electric shock or fire! Installation should only be carried out by a qualified electrician! • The remote control is designed for wall installation Designated use • The remote control device controls ventilation in detached and multi-occupancy houses, flats, offices etc. •... -
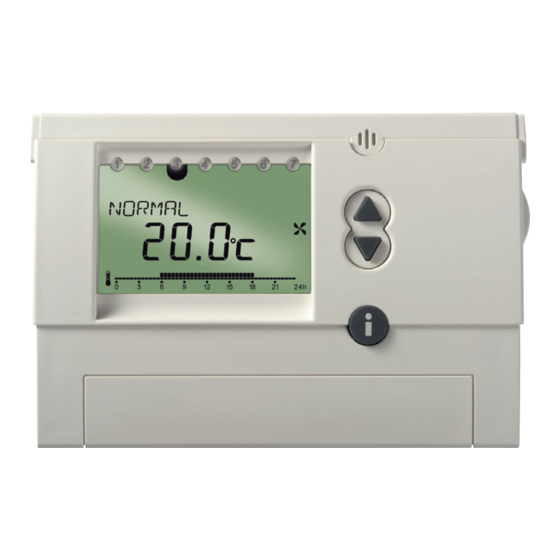
Page 4: Screen And Push Buttons
Screen and push buttons 1 Day of the week display (1 = Monday ...) 2 +/– (change values) 3 Rotary switch for program selection 4 OK (confirm selection, call up next parameter) 5 ESC (escape, cancel entry) 6 info (view settings) MENU 7 RES (Reset for time, date, holiday program) 8 Fan operating display... - Page 5 Screen and buttons (ff.) 1 Weekdays 1 to 7 2 Display menu line Bypass function Date and time PROG individual time program P2 Holiday program Service settings 3 Display text line Display depending on menu level and display settings 4 Fan operating display 5 Display dependent on types of display Type 1 room temperature Type 2 time (delivered status)
-
Page 6: Connection/Installation/Dismantling
Connection/installation Installation Fix plate to wall and attach device. Ensure installation height of approx. 1.5 m. Avoid installation near tiled stoves, windows, display cases, television sets etc. Dismantling Insert screwdriver from below, push detent hooks up and open device. OT bus OT bus OpenTherm (2-wire cable, 2 x 0.75 mm... -
Page 7: Reset
Reset Press the RES button with a sharp object. The following data is deleted: Date, time and holiday program. Summer/winter changeover and program P2 remain unchanged. Info key i – View settings The info button can be used to view the current room temperature, all important settings of the relevant program, date and time as well as some current data from ventilation device (the rotary switch must not point to MENU). -
Page 8: Factory Setting
Factory setting (delivery status) Press ESC and OK buttons simultaneously for approx. 2 s. Select + or – buttons for value 1 (reset to factory setting) or value 0 (no reset). Confirm by pressing OK. If value 1 is confirmed, the following data will be deleted: Holiday program, time, date, program 2 and the GERMAN language option. -
Page 9: Initial Start-Up
Initial start-up If you select WITH SU/WI you can choose between EUROPE, FREE SETTING and different After connecting the OpenTherm bus line, countries. follow instructions on display. Confirm each setting by pressing OK. Setting date and time Set rotary switch to desired program. The time appears first on the display at initial The date, time and summer/winter changeover start-up or after a reset. -
Page 10: User Operating Level
& user information Setting programs Caution: Switch system off If the system is switched off damage could be caused by moisture. Set rotary switch to – You can briefly Therefore, select REDUCED if switch the system off. away for a long period. Changing operating settings Set rotary switch to MENU, e.g. -
Page 11: Setting Normal Program
Setting programs (ff.) Setting NORMAL program Set rotary switch to The air will be changed once within approx. 2 hours (e.g. during the day with normal use of the property) Setting PARTY program Set rotary switch to PARTY (on-demand service). -
Page 12: Setting Program P1
Setting programs (ff.) Setting program P1 Set rotary switch to P1. (preset fixed time program) Monday to Friday 06.00 to 22.00: Ventilation at NORMAL level Display: P1 NORMAL 22.00 to 06.00: Ventilation at REDUCED level Display: P1 REDUCED Saturday and Sunday 07.00 to 23.00: Ventilation at NORMAL level Display: P1 NORMAL 23.00 to 07.00 ventilation at REDUCED level... -
Page 13: Setting Switching Times
Setting switching times (for ventilation) • Switching times have to be entered for the full week. • Time and ventilation level have to be set for each switching time. • Up to 32 switching times can be entered. • You can choose between: If no switching times and pro- MON–FRI (the same for Monday to Friday) - Page 14 Example Operating steps: Room ventilation with normal ventilation level Mon–Fri: 08:00–22:00 from Monday – Friday and on Sunday from Setting MON–FRI switching times 08:00 to 22:00 as well as on Saturday from Individual day SUNDAY: 09:00 to 23:00. Setting switching times from 08:00–22:00 Room ventilation should be run at reduced Individual day SATURDAY: ventilation level for the rest of the time.
- Page 15 Confirm by pressing OK. Free memory INDIVIDUAL DAY flashes. locations (max. 32) and MON–FRI flash. Confirm by pressing OK. MONDAY is displayed. Confirm by pressing OK. Use + or – buttons to select SUNDAY. Repeat steps for 22.00. Confirm by pressing OK.
- Page 16 Deleting individual switching times Confirm by pressing OK. END NEW flashes. Confirm by pressing OK. INDIVIDUAL DAY Set rotary switch to MENU. flashes. Use the + button to select PROGRAM P2. Confirm by pressing OK. MONDAY is displayed. PROG flashes.
-
Page 17: Delete All Switching Times
Delete all switching times Viewing switching times Set rotary switch to MENU. Set rotary switch to MENU. Use the + button to select PROGRAM P2. Use the + button to select PROGRAM P2. PROG flashes. PROG flashes. Confirm by pressing OK. -
Page 18: Reducing Ventilation For Several Days
Reducing ventilation for several days • You can set the ventilation to minimum energy use via the holiday program • The ventilation then operates in REDUCED mode. Setting holiday program (start and end times) Set rotary switch to MENU. Use the + or –... -
Page 19: Ending/Deleting Holiday Program
Ending/deleting holiday program • The holiday program ends automatically when you have reached the end time. • Take the following steps if you have prematurely cleared the holiday program: Set rotary switch to MENU. Use the + or – buttons to select HOLIDAY. DELETE Confirm by pressing OK. -
Page 20: Changing Ventilation Manually
Changing ventilation manually • In programs P1 and P2 you can select a higher/lower ventilation level, depending on the available ventilation setting, without permanently changing the settings. • These automatic settings are automatically reset. • 3 ventilation levels are available. They can be changed using the p q buttons: –... -
Page 21: Operating Level For Specialist Personnel
Operating level for specialist personnel Settings – Overview BYPASS TIME/ PROG HOLIDAY SERVICE DATE PROGRAM P2 DISPLAY MENU BYPASS AUTO HOUR START DATE BYPASS ON MINUTE YEAR LANGUAGE BYPASS OFF PARAMETER YEAR FREE MONTH MONTH VIEW HOUR... -
Page 22: Setting Bypass Functions
Functions Setting bypass functions Set rotary switch to MENU. Use the + or – buttons to select BYPASS. The symbol flashes. Confirm by pressing OK. Use the + or – buttons to select BYPASS ON, BYPASS AUTO, BYPASS OFF. - Page 23 Setting date and time (ff.) Use the + or – buttons to select END or for the summer/ winter changeover WITHOUT SU/WI or. WITH SU/WI. Confirm by pressing OK. When you select WITH SU/WI, EUROPE appears. Use the + or – buttons to select a country or FREE SETTING.
-
Page 24: Service Setting
SERVICE settings Setting display type The on-screen display for the individual positions of the rotary switch depend on the set display type. Set rotary switch to MENU. Select SERVICE using the + or – buttons. The symbol flashes. Confirm by pressing OK, DISPLAY flashes. -
Page 25: Setting The Language
SERVICE settings (ff.) Setting the language Set rotary switch to MENU. Use the + or – buttons to select SERVICE. The symbol flashes. Confirm by pressing OK, DISPLAY flashes. Use the + or – buttons to select LANGUAGE. Confirm by pressing OK, the selected language (DEUTSCH, FRANÇAIS, SVENSKA, ITALIANO or POLSKI flashes (GERMAN is default setting). -
Page 26: Setting Parameters
SERVICE settings (ff.) Setting parameters Potential settings depend on ventilation control used Set rotary switch to MENU. Use the + or – buttons to select SERVICE. The symbol flashes. Confirm by pressing OK, DISPLAY flashes. Use the + or – buttons to select PARAMETER. Confirm by pressing OK. - Page 27 1. Changeable parameters Number Description Possible values (depending Factory on the type of device) settings Air flow in reduced mode (setting range 180 m³/h: 50 ... 170 75 m³/h min. 10 m³/h less than on-demand mode setting) 300 m³/h: 50 ... 290 100 m³h 400 m³/h: 50 ...
- Page 28 2. Fixed parameters Number Description Possible values Converted display value Type of device relevant devices relevant devices Current throughput in m 0 to 40 0 to 400 m ³ ³ Bypass function 0 to 2 0 to 24/1 Auto/2 min External air temperature in °C –100 to +200 –100 to +100...
-
Page 29: Technical Details/Service Address
Technical data Service address Power reserve: >4 hours Theben AG (after 6 hours charging) Hohenbergstr. 32 Power consumption: 30 mW (typical) 72401 Haigerloch OpenTherm bus: GERMANY Telephone +49 (0) 74 74 6 92 0 Connection: 2 wire interchangeable +49 (0) 74 74/6 92-150 Cable length: max.