
Related Manuals for NETGEAR WNDR4500v1


Summary of Contents for NETGEAR WNDR4500v1
-
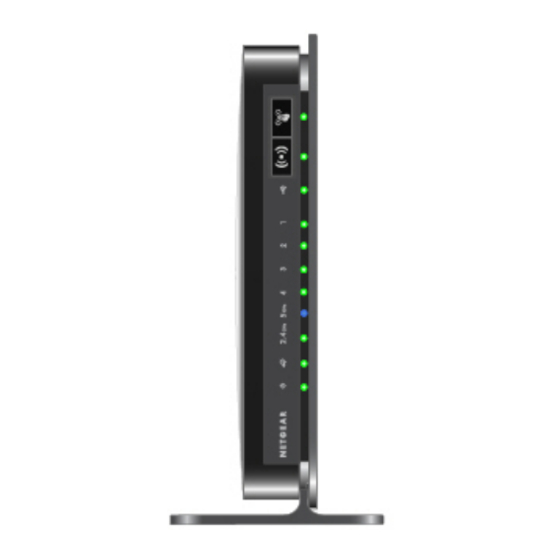
Page 1: Front Panel
N900 Wireless Dual Band Gigabit Router WNDR4500 Setup Manual NETGEAR, Inc. 350 E. Plumeria Drive San Jose, CA 95134 USA November 20101 208-107xx-xx v1.0... - Page 2 In the interest of improving internal design, operational function, and/or reliability, NETGEAR reserves the right to make changes to the products described in this document without notice. NETGEAR does not assume any liability that may occur due to the use or application of the product(s) or circuit layout(s) described herein.
-
Page 3: Table Of Contents
Contents N900 Wireless Dual Band Gigabit Router WNDR4500 Setup Manual Getting to Know Your Wireless Router................1 Unpacking Your New Wireless Router ................1 Hardware Features ......................2 Front Panel ........................3 Back Panel ........................5 Router Label ........................ 6 Positioning Your Wireless Router .................. -
Page 4: Router Label
Checking the Internet Service Connection ..............30 Obtaining an Internet IP Address ................30 Troubleshooting PPPoE .................... 31 Troubleshooting Internet Browsing ................32 Troubleshooting Connectivity Using the Ping Utility ............32 Testing the Path from a PC to Your Router .............. 32 Testing the Path from a PC to the Internet .............. -
Page 5: Getting To Know Your Wireless Router
Installing Your Wireless Router To help you set up your router and get on the Internet quickly, the Resource CD contains a Smart Wizard™. The Smart Wizard walks you through the steps required to connect your router and PC(s); configure your internet settings; configure your wireless settings; and enable wireless security for your network. -
Page 6: Updating Your Router Firmware
Updating Your Router Firmware NETGEAR is always improving the operability and features included with your router. To make it easy for you to receive the best, most up-to-date features of your router, NETGEAR provides a variety of methods for updating your product. -
Page 7: Installing Your Wireless Router Using Smart Wizard
For cable modem service, that you use the computer you first used to set up your Internet service. The NETGEAR Smart Wizard takes you through the procedure to connect your router and PC(s). It then helps you to configure your wireless settings and enable wireless security for your network. - Page 8 Follow the instructions and prompts to complete the installation. The Smart Wizard guides you through installing your router, connecting your router to the Internet, configuring your wireless network settings, and selecting the optimum security protection for your network. If you choose not to select a security option during installation, you can always access the router’s user interface later to select a security option (see “Setting Your SSID and Wireless Security Manually”...
-
Page 9: Installing Your Wireless Router Manually (Advanced And Linux Users)
Installing Your Wireless Router Manually (Advanced and Linux Users) Before installing and connecting your router manually, review the list below and make sure that you have all of the necessary information. • A DSL or cable service connection to an Internet Service Provider (ISP). •... - Page 10 Disconnect the cable from the modem (2). You will connect it to the router later. Locate the Ethernet cable that came with the NETGEAR product. Securely insert that Ethernet cable into your modem and into the Internet port of the N750 wireless gigabit router (3).
- Page 11 Figure 6 Locate the cable you removed from the modem in step 2. Securely insert that cable (4) into a LAN port on the router such as LAN port 1. Figure 7 Your network cables are connected, and you are ready to start your network. It is important that you start your network in the correct sequence.
-
Page 12: Verifying Your Connection
First, plug in and turn on the cable or DSL modem (if your modem has a backup battery, plug it back in). Wait 2 minutes. Now, plug the power cord into your N750 wireless gigabit router and into a power outlet. Wait 1 minute. -
Page 13: Setting Up Your Router For Internet Access
• LAN. At least one LAN light (4) should be lit. Green indicates that your computer is communicating at 1 Gbps; amber indicates 10/100 Mbps. If a LAN light is not lit, check that the Ethernet cable from the computer to the router is securely attached at both ends, and that the computer is turned on. - Page 14 A login window such as the one in the following figure displays: Figure 10 For security reasons, the router has its own user name and password. When prompted, enter admin for the router user name and password for the router password, both in lowercase letters.
- Page 15 From the main menu, select Setup Wizard. The Setup Wizard screen displays. Figure 11 Select No to set up the connection yourself. Click Next and the Basic Settings screen will display. Enter the required information for your ISP connection in the appropriate fields. If you need assistance, follow the Basic Settings Help screens on the router interface or see the online User Manual for this N750 wireless gigabit router.
- Page 16 • Contact your ISP to verify that you have the correct configuration information. • Read “Troubleshooting” on page If problems persist, register your NETGEAR product and contact NETGEAR Technical Support. Installing Your Wireless Router Manually (Advanced and Linux Users)
-
Page 17: Configuring Your Wireless Network
After installing your router, you must log into the router to complete your wireless setup. When you log in to the browser, you will be prompted to check for firmware updates from the NETGEAR update server. Accessing Your Router After Installation and Checking for New Firmware The Smart Wizard only appears when you run the CD. -
Page 18: Configuring Your Wireless Settings And Security Options
For a wireless connection, the router and each wireless computer must use the same SSID, also called the wireless network name, and the same wireless security. NETGEAR strongly recommends that you use wireless security. Indoors, computers can connect over wireless networks at a range of several hundred feet. - Page 19 Leave the wireless mode set to the default setting of Up to 145Mbps for 2.4GHz. Select security options for the 2.4GHz wireless network. The wireless Security Options are set to None by default. NETGEAR strongly recommends that you use wireless security. You can select a different Security Option and a different passphrase for each wireless network.
- Page 20 Leave the wireless mode set to the default setting of Up to 450Mbps for 5GHz. Select security options for the 5 GHz wireless network. The wireless Security Options are set to None by default. NETGEAR strongly recommends that you use wireless security. You can select a different Security Option and a different passphrase for each wireless network.
-
Page 21: Using Push 'N' Connect (Wps) To Configure Your Wireless Network
Open the networking utility of the device you want to connect to that supports WPS. Push the N750 wireless gigabit router’s WPS button, then release. The WPS LED will start to blink. 1. For a list of other Wi-Fi-certified products available from NETGEAR, go to http://www.wi-fi.org Configuring Your Wireless Network... -
Page 22: Testing Basic Wireless Connectivity
Microsoft Internet Explorer or Firefox. If you are planning a mixed network of WPS capable devices and non-WPS capable devices, NETGEAR suggests that you set up your wireless network and security settings manually first, and use WPS only for adding additional WPS capable devices. - Page 23 Note your SSID name. If you used WPS to establish a connection with other devices, the SSID will now be a randomly selected name. The SSID of any wireless adapters or wireless devices connected to your router must match the SSID you configured in the N750 wireless gigabit router. If they do not match, you will not get a wireless connection.
-
Page 24: Troubleshooting
Troubleshooting This chapter gives information about troubleshooting your N750 wireless gigabit router. You can find help with the following problems: • “Basic Setup Checklist” on page 26 • “Checking Basic Router Functions” on page 27 • “Troubleshooting Login Problems” on page 29 •... -
Page 25: Checking Basic Router Functions
Make sure that the network settings of the computer are correct: Verify that your LAN-connected computers are configured to obtain an IP address automatically through DHCP. For help with this, see the documentation for your computer or “Related Documents” on page Verify whether the MAC address is needed. - Page 26 • Make sure that the power cord is properly connected to your router and that the power adapter is properly connected to a functioning power outlet. • Check that you are using the power adapter supplied by NETGEAR for this product.
-
Page 27: Troubleshooting Login Problems
Table 3. Troubleshooting the router’s LED behavior (continued) Internet light stays When the router is turned on, the Internet light turns amber for about 70 seconds amber. and then turns green. If the light does not turn green, the router has a problem. If the Internet light is still amber 2 minutes after turning on power to the router: 1. - Page 28 To ping the wireless router: From the Windows toolbar, click Start and select Run. In the field provided, type Ping followed by the address of the router, as in this example: ping www.routerlogin.net ping 192.168.1.1 Click OK. You should see a message like this one: Pinging 192.168.1.1 with 32 bytes of data If the path is working, you see this message: Reply from 192.168.1.1: bytes=32 time=NN ms TTL=xxx...
- Page 29 Related Documents This table provides links to reference documents that you can use to gain a more complete understanding of the technologies used in your NETGEAR product. Table 5. Document Link TCP/IP Networking http://documentation.netgear.com/reference/enu/tcpip/index.htm Basics Preparing Your Network http://documentation.netgear.com/reference/enu/wsdhcp/index.htm Glossary http://documentation.netgear.com/reference/enu/glossary/index.htm...
- Page 30 Product Registration, Support, and Documentation Register your product at You must register before you can use our telephone http://www.NETGEAR.com/register support service. Product updates and Web support are always available by going to http://www.netgear.com/support Setup documentation is available on the CD, on the support website, and on the documentation website...
- Page 31 Federal Communication Commission Interference Statement This equipment has been tested and found to comply with the limits for a Class B digital device, pursuant to Part 15 of the FCC Rules. These limits are designed to provide reasonable protection against harmful interference in a residential installation. This equipment generates, uses and can radiate radio frequency energy and, if not installed and used in accordance with the instructions, may cause harmful interference to radio communications.
- Page 32 IC Statement This Class B digital apparatus complies with Canadian ICES-003. Operation is subject to the following two conditions: (1) this device may not cause interference, and (2) this device must accept any interference, including interference that may cause undesired operation of the device. For product available in the USA/Canada market, only channel 1~11 can be operated.
- Page 33 Le dispositif pourrait automatiquement cesser d'émettre en cas d'absence d'informations à transmettre, ou une défaillance opérationnelle. Notez que ce n'est pas l'intention d'interdire la transmission des informations de contrôle ou de signalisation ou l'utilisation de codes répétitifs lorsque requis par la technologie. les dispositifs fonctionnant dans la bande 5150-5250 MHz sont réservés uniquement pour une utilisation à...