
Related Manuals for LG A09AW1


Summary of Contents for LG A09AW1
-
Page 1: Air Conditioner
OWNER’S MANUAL AIR CONDITIONER Please read this manual carefully before operating your set and retain it for future reference. P/NO : MFL42262801 www.lg.com... -
Page 2: Table Of Contents
Room Air Conditioner Owner’s Manual TABLE OF CONTENTS A. Safety Precautions ...3 B. Electrical Safety...6 Temporary Use of an Adapter ...6 Temporary Use of an Extension Cord ...6 Symbols used in this Manual...6 C. Product Introduction...7 Indoor Units ...7 Operation Indication Lamps ...8 Outdoor Unit ...8 D. -
Page 3: Safety Precautions
Safety Precautions To prevent injury to the user or other people and property damage, the following instructions must be followed. I Incorrect operation due to ignoring instruction will cause harm or damage. The seriousness is classified by the following indications. I Meanings of symbols used in this manual are as shown below. - Page 4 Safety Precautions Indoor/outdoor wiring connections must be secured tightly and the cable should be routed properly so that there is no force pulling the cable from the connection terminals. • Improper or loose connections can cause heat generation or fire. Be sure to check the refrigerant to the used.
- Page 5 Do not use the product for special purposes, such as preserving foods, works of art, etc. It is a consumer air conditioner, not a precision refrigeration system. • There is risk of damage or loss of property. Do not touch the metal parts of the product when removing the air filter.
-
Page 6: Electrical Safety
Electrical Safety Electrical Safety • This appliance must be properly grounded. To minimize the risk of electric shock, you must alway plug into a grounded oulet. • Do not cut or remove the grounding prong from the power plug. • Attaching the adapter ground terminal to the wall receptacle cover screw does not ground the appliance unless the cover screw is metal and not insulated, and the wall receptacle is grounded through the house wiring. -
Page 7: Product Introduction
Product Introduction Here is a brief introduction of the indoor and outdoor units. Please see the information specific to your indoor unit type. Indoor Units Standard Split Type Display panel LED indicators Plasma filter (Optional) Air filter Air outlet Art Cool (Type1) Display panel LED indicators Front panel Signal receiver... -
Page 8: Operation Indication Lamps
Product Introduction Art Cool Deluxe(Type 1) Display panel LED indicators Air inlet Plasma filter Air filter Air discharge Front panel Power cord Signal receiver ON/OFF button Operation Indication Lamps : Lights up during the system operation, error code and auto restart setting. On/Off Sleep mode : Lights up during sleep mode auto operation. -
Page 9: Operating Instructions
Operating Instructions How to insert the Batteries 1. Remove the battery cover by pulling it according to the arrow direction. 2. Insert new batteries making sure that the (+) and (-) of battery are installed correctly. 3. Reattach the cover by sliding it back into position. NOTE 1. -
Page 10: Wireless Remote Controller
Operating Instructions Wireless Remote Controller The controls will look like the following. Signal transmitter Operation Mode Cooling Operation Auto Operation or Auto Changeover Healthy Dehumidification Operation Heating Operation Air Circulation • Cooling Model( ), Heat Pump Model( 10 Room Air Conditioner 1. -
Page 11: Operation Mode
Operation Mode For cooling or heating operation set the desired indoor temperature by pressing the ROOM TEMPERATURE SETTING BUTTONS. For cooling the temperature can be set within 18°C~30°C and for heating the temperature range is 16°C~30°C. Set the fan speed with the remote controller. You can select the fan speed in four steps-low, medium, high and CHAOS by pressing the INDOOR FAN SPEED SELECTOR BUTTON. -
Page 12: Healthy Dehumidification Operation
Operating Instructions Healthy Dehumidification Operation During Healthy Dehumidification Operation ❏ If you select the dehumidification mode on the OPERATION MODE SELECTION BUTTON, the product starts to run the dehumidification function. It automatically sets the room temperature and airflow volume to the best condition for dehumidification, based on the sensed current room temperature. -
Page 13: Jet Cool/Heat Operation
NEO PLASMA Purification Operation (Optional) Plasma filter is a technology developed by LG to get rid of microscopic contaminants in the intake air by generating a plasma of high charge electrons. This plasma kills and destroys the contaminants completely to provide clean and hygienic air. -
Page 14: Energy-Saving Cooling Mode (Optional)
Operating Instructions Energy-Saving Cooling Mode (Optional) Energy-saving cooling mode can save energy in cooling and healthy dehumidification operation, because it can operate efficiently by setting body-adaptation time according to the change of time and temperature and adjusting automatically desired temperature. 1. -
Page 15: Sleep Mode
Setting the Current Time 1. Press the TIMER BUTTON for 3 seconds. 2. Press TIME SETTING BUTTONS until the desired time is set. NOTE Check the indicator for A.M. and P.M. Timer Setting 1. Press the TIMER BUTTON to turn timer on or off. 2. -
Page 16: Vertical / Horizontal Airflow Direction Control (Optional)
Operating Instructions Vertical / Horizontal Airflow Direction Control (Optional) The up/down airflow (Vertical airflow) can be adjusted by using the remote controller. 1. Press the ON/OFF BUTTON to start the unit. 2. Press CHAOS SWING BUTTON. 3. The louvers will swing up & down automatically. -
Page 17: Maintenance And Service
Maintenance and Service Before performing any maintenance, turn off the main power to the system, disconnect the circuit breaker and unplug the power cord. Indoor Unit Clean the unit with a soft dry cloth. Do not use bleach or abrasives. Never use any of these •... - Page 18 Maintenance and Service Type 2: Pull the front panel from both sides as shown. Then pull the filter tab slightly forward to remove the filter. After removing the air filter remove the plasma and triple deodorizer filter by slightly pulling forward. Don't touch this plasma filter within 10 seconds after opening the inlet grille, it may cause an electric shock.
- Page 19 5. Deluxe (Type 1): Open the upside of the panel and lift it up as shown. The hooks of the panel will come off. Remove the air filters. Then pull out the plasma filter Front panel Panel hook After cleaning and drying well reinstall the filters in their original position. 6.
-
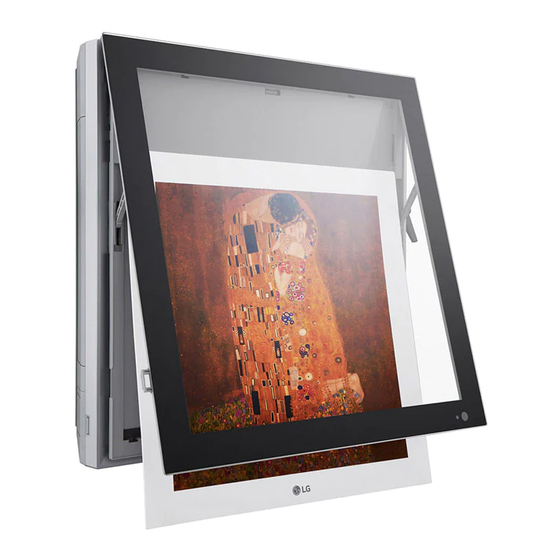
Page 20: How To Replace Picture & Photograph
Maintenance and Service How to replace picture & photograph (Art Cool Type2) Turn off power and then open the upper part of front panel. Take out picture. Cover mat and press down with hand(s) until contacting closely. In case a mat is not used, recommended size of a photo/picture: 522mm x 522mm When powering on after replacing filter and picture, the front panel doesn't intervene. -
Page 21: Outdoor Unit
Outdoor Unit The heat exchanger coils and panel vents of the outdoor unit should be checked regularly. If clogged with dirt or soot, the heat exchanger and panel vents may be professionally steam cleaned. NOTE Dirty or clogged coils will reduce the operating efficiency of the system and cause higher operating costs. Operation Tips! Do not overcool the room. -
Page 22: Troubleshooting Tips! Save Time And Money
Maintenance and Service Troubleshooting Tips! Save time and money! The air conditioner may be operating abnormally when: Problem Possible Causes I The air conditioner is unplugged. I The fuse is blown/circuit breaker is tripped. I Power failure. conditioner does not start I High voltage.