Table of Contents
Advertisement
Available languages
Available languages
Quick Links
KD-T922BT / KD-DB622BT / KD-X38MDBT
CD RECEIVER / DIGITAL MEDIA RECEIVER
Quick Start Guide
RECEPTOR CON CD / RECEPTOR DE MEDIOS DIGITALES
Guía de inicio rápido
CD-RECEIVER / DIGITALE MEDIAONTVANGER
Snelstartgids
RECEPTOR CD / RECEPTOR MÉDIA DIGITAL
Guia de Início Rápido
CD-RECEIVER / DIGITAL-MEDIA-RECEIVER
Schnellstartanleitung
RÉCEPTEUR CD / RÉCEPTEUR MULTIMÉDIA NUMÉRIQUE
Guide de démarrage rapide
SINTOAMPLIFICATORE CON RIPRODUTTORE DI CD /
RICEVITORE MULTIMEDIALE DIGITALE
Guida di avvio rapido
CD-PECИBEP / ЦИФРОВОЙ МЕДИА-РЕСИВЕР
Краткое руководство по началу работы
For detailed operations and information, refer to the INSTRUCTION MANUAL on the following
website:
Para obtener más información y detalles sobre las operaciones, consulte el MANUAL DE
INSTRUCCIONES en el siguiente sitio web:
Raadpleeg de GEBRUIKSAANWIJZING op de volgende website voor gedetailleerde informatie over
de bediening:
Para as operações e informações detalhadas, consulte o MANUAL DE INSTRUÇÕES no website
abaixo:
Für detaillierte Bedienungen und Informationen siehe BEDIENUNGSANLEITUNG auf der folgenden
Website:
Pour les opérations et les informations détaillées, reportez-vous au MANUEL D'INSTRUCTIONS sur
le site web suivant:
Per le operazioni e le informazioni dettagliate, fare riferimento al ISTRUZIONI PER L'USO nel
seguente sito web:
За подробными инструкциями по управлению и информацией обращайтесь к ИHCTPУKЦИИ
ПO ЭKCПЛУATAЦИИ на следующем веб-сайте:
<http://www.jvc.net/cs/car/>
ENGLISH
ESPAÑOL
NEDERLANDS
PORTUGUÊS
DEUTSCH
FRANÇAIS
ITALIANO
РУCCKИЙ
B5K-0769-10 [E]
Advertisement
Table of Contents

Related Manuals for JVC KD-T922BT


Summary of Contents for JVC KD-T922BT
- Page 1 ESPAÑOL NEDERLANDS PORTUGUÊS DEUTSCH FRANÇAIS ITALIANO KD-T922BT / KD-DB622BT / KD-X38MDBT РУCCKИЙ CD RECEIVER / DIGITAL MEDIA RECEIVER For detailed operations and information, refer to the INSTRUCTION MANUAL on the following Quick Start Guide website: RECEPTOR CON CD / RECEPTOR DE MEDIOS DIGITALES Para obtener más información y detalles sobre las operaciones, consulte el MANUAL DE...
- Page 2 Informatie over het weggooien van elektrische en elektronische apparatuur en batterijen (particulieren) Dit symbool geeft aan dat gebruikte elektrische, elektronische producten en batterijen niet bij het normale huishoudelijke afval mogen. Lever deze producten in bij de aangewezen inzamelingspunten, waar ze gratis worden geaccepteerd en op de juiste manier worden verwerkt, teruggewonnen en hergebruikt.
- Page 3 (valide per i paesi che hanno adottato sistemi di raccolta differenziata) частности, гарантийного обслуживания JVC, которое он может получить в соответствии с законом о I prodotti e le batterie recanti il simbolo di un cassonetto della spazzatura su ruote barrato non possono правах...
- Page 4 SOFTWARE LICENSE AGREEMENT Article 4 Right pertaining to the Licensed Software Any and all copyrights and other rights pertaining to the Licensed Software and related documents The software embedded in the Product (hereinafter the "Licensed Software") provided by Licensor is shall belong to the Licensor or the original holder of the right who granted to the Licensor the license or copyrighted to or sublicensable by the Licensor, and this Agreement provides for the terms and conditions sublicense for the Licensed Software (hereinafter the "Original Rightholder"), and the User shall not be...
-
Page 5: Important Notice Concerning The Software
Important Notice concerning the Software Article 9 Destruction of the Licensed Software If this Agreement is terminated pursuant to the provision of Article 8, the User shall destroy the Licensed -jansson Software, any related documents and copies thereof within two (2) weeks from such date of termination. Copyright (c) 2009-2012 Petri Lehtinen <petri@digip.org>... - Page 6 -CMP sha2 AUTHOR: Aaron D. Gifford - http://www.aarongifford.com/ The MIT License (MIT) Copyright (c) 2014 Charles Gunyon Copyright (c) 2000-2001, Aaron D. Gifford All rights reserved. Permission is hereby granted, free of charge, to any person obtaining a copy of this software and associated documentation files (the "Software"), to deal in the Software without restriction, including without You may obtain a copy of the license at limitation the rights to use, copy, modify, merge, publish, distribute, sublicense, and/or sell copies of the...
- Page 7 Copyright (c) 1995, 1996 Carnegie-Mellon University. All rights reserved. T-Kernel 2.0 Author: Chris G. Demetriou This product uses the source code of T-Kernel 2.0 under T-License 2.0 granted by T-Engine Forum (www.tron.org) Permission to use, copy, modify and distribute this software and its documentation is hereby granted, provided that both the copyright notice and this permission notice appear in all copies of the software, BSD-3-Clause derivative works or modified versions, and any portions thereof, and that both notices appear in supporting...
- Page 8 Konformitätserklärung in Bezug auf die RE-Vorschrift 2014/53/EU Konformitätserklärung in Bezug auf die RoHS-Vorschrift 2011/65/EU Hersteller: JVCKENWOOD Corporation Declaration of Conformity with regard to the RE Directive 2014/53/EU 3-12, Moriya-cho, Kanagawa-ku, Yokohama-shi, Kanagawa, 221-0022, JAPAN Declaration of Conformity with regard to the RoHS Directive 2011/65/EU EU-Vertreter: Manufacturer: JVCKENWOOD Europe B.V.
- Page 9 Par la présente, JVCKENWOOD déclare que Por la presente, JVCKENWOOD declara que el JVCKENWOOD ezennel kijelenti, hogy a rádiové zariadenie „KD-T922BT/KD-DB622BT/ l’équipement radio « KD-T922BT/KD-DB622BT/ equipo de radio “KD-T922BT/KD-DB622BT/ „KD-T922BT/KD-DB622BT/KD-X38MDBT“ KD-X38MDBT“ vyhovuje smernici 2014/53/EÚ. KD-X38MDBT » est conforme à la directive KD-X38MDBT”...
- Page 10 HRVATSKI / SRPSKI JEZIK Русский Käesolevaga JVCKENWOOD kinnitab, et JVCKENWOOD ovim izjavljuje da je radio oprema JVCKENWOOD настоящим „KD-T922BT/KD-DB622BT/KD-X38MDBT“ “KD-T922BT/KD-DB622BT/KD-X38MDBT” u skladu заявляет, что радиооборудование raadiovarustus on vastavuses direktiiviga s Direktivom 2014/53/EU. «KD-T922BT/KD-DB622BT/KD-X38MDBT» 2014/53/EL. Cjeloviti tekst deklaracije Europske unije o соответствует...
- Page 11 KD-T922BT/KD-DB622BT: Etichetta per i prodotti che impiegano raggi laser L’etichetta si trova sul rivestimento o sulla scatola e serve ad avvertire che il componente impiega raggi laser che sono stati classificati come classe 1. Ciò significa che l’apparecchio utilizza raggi laser di una classe inferiore.
-
Page 12: Basic Procedure
Installation/Connection Basic procedure Remove the key from the ignition switch, then disconnect the terminal of the car battery. This section is for the professional installer. Connect the wires properly. See “Wiring connection” on page 3, 4. For safety’s sake, leave wiring and mounting to professionals. Consult the car audio dealer. Install the unit to your car. - Page 13 Installing the unit (without mounting sleeve) Wiring connection of KD-T922BT Remove the mounting sleeve and trim plate from the unit. Align the holes in the unit (on both sides) with the vehicle Antenna terminal mounting bracket and secure the unit with screws (commercially available).
-
Page 14: Before Use
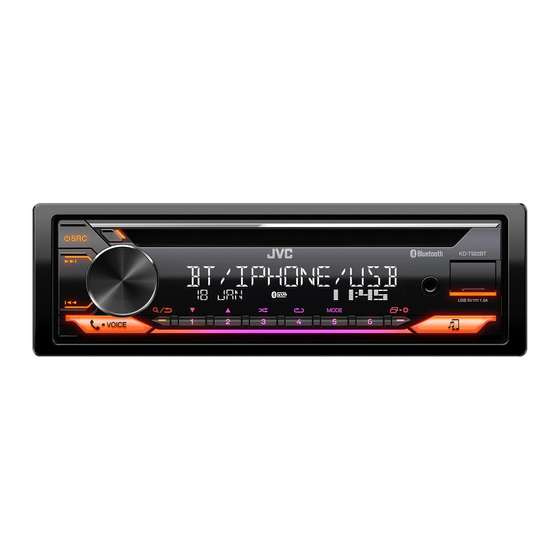
Orange/white : Car light control switch • KD-T922BT/KD-DB622BT: If a disc error occurs due to condensation on the laser lens, eject the disc and wait for the moisture to evaporate. : Ignition (ACC) - Page 15 Basics Faceplate of KD-X38MDBT Volume knob Auxiliary input jack Faceplate of KD-T922BT Volume knob Loading slot Auxiliary input jack Detach button Display window*1 USB input terminal Detach button Display window*1 USB input terminal Attach Detach How to reset Reset the unit Faceplate of KD-DB622BT within 5 seconds...
-
Page 16: Getting Started
Turn the volume knob to select [DATE SET], then press the knob. [DEUTSCH]* Turn the volume knob to make the settings, then press the knob. Set the date in the order of “Day” “Month” “Year”. * Only for KD-T922BT. Press to exit. To return to the previous setting item, press... -
Page 17: Digital Radio
Digital Radio Settings in memory (for KD-DB622BT/KD-X38MDBT) You can store up to 18 services. About DAB (Digital Audio Broadcasting) Store a service DAB is one of the digital radio broadcasting systems available today. It can While listening to a service..deliver digital quality sound without any annoying interference or signal Press and hold one of the number buttons (1 to 6). -
Page 18: Analog Radio
Analog Radio CD/USB/iPod Selectable source: Search for a station • KD-T922BT: CD/USB/iPod USB or iPod BT Press B SRC repeatedly to select FM or AM. • KD-DB622BT: CD/USB Press S / T to search for a station automatically. • KD-X38MDBT: USB (or) Press and hold S / T until “M”... -
Page 19: Menu Settings
• Refer to the INSTRUCTION MANUAL on the following website for the detailed explanation of each item: <http://www.jvc.net/cs/car/> • The availability of each item vary depending on the model. Turn the volume knob clockwise to select [SUBWOOFER SET], then press the knob. -
Page 20: Other Information
[RELAX]/[SUNSET]: The selected color pattern is Illumination Color Setting shown. (Selectable only when [ALL ZONE] is selected For KD-T922BT/KD-X38MDBT, you can set your preferred illumination color in step 4.) for each zone. Repeat step 4 and step 5 to set color for other zones. -
Page 21: Connect The Microphone
Pair and connect a Bluetooth device for the first time Press B SRC to turn on the unit. Play back/pause Press the volume knob. Search and select the name of your receiver (“KD-T922BT”/ Select group or folder Press 2 J / 1 K. “KD-DB622BT”/“KD-X38MDBT”) on the Bluetooth device. -
Page 22: Procedimiento Básico
Instalación/Conexión Procedimiento básico Quite la llave del interruptor de encendido; después, desconecte el terminal de la batería del automóvil. Esta sección es para los instaladores profesionales. Conecte los cables correctamente. Consulte “Conexión del cableado” en la Para fines de seguridad, deje que un profesional realice el cableado y el montaje. Consulte con un página 3, 4. - Page 23 Instalación de la unidad (sin manguito de montaje) Conexión del cableado del KD-T922BT Retire de la unidad, el manguito de montaje y la placa embellecedora. Alinee los orificios de la unidad (en ambos lados) con la ménsula de Terminal de la antena montaje del vehículo y asegure la unidad con los tornillos (disponibles...
-
Page 24: Antes Del Uso
Patilla Color y función monedas o herramientas metálicas) dentro de la unidad. • KD-T922BT/KD-DB622BT: Si ocurre un error de disco debido a la condensación Amarillo : Batería en el lente láser, extraiga el disco y espere hasta que se evapore la humedad. -
Page 25: Puntos Básicos
Puntos básicos Placa frontal del KD-X38MDBT Rueda de volumen Toma de entrada auxiliar Placa frontal del KD-T922BT Rueda de volumen Ranura de carga Toma de entrada auxiliar Botón de liberación Ventanilla de visualización*1 Terminal de entrada USB Botón de liberación Ventanilla de visualización*1... -
Page 26: Procedimientos Iniciales
Gire la rueda de volumen para seleccionar y, a continuación, pulse la rueda. [DEUTSCH] Para ajustar la fecha * Solo para KD-T922BT. Gire la rueda de volumen para seleccionar [DATE SET] y, a continuación, pulse la rueda. Gire la rueda de volumen para realizar los ajustes y, a continuación, pulse la rueda. -
Page 27: Radio Digital
Radio digital Ajustes en la memoria (para KD-DB622BT/KD-X38MDBT) Puede guardar hasta 18 servicios. Acerca de DAB (Radiodifusión de audio digital) Guardar un servicio DAB es unos de los sistemas de radiodifusión digital de radio disponibles en la Mientras escucha un servicio..actualidad. -
Page 28: Radio Analógica
Radio analógica CD/USB/iPod Fuente seleccionable: Búsqueda de una emisora • KD-T922BT: CD/USB/iPod USB o iPod BT Pulse SRC repetidamente para seleccionar FM o AM. • KD-DB622BT: CD/USB Pulse para la búsqueda automática de emisoras. • KD-X38MDBT: USB Pulse y mantenga pulsado hasta que parpadee “M”... -
Page 29: Ajustes Del Menú
Para volver al elemento de ajuste anterior, pulse • Para obtener más detalles sobre cada una de las opciones, consulte el MANUAL DE INSTRUCCIONES en el siguiente sitio web: <http://www.jvc.net/cs/car/> Gire la rueda de volumen en sentido horario para seleccionar •... -
Page 30: Otras Informaciones
[OCEAN] Ajuste del color de iluminación [RELAX] [SUNSET] : Se muestra el patrón del color Para KD-T922BT/KD-X38MDBT, el color de iluminación preferido se puede ajustar seleccionado. (Puede seleccionarse sólo si se selecciona para cada zona. [ALL ZONE] en el paso 4.) Ejemplo: Repita los pasos 4 y 5 para definir el color para las otras zonas. -
Page 31: Contestar Una Llamada
Reproducción/pausa Pulse la rueda de volumen. Pulse SRC para encender la unidad. Busque y seleccione el nombre de su receptor (“KD-T922BT”/ Seleccione un grupo o carpeta Pulse 2 “KD-DB622BT”/“KD-X38MDBT”) en el dispositivo Bluetooth. Realice (A) o (B) dependiendo de los datos mostrados en la pantalla. - Page 32 Installeren/Verbinden Basisprocedure Haal de sleutel uit het contactslot en ontkoppel vervolgens de aansluiting van de auto-accu. Dit gedeelte is voor de professionele installateur. Verbind de draden juist. Zie “Verbinden van draden” op pagina 3, 4. Laat het monteren en verbinden voor de veiligheid door een vakman uitvoeren. Raadpleeg de Installeer het toestel in de auto.
- Page 33 Installeren van het toestel (zonder bevestigingshuls) Verbinden van draden van de KD-T922BT Verwijder de bevestigingshuls en sierplaat van het toestel. Breng de gaten in het apparaat (beide kanten) in lijn met de Antenne-aansluiting bevestigingsbeugel van de auto en zet het apparaat met schroeven (los verkrijgbaar) vast.
-
Page 34: Alvorens Gebruik
• Voorkom kortsluiting en steek derhalve nooit metalen voorwerpen (zoals munten en gereedschap) in het toestel. Geel : Accu • KD-T922BT/KD-DB622BT: In geval van een storing door condensvorming op Blauw/wit : Stroomregeling (12 V 350 mA) de laserlens, moet u de disc verwijderen en wachten totdat de condens is... - Page 35 Basispunten Voorpaneel van de KD-X38MDBT Volumeknop Aux-ingangsaansluiting Voorpaneel van de KD-T922BT Volumeknop Lade Aux-ingangsaansluiting Verwijdertoets Displayvenster*1 USB-ingangsaansluiting Verwijdertoets Displayvenster*1 USB-ingangsaansluiting Bevestigen Verwijderen Terugstellen Voorpaneel van de KD-DB622BT Stel het toestel terug binnen Volumeknop Lade Aux-ingangsaansluiting 5 seconden na het verwijderen van het voorpaneel.
- Page 36 [DEUTSCH] Draai de volumeknop om de instellingen te maken en druk vervolgens op de knop. * Alleen voor de KD-T922BT. Stel de datum in de volgorde van “Dag” “Maand” “Jaar”. Druk op om te verlaten.
- Page 37 Digitale radio Geheugeninstellingen (voor de KD-DB622BT/KD-X38MDBT) U kunt maximaal 18 services opslaan. Meer over DAB (Digital Audio Broadcasting) Opslaan van een service DAB is een van de hedendaagse beschikbare digitale radio-uitzendsystemen. DAB Tijdens het luisteren naar een service..levert een digitale geluidskwaliteit, zonder interferentie en signaalvervorming. Houd een van de cijfertoetsen (1 tot 6) even ingedrukt.
-
Page 38: Analoge Radio
Analoge radio CD/USB/iPod Kiesbare bron: Opzoeken van een zender • KD-T922BT: CD/USB/iPod USB of iPod BT Druk herhaaldelijk op SRC om FM of AM te kiezen. • KD-DB622BT: CD/USB Druk op om automatisch een zender op te zoeken. • KD-X38MDBT: USB... -
Page 39: Menu-Instellingen
Druk op om naar het voorgaande instelonderdeel terug te keren. • Raadpleeg de GEBRUIKSAANWIJZING op de volgende website voor een gedetailleerde uitleg over elk item: <http://www.jvc.net/cs/car/> Draai de volumeknop met de klok mee om [SUBWOOFER SET] te kiezen en •... -
Page 40: Andere Informatie
[GRADATION] [OCEAN] Kleurinstelling van verlichting [RELAX] [SUNSET] : Het gekozen kleurpatroon wordt Voor KD-T922BT/KD-X38MDBT kunt u de gewenste verlichtingskleur instellen voor getoond. (Alleen kiesbaar indien [ALL ZONE] in stap 4 is elke zone. gekozen.) Herhaal stap 4 en stap 5 om de kleur in te stellen voor andere zones. - Page 41 Afspelen/pauzeren Druk op de volumeknop. Druk op SRC om het toestel in te schakelen. Zoek en selecteer de naam van uw receiver (“KD-T922BT”/“KD-DB622BT”/ Kiezen van een groep of map Druk op 2 “KD-X38MDBT”) op het Bluetooth-apparaat. Voer afhankelijk van wat op het display verschijnt (A) of (B) uit.
- Page 42 Instalação/Conexão Processo básico Retire a chave do interruptor de ignição e, em seguida, desconecte o terminal da bateria do automóvel. Esta secção é para o instalador profissional. Conecte os fios adequadamente. Consulte “Ligação da cablagem” na Para o propósito de segurança, encarregue as ligações e a montagem a profissionais. Consulte o página 3, 4.
- Page 43 Instalação do aparelho (sem manga de montagem) Ligação da cablagem do KD-T922BT Retire a manga de montagem e a placa de guarnição do aparelho. Alinhe os orifícios no aparelho (em ambos lados) com o suporte de Terminal de antena montagem do veículo e fixe o aparelho com parafusos (disponíveis comercialmente).
-
Page 44: Antes De Utilizar
• Para prevenir curtos-circuitos, nunca coloque nem deixe cair objetos metálicos (moedas ou ferramentas de metal, por exemplo) dentro do aparelho. Amarelo : Bateria • KD-T922BT/KD-DB622BT: Se ocorrer um erro de disco devido à condensação na Azul/branco : Controlo de energia (12 V 350 mA) lente laser, ejete o disco e espere que a humidade se evapore. - Page 45 Fundamentos Painel frontal do KD-X38MDBT Botão de volume Tomada de entrada auxiliar Painel frontal do KD-T922BT Botão de volume Abertura de carregamento Tomada de entrada auxiliar Botão de remoção Visor*1 Terminal de entrada USB Botão de remoção Visor*1 Terminal de entrada USB...
- Page 46 [DEUTSCH] [DATE SET] Rode o botão de volume para selecionar e, em seguida, prima-o. Rode o botão de volume para fazer as definições e, em seguida, prima-o. * Somente para KD-T922BT. Defina a data na ordem de “Dia” “Mês” “Ano”. Prima para sair.
- Page 47 Rádio digital Definições na memória (para KD-DB622BT/KD-X38MDBT) Pode armazenar até 18 serviços. Sobre DAB (Digital Audio Broadcasting) Armazene um serviço DAB é um dos sistemas de radiodifusão digital disponíveis atualmente. Pode Durante a escuta de um serviço..proporcionar um som de qualidade digital sem interferência desagradável ou Mantenha premido um dos botões numéricos (1 a 6).
- Page 48 Rádio analógico CD/USB/iPod Fonte selecionável: Procura de uma estação • KD-T922BT: CD/USB/iPod USB ou iPod BT Prima SRC repetidamente para selecionar FM ou AM. • KD-DB622BT: CD/USB Prima para procurar uma estação automaticamente. • KD-X38MDBT: USB (ou) Mantenha premido até que “M” comece a piscar e, em seguida, Inicie a reprodução...
- Page 49 • Consulte o MANUAL DE INSTRUÇÕES no website abaixo para uma explicação detalhada de cada item: <http://www.jvc.net/cs/car/> • A disponibilidade de cada item varia dependendo do modelo. Rode o botão do volume no sentido horário para selecionar [SUBWOOFER SET]...
-
Page 50: Outras Informações
Definição da Cor de Iluminação mostrado. (Selecionável somente se [ALL ZONE] Para KD-T922BT/KD-X38MDBT, pode definir sua cor de iluminação preferida para selecionado no passo 4.) cada zona. Repita o passo 4 e o passo 5 para definir a cor para outras zonas. - Page 51 Prima SRC para ligar a alimentação do aparelho. Selecionar um grupo ou pasta Prima 2 Busque e selecione o nome do seu recetor (“KD-T922BT”/“KD-DB622BT”/ “KD-X38MDBT”) no dispositivo Bluetooth. Saltar para trás/para a frente Prima Realize (A) ou (B) dependendo do que aparecer no visor.
-
Page 52: Grundlegendes Verfahren
Einbau/Anschluss Grundlegendes Verfahren Ziehen Sie den Schlüssel aus dem Zündschloss, und trennen Sie dann den -Klemme der Autobatterie ab. Dieser Abschnitt ist für den professionellen Einbautechniker gedacht. Schließen Sie die Kabel richtig an. Siehe “Verdrahtungsanschluss” auf Überlassen Sie aus Sicherheitsgründen die Arbeiten zur Montage und Verkabelung ausgewiesenem Seite 3, 4. - Page 53 Installieren der Einheit (ohne die Einbauhalterung) Verdrahtungsanschluss von KD-T922BT Nehmen Sie die Einbauhalterung und den Frontrahmen vom Gerät ab. Richten Sie die Öffnungen am Gerät (an beiden Seiten) mit der Antennenanschluss Befestigungskonsole am Fahrzeug aus und sichern Sie das Gerät mit Schrauben (im Handel erhältlich).
-
Page 54: Vor Der Inbetriebnahme
• Stellen Sie sicher, dass keine Metallgegenstände (wie etwa Münzen oder Werkzeuge) ins Innere des Geräts gelangen und Kurzschlüsse verursachen. Gelb : Batterie • KD-T922BT/KD-DB622BT: Wenn ein Disc-Fehler durch Kondensationsbildung auf Blau/Weiß : Stromsteuerung (12 V 350 mA) der Laserlinse auftritt, werfen Sie die Disc aus und warten Sie eine Zeit lang, bis Orangefarben/Weiß... - Page 55 Grundlagen Frontblende von KD-X38MDBT Lautstärke-Regler Auxiliary-Eingabebuchse Frontblende von KD-T922BT Lautstärke-Regler Ladeschlitz Auxiliary-Eingabebuchse Abnehmen-Taste Displayfenster*1 USB-Eingangsterminal Abnehmen-Taste Displayfenster*1 USB-Eingangsterminal Anbringen Abnehmen Rücksetzen Frontblende von KD-DB622BT Nehmen Sie einen Reset am Lautstärke-Regler Ladeschlitz Auxiliary-Eingabebuchse Gerät innerhalb von 5 Sekunden nach dem Abnehmen der Frontblende vor.
-
Page 56: Erste Schritte
Drehen Sie den Lautstärke-Regler zum Wählen von [12H] oder [24H] , und [DEUTSCH] drücken Sie dann den Regler. * Nur für KD-T922BT. Zum Einstellen des Datums Drehen Sie den Lautstärke-Regler zum Wählen von [DATE SET] , und drücken Sie dann den Regler. - Page 57 Digitalradio Einstellungen im Speicher (für KD-DB622BT/KD-X38MDBT) Sie können bis zu 18 Dienste speichern. Wissenwertes über DAB (Digital Audio Broadcasting) Speichern eines Dienstes DAB ist eines der heute verfügbaren digitalen Rundfunksendesysteme. Es kann Beim Hören eines Dienstes... Klang in Digitalqualität ohne störende Interferenzen oder Signalverzerrung liefern. Halten Sie eine der Zifferntasten (1 bis 6) gedrückt.
- Page 58 Analogradio CD/USB/iPod Wählbare Quelle: Suche nach einem Sender • KD-T922BT: CD/USB/iPod USB oder iPod BT Drücken Sie SRC wiederholt, um FM (UKW) oder AM zu wählen. • KD-DB622BT: CD/USB Drücken Sie , um einen Sender automatisch zu suchen. • KD-X38MDBT: USB...
- Page 59 : Wählen die Sprache für das Menü und die Musikinformation. [DEUTSCH] : Wählen die Sprache für das Menü und die Musikinformation. [DEMO MODE] : Aktiviert oder deaktiviert die Displaydemonstration. *1 Nur anwendbar, während am Telefon gesprochen wird. *2 Nur für KD-T922BT. Fortsetzung auf nächster Seite...
-
Page 60: Andere Informationen
[GRADATION] [OCEAN] Einstellung der Beleuchtungsfarbe [RELAX] [SUNSET] : Das gewählte Farbmuster Für KD-T922BT/KD-X38MDBT, können Sie Ihre bevorzugte Beleuchtungsfarbe für wird gezeigt. (Nur wählbar, wenn [ALL ZONE] jede Zone einstellen. Schritt 4 gewählt ist.) Beispiel: Wiederholen Sie Schritt 4 und Schritt 5, um die Farbe für andere Zonen KD-T922BT einzustellen. - Page 61 Drücken Sie SRC, um die Einheit einzuschalten. Wiedergabe/Pause Drücken Sie den Lautstärke-Regler. Suchen und wählen Sie den Namen Ihres Receivers (“KD-T922BT”/ “KD-DB622BT”/“KD-X38MDBT”) auf dem Bluetooth-Gerät. Wählen Sie die Gruppe oder den Drücken Sie 2 Führen Sie (A) oder (B) aus, je nachdem was im Display erscheint.
-
Page 62: Procédure De Base
Installation/Connexion Procédure de base Retirez la clé de contact, puis déconnectez la borne de la batterie de la voiture. Cette section est réservée aux installateurs professionnels. Connectez les fils correctement. Voir “Connexions” à la page 3, 4. Pour des raison de sécurité, laissez le travail de câblage et de montage des professionnels. Consultez Installez l’appareil dans votre voiture. - Page 63 Installation de l’appareil (sans le manchon de montage) Connexions du KD-T922BT Retirez le manchon de montage et la plaque de garniture de l’appareil. Alignez les entailles de l’appareil (des deux côtés) avec le support de Borne de l’antenne montage du véhicule et fixez l’appareil avec les vis (en vente dans le commerce).
-
Page 64: Avant L'utilisation
: Commande d’alimentation (12 V 350 mA) circuit. Orange/blanc : Commutateur d’éclairage de la voiture • KD-T922BT/KD-DB622BT: Si une erreur de disque se produit à cause de la condensation sur l’objectif laser, éjectez le disque et attendez que l’humidité Rouge : Allumage (ACC) s’évapore. -
Page 65: Fonctionnement De Base
Fonctionnement de base Façade du KD-X38MDBT Bouton de volume Prise d’entrée auxiliaire Façade du KD-T922BT Bouton de volume Fente d’insertion Prise d’entrée auxiliaire Touche de détachement Fenêtre d’affichage*1 Prise d’entrée USB Touche de détachement Fenêtre d’affichage*1 Prise d’entrée USB Attachez Détachez... -
Page 66: Prise En Main
[DATE SET] Tournez le bouton de volume pour choisir , puis appuyez sur le bouton. * Uniquement pour KD-T922BT. Tournez le bouton de volume pour faire les réglages, puis appuyez sur le bouton. Réglez la date dans l’ordre “Jour” “Mois” “Année”. -
Page 67: Radio Numérique
Radio numérique Réglages en mémoire (pour KD-DB622BT/KD-X38MDBT) Vous pouvez mémoriser un maximum de 18 services. À propos du DAB (Digital Audio Broadcasting) Mémorisez un service DAB est l’un des systèmes de radio numérique disponibles aujourd’hui. Il peut Pendant l’écoute d’un service..offrir un son de qualité... -
Page 68: Radio Analogique
Radio analogique CD/USB/iPod Source sélectionnable: Recherchez une station • KD-T922BT : CD/USB/iPod USB ou iPod BT Appuyez répétitivemenent sur SRC pour sélectionner FM ou AM. • KD-DB622BT : CD/USB Appuyez sur pour rechercher une station automatiquement. • KD-X38MDBT : USB (ou) Maintenez en enfoncé... -
Page 69: Réglages Du Menu
Pour retourner à l’option de réglage précédente, appuyez sur • Reportez-vous au MANUEL D’INSTRUCTIONS sur les sites web suivant pour une explication détaillée de chaque élément: <http://www.jvc.net/cs/car/> Tournez le bouton de volume dans le sens des aiguilles d’une montre • La disponibilité de chaque élément varient en fonction du modèle. -
Page 70: Autres Informations
[GRADATION] [OCEAN] Réglage de la couleur d’éclairage [RELAX] [SUNSET] : Le motif de couleur sélectionné Pour le KD-T922BT/KD-X38MDBT, vous pouvez régler votre couleur d’éclairage apparaît. (Sélectionnable uniquement quand [ALL ZONE] préférée pour chaque zone. est choisi à l’étape 4.) Exemple: Répétez l’étape 4 et l’étape 5 pour régler la couleur pour les autres zones. - Page 71 SRC pour mettre l’appareil sous tension. Choisissez un groupe ou un Appuyez sur 2 Recherchez et sélectionnez le nom de votre récepteur (“KD-T922BT”/ dossier “KD-DB622BT”/“KD-X38MDBT”) sur le périphérique Bluetooth. Réalisez (A) ou (B) en fonction de ce qui apparait sur l’affichage.
-
Page 72: Installazione E Collegamenti
Installazione e collegamenti Procedura di base Sfilare la chiave di accensione e scollegare la presa della batteria del veicolo. Questa sezione è destinata agli installatori. Collegare correttamente i cavi elettrici. Vedere la sezione “Collegamento Per motivi di sicurezza si raccomanda di affidare l’installazione e i collegamenti elettrici a un tecnico dei cavi”... - Page 73 Installazione dell’apparecchio (senza manicotto di montaggio) Collegamento dei cavi per il modello KD-T922BT Rimuovere il supporto di montaggio e la piastrina di finitura dall’unità. Allineare i fori dell’unità (di entrambi i lati) con quelli della staffa di Presa d’antenna montaggio del veicolo e fissarvela usando comuni viti.
-
Page 74: Prima Dell'uso
• Non inserire né lasciare nell’apparecchio corpi metallici quali monete o attrezzi, pena la possibilità di cortocircuiti. Contatto Colori e funzione • KD-T922BT/KD-DB622BT: Se durante la riproduzione a causa della formazione Giallo : Batteria di condensa sulla testina laser si verifica un errore si suggerisce di espellerlo e di Blu/bianco : Alimentazione (12 V... - Page 75 Fondamenti Frontalino del modello KD-X38MDBT Manopola del volume Presa d’ingresso ausiliario Frontalino del modello KD-T922BT Manopola del volume Vano di caricamento Presa d’ingresso ausiliario Pulsante di rimozione Finestra del display*1 Presa d’ingresso USB Pulsante di rimozione Finestra del display*1 Presa d’ingresso USB...
-
Page 76: Operazioni Preliminari
[DEUTSCH] [12H] o [24H] Ruotare la manopola del volume sino a selezionare e quindi * Solo per il modello KD-T922BT. premerla. Per impostare la data Ruotare la manopola del volume sino a selezionare [DATE SET] e quindi premerla. -
Page 77: Radio Digitale
Radio digitale Impostazioni in memoria (per KD-DB622BT/KD-X38MDBT) È possibile registrare sino a 18 servizi. Informazioni sulla funzione DAB (Digital Audio Broadcasting) Per salvare un servizio Il DAB è uno dei sistemi di diffusione radio digitale oggi disponibili. Esso offre Durante l’ascolto di un servizio... un suono di qualità... -
Page 78: Radio Analogica
Radio analogica CD/USB/iPod Sorgenti selezionabili: Ricercare una stazione • KD-T922BT: CD/USB/iPod USB o iPod BT Premere SRC sino a selezionare FM o AM. • KD-DB622BT: CD/USB Premere per ricercare automaticamente le stazioni. • KD-X38MDBT: USB Premere a lungo sino a quando “M” inizia a lampeggiare, quindi... - Page 79 Per ritornare all’impostazione precedente premere • Fare riferimento al ISTRUZIONI PER L’USO disponibile nel seguente sito web per la spiegazione dettagliata di ciascuna voce: <http://www.jvc.net/cs/car/> Ruotare la manopola del volume in senso orario per selezionare • La disponibilità di ciascuna voce varia a seconda del modello.
-
Page 80: Altre Informazioni
[OCEAN] Impostazione del colore d’illuminazione [RELAX] [SUNSET] : appare il motivo a colori selezionato. Nel modello KD-T922BT/KD-X38MDBT è possibile impostare il colore (Selezionabili soltanto quando al passo 4 si seleziona d'illuminazione preferito per ciascuna zona. [ALL ZONE] Esempio Ripetere i passi 4 e 5 per impostare il colore delle altre zone. - Page 81 Bluetooth Riproduzione/pausa Premere la manopola del volume. Premere SRC per accendere l’apparecchio. Cercare e selezionare il nome del proprio ricevitore (“KD-T922BT”/ Selezionare un gruppo o una Premere 2 “KD-DB622BT”/“KD-X38MDBT”) sul dispositivo Bluetooth. cartella Sulla base del testo che appare in scorrimento sul display dare luogo all’operazione (A) o (B).
-
Page 82: Установка И Подключение
Установка и Подключение Стандартная процедура Извлеките ключ из замка зажигания, затем отсоедините разъем автомобильного аккумулятора. Данный раздел предназначен для специалиста по установке. Правильно подключите провода. См. “Подключение проводов” на В целях безопасности работа по подключению проводов и монтажу должна выполняться стр. 3, 4. - Page 83 Установка устройства (без посадочного корпуса) Подключение проводов на KD-T922BT Снимите посадочный корпус и декоративную панель с устройства. Совместите отверстия в устройстве (с обеих сторон) с монтажной Разъем для антенны консолью автомобиля и закрепите устройство винтами (которые можно приобрести в магазине).
-
Page 84: Перед Использованием
металлические инструменты) внутри устройства во избежание коротких автомобиля замыканий. Kрасный : Зажигание (АCC) • KD-T922BT/KD-DB622BT: Если ошибка чтения диска возникла из-за Чёрный : Заземляющее соединение (земля) образования конденсата на лазерных линзах, извлеките диск и дождитесь, B1, B2 : Задний динамик (правый) Фиолетовый... -
Page 85: Основные Сведения
Основные сведения Передняя панель KD-X38MDBT Pучка регулировки громкости Дополнительный входной разъем Передняя панель KD-T922BT Дополнительный Pучка регулировки Загрузочный отсек входной разъем громкости Кнопка отсоединения Дисплей*1 Входной USB-разъем Прикрепление Отсоединение Порядок сброса Кнопка отсоединения Дисплей*1 Входной USB-разъем Выполните Передняя панель KD-DB622BT сброс... -
Page 86: Начало Эксплуатации
Поверните ручку регулировки громкости для выбора [12H] или [24H] , а [DEUTSCH] затем нажмите ее. * Только для KD-T922BT. Чтобы установить дату Поверните ручку регулировки громкости для выбора элемента [DATE SET] , а затем нажмите ее. Поворачивайте ручку регулировки громкости, чтобы выбрать... - Page 87 Цифровое радио Настройки в памяти (для KD-DB622BT/KD-X38MDBT) Сохранить можно до 18 сервисов. Информация о DAB (Digital Audio Broadcasting — цифровое Сохранение сервиса аудиовещание) При прослушивании сервиса..DAB представляет собой одну из доступных сегодня систем цифрового Нажмите и удерживайте нажатой одну из нумерованных кнопок (от 1 до 6). радиовещания.
- Page 88 Аналоговое радио CD/USB/iPod Доступные для выбора источники: Поиск радиостанции • KD-T922BT: CD/USB/iPod USB или iPod BT Нажмите кнопку SRC несколько раз для выбора FM или AM. • KD-DB622BT: CD/USB Нажмите кнопку для автоматического поиска радиостанции. • KD-X38MDBT: USB (или) Нажмите и удерживайте нажатой кнопку...
-
Page 89: Настройки Меню
: Выбор языка для меню и информации о музыке. [DEUTSCH] : Выбор языка для меню и информации о музыке. [DEMO MODE] : Включение или выключение демонстрации на дисплее. *1 Применимо только во время разговора по телефону. *2 Только для KD-T922BT. Продолжение на следующей странице... - Page 90 [SUNSET] : Отображается выбранная цветовая Установка цвета подсветки комбинация. (Доступно для выбора, только если в Для KD-T922BT/KD-X38MDBT: вы можете установить предпочитаемый цвет действии 4 выбран параметр [ALL ZONE] подсветки для каждой зоны. Повторите действие 4 и действие 5, чтобы задать цвет для других зон.
- Page 91 Для включения устройства нажмите SRC. Воспроизведение/пауза Нажмите ручку регулировки громкости. На устройстве Bluetooth найдите и выберите название используемого приемника (“KD-T922BT”/“KD-DB622BT”/“KD-X38MDBT”). Выбор группы/папки Нажмите кнопку 2 В зависимости от отображаемых на экране данных, выполните действие (A) или (B). Переход назад/Переход вперед...
- Page 92 • Windows Media is a registered trademark or trademark of Microsoft Corporation in the United States and/or other countries. This product is protected by certain intellectual property rights of Microsoft. Use or distribution of such technology outside of this product is prohibited without a license from Microsoft. •...