Advertisement
Quick Links
Advertisement

Related Manuals for Kodak ROCPGTRI9


Summary of Contents for Kodak ROCPGTRI9
- Page 1 KODAK PHOTO GEAR MINI TRIPOD WITH REMOTE 9" / 23 cm User Guide...
-
Page 2: Table Of Contents
TABLE OF CONTENTS INTRODUCTION SAFETY PRECAUTIONS PACKAGE CONTENTS ABOUT THE KODAK 9" / 23 CM MINI TRIPOD WITH REMOTE PRODUCT OVERVIEW TECHNICAL SPECIFICATIONS 9-10 WARRANTY INFORMATION GET IN TOUCH TO SEE THIS GUIDE IN FRENCH, ITALIAN, GERMAN, OR SPANISH, PLEASE VISIT WWW.KODAKPHOTOPLUS.COM... -
Page 3: Introduction
INTRODUCTION Thank you for purchasing the KODAK 9" / 23 cm Mini Tripod with Remote. This User Guide is intended to provide you with guidelines to ensure that operation of this product is safe and does not pose risk to the user. Any use that does not conform to the guidelines described in this User Guide may void the limited warranty. -
Page 4: Package Contents
YOUR SMARTPHONE TO DOWNLOAD THE FREE KODAK TRIPOD/MONOPOD E-GUIDE! ABOUT THE KODAK 9" / 23 CM MINI TRIPOD WITH REMOTE • Unique mini design stows easily in a backpack or handbag • Easy-to-use Bluetooth® remote so you can capture images even when you’re not behind the camera... -
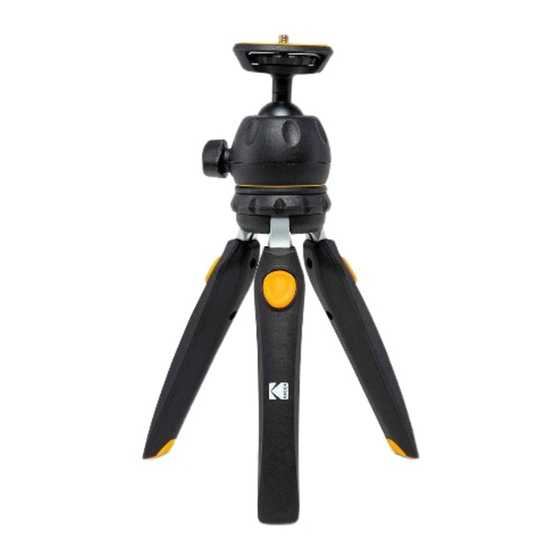
Page 5: Product Overview
PRODUCT OVERVIEW 1. 1/4" (0.6 cm) universal screw 2. Non-slip rubberized mount platform 3. Camera mount platform thumb wheel 4. Swivel head 5. Notch in head for landscape/portrait conversion 6. Swivel head knob 7. Swivel head casing 8. Non-slip rubber pad 9. - Page 6 PRODUCT OVERVIEW (CONTINUED) 1. 2-Section Legs a. Fold the legs out. b. Use the yellow button located on top of each leg to make it longer or shorter. 2. A => B Leg Position Dial a. To position the tripod in an upright orientation, turn the dial to B. b.
- Page 7 3. Swivel Head and Locking Knob a. Loosen the Locking Knob to adjust the swivel head to your desired angle. b. Tighten it to set the angle for mounting your camera or smartphone. 4. Mounting a Camera a. Align the screw adapter with the corresponding threading on your camera.
- Page 8 5. Mounting a Smartphone (works for phones up to 2.2" x 3.4" / 5.5 cm x 8.6 cm) a. Align the screw adapter with the corresponding threading on the smartphone adapter. b. Holding the smartphone adapter in one hand, turn the thumb wheel to the right until it is securely attached to the adapter.
- Page 9 5. Mounting an Action Camera a. Align the screw adapter with the corresponding threading on the action camera adapter. b. Holding the action camera adapter in one hand, turn the camera mount platform thumb to the right until it is securely attached to the adapter.
- Page 10 Turn the switch to On. The status indicator light will flash. ii. Activate the Bluetooth® connection on your smartphone or tablet. iii. Select the device “KODAK” and pair to your smartphone or tablet. The status indicator light will flash green, then stop flashing.
-
Page 11: Technical Specifications
WHAT DOES THIS WARRANTY COVER? This limited warranty covers defects in materials and workmanship of the KODAK 9" / 23 cm Mini Tripod with Remote (the “product”) for the Warranty Period as defined below. -
Page 12: Get In Touch
HOW DO YOU OBTAIN WARRANTY SERVICE? To obtain warranty service, you must contact us at 844-516-1539 or by email at kodak@camarketing.com during the Warranty Period to obtain a Defective Merchandise Authorization (“DMA”) number. - Page 13 The Kodak trademark, logo and trade dress are used under license from Eastman Kodak Company. Bluetooth is a trademark of Bluetooth SIG, Inc. USA. IOS is a trademark of Cisco in the U.S. and other countries and is used under license.