Bella Pro Series Instruction Manual
12 cup programmable
Hide thumbs
Also See for Pro Series:
- Instruction manual (44 pages) ,
- Instruction manual (42 pages) ,
- Instruction manual (12 pages)
Table of Contents
Advertisement
Advertisement
Table of Contents

Related Manuals for Bella Pro Series


Summary of Contents for Bella Pro Series
- Page 1 12 CUP PROGRAMMABLE COFFEE MAKER Instruction Manual...
- Page 2 Thank You for your purchase Register & sign up for special announcements and trendy recipes! Tell us what you think! Rate, review or ask us a question. @bellahousewares.com #getinspired BellaLife BellaLifestyle...
-
Page 3: Table Of Contents
TABLE OF CONTENTS Important Safeguards ..................... 4-6 Additional Important Safeguards .................. 6-8 Notes On The Plug .......................8 Notes On The Cord ......................8 Electric Power ........................8 Carafe Safety Precautions ....................9 Coffee Yield ........................10 Permanent Coffee Filter Basket ..................10 Getting To Know Your Programmable 12 Cup Coffee Maker ........11 Before Using For The First Time.................. -
Page 4: Important Safeguards
IMPORTANT SAFEGUARDS When using electrical appliances, basic safety precautions should always be followed, including the following: 1. READ ALL INSTRUCTIONS. 2. Do not touch hot surface. Use handles or knobs only. 3. This appliance is not intended for use by persons (including children) with reduced physical, sensory or mental capabilities, or lack of experience and knowledge, unless they have been given supervision or instruction concerning use of the appliance by a person responsible... - Page 5 Return appliance to the nearest authorized service facility for examination, repair or adjustment. NOTE: DO NOT ATTEMPT TO REPAIR THE UNIT YOURSELF.THIS WILL VOID THE WARRANTY. 11. The use of accessory attachments not recommended by the appliance manufacturer may result in fire, electric shock or injury to persons. 12.
-
Page 6: Additional Important Safeguards
23. Do not use this appliance for other than its intended use. 24. Scalding may occur if the lid is removed during the brewing cycles. 25. To reduce the risk of fire, do not mount unit over or near any portion of a heating or cooking appliance. - Page 7 3. Use water only in this appliance! Do not put any other liquids or food products in this appliance. Do not mix or add anything to the water placed in this appliance, except as instructed in the User Maintenance Instructions to clean the appliance. 4.
-
Page 8: Notes On The Plug
13. CAUTION: To prevent injury when utilizing the auto pour and serve feature, replace carafe within 30 seconds of removing during brewing process. SAVE THESE INSTRUCTIONS NOTES ON THE PLUG This appliance has a polarized plug (one blade is wider than the other). To reduce the risk of electric shock, this plug will fit in a polarized outlet only one way. -
Page 9: Carafe Safety Precautions
CARAFE SAFETY PRECAUTIONS 1. Do not use a cracked carafe or any carafe with a loose or weakened handle. 2. This carafe is designed to be used only on the warming plate of your Coffee Maker. Do not use in a conventional oven. 3. -
Page 10: Coffee Yield
COFFEE YIELD 12 Cup Coffee Maker: 12 (5 oz.) cups NOTE: A 5-oz.cup is the American industry standard and is used by most Coffee Maker manufacturers. To fill your favorite over-sized mug, fill Coffee Maker reservoir with enough water for 3 to 4 cups (15 to 20 ounces). -
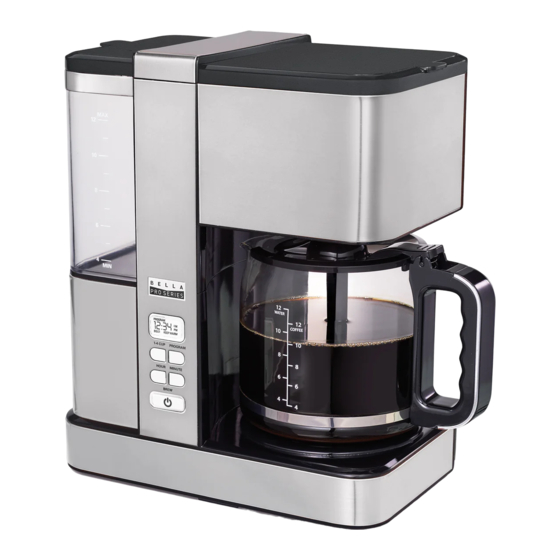
Page 11: Getting To Know Your Programmable 12 Cup Coffee Maker
Getting To Know Your Programmable 12 cup coffee maker Product may vary slightly from illustrations. Removable lter holder Shower Permanent head coffee lter Pause and Serve Valve Measuring Large, easy scoop access water tank Carafe lid 12 Cup glass LCD Display carafe Control Panel... -
Page 12: Before Using For The First Time
Before Using for the First Time CAUTION: To protect against electrical shock, do not immerse the Coffee Maker or allow power cord to come into contact with water or other liquids. Remove all packing material and labels from the inside and outside of the Coffee Maker. Place the unit on a flat, clean surface. -
Page 13: Brewing Coffee
BREWING COFFEE MAKING COFFEE IMMEDIATELY NOTE: The amount of brewed coffee will always be less than the amount of water placed into the water reservoir; as much as 10% is absorbed by coffee grounds and filter. Lift to open the Coffee Maker Lid. Fill carafe with cold tap water and pour into water reservoir at the side of the unit. -
Page 14: Setting The Program (Future Brew) Time
NOTE: To check the current time press the PROGRAM button. The KEEP WARM icon will disappear and the current time will appear for 5 seconds. Once the 5 seconds is reached, the time since brew and the KEEP WARM icon will reappear. After 2 hours the appliance (and carafe warming plate) will turn off automatically and will beep 2 times. -
Page 15: Setting The Bold Function
When the preset time is reached, the light of BREW will illuminate white and brewing will begin as indicating above under the MAKING COFFEE IMMEDIATELY steps 6-8. IMPORTANT: To cancel the PROGRAM (future brew) start time, press the PROGRAM button, the PROGRAM icon will disappear from the LCD display. -
Page 16: Pause And Serve
PAUSE AND SERVE Using the pause and serve feature: If you wish to serve a cup of coffee before the brew cycle is completed, simply remove carafe from the warming plate. Dripping will automatically cease. Return the carafe onto the warming plate, dripping will resume. CAUTION: To prevent injury when utilizing pause and serve feature, replace carafe within 30 seconds after removing during the brewing process. -
Page 17: User Maintenance Instructions
• Finer grinds, such as drip coffee, promote fuller extraction and provide rich, full-bodied coffee. Regular grind will require slightly more coffee per cup to provide the strength of a finer grind. • Store coffee in a cool, dry place. •... -
Page 18: Descaling
DESCALING Special cleaning of your Coffee Maker is recommended at least once a month, depending on frequency of use and quality of water used in the unit. If water in your area is especially hard, the following cleaning procedure should be performed every 2 weeks, since minerals in water can detract from the flavor of the coffee and possibly lengthen brew time. -
Page 19: Auto Clean
Auto Clean We recommend cleaning your coffeemaker once a month. Combine 6 cups of white vinegar and 4 cups of cold water in carafe. Pour into water reservoir. Place an 8 to 12 cup cupcake style paper filter in the removable filter basket. Insert filter basket into filter basket holder and close lid. -
Page 20: Warranty
Limited Two-Year Warranty SENSIO Inc. hereby warrants that for The warranty is only valid for the a period of TWO YEARS from the date original retail purchaser from the date of purchase, this product will be free of initial retail purchase and is not from mechanical defects in material transferable. - Page 21 How To Obtain Warranty Service: You must contact Customer Service at Also, include a copy of the original sales our toll-free number: 1-866-832-4843. receipt. Carefully package the tagged A Customer Service Representative product with the sales receipt, and send will attempt to resolve warranty issues it (with shipping and insurance prepaid) over the phone.
- Page 24 For customer service questions or comments 1-866-832-4843 bellahousewares.com BELLA Pro Series is a registered trademark of Sensio Inc., Montreal, Canada H3C 4S9. All rights reserved.