Table of Contents
Advertisement
Quick Links
Advertisement
Table of Contents

Summary of Contents for Focusrite Clarett 4 Pre
- Page 1 User Guide focusrite.com Version 2 FFFA001256-02...
-
Page 2: Table Of Contents
FOCUSRITE CONTROL - OVERVIEW . . . . . . . . . . . . . . . . . . -
Page 3: Overview
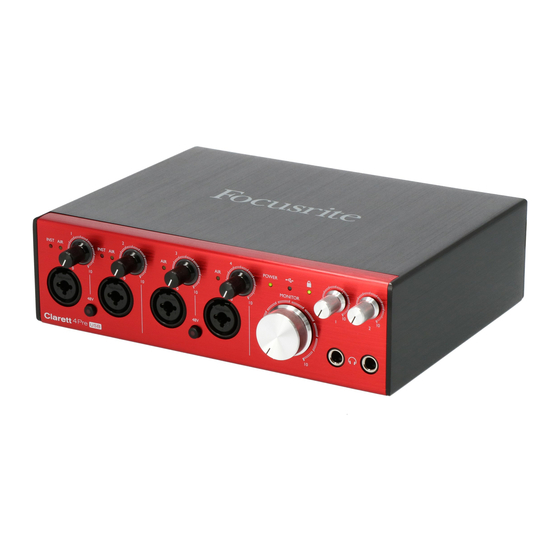
Clarett analogue pre-amplifiers with the unique AIR function. In conjunction with the Focusrite Control application, you now have a highly versatile and professional solution for routing high quality audio to and from your computer recording system, with extremely low latency. -
Page 4: Features
All inputs on the Clarett 4Pre are routed directly to your DAW software for recording, but Focusrite Control also allows you to route these signals internally within the device to the outputs so you can monitor the audio signals with ultra-low latency - before they arrive at your DAW, should you need to do so. -
Page 5: Getting Started
4. Download and install the Focusrite Control software application. Follow all on-screen instructions. 5. When the installation is complete, you will be prompted to restart your computer. -
Page 6: Hardware Features
INST – two red LEDs which illuminate when INST mode is selected for the jack contacts of Inputs 1 or 2 from Focusrite Control software. When INST is selected, the gain range and input impedance are altered (relative to LINE), and the input is made unbalanced. This optimises it for the direct connection of instruments via a 2-pole (TS) jack plug. -
Page 7: Rear Panel
S/PDIF signals may be customised in Focusrite Control. The S/PDIF Input appears in Focusrite Control as Inputs 9 and 10 and the S/PDIF Output as Outputs 7 and 8. The S/PDIF inputs are functional up to 96 kHz sample rate. -
Page 8: Connecting Your Clarett 4Pre
Your OS should automatically select the Clarett 4Pre as the default audio device. You can check this selection has been made correctly, if you wish. Details of how to do this on various operating systems can be found at focusrite.com/get-started/clarett-4Pre. Audio Setup in your DAW After installing the drivers and connecting the hardware, you can start using the Clarett 4Pre with the DAW of your choice. -
Page 9: Connecting Clarett 4Pre To Loudspeakers
Connecting Clarett 4Pre to loudspeakers The 1/4” jack LINE OUTPUTS 1 and 2 on the rear panel will normally be used to drive monitoring speakers. Self-powered monitors (e.g., typical computer speakers) have internal amplifiers, and may be connected directly. Passive loudspeakers will require a separate stereo amplifier; in this case, the outputs should be connected to the amplifier’s inputs. - Page 10 When mixing, you can connect an additional pair of speakers (mid-field. near-field, etc.) to LINE OUTPUTS 3 and 4 to check your mix on different types of speaker. You can configure Focusrite Control to route the mix to these outputs as well as Outputs 1 and 2.
-
Page 11: Examples Of Usage
Ensure INST mode is selected for Inputs 1 and 2 from Focusrite Control, and the INST LEDs are illuminated. The two mics for vocals are plugged into Inputs 3 and 4; if they are condenser mics, press the 48V button to enable phantom power. - Page 12 – this may be necessary when you are recording overdubs on a particularly large project, with many DAW channels, including software instruments and FX plug-ins. To overcome this, Focusrite Control gives you the option of sourcing your monitor feed directly from the Clarett 4Pre’s inputs.
-
Page 13: Recording A Drum Kit With (And Without) The Optical Connection
TOSLINK optical cable. To synchronise the two devices set the Clarett 4Pre’s clock source (in Focusrite Control) to ADAT and set the Octopre to Internal. NOTE: when interconnecting two digital devices by any method, always ensure both are set to use the same... - Page 14 The additional inputs from the optical port may be routed using Focusrite Control in exactly the same way as the other inputs. The additional inputs can form part of any musician’s headphone mix, as required. If an ADAT-equipped mic pre-amp is not available, you can record drums with just four mics as...
-
Page 15: Providing Foldback While Recording
You can adjust the content of both mixes in Focusrite Control - that for Outputs 3/4 defines what is heard by Headphones 1, and that for Outputs 5/6 (which have no corresponding rear panel sockets) defines what is heard by Headphones 2 . -
Page 16: Loopback Recording
DAW as signal sources for recording. By routing DAW 1 and 2 to your Loopback mix in Focusrite Control, when you select the Loopback output as the recording source on a mono or stereo DAW track, you can record from another software application into your DAW. -
Page 17: Clarett 4Pre Technical Specifications
CLARETT 4PRE TECHNICAL SPECIFICATIONS Performance Specifications Configuration Inputs 18: analogue (8), S/PDIF (2), ADAT (8) Outputs 8: analogue (4), S/PDIF (2), HP (2) Mixer Fully assignable 26-in/10-out mixer Digital Performance Supported sample rates 44.1 kHz, 48 kHz, 88.2 kHz, 96 kHz, 176.4 kHz & 192 kHz Microphone Inputs Frequency Response 20 Hz - 20 kHz +/-0.1 dB... -
Page 18: Physical And Electrical Characteristics
“Combo XLR” sockets: Mic/Line/Inst (Inputs 1 & 2); Mic/Line Connectors (Inputs 3 & 4) on front panel Mic/Line switching Automatic Line/Instrument switching via Focusrite Control (Inputs 1 & 2) Phantom power +48 V switches for inputs 1 & 2, 3 & 4 Analogue Inputs 5 to 8 Connectors 4 x balanced ¼”... -
Page 19: Troubleshooting
For all troubleshooting queries, please visit the Focusrite Help Centre at support.focusrite.com. COPYRIGHT AND LEGAL NOTICES Focusrite is a registered trade mark and Clarett 4Pre is a trade mark of Focusrite Audio Engineering Limited. All other trade marks and trade names are the property of their respective owners.


