Table of Contents
Advertisement
Quick Links
Advertisement
Table of Contents

Related Manuals for LG GM-652RC Series


Summary of Contents for LG GM-652RC Series
- Page 1 OWNER’S MANUAL BOTTOM FREEZER REFRIGERATOR Read this owner’s manual thoroughly before operating the appliance and keep it handy for reference at all times. ENGLISH GM-652R*C MFL67851412 www.lg.com Rev.00_030221 Copyright © 2021 LG Electronics Inc. All Rights Reserved.
-
Page 3: Table Of Contents
TABLE OF CONTENTS SAFETY INSTRUCTIONS SAFETY INSTRUCTIONS WARNING CAUTION PRODUCT OVERVIEW Product Features 11 INSTALLATION Before Installing Choosing the Proper Location Removing/Assembling the Handles Removing/Assembling the Doors and Drawers Connecting the Water Line Leveling Turning on the Power 22 OPERATION Before Use Control Panel Shabbath Mode... -
Page 4: Safety Instructions
4 SAFETY INSTRUCTIONS SAFETY INSTRUCTIONS READ ALL INSTRUCTIONS BEFORE USE Safety Messages Your safety and the safety of others are very important. We have provided many important safety messages in this manual and on your appliance. Always read and follow all safety messages. This is the safety alert symbol. - Page 5 SAFETY INSTRUCTIONS • Children should be supervised to ensure that they do not play with the refrigerator. • If the supply cord is damaged, it must be replaced by the manufacturer or its service agent or a similarly qualified person in order to avoid a hazard. •...
- Page 6 6 SAFETY INSTRUCTIONS • Do not touch frozen food or the metal parts in the freezer compartment with wet or damp hands. Doing so may cause frostbite. • Do not refreeze frozen food that has thawed completely. Doing so may result in a serious health hazard. •...
- Page 7 SAFETY INSTRUCTIONS Grounding Instructions • Improper connection of the equipment-grounding conductor can result in a risk of electric shock. Check with a qualified electrician or service personnel if you are in doubt whether the appliance is properly grounded. Do not modify the plug provided with the appliance; if it will not fit the outlet, have a proper outlet installed by a qualified electrician.
-
Page 8: Product Overview
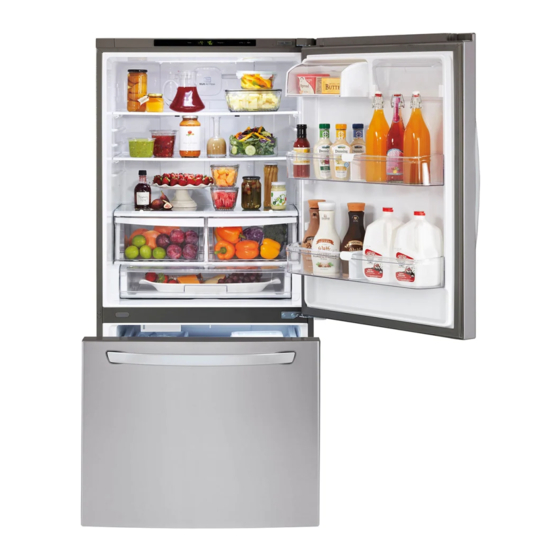
PRODUCT OVERVIEW PRODUCT OVERVIEW Product Features The images in this guide may be different from the actual components and accessories, which are subject to change by the manufacturer without prior notice for product improvement purposes. Exterior Refrigerator Fresh food compartment Handle Opens and closes the refrigerator door. - Page 9 PRODUCT OVERVIEW Interior LED Interior Lighting Lights up the inside of the refrigerator. Humidity Controlled Crisper Helps vegetables and fruit to stay crisp and controls humidity. Auto-Closing Hinge The refrigerator doors and freezer drawers close automatically when pushed slightly. (The door only closes automatically when it is open at an angle of less than 30°).
- Page 10 10 PRODUCT OVERVIEW Pullout Drawer Provides extra storage within the freezer compartment. Durabase and Durabase Divider Provides storage for large food items. Product Specifications The appearance and specifications listed in this manual may vary due to constant product improvements. Electrical requirements: 230 V, 50 Hz Min.
-
Page 11: Installation
INSTALLATION INSTALLATION Before Installing Installation Overview Please read the following installation instructions first after purchasing this product or transporting it to another location. Unpacking the Refrigerator Choosing the Proper Location Disassembling/Assembling Connecting the Water Line Leveling and Door Alignment WARNING •... -
Page 12: Choosing The Proper Location
12 INSTALLATION Choosing the Proper Unpacking the Refrigerator Location WARNING • Use two or more people to move and install the Water refrigerator. Failure to do so can result in back Water supply must be easily connected for the injury or other injury. automatic icemaker. - Page 13 INSTALLATION Dimensions and Clearances • Check the dimensions of the appliance and the installation path to ensure there is sufficient room to move the refrigerator through doors or narrow openings. • If an opening is too narrow to fit the refrigerator through, remove the refrigerator doors. See Removing/ Assembling the Doors and Drawers in this manual.
-
Page 14: Removing/Assembling The Handles
14 INSTALLATION Removing/Assembling the fasteners and tightening the set screws with a 3/32 in. Allen wrench. Handles When moving the refrigerator through a narrow opening, removing the doors is preferred. The appearance of the handles may vary from what is shown. WARNING Removing the Refrigerator Handles •... -
Page 15: Removing/Assembling The Doors And Drawers
INSTALLATION Removing/Assembling the Doors and Drawers If the entrance door is too narrow for the refrigerator to pass through, remove the refrigerator doors and move the refrigerator sideways through the doorway. Lift the door from the middle hinge pin and remove the door WARNING WARNING... - Page 16 16 INSTALLATION Lift the front of the drawer up, then pull it Hold both rails and push them in straight out. simultaneously. Assembling the Freezer Drawer Remove the Durabase basket from the rails. Remove the screws from the rails at both Pull out both rails simultaneously, until they ends.
- Page 17 INSTALLATION Assembling the Refrigerator Door Lower the door into its final position and insert the screws in the rails on both sides. Make sure that the plastic sleeve is inserted in the bottom of the door. Lower the door onto the middle hinge pin.
-
Page 18: Connecting The Water Line
18 INSTALLATION Connecting the Water Line • Check to see if the sediment filter in the reverse osmosis system is blocked. Replace the filter if necessary. Before Beginning • Allow the storage tank on the reverse osmosis system to refill after heavy usage. This water line installation is not covered by the •... - Page 19 INSTALLATION • Shutoff valve to connect to the cold water line. Drill the hole for the valve. The shutoff valve should have a water inlet with • Drill a ¼ in. hole in the water pipe using a a minimum inside diameter of 5/32 in. at the sharp bit.
- Page 20 20 INSTALLATION NOTE Saddle-Type Shutoff Valve • Do not over tighten clamp or you may crush the Compression Nut tubing. Packing Nut Outlet Valve Ferrule (sleeve) Flush out the tubing. • Turn the main water supply on and flush out the tubing until the water is clear. Shut the water off at the water valve after about one quart of water has been flushed through the tubing.
-
Page 21: Leveling
INSTALLATION Tubing Clamp Open both doors and check to make sure that they close easily. If the doors do not close ¼ in. Tubing easily, tilt the refrigerator slightly more to the ¼ in. Compression Nut rear by turning both leveling legs to the left. It may take several more turns, and be sure to Ferrule (sleeve) turn both leveling legs the same amount. -
Page 22: Operation
OPERATION OPERATION Before Use Checklist Clean the refrigerator. Clean the refrigerator thoroughly and wipe off all dust that accumulated during shipping. CAUTION • Do not scratch the refrigerator with a sharp object or use a detergent that contains alcohol, a flammable liquid or an abrasive when removing any tape or adhesive from the refrigerator. -
Page 23: Control Panel
OPERATION Control Panel Depending on the model, some of the following functions may not be available. The actual control panel may differ from model to model. Control Panel Features Freezer Indicates the set temperature of the freezer compartment in Celsius (°C) or Fahrenheit (°F). The default freezer temperature is 0°F (-18 °C). -
Page 24: Shabbath Mode
OPERATION Shabbath Mode temperature around the appliance, frequency of the door being opened, amount of food stored Using the Shabbath Mode in the appliance, etc.). • The amount and shape of ice may vary according Shabbath mode is used on the Jewish Shabbath to the environment (ambient temperature and holidays. -
Page 25: Storing Food
OPERATION water supply system to prevent serious property Food How to Store damage due to flooding caused by ruptured water Fish Freeze fresh fish and shellfish if they lines or connections are not being eaten the same day purchased. Eating fresh fish and Storing Food shellfish the same day purchased is recommended. -
Page 26: Humidity Controlled Crispers
OPERATION Follow package or container instructions for • Vegetables keeps moist air in the crisper for proper freezing methods. best storage of fresh, leafy vegetables. • Fruit lets moist air out of the crisper for best Do not use storage of fruit. •... -
Page 27: Glide'n'serve
OPERATION Glide‘N’Serve Detaching/Assembling the Full Width Shelf Using the Glide‘N’Serve CAUTION This drawer can be used for large party trays, deli • Do not clean glass shelves with warm water items and beverages. This drawer should not be while they are cold. Shelves may break if used to store vegetables that require high exposed to sudden temperature changes or humidity. -
Page 28: Dairy Bin
OPERATION To replace the bin, slide it in above the desired support and push down until it snaps into place. Dairy Bin To remove the dairy bin, simply lift it and pull straight out. To replace the dairy bin, slide it above the de- sired location and push down until it stops. -
Page 29: Smart Functions
Follow the instructions below to use the audible Communicate with the appliance from a diagnosis method. smartphone using the convenient smart features. • Launch the LG ThinQ application and select the Smart Diagnosis Smart Diagnosis feature in the menu. Follow the • This function provides useful information... -
Page 30: Maintenance
MAINTENANCE MAINTENANCE Cleaning Inside Walls • Allow freezer to warm up so the cloth will not WARNING stick. • Use non-flammable cleaner. Failure to do so can To help remove odors, wash the inside of the result in fire, explosion, or death. refrigerator with a mixture of baking soda and warm water. - Page 31 MAINTENANCE Guidelines for Application / Water Supply Parameters Service Flow 0.5 gpm (1.9 lpm) Water Supply Community or Private Well - Potable Water Water Pressure 20 – 120 psi (138 – 827 kPa) Water Temperature 33 °F – 100 °F (0.6 °C – 37.8°C) Capacity 200 gallons (757 liters) It is essential that the manufacturer’s recommended installation, maintenance and filter replacement...
-
Page 32: Troubleshooting
TROUBLESHOOTING TROUBLESHOOTING FAQs Frequently Asked Questions What are the best temperature settings for my refrigerator and freezer? The default setting for the refrigerator is 37° Fahrenheit (3° Celsius). The default setting for the freezer is 0° Fahrenheit (-18° Celsius). Adjust these settings as necessary to keep food at desired temperatures. -
Page 33: Before Calling For Service
TROUBLESHOOTING Before Calling for Service Cooling Problem Possible Cause & Solution Refrigerator and A fuse in your home may be blown or the circuit breaker tripped. Or the appliance is Freezer section are connected to a GFCI (Ground Fault Circuit Interrupter) outlet, and the outlet’s circuit not cooling. - Page 34 TROUBLESHOOTING Problem Possible Cause & Solution Interior moisture Doors are opened often or for long periods of time. buildup. • When the doors are opened often or for long periods of time, warm, humid air enters the compartment. This raises the temperature and moisture level within the compartment. To lessen the effect, reduce the frequency and duration of door openings.
- Page 35 TROUBLESHOOTING Problem Possible Cause & Solution Refrigerator or Refrigerator was recently installed. Freezer section is too • It may take up to 24 hours for each compartment to reach the desired temperature. warm. The air vents are blocked. Cold air circulates from the freezer to the fresh food section and back again through air vents in the wall dividing the two sections.
- Page 36 TROUBLESHOOTING Ice & Water Problem Possible Cause & Solution Icemaker is not Demand exceeds ice storage capacity. making enough ice. • The icemaker will produce approximately 70-184 cubes in a 24 hour period. House water supply is not connected, valve is not turned on fully, or valve is clogged. •...
- Page 37 TROUBLESHOOTING Problem Possible Cause & Solution Icemaker is not Refrigerator was recently installed or icemaker recently connected. making ice • It may take up to 24 hours for each compartment to reach the desired temperature and for the icemaker to begin making ice. Icemaker is not turned on.
- Page 38 TROUBLESHOOTING Parts & Features Problem Possible Cause & Solution Doors will not close Food packages are blocking the door open. correctly or pop • Rearrange food containers to clear the door and door shelves. open. Ice bin, crisper cover, pans, shelves, door bins, or baskets are out of position. •...
- Page 39 TROUBLESHOOTING Problem Possible Cause & Solution Rattling Rattling noises may come from the flow of refrigerant, the water line on the back of the unit, or items stored on top of or around the refrigerator. • Normal Operation Refrigerator is not resting solidly on the floor. •...
- Page 40 GM-652R*C www.lg.com LG Electronics Inc 2021 ©...
- Page 41 Glide'N'Serve Durabase...
- Page 42 R600a R600a " " 10.8...
- Page 43 " LPG)
- Page 44 – •...
- Page 46 Glide'N'Serve...
- Page 47 Durabaser o Durabase V, 50 Hz psi (138-827 20-120 GM-652R*C "...
- Page 48 •...
- Page 49 • kgf/cm2 kgf/cm2) Volts, 50 Hz, AC, 15 Amps • °C °C (110 °F) (55 °F)
- Page 50 " " GM-652R*C " " 1/2 29 " 1705 1/8 67 " 1740 1/2 68 " " 1/2 29 " 886.4 7/8 34 " 1440 2/3 56 " 90° " " 1515 2/3 59 " 1/2 30 " 1250 1/8 49...
- Page 51 3/32 3/32 ® 3/32...
- Page 52 3/32 • Durabase ® •...
- Page 53 • Durabase...
- Page 54 Durabase •...
- Page 55 " • • " • • 5/32 psi (138-827 20-120 " " •...
- Page 56 • 248CMR • • • • • • • • 49599 49595 • • "...
- Page 57 " • • Ferrule • Ferrule • •...
- Page 58 • - 1 2 °C (10 °F) • ON (I)
- Page 60 °F °C ° (-18 °C) 0°F - 1 5 °C ° °F °F °C 43 °F (3 °C) F ° C ° ° °F ° C ° F Express Frz. Fridge . Express Frz. •...
- Page 61 ON (| --------------- -------------------------------- • 50-110 ' .( ' .(...
- Page 63 Glide'N'Serve • Glide'N'Serve Glide'N'Serve Glide'N'Serve Glide'N'Serve • Glide'N'Serve Glide'N'Serve...
- Page 64 Durabase Durabase Durabase • Durabase Durabase...
- Page 65 Smart LG ThinQ • Diagnosis LG ThinQ LG ThinQ . LG ThinQ LG ThinQ " " 3 • LG SmartThinQ Google Play Store LG ThinQ Apple App Store • LG ThinQ Smart Diagnosis™ ) § Wi-Fi Wi-Fi...
- Page 66 • • •...
- Page 67 psi (138-827 20-120 37.8°C 0.6° C 100° F 33 °F •...
- Page 68 3° 37° -18° 0° ) " " Ice Plus...
- Page 69 " " 21°C °F (43 °C) F °...
- Page 70 ." " 5°C 13°C •...
- Page 71 (43 °C) F °...
- Page 72 70-184...
- Page 73 ON/OFF •...
- Page 74 • • • •...
- Page 75 • • • • • • • • • • •...