AEG 65300KF-an Operating Instructions & Installation Instructions
Glass ceramic cooking surface
Hide thumbs
Also See for 65300KF-an:
- Operating instructions & installation instructions (32 pages) ,
- Operating and installation manual (33 pages) ,
- Operating instructions & installation instructions (32 pages)
Table of Contents
Advertisement
Quick Links
Advertisement
Table of Contents

Related Manuals for AEG 65300KF-an


Summary of Contents for AEG 65300KF-an
- Page 1 All manuals and user guides at all-guides.com 65300KF-an Glass Ceramic Cooking Surface Table de cuisson vitrocéramique Placa vitrocerámica Operating Instructions/ Installation Instructions Mode d'emploi/ Instructions d'installation Instrucciones para el uso/ Instrucciones de montaje III II...
- Page 2 All manuals and user guides at all-guides.com Dear customer, Please read these operating instructions through carefully. Above all, please take note of the «Safety» section on the first few pages. Please keep these operating instructions for later reference. Pass them on to any subsequent owner of the appliance.
-
Page 3: Table Of Contents
All manuals and user guides at all-guides.com Content CONTENT OPERATING INSTRUCTIONS ......Safety ..........Disposal . - Page 4 All manuals and user guides at all-guides.com Content Cleaning and care ........Ceramic Glass .
-
Page 5: Operating Instructions
Repairs to the appliance should only be carried out by approved service engineers. Improper repairs can cause injury or significant malfunction. If your appliance needs repairing, please contact your local AEG Service Force Centre. If your appliance malfunctions, or fractures, cracks or splits appear: - switch off all cooking zones, - Disconnect the hob from the electricity supply. - Page 6 All manuals and user guides at all-guides.com Operating Instructions Safety When Cleaning For safety reasons do not clean the appliance with a steam jet or high pres sure cleaner. Clean the hob in accordance with the maintenance and cleaning instruc tions in this manual.
-
Page 7: Disposal
All manuals and user guides at all-guides.com Operating Instructions Disposal Disposing of the packaging material All packaging can be recycled, sheet and hard foam parts are appropriately marked. Please dispose of packaging material and any old appliance with due regard to safety and the environment. Information on disposal The appliance must not be disposed of in the household rubbish. -
Page 8: Appliance Description
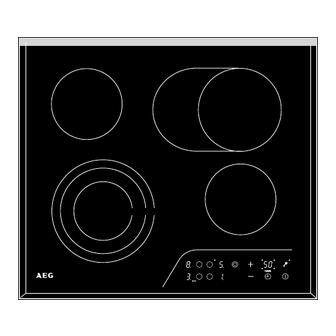
All manuals and user guides at all-guides.com Operating Instructions Appliance Description Features of the hob III II Cooking zone dimensions: rear left: 145 mm rear right: 170/265 mm front left: 210/175/120 mm front right: 145 mm... -
Page 9: Control Panel
All manuals and user guides at all-guides.com Operating Instructions Control Panel III II Main "On/Off" button For switching on the entire appliance. The appliance is - switched on when the button is touched for approx. one second, - switched off when the button is touched again for one second. When the appliance is switched on the "Heat Setting/Residual Heat"... -
Page 10: Heat Setting Selection And
All manuals and user guides at all-guides.com Operating Instructions Heat setting selection For setting or changing the heat setting ( ) for the selected coo king zone, or when in timer mode, for setting or changing the required cooking time. - The heat setting or the cooking time is increased using the button and the automatic warm up function activated. -
Page 11: Cooking Zone Safety Switch
All manuals and user guides at all-guides.com Operating Instructions Cooking zone safety switch If, after a certain period of time, one of the zones is not switched off or the heat setting not changed, then the cooking zone switches off automati cally. -
Page 12: Operation Of The Cooking Surface
All manuals and user guides at all-guides.com Operating Instructions Operation of the cooking surface TOUCH CONTROL sensor buttons To operate the TOUCH CONTROL sensor buttons, place your finger flat, from above, on the desired button until the corresponding indicator illuminates, or extinguishes, or the desired function is performed. -
Page 13: Cooking With The Automatic Warm Up Function
All manuals and user guides at all-guides.com Operating Instructions III II Cooking with the automatic warm up function All four zones have nine heat settings and are equipped with an automatic warm up function. , lowest heat setting , highest heat setting , automatic warm up function. -
Page 14: Cooking Without The Automatic Warm Up Function
All manuals and user guides at all-guides.com Operating Instructions warm, the automatic warm up function uses the residual heat. This saves time and energy. Switching off a cooking zone 1. Select the desired cooking zone using the cooking zone buttons. 2. -
Page 15: Switching The Triple Ring Zone On And Off
All manuals and user guides at all-guides.com Operating Instructions III II Switching the triple zone on and off If a larger cooking zone is required, a larger ring on the triple cooking zone can be switched in. 1. Select the triple cooking zone using the appropriate cooking zone selection button and select the desired heat setting ( 2. -
Page 16: Setting/Changing The Cooking Time
All manuals and user guides at all-guides.com Operating Instructions Setting/changing the cooking time 1. Select the desired cooking zone using the cooking zone selection buttons and set the desired heat setting. 2. Press the "Timer" button to activate the timer function for this cooking zone. -
Page 17: Ending The Timer Function Early
All manuals and user guides at all-guides.com Operating Instructions III II Ending the timer function early There are two ways of switching off the timer early: Switching off the cooking zone and timer simultaneously 1. Select the desired cooking zone using the cooking zone buttons. If the selected cooking zone is in timer mode (TIMER indicator illumina ted), the remaining cooking time appears in the timer display field. -
Page 18: Tables And Tips
All manuals and user guides at all-guides.com Operating Instructions Tables and Tips Pans The better the pan, the better the results. You can recognise good pans by their bases. The base should be thick and as flat as possible. Pans with aluminium or copper bases can leave metal discoloration on the glass ceramic surface that is very difficult or impossible to remove. -
Page 19: Tips For Cooking With And Without The Automatic Warm Up Function
All manuals and user guides at all-guides.com Operating Instructions Tips for cooking with and without the automatic warm up function The automatic warm up function is suitable for: dishes that start off cold, are heated up at a high setting and do not need to be continually watched when cooking, dishes that are put in a hot frying pan. - Page 20 All manuals and user guides at all-guides.com Operating Instructions The figures given in the following tables are for guidance. Exactly which heat setting needs to be used depends on the quality of the pans and the type and quantity of the food. Table: Cooking and Frying Automatic Switch...
-
Page 21: Cleaning And Care
All manuals and user guides at all-guides.com Operating Instructions Cleaning and care Ceramic Glass Important: Cleaners must not come into contact with the ceramic glass when hot! All cleaners must be removed with plenty of clean water after cleaning as they may have a caustic effect when the rings are next heated! Do not use any aggressive cleaners, such as e.g. -
Page 22: The Hob Frame
All manuals and user guides at all-guides.com Operating Instructions Burnt on Soilage 1. Remove burnt on sugar, melted plastic, aluminium foil or other melted ma terials immediately, while the hob is still hot, using a glass scraper. Important: When using the glass scraper on the hot cooking zone, there is a risk of burns! 2. -
Page 23: What To Do If
Warning: Repairs to the appliance may only be carried out by approved service engineers. Improper repairs can cause injury or serious malfunction. If your appliance needs repairing, please contact your local AEG Service Force Centre. What to do if ... - Page 24 - The cooking zone has only been in operation for a short time, and is therefore not hot enough. If the cooking zone is hot, please call in an approved electrician, or call your Local AEG Service Force Centre..one of the cooking zones cannot be switched off? Check whether - the touch keys are partly covered by a damp cloth or a liquid.
-
Page 25: Installation Instructions
1500/2400 W Single ring cooking zone front right 1200 W Heater Element Voltage 230 V ~ 50 Hz Total load 7.1 kW 941 054 482 Prod-nr: Serie 7.10 kW 230V, 230V 2-3, 400V 2N ~50 Hz 65300KF-an Typ 230.1EWWBNAPNNA 0000... -
Page 26: Legal Stipulations, Standards, Directives
All manuals and user guides at all-guides.com Installation Instructions Legal stipulations, standards, directives This appliance meets the following standards: EN 60 335-1 and EN 60 335-2-6 in respect of the safety of electrical appliances for household use and similar purposes and DIN 44546 / 44547 / 44548 in respect of properties of electrical cookers for the household. -
Page 27: Safety Instructions For The Installer
All manuals and user guides at all-guides.com Installation Instructions Safety Instructions for the Installer A device must be included in the electrical installation that makes it possi ble to isolate the appliance from the mains supply with a minimum contact separation of 3 mm. -
Page 28: Installation Into A Kitchen Worksurface
All manuals and user guides at all-guides.com Installation Instructions Installing into a kitchen worksurface Make a note of the serial number on the appliance rating plate prior to installation. This number will be required in the case of requests for service and is no longer accessible after installation, as it is on the original rating plate on the underside of the appliance. - Page 29 All manuals and user guides at all-guides.com Installation Instructions Catch spring Screws Worktop Frame Glass ceramic plate...
-
Page 30: Electrical Connection
All manuals and user guides at all-guides.com Installation Instructions Electrical connection Important! Make the electrical connection in accordance with the wiring diagram. If the mains connection cable has to be replaced, a cable with Spare Parts No. 374 2929 00/7 must be used. After connecting the electrical supply, all cooking zones should be briefly switched on one after the other at their maximum power, in order to test whether they are operational. -
Page 31: Service
All manuals and user guides at all-guides.com Service SERVICE In the «What to do, if ...» section a number of malfunctions are listed that you can rectify yourself. In the event of a malfunction, look there first. Is it a technical malfunction? Then please contact your customer service centre. - Page 32 All manuals and user guides at all-guides.com AEG Hausgeräte GmbH Postfach 1036 D-90327 Nürnberg http://www.aeg.hausgeraete.de ECopyright by AEG 374 3557 02 / 02.00 mh...