Table of Contents

Related Manuals for EINHELL EXPERT TE-CC 315 U


Summary of Contents for EINHELL EXPERT TE-CC 315 U
- Page 1 Anleitung_TE_CC_315_U_SPK8__ 19.11.12 15:54 Seite 1 Manual de instrucciones original Sierra circular de formatos Original operating instructions Format Circular Saw 315 U South America TE-CC...
- Page 2 Anleitung_TE_CC_315_U_SPK8__ 19.11.12 15:54 Seite 2...
- Page 3 Anleitung_TE_CC_315_U_SPK8__ 19.11.12 15:54 Seite 3 b,c,d g,h,i,j f,h,i...
- Page 4 Anleitung_TE_CC_315_U_SPK8__ 19.11.12 15:55 Seite 4...
- Page 5 Anleitung_TE_CC_315_U_SPK8__ 19.11.12 15:55 Seite 5 19 28...
- Page 6 Anleitung_TE_CC_315_U_SPK8__ 19.11.12 15:55 Seite 6...
- Page 7 Anleitung_TE_CC_315_U_SPK8__ 19.11.12 15:55 Seite 7...
- Page 8 Anleitung_TE_CC_315_U_SPK8__ 19.11.12 15:55 Seite 8 45°...
- Page 9 Anleitung_TE_CC_315_U_SPK8__ 19.11.12 15:55 Seite 9...
- Page 10 Anleitung_TE_CC_315_U_SPK8__ 19.11.12 15:55 Seite 10...
- Page 11 Anleitung_TE_CC_315_U_SPK8__ 19.11.12 15:55 Seite 11...
- Page 12 Anleitung_TE_CC_315_U_SPK8__ 19.11.12 15:55 Seite 12...
- Page 13 Anleitung_TE_CC_315_U_SPK8__ 19.11.12 15:56 Seite 13...
-
Page 14: Instrucciones De Seguridad
Anleitung_TE_CC_315_U_SPK8__ 19.11.12 15:56 Seite 14 5. Guardar la herramienta en un lugar seguro ¡Atención! - Guardar las herramientas que no se utilicen en Al usar aparatos es preciso tener en cuenta una lugar cerrado y seco y fuera del alcance de los serie de medidas de seguridad para evitar lesiones o niños. -
Page 15: Instrucciones Especiales De Seguridad
Anleitung_TE_CC_315_U_SPK8__ 19.11.12 15:56 Seite 15 de sierra, taladros y todo otro tipo de 22. Conectar el dispositivo de aspiración de herramientas. polvo 15. No dejar ninguna llave puesta - Si la máquina dispone de dispositivos de - Comprobar que llaves y herramientas de ajuste aspiración, asegurarse de que estos estén hayan sido extraídas antes de enchufar la conectados y se utilicen. - Page 16 Anleitung_TE_CC_315_U_SPK8__ 19.11.12 15:56 Seite 16 3. Servicio seguro La persona encargada de operar la máquina debe tener 18 años como mínimo, los Utilizar una pieza de empuje o empuñadura con madera de empuje para desplazar la pieza de aprendices 16 años como mínimo, aunque éstos forma segura por la hoja de la sierra.
- Page 17 Anleitung_TE_CC_315_U_SPK8__ 19.11.12 15:56 Seite 17 Mantener la pieza siempre presionada contra la conectarse o desconectarse conlleva peligros y mesa de trabajo. debe repararse. Asegurarse de que las piezas de madera Guardar las herramientas eléctricas que no se cortadas no entren en contacto con la corona usen fuera del alcance de los niños.
-
Page 18: Uso Adecuado
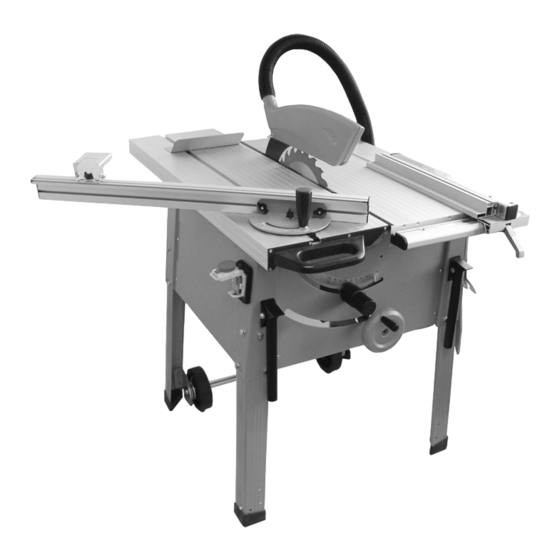
Anleitung_TE_CC_315_U_SPK8__ 19.11.12 15:56 Seite 18 2. Descripción del aparato / 2.4 Volumen de entrega Sierra circular de formatos Herramienta de montaje / Material de Tope en paralelo (3) con guía de corte (2) montaje / Volumen de entrega Pieza de empuje (6) (fig. -
Page 19: Antes De La Puesta En Marcha
Anleitung_TE_CC_315_U_SPK8__ 19.11.12 15:56 Seite 19 derivados. Los valores en cada lugar de trabajo Antes de presionar el interruptor ON/OFF/de paro pueden variar de país a país. Esta información está de emergencia (9), asegurarse de que la hoja de destinada a ayudar al usuario a realizar una mejor la sierra esté... - Page 20 Anleitung_TE_CC_315_U_SPK8__ 19.11.12 15:56 Seite 20 sobre las ruedas y una persona puede llevarla adaptador correspondiente (27) y la tubuladura cogida de las empuñaduras de desplazamiento de aspiración de la protección de la hoja de sierra (fig. 10). (18) y asegurar las abrazaderas para la Atención: ¡No levantar nunca la sierra tirando de manguera de aspiración (28).
- Page 21 Anleitung_TE_CC_315_U_SPK8__ 19.11.12 15:56 Seite 21 5.2.2). sierra (12). Colocar la llave de brida (29) en la brida de la Colocar el tope en paralelo (3) por arriba en el riel hoja de la sierra (K). guía correspondiente (5) (fig. 29). Desatornillar el tornillo de la brida (L) con el En el riel guía para el tope en paralelo (5) se destornillador (30) en el sentido de la avance de...
- Page 22 Anleitung_TE_CC_315_U_SPK8__ 19.11.12 15:56 Seite 22 Seleccionar la altura de tope correspondiente y El montaje se lleva a cabo realizando la misma montarlo como se describe en los puntos 5.3.1.1 secuencia pero en sentido contrario. ó 5.3.1.2 para el tope en paralelo. 5.3.4 Chapa auxiliar para cantear (fig.
- Page 23 Anleitung_TE_CC_315_U_SPK8__ 19.11.12 15:56 Seite 23 paralelo (2). Comprobar que el indicador (i) se sencillamente la máquina, pulsar la tapa del encuentre apuntando a 0°. De lo contrario, soltar los interruptor ON/OFF/de paro de emergencia (fig. dos tornillos (g) y ajustar la escala graduada (j) hasta 54/pos.
-
Page 24: Mantenimiento Y Limpieza
Anleitung_TE_CC_315_U_SPK8__ 19.11.12 15:56 Seite 24 Ajustar el tope en paralelo (3) según la altura de angular deseada y fijarlo a la mesa deslizante la pieza y el ancho deseado. (véase la fig. 5.3.1) (15) (véase 5.3.2). Conectar la sierra (véase punto 6.1.1) Presionar fuertemente la pieza a cortar contra el Colocar las manos con los dedos apretados tope transversal (11) y empujar lentamente la... -
Page 25: Eliminación Y Reciclaje
Anleitung_TE_CC_315_U_SPK8__ 19.11.12 15:56 Seite 25 8. Eliminación y reciclaje El aparato está protegido por un embalaje para evitar daños producidos por el transporte. Este embalaje es materia prima y, por eso, se puede volver a utilizar o llevar a un punto de reciclaje. El aparato y sus accesorios están compuestos de diversos materiales, como, p. -
Page 26: Safety Regulations
Anleitung_TE_CC_315_U_SPK8__ 19.11.12 15:56 Seite 26 - Do not wear loose clothing or jewelry. They can Important! be caught in moving parts. Rubber gloves and When using equipment, a few safety precautions nonskid footwear are recommended when must be observed to avoid injuries and damage. working outdoors. -
Page 27: Special Safety Instructions
Anleitung_TE_CC_315_U_SPK8__ 19.11.12 15:56 Seite 27 the moving parts are working correctly, that they - Recommended capacity of the vacuum do not jam, and that no parts are damaged. Make extraction system: 20 m/s sure that all parts are fitted correctly to ensure - Proper guidance of the workpiece that the equipment remains safe to use. - Page 28 Anleitung_TE_CC_315_U_SPK8__ 19.11.12 15:56 Seite 28 Before you use the machine for the first time, Never load the machine so much that it cuts out. check that the voltage marked on the rating plate Always press the workpiece firmly against the is the same as your mains voltage.
- Page 29 Anleitung_TE_CC_315_U_SPK8__ 19.11.12 15:56 Seite 29 2. Layout and items supplied / familiar with the tool or who have not read these instructions to use the tool. Electric tools are Installation tools / Assembly material dangerous if they are used by inexperienced / Supplied package people.
-
Page 30: Proper Use
Anleitung_TE_CC_315_U_SPK8__ 19.11.12 15:56 Seite 30 2.4 Supplied package user should at least be able to make a better Format circular saw assessment of the dangers and risks involved.“ Parallel stop (3) with stop rail (2) Push stick (6) Keep the noise emissions and vibrations to a Cross stop (11) minimum. - Page 31 Anleitung_TE_CC_315_U_SPK8__ 19.11.12 15:56 Seite 31 5.1 Assembly slideways (B) and push it forwards to the point Important. Pull out the power plug before where the locking hook (C) latches home. (Fig. 11 carrying out any maintenance, resetting or - 13). assembly work on the cutting-off machine! To dismantle the sliding table (15), pull the sliding table (15) forward until the latching hook (C)
- Page 32 Anleitung_TE_CC_315_U_SPK8__ 19.11.12 15:56 Seite 32 you set an angle of approx. 30° (see 6.1.3). 5.3.1 Parallel stop To assemble, proceed in reverse order. When closing the chip box (23) ensure that the 5.3.1.1 Stop height (Fig. 29 – 33) control pin (H) slides into the opening provided The stop rail (2) for the parallel stop (3) has two for it on the microswitch (I).
- Page 33 Anleitung_TE_CC_315_U_SPK8__ 19.11.12 15:56 Seite 33 5.3.2 Cross stop stop (14) into the required position on the stop rail for the cross stop (13) and then retighten the wing 5.3.2.1 Fitting the cross stop (Fig. 35 - 37) nut (K). Undo the clamp handle for the cross stop (10) The adjustable limit stop (14) can be moved away and wing nut (H).
-
Page 34: Operation
Anleitung_TE_CC_315_U_SPK8__ 19.11.12 15:56 Seite 34 5.4.3. Adjusting the cross stop (Figure 47-48) 6.1.2 Setting the cutting depth (Fig. 56) Undo the locking grip for the cross stop (10) and align Turn the crank handle for the saw blade height (7) the stop rail for the cross stop (13) using the stop to set the saw blade (12) to the required cutting angle (A) as shown in Fig. -
Page 35: Cleaning And Maintenance
Anleitung_TE_CC_315_U_SPK8__ 19.11.12 15:56 Seite 35 6.2.2 Cutting narrow workpieces (Fig. 59) Push the sliding table (15) with the workpiece Be sure to use a push stick (6) when making toward the blade (12) and make the cut. longitudinal cuts in workpieces smaller than 120 mm in width. - Page 36 Anleitung_TE_CC_315_U_SPK8__ 19.11.12 15:56 Seite 36...
- Page 37 Anleitung_TE_CC_315_U_SPK8__ 19.11.12 15:56 Seite 37 La reimpresión o cualquier otra reproducción de documentos e información adjunta a productos, incluida cualquier copia, sólo se permite con la autorización expresa de ISC GmbH. The reprinting or reproduction by any other means, in whole or in part, of documentation and papers accompanying products is permitted only with the express consent of ISC GmbH.
- Page 38 Anleitung_TE_CC_315_U_SPK8__ 19.11.12 15:56 Seite 38 Salvo modificaciones técnicas Technical changes subject to change...
-
Page 39: Certificado De Garantia
50 Hz, corriente alterna. correcto funcionamiento de la unidad, no estando La garantía caduca automáticamente: EINHELL Argentina S.A. obligada en ningún caso al a) si la herramienta fuera abierta examinada, cambio de la unidad completa. Las reparaciones se alterada, falsificada, modificada o reparada por efectuarán en nuestros talleres autorizados. - Page 40 En ningún caso la responsabilidad de EINHELL Argentina S.A. respecto del comprador o de cualquier otra parte (como eventual consecuencia de un reclamo fundado en contrato o en obligaciones extracontractuales) podrá...
- Page 41 Anleitung_TE_CC_315_U_SPK8__ 19.11.12 15:56 Seite 41 Características técnicas Motor de corriente alterna 230V ~ 50Hz Potencia P 2200 W Velocidad en vacío n 2860 r.p.m. Hoja de sierra con metal duro Ø 315 x Ø 30 x 3,6 mm Número de dientes Mesa principal grande 800 x 350 mm Mesa de desplazamiento grande...
-
Page 42: Certificado De Garantía
Para ello, envíe el aparato a nuestra dirección de servicio técnico. Einhell Chile S.A. Av. Recoleta 1223, Santiago, Chile Tel.: +56-2-9150300 • Fax: +56 2 7376799... - Page 43 Anleitung_TE_CC_315_U_SPK8__ 19.11.12 15:56 Seite 43 Características técnicas Características técnicas Motor de corriente alterna 230V ~ 50Hz Potencia P 2200 W Velocidad en vacío n 2860 r.p.m. Hoja de sierra con metal duro Ø 315 x Ø 30 x 3,6 mm Número de dientes Mesa principal grande 800 x 350 mm...
- Page 44 Anleitung_TE_CC_315_U_SPK8__ 19.11.12 15:56 Seite 44 EH 11/2012 (01)