Epson Stylus Photo RX580 Manual
Epson stylus photo rx580: product information
Hide thumbs
Also See for Stylus Photo RX580:
- Basic manual (95 pages) ,
- Start here manual (8 pages) ,
- Service manual (107 pages)
Table of Contents
Advertisement
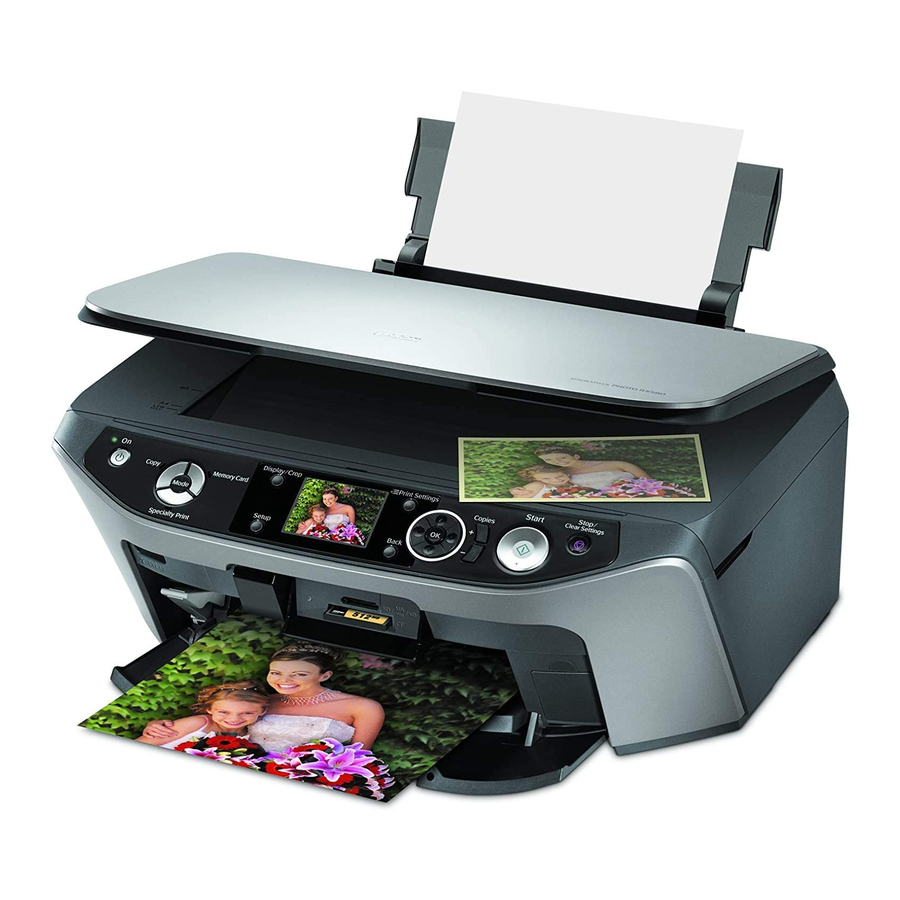
Product Parts
Sheet feeder
Paper
support
Edge guide
LCD
screen
Tray lever
Front tray
EXT. I/F USB port
®
(for PictBridge
or
USB storage devices)
Scanner unit
Feeder guard
Document cover
Control
panel
Front tray extensions
Document
table
Memory
card
slots
Infrared port
Cartridge cover
AC inlet
Copy a photo or document
View and print photos on memory card; scan to card;
print an index sheet; print from an index sheet;
play a slide show of photos on card
Display 1 or 9 photos;
crop or zoom a photo
Check ink status; replace ink cartridges;
maintain the RX580; adjust CD/DVD print position;
backup photos; restore default settings;
make PictBridge or Bluetooth
Print on CD/DVDs;
reprint or restore photos;
print photo greeting cards
11/06
Epson Stylus Photo RX580
USB port
CD/DVD tray
Stop printing or
copying; cancel
settings
®
settings
Epson Stylus Photo RX580
- 1
Advertisement
Table of Contents

Related Manuals for Epson Stylus Photo RX580


Summary of Contents for Epson Stylus Photo RX580
-
Page 1: Product Parts
Cartridge cover Print on CD/DVDs; reprint or restore photos; print photo greeting cards 11/06 Epson Stylus Photo RX580 AC inlet USB port CD/DVD tray View and print photos on memory card; scan to card; print an index sheet; print from an index sheet;... -
Page 2: Ink Cartridges
77 (T077520) High-Capacity Light Magenta 77 (T077620) Caution: To ensure good results, use genuine Epson cartridges and do not refill them. Other products may cause damage to your RX580 not covered by Epson’s warranties. Don’t use an ink cartridge beyond the expiration date on the package. -
Page 3: Product Specifications
Ink thaws and is usable after approximately 3 hours at 77 °F (25 °C) Caution: To ensure the best results, use genuine Epson cartridges and do not refill them. Other products may cause damage to your RX580 not covered by Epson’s warranties. Don’t use an ink cartridge beyond the expiration date on the package. -
Page 4: Safety Approvals
Epson Stylus Photo RX580 Humidity (without condensation) Operation 20 to 80% RH Storage 5 to 85% RH Interfaces USB 2.0 Hi-Speed (Device Class for computers), based on Universal Serial Bus Specifications Revision 2.0; 480Mbps USB 2.0 Hi-Speed (Mass Storage Class for external storage devices) ®... -
Page 5: Copying Without A Computer
Up to 999 Paper Loading Guidelines You can load up to 120 sheets of plain paper. You can load the following number of sheets of Epson special media: Paper type Epson Presentation Paper Matte Epson Photo Quality Ink Jet Paper... -
Page 6: Copying Documents
(using default settings) is using 4 × 6 Epson Premium Photo Paper Glossy. See page 2 for a list of special Epson papers for photos and creative projects. 1. Place your photo on the glass as described on page 5. Be sure to close the document cover. -
Page 7: Reprinting Photos And Restoring Color
Repeat-4 Prints a photo four times on one sheet. Print Settings for Copying You can choose from various sizes and types of Epson paper and other settings to get just the results you want. 1. Press the mode button. Copy 2. -
Page 8: Printing Cds And Dvds
CD or DVD. When you use your computer, the Epson Print CD software makes it easy to import your own photos, add text, and modify your designs with a variety of special effects. You can Standard print on both regular 12-cm and 8-cm CDs and DVDs. -
Page 9: Inserting A Cd Or Dvd
RX580 may be damaged or the surface of the CD or DVD may become dirty or scratched. Make sure the CD/DVD tray slides under the tab (on both sides) 11/06 Epson Stylus Photo RX580 CD/DVD adapter 8-cm CD/DVD Make sure the arrow marks match... -
Page 10: Printing Photos
9. Press u or d to select the setting that matches the type of paper you loaded, then press Note: See “Selecting the Paper Type Setting When You Print or Copy Without a Computer” on page 8 for a list of Epson papers and the corresponding Paper Types. 10. Press d to highlight Paper Size list of sizes. -
Page 11: Printing From Other Devices
RX580 and print them wirelessly. See your printed Basics Guide for more information. Using the optional Epson Bluetooth Photo Print Adapter, you can also print wirelessly from a Bluetooth-enabled PDA, mobile phone, or computer. For more information, see the on-screen User’s Guide. -
Page 12: Ink Cartridge Precautions
Caution: Leave the expended cartridge installed until you have obtained a replacement, or the ink remaining in the print head nozzles may dry out. To ensure the best results, use genuine Epson ink cartridges and do not refill them. Other products may cause ink spills or other damage to your RX580 not covered by Epson’s... - Page 13 If you have installed an ink cartridge without removing the yellow tape, take the cartridge out of the RX580, remove the yellow tape, and then reinstall it. Epson Stylus Photo RX580 Do not remove the transparent seal from the bottom of the cartridge; otherwise, the cartridge may become unusable.
-
Page 14: Checking The Print Head Nozzles
Epson Stylus Photo RX580 12. Press The RX580 begins charging the ink delivery system and the message “Charging Ink. Please Wait” appears on the LCD screen. After about one minute, the message “Ink cartridge replacement is complete” appears on the LCD screen. -
Page 15: Aligning The Print Head
1. Remove all paper from the sheet feeder. 2. Turn the RX580 off. 3. Remove any memory cards installed in the memory card slots. , then press , then 11/06 Epson Stylus Photo RX580 Epson Stylus Photo RX580 - 15... -
Page 16: Related Documentation
14; if output is grainy or blurry, align the print head as described on page 15. Epson Stylus Photo RX580 16 - Related Documentation CPD-22267R1 Epson Stylus Photo RX580 Start Here CPD-22269 Epson Stylus Photo RX580 Basics Guide CPD-22268R1 Epson Stylus Photo RX580 CD-ROM with on-screen User’s Guide...