Table of Contents
Advertisement
Available languages
Available languages
Quick Links
QTXN SERIES HEATER / FAN /
FLUORESCENT LIGHT / NIGHT LIGHT
READ AND SAVE THESE INSTRUCTIONS
IMPORTANT INSTRUCTIONS
READ ALL INSTRUCTIONS BEFORE INSTALLING OR
USING THIS HEATER.
To reduce the risk of fire, electric shock, or injury to persons, observe the fol-
lowing:
1. Use this unit only in the manner intended by the manufacturer. If you have
questions, contact the manufacturer at the address or telephone number
listed in the warranty.
2. Before servicing or cleaning unit, switch power off at service panel and lock
the service disconnecting means to prevent power from being switched on
accidentally. When the service disconnecting means cannot be locked,
securely fasten a prominent warning device, such as a tag, to the service
panel.
3. Installation work and electrical wiring must be done by a qualified person(s)
in accordance with all applicable codes and standards, including fire-rated
construction codes and standards.
4. When cutting or drilling into wall or ceiling, do not damage electrical wiring
and other hidden utilities.
5. This heater is hot when in use. To avoid burns, do not let bare skin touch
hot surfaces. Keep combustible materials, such as furniture, pillows, bed-
ding, papers, clothes, etc. and curtains at least 3 feet (0.9 m) from the front
of the heater.
6. Extreme caution is necessary when any heater is used by or near children
or invalids and whenever the heater is left operating and unattended.
7. Do not operate any heater after it malfunctions. Disconnect power at ser-
vice panel and have heater inspected by a reputable electrician before
reusing.
8. Do not use outdoors.
9. To disconnect heater, turn controls to off, and turn off power to heater cir-
cuit at main disconnect panel (or operate internal disconnect switch, if
provided).
10. Do not insert or allow foreign objects to enter any ventilation or exhaust
opening, as this may cause an electric shock or fire, or damage the heater.
11. To prevent a possible fire, do not block air intakes or exhaust in any man-
ner.
12. A heater has hot and arcing or sparking parts inside. Do not use it in areas
where gasoline, paint, or flammable vapors or liquids are used or stored.
13. Use this heater only as described in this manual. Any other use not recom-
mended by the manufacturer may cause fire, electric shock, or injury to
persons.
14. This product must be grounded.
15. Do not install heater in a tub or shower enclosure.
16. This product is designed for installation in ceilings up to a 12/12 pitch. Duct
connector must point up. DO NOT MOUNT THIS PRODUCT IN A WALL.
17. Install heater in ceiling only - at least 6 inches from any wall.
18. Do not connect heater to dimmer switch or speed control.
19. Provide a separate 20 AMP circuit. Use 12 GA. power cable of type which
meets code. Use supply wiring rated for at least 90
20. For greatest efficiency, install heater so heat is directed toward tub or shower
area. Avoid directing toward walls or windows.
SAVE THESE INSTRUCTIONS
O
C.
TYPICAL INSTALLATION
CEILING
JOIST, TRUSS,
OR I-JOISTS
CEILING
MATERIAL
Housing mounted directly to joists, trusses, or I-joists.
Up to 24-inches on-center.
PLAN THE INSTALLATION
INSULATION
(Can be placed
around and over
fan housing.)
FAN
HOUSING
6-IN.
ROUND
*
DUCT
*
Purchase
6-IN. ROUND
separately
ELBOW(S)
The unit will operate most quietly and efficiently when located
where the shortest possible duct run and minimum number of
elbows will be needed.
Use a roof cap or wall cap that has a built-in damper to reduce
backdrafts.
Plan to supply the unit with proper line voltage and appropriate
power cable.
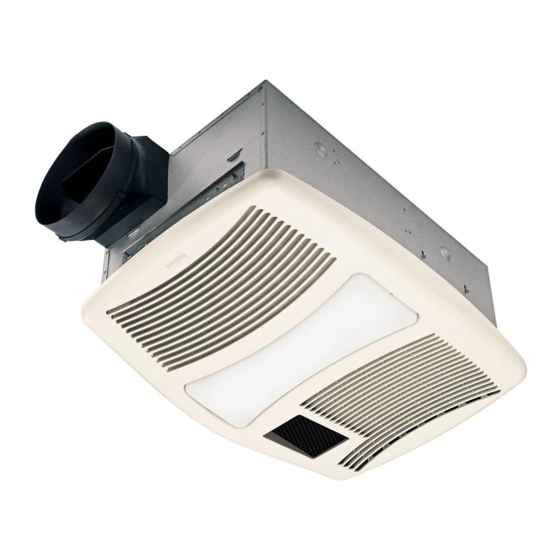
MODEL QTXN110HFLT
Page 1
POWER
MOUNTING
CABLES
CHANNELS
HOUSING
GRILLE
ROOF
*
CAP
WALL
*
CAP
*
Advertisement
Table of Contents

Related Manuals for NuTone QTXN Series


Summary of Contents for NuTone QTXN Series
- Page 1 MODEL QTXN110HFLT Page 1 QTXN SERIES HEATER / FAN / FLUORESCENT LIGHT / NIGHT LIGHT READ AND SAVE THESE INSTRUCTIONS TYPICAL INSTALLATION IMPORTANT INSTRUCTIONS READ ALL INSTRUCTIONS BEFORE INSTALLING OR CEILING USING THIS HEATER. POWER MOUNTING JOIST, TRUSS, CABLES To reduce the risk of fire, electric shock, or injury to persons, observe the fol-...
-
Page 2: Installation
CAUTION ceiling material. FAN (2-position rocker) RATING SPECIFICATIONS HEAT (2-position rocker) • The three-position rocker switch is rated NuTone 4-Function 5 A @ 125VAC. Use this 3. Attach 4-FUNCTION CONTROL Control shown switch for Lights ONLY. 120 VAC LINE IN... - Page 3 MODEL QTXN110HFLT Page 3 INSTALL GRILLE & BULBS 10. Install bulbs. 6. Finish ceiling. The unit Install ceiling material. Cut out ceiling material closely accepts (2) around housing. 18-Watt 3500K (maximum) 7. Remove GU24 based light lens fluorescent from grille. bulbs and (1) 7-Watt night Insert a small...
-
Page 4: Operation
MODEL QTXN110HFLT Page 4 OPERATION Before using heater, make sure heater has been properly installed according to installation steps beginning with the "TYPICAL IN- STALLATION" section on page 1. Use a 4-Function Control to operate the heater, fan, light, and night light separately. -
Page 5: Maintenance
This warranty supersedes all prior warranties. To qualify for warranty service, you must (a) notify Broan-NuTone at the address or telephone number stated below, (b) give the model number and part identification and (c) describe the nature of any defect in the product or part. -
Page 6: Service Parts
MODEL QTXN110HFLT Page 6 SERVICE PARTS Key No. Part No. Description 97016470 Housing 98007763 Slide Channel (2 req.) 98003036 Support Angle (4 req.) 97016450 Duct Connector 99170245 Screw #8-18 X .375 (8 req.) 93260454 Nut, Sheet Metal #8-18 (Partition) (2 req.) 99260512 Nut, Sheet Metal #8-18 (Grille) (3 req.) -
Page 7: Instrucciones Importantes
MODELO QTXN110HFLT Página 7 SERIE QTXN CALEFACTOR / VENTILADOR / LUZ FLUORESCENTE / LUZ DE NOCHE LEA Y CONSERVE ESTAS INSTRUCCIONES INSTRUCCIONES IMPORTANTES INSTALACIÓN TÍPICA LEA TODAS LAS INSTRUCCIONES ANTES DE INSTALAR O USAR ESTE CALENTADOR. CABLES DE VIGA DE TECHO, ELECTRICIDAD TIRANTE O Para reducir el riesgo de incendios, descargas eléctricas o lesiones personales, observe... -
Page 8: Instalación
ESPECIFICACIONES (interruptor 2-posición) del cielo raso. DEL GRADO CALENTADOR ROJO (interruptor 2-posición) • El interruptor de NuTone control para eje de balancín de tres CONTROL DE 3. Acople el 4-funciones ilustrado posiciones es clasificado 4 FUNCIONNES LINEA DE ENTRADA (comprar separado) 5 A @ 125VCA. - Page 9 MODELO QTXN110HFLT Página 9 INSTALE LA REJILLA Y LOS FOCOS 10. Instale los focos. 6. Termine el cielo raso. La unidad acepta Instale el material del cielo raso. Recorte el material del cielo dos (2) focos raso de cerca alrededor de la cubierta. fluorescentes de 18 watts 3500K 7.
-
Page 10: Operación
MODELO QTXN110HFLT Página 10 OPERACIÓN Antes de usar el calentador, asegúrese de que esté instalado ad- ecuadamente, de acuerdo con los pasos de instalación indicados en “INSTALACIÓN TYPICA” en la página 7. Utilice un control de 4 funciones para operar el calefactor, el ventilador, la luz y la luz nocturna por separado (vea los detalles en la sección “Conexión eléctrica”). -
Page 11: Mantenimiento
Esta garantía reemplaza todas las garantías anteriores. Para calificar en la garantía de servicio, usted debe (a) notificar a Broan-NuTone al domicilio o al número de teléfono abajo, (b) dar el número del modelo y la identificación de la pieza, y (c) describir la naturaleza de cualquier defecto en el producto o pieza. -
Page 12: Piezas De Repuesto
MODELO QTXN110HFLT Página 12 PIEZAS DE REPUESTO Clave No. Pieza No. Descripción 97016470 Cubierta 98007763 Ranura de deslizamiento (se req. 2) 98003036 Ángulo de soporte (se req. 4) 97016450 Conector del conducto 99170245 Tornillo, #8-18 x 0.375 (se req. 8) 93260454 Tuerca de chapa #8-18 (División) (se req.