Table of Contents
Advertisement
Quick Links
Advertisement
Table of Contents

Summary of Contents for Gigaset GS190
- Page 1 GS190 You can also find the user guide online on your smartphone...
-
Page 2: Table Of Contents
Gigaset GS190 ........ -
Page 3: Overview
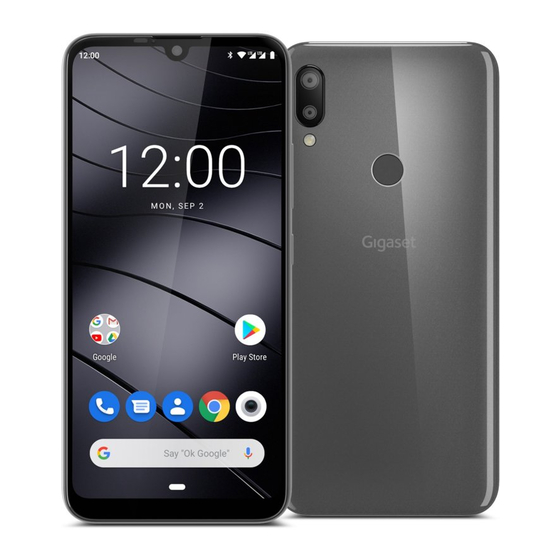
Gigaset GS190 Overview Gigaset GS190 SIM/SD card slot 11 Dual camera Headset connector 12 Flash Message LED 13 Fingerprint sensor Front camera Receiver Volume +: Press top Volume –: Press bottom Switching on and off Microphone USB type C connector... -
Page 4: Start Screen
Start screen Status displays of the message LED The message LED provides information on the charge level when charging, and the arrival of notifications. Meaning Device is charging. Flashing Device is charging and/or notification available. Device is not charging and no notification available. Start screen Notifications and Status bar Icons show the arrival of notifications and various... -
Page 5: Illustration In The User Guide
Illustration in the user guide Illustration in the user guide Icons Warnings, the non-adherence to which can result in damage to devices or personal injury. Important information regarding function and appropriate handling or functions that could generate costs. Prerequisite for carrying out the following action. Additional helpful information. -
Page 6: Safety Precautions
86). • For your own safety, only use original, approved accessories from Gigaset for your mobile phone. Using incompatible accessories can damage the mobile phone and entail hazardous situations. Original acces- sories can be purchased from Gigaset Customer Service (see Customer service United Kingdom and Ireland p. - Page 7 Safety precautions Headset High volumes can impair hearing. Listening to music or conversation with headphones set to a loud volume can be unpleasant and permanently impair hearing. To prevent loss of hearing, do not have the volume turned up too high for long periods. •...
- Page 8 Do not use the device if the display is cracked or shattered. Fragments of glass or plastic can injure hands and face. • In the event of malfunction of your mobile phone, battery or accessories, please contact a Gigaset Service Centre for an inspection. Other important information •...
-
Page 9: Getting Started
Replace the SIM/SD card slot and push down until it clicks into place. The device detects SD cards with a storage capacity of 32 GB. Higher capacity cards (to 256 GB) can be used if formatted on the Gigaset GS190 (not from a PC). - Page 10 Getting started Charging the battery The battery is built-in. This means a higher battery capacity can be realised for the same device dimensions. ¤ Plug the USB Type C connector on the charger cable provided into the USB Type C connector on the smartphone ¤...
- Page 11 Getting started Establishing a WLAN connection Wireless networks (WLANs) in range are displayed. ¤ Tap the required WLAN Enter the WLAN password Connect . . . A connection to the selected WLAN is established Copying apps & data You can now specify whether you want to set up the device as a completely new device or if you want to copy personal data (e.
- Page 12 Getting started ¤ Enter the PIN ¤ Select Options for the display lock ¤ Select Pattern | PIN | Password Next ¤ Enter the pattern, PIN or password Next Repeat Confirm Enabling Google Assistant Google Assistant answers questions and carries out a range of tasks. This page provides information about the authorisations required for Google Assistant.
-
Page 13: Using The Device
Getting to know your device Using the device Getting to know your device Switching the device on and off Switching on ¤ Press and hold the On/Off button . . . The device is started Unlocking the SIM card ¤ Enter the PIN for the SIM card Removing notifications (if available) ¤... - Page 14 Getting to know your device Switching the device to and ending idle mode Switching the device to idle mode ¤ Briefly press the On/Off button If the device is not used for a defined time, it automatically switches to idle mode. Setting the period of inactivity for transitioning to idle mode ¤...
- Page 15 Getting to know your device Spreading apart / pinching together your fingers ¤ Place two or more fingers on the screen at the same time ¤ Zoom in: Spread your fingers apart ¤ Zoom out: Pinch your fingers together Example: Scaling screen content. Only possible for special screens (such as Google Maps and Chrome).
- Page 16 Getting to know your device The Google feed is displayed on the very left of the screen. For the selection of messages shown in the feed, Google uses information from your device, from other Google products and from data stored in your Google account. You can specify in Settings which type of information is displayed in your feed.
- Page 17 Getting to know your device Editing quick settings You can make available more quick settings, remove any not used and rearrange the icons. ¤ . . . Quick settings not being used are shown at the bottom Touch and keep your finger on the icon, and drag it to the required position Finish editing: in the top left...
- Page 18 Getting to know your device Editing text ¤ Positioning the cursor: Tap the place in the text where you want to position the cursor ¤ Moving the cursor: Swipe left or right on the text ¤ Deleting a character: Touch and hold the backspace key ¤...
-
Page 19: Configuring The Start Screens
Configuring the start screens Configuring the start screens You can create several start screens and configure them as you wish - to be able to quickly access favourite apps and content. Tailoring the Favourites bar At the bottom of every start screen is the Favourites bar, from which you are able to quickly access the apps you use most frequently. - Page 20 Configuring the start screens Adding a widget to a start screen Widgets are components that are specifically intended to be displayed on a start screen, e.g. a clock, a calendar extract for the current day, an important entry from the contact list or a direct dial.
-
Page 21: Notifications
Notifications Adding start screens ¤ Touch and hold an app Drag the app all the way to the right until a blank start screen is shown Release your finger . . . A new start screen is created and the app is placed on it Removing a start screen ¤... - Page 22 Notifications Dealing with notifications Viewing and responding to notifications ¤ Tap the notification . . . The contents of the message are displayed in the associated app. If there are several possible apps, you can select one. Which information is displayed and which actions are possible depend on the app which triggers a notification.
-
Page 23: Apps
Apps • If you do not wish to be disturbed, you can mute your device. No notification sound is then played. Use the “Do not disturb” function to mute your device p. 30 • In some apps, sound and vibration settings for notifications can be set directly in the app from the Settings menu. - Page 24 Apps Opening and exiting apps Opening an app from the App menu The start screen is open. If not: ¤ Swipe up twice from the bottom . . . All apps are displayed (sorted alphabetically) the app you want to open Switching between apps ¤...
- Page 25 Apps Installing/uninstalling apps Installing new apps Downloading apps from Google Play: ¤ Play Store . . . The Google Play Store is opened Look for the app you want Open the app screen Install Uninstalling or disabling apps You can delete apps you no longer need from the device. You can uninstall apps you have downloaded.
- Page 26 Apps Files File manager Drive Store data centrally Play Music Listen to music Play Movies & TV Watch films and series Hangouts Communicate with friends with voice calls, messages and videos Photos Save and manage photos centrally Make calls with video view Play Store Download apps More information on Google apps...
- Page 27 Apps Protection from harmful apps Downloading apps from sources other than Google Play If you want to download apps from sources other than Google Play, you must permit it explicitly. You can find this function in the settings for the app that allows the download, e. g. browser or mail program.
-
Page 28: Downloads
Downloads This option might not work for all apps because developers are able to disable this function to prevent their apps being subjected to verification. Downloads You can download files from websites onto your device. Downloaded files are mainly stored in the file manager app available, e.g. -
Page 29: Fingerprint Sensor
Fingerprint sensor Fingerprint sensor The device has a fingerprint sensor. This enables you for example to authorise purchases, register with certain apps and quickly open a contact from idle mode. Setting up the fingerprint ¤ Settings Security & location Fingerprint . . . A wizard opens which guides you through the necessary steps Next When a display lock is set up:... -
Page 30: Do Not Disturb
“Do not disturb” Using a fingerprint If an action can be authorised with a fingerprint, the icon or alternative pattern is displayed if a display lock with fingerprint is set up. ¤ Tap the fingerprint sensor with a finger which has been scanned Repeat the process as required The alternative method is enabled automatically if the fingerprint is not recognised after several... - Page 31 “Do not disturb” Editing the list of selected contacts If you select From starred contacts only, you can edit the list of these contacts. Selected contacts are the favourites in your contact list. ¤ Tap Calls Starred contacts . . . a list of your contacts with Favourite status is opened Cancelling a selection: ¤...
-
Page 32: Additional Functions
Additional functions Additional functions Setting up multiple users You can enable the device for more users. All users receive a separate area they can set up themselves, such as own start screen, apps, accounts and contacts. Different user icon colours denote different users. - Page 33 Additional functions Creating screenshots Take a screenshot of the smartphone as an image, and edit, share and send it. Taking a screenshot ¤ Open the screen for which you want to create a screenshot. ¤ Press and hold the On/Off button Screenshot ¤...
- Page 34 Additional functions Sending files between a computer and the smartphone Use a USB cable to send photos, music, ringtones and other files between a computer and the smartphone. A computer detects the device connected via USB. It is linked in as a drive. Connecting the USB cable ¤...
- Page 35 Additional functions Sending the screen content to another device (streaming) Send the image and sound of your smartphone to a TV device. The TV device has a streaming unit (such as Chromecast) and is accessible via Bluetooth. Starting transmission ¤ Start video on the smartphone ¤...
-
Page 36: Communication
Making calls Communication Making calls To make calls, use the Phone app. It is in the Favourites bar on the start screen by default p. 19). Making a call ¤ Phone . . . Entering the number ¤ . . . The dialpad is shown Type in the phone number Whilst a number is being entered, contacts with a potential matching phone number are displayed. - Page 37 Making calls Incoming calls With an incoming call, the phone number of the caller is displayed, if available. Information on the contact or the Caller ID is also displayed. Accepting a call ¤ Display lock enabled: Touch the white circle and swipe up ¤...
- Page 38 Making calls Options during a call Showing the dialpad during a call ¤ Switching between headset, speaker and connected Bluetooth headset ¤ Muting and switching back on the microphone ¤ Interrupting and continuing a call ¤ Consultation, call swapping ¤ Enter the call number for a second person with or select this person from the contacts with...
- Page 39 Making calls Call settings Display of caller name in the call log and contact list of the Phone app ¤ Phone Settings Display options . . . Specify how calls are sorted: ¤ Sort by First name or Last name Specify how the names of contacts are displayed: ¤...
- Page 40 Making calls Using TTY for calls In TTY mode (Telephone Typewriter), those with speech and hearing impediments can communicate by entering text on a smartphone. The smartphone is connected to a special teletypewriter or other TTY service via USB. Enabling TTY mode: ¤...
-
Page 41: Contacts
Contacts Adding a phone number to the contacts ¤ Phone Tap the call Add to contact or Create new contact Deleting calls from the call log ¤ Phone . . . Deleting a call: Tap the call Call details Deleting all entries: ¤... - Page 42 Contacts Using a contact for communication Calling a contact, sending an email or SMS to a contact. ¤ Contacts Scroll through the list and select the required contact Select an action . . . ¤ Calling: Tap the number or .
- Page 43 Contacts Adding contacts If you have set up a Google account, you can also set up and manage your contacts from your computer. The contacts are automatically synchronised with the smartphone. Creating a contact ¤ Contacts Enter name, phone numbers and other details for the contact Save Importing/exporting contacts...
- Page 44 Contacts Diverting calls from a contact to the mailbox ¤ Contacts Select a contact Route to voicemail Deleting contacts ¤ Contacts Select a contact Delete Deleting more than one contact at the same time: ¤ Touch and hold down the contact . . . squares are shown next to all contacts Select the contact Adding contacts for direct dialling on the start screen...
-
Page 45: Messages (Sms/Mms)
Messages (SMS/MMS) Messages (SMS/MMS) To send and receive messages, use the Messages app. It is in the Favourites bar on the start screen by default ( p. 19). Instead of Messages, use another app as the default app for interchanging messages. At least one other SMS app is installed. - Page 46 Messages (SMS/MMS) Saving a message as a draft ¤ Whilst entering a text message, tap . . . The message is stored in the list of conversations as a draft Continue with your entry: Tap this conversation. Writing an MMS Multimedia messages (MMS) can contain text, images, voice messages, camera pictures or videos, preconfigured stickers (animated symbols) and information about a location.
- Page 47 Messages (SMS/MMS) Sending a message ¤ Write a text or multimedia message . . . The message is sent Back to the list of conversations: The message is the start of a conversation. It is stored in the message list under the name or phone number of the recipient.
- Page 48 Messages (SMS/MMS) Deleting a message from a conversation: ¤ Confirm with Delete Searching in messages ¤ Messages Enter the search term . . . Messages in which text matching the search term occurs are displayed Managing conversation ¤ Messages . . . The list of conversations is displayed Touch and hold one or more conversations .
-
Page 49: Settings
Device Settings Device Language Change the language for the displays. ¤ Settings System Languages & input Languages . . . All available languages are displayed in a list. The language being used at the moment is at the very top. Make available other languages: ¤... - Page 50 Device Night light To protect your eyes from bright light, you can reduce the display lighting with time control. ¤ Settings Display Night Light ¤ Use the slider bar to set the light intensity required Enable: ¤ Tap Turn on now . . . The night light is enabled immediately Enable with time control: ¤...
- Page 51 Device Ringtones Changing the default ringtone ¤ Settings Sound Phone ringtone Select a ringtone Adding new ringtones Ringtone apps: Download and install ringtone apps from the Google Play Store Transferring a music file (MP3) from a computer: ¤ Use the USB cable provided to connect the device to a computer p.
- Page 52 Device Power management To prolong the life of your smartphone as long as possible, the device has various ways to make best possible use of the battery capacity. Showing the battery charge level icon in the Status bar shows the charge level ( p.
- Page 53 Tap an entry Device storage management with SD card The device detects SD cards with a storage capacity of 32 GB. Higher capacity cards (to 256 GB) can be used if formatted on the Gigaset GS190 (not from a PC). ¤ Settings Storage .
- Page 54 Device Accessibility features For those with disabilities, there are a number of useful settings for adapting the usage of the smartphone to personal needs. ¤ Settings Accessibility Enable/disable or set up the required function For example: Text-to-speech output Configure comprehensive settings for speech output. Font size Use a larger font for text on the display.
-
Page 55: Security
Security Security Display lock The display lock protects the device from unauthorised use. When you switch the device on or enable the display, you are prompted to unlock the device. The display lock becomes active after a defined time after the device has switched to idle mode. A pattern, PIN or password is used as the display lock. - Page 56 Security Settings for the lock screen ¤ Settings Security & location Lock screen settings Entering a lock screen message Enter the text to be displayed when the screen lock is enabled, such as your name and address, or an emergency message. All those picking up the phone can read the message without unlocking the smartphone.
- Page 57 Security Other settings Face unlocking is enabled immediately once you switch the device on: ¤ Enable/disable Use facial recognition when screen active using the switch For facial recognition to also work when it is dark, the screen lighting must be switched on: ¤...
- Page 58 Security SIM card lock The SIM card lock prevents unauthorised use of the device. For every locked SIM card, the PIN must be entered when the device is started. The PIN lock is enabled when the device is purchased. The PIN is available from your mobile network operator.
- Page 59 Security Android Device Manager If you have lost your smartphone, you can use the Android Device Manager to locate it, ring it, lock it and delete data on it. The device is registered with a Google account ( p. 61) Location detection is enabled ( p.
- Page 60 Security Certificates Digital certificates are used to identify your smartphone in secure network connections. You require a certificate for VPN or WLAN connections for example, or for authentication with email servers, browsers or other apps. Some certificates are already stored on your phone by default. You can install further certificates.
-
Page 61: Accounts And Location Detection
Accounts and location detection Accounts and location detection Accounts Use one or more accounts to use personal information such as contacts, pictures and mailbox on multiple devices. An account enables synchronisation of the information and makes it available to all registered devices. Account types Google account You need a Google account for Google services such as Gmail™, Google+™... - Page 62 Accounts and location detection Synchronising You can specify how apps synchronise messages, emails and other current data in your Google account. Google apps are automatically synchronised with the Google account as standard. You can enable and disable automatic synchronisation for individual Google apps. Apps which are not from Google cannot be synchronised using a Google account.
- Page 63 Accounts and location detection Location detection Apps with Location detection permission can use the device’s location information to offer location-specific services, such as check-in options, traffic information and nearby restaurants. Enabling/disabling location detection ¤ From the Status bar, swipe down using two fingers . . . The quick settings are displayed symbol ¤...
-
Page 64: Apps
Apps Apps Detailed information on working with apps p. 23 Default app If you have several apps with identical functions, you can select which app is used as standard for an action. For example, if you have downloaded from Google Play a different calendar or another app for making calls, you can make these the default apps. - Page 65 Apps Changing app settings Check the current app settings and change them as required. ¤ Settings Apps & notifications Display all apps Select the app Which settings are available depends on the respective app. Uninstall / Disable Uninstall app from device / disable app p.
- Page 66 Apps General app settings Checking and changing the permissions and default values for apps. ¤ Settings Apps & notifications Notifications Set up notifications for apps ( p. 21). Default apps If several apps with identical function are available, select which one is used by default p.
-
Page 67: Network Connections
Network connections Network connections The smartphone can establish connections to mobile networks, WLANs and other devices via Bluetooth. Mobile networks To make and receive calls with the smartphone over a mobile network, you require a SIM card from the relevant mobile network operator. Refer to your mobile contract for which services are available, and which terms and conditions apply. - Page 68 Network connections Wi-Fi calling (depending on the mobile provider) Make calls over WLAN. Automatically select network The network is selected automatically by default. Selecting a network manually: Switch off function Select a provider from the available networks. Access point names Your mobile network operator can use these settings to determine the correct IP address for your device, and so establish a secure connection for your device.
- Page 69 Network connections WLAN Use the smartphone to establish a connection to a WLAN, and use the connection to send data and to surf the Internet. A connection is established automatically if the smartphone is within range of a registered WLAN and the WLAN function is enabled. Enabling/disabling the WLAN function ¤...
- Page 70 Network connections Viewing WLAN details ¤ Settings Network & internet Wi-Fi Tap the network name of a connected WLAN . . . Information on the connection is displayed, such as signal strength, connection status and transmission rate Changing the network settings: Connection configuration Align the network settings to the requirements of the WLAN to be used to establish a connection.
- Page 71 Network connections Establish a connection between the device and other Wi-Fi Direct-enabled devices. ¤ Wi-Fi Direct . . . WiFi Direct-enabled devices or groups within range are displayed Select the required device or group Data usage The data usage is the amount of data uploaded or downloaded by the device over a certain period over the mobile data connection or WLAN.
- Page 72 Network connections Setting a limit and warning for mobile data usage Specifying the data usage cycle Data usage is recorded in a monthly cycle, starting as standard on the 1st of every month. If the billing cycle of your mobile provider is different, you can select a different day as the start day. ¤...
- Page 73 Network connections Other ways to reduce data usage Disabling automatic synchronisation When automatic synchronisation is enabled, the data of apps is updated automatically (such as contacts and appointments). Disabling automatic synchronisation: p. 62 Disabling roaming If the network of your mobile network operator is not available, roaming enables the device to use the networks of other operators.
- Page 74 Connected devices Tap the connected device Enable/disable Contact sharing with the switch Changing the Bluetooth name of the smartphone The smartphone can be seen by other Bluetooth devices under name Gigaset GS190. You can change this name. ¤ Settings Connected devices...
- Page 75 Network connections Flight mode WLAN, mobile networks and Bluetooth are disabled in Flight mode. ¤ From the Status bar, swipe down using two fingers . . . The quick settings are displayed Flight mode icon ¤ Settings Network & internet Airplane mode Enable/disable Flight Mode with the switch...
- Page 76 Network connections Deleting a VPN ¤ Settings Network & internet VPN . . . The VPNs set up are listed Next to the VPN to be deleted, tap Forget Editing VPN settings ¤ Settings Network & internet Next to the VPN to be changed, tap Edit the VPN settings Save If you are using a VPN app, it is opened and you can make the required changes.
- Page 77 Network connections Changing WLAN hotspot settings Change the network name, security, password and frequency band for access points. ¤ Settings Network & internet Hotspot & tethering Wi-Fi hotspot Change the required option Save Connecting a device to the WLAN hotspot To connect, you need the name and password of the hotspot.
-
Page 78: System
System Setting up and using USB tethering Share the Internet connection with another device over a USB cable. The mobile data connection is active p. 67 ¤ Use a USB cable to connect the smartphone to another device Open message over USB connection and ensure that Media device (MTP) or Camera (PTP) is set ( p. - Page 79 System Setting the date and time format Displaying the time in 24-hour format (e.g. 18:30) / 12-hour format (6:30 pm): ¤ Enable/disable the switch next to Use 24-hour format Software updates Checking the Android version ¤ Settings System Phone info . . . The current version is displayed under Android version Downloading Android updates You will be informed when a new Android system update is available for your device.
- Page 80 System Backing up and restoring the system Backing up data and settings Use the Android Backup Service to backup data linked to one or more Google accounts. If you have to swap your device or delete data, you can restore the data from every Google account backed up beforehand.
- Page 81 System Resetting the device to the default settings You can remove all personal data when you pass on the device to another person. When resetting the device to the default settings, the internal storage is cleared, downloaded apps, music, photos, etc. are removed and registration to the Google account is cancelled.
-
Page 82: Appendix
Please have your proof of purchase ready when calling. Please note that if the Gigaset product is not sold by authorised dealers in the national territory the product may not be fully compatible with the national telephone network. It is clearly specified on the box near the CE mark for which country/countries the equipment has been developed. -
Page 83: Customer Service & Assistance
China - - - - - - - - - - - 0 21 400 670 6007 (RMB 0.11) - - - - - - - - - - - - - - - - - - - - - - (01800 999 GIGASET) - Page 84 In the case of new devices and their components exhibiting defects resulting from manufacturing and/or material faults within 24 months of purchase, Gigaset Communications shall, at its own option and free of charge, either replace the device with another device reflecting the current state of the art, or repair the said device.
-
Page 85: Manufacturer's Advice
Country-specific requirements have been taken into consideration. Hereby, Gigaset Communications GmbH declares that the radio equipment type Gigaset GS190 is in compli- ance with Directive 2014/53/EU. The full text of the EU declaration of conformity is available at the following internet address: www.gigaset.com/docs. - Page 86 Manufacturer's advice Waste and environmental protection Correct disposal of this product (Directive for electric and electronic equipment (WEEE)) (Applicable in countries with waste separation systems) This label on the product, accessory or in documentation indicates that the product and its electronic accessories (such as charger, headphones and USB cable) may not be disposed of in household waste.
- Page 87 23.80 dBm WLAN 11A: 17.806 dBm 11B: 16.39 dBm 11G: 14.52 dBm 11N: 17.769 dBm 6.65 dBm Accessories Only use Gigaset approved chargers, batteries and cables. Unapproved accessories can damage the device. Power adapter Input: 100-240V 50/60Hz Output: 2000mA Battery...
-
Page 88: Icons
Icons Icons Status bar and quick settings Coloured background: enabled; grey background: disabled WLAN Location sending Automatic rotation of the Bluetooth screen Mobile data Torch Power save mode Location detection Data save mode "Do not disturb" function Flight mode WLAN hotspot Status bar Battery charge status / battery is charging Power save mode enabled... - Page 89 Icons Notifications App authorisation management Missed call New text message New email New SD card detected Screenshot created USB tethering enabled WLAN hotspot activated Multiple tethering connections activated (USB and/or WLAN) Data downloaded / data uploaded Update for Google available / Google apps updated .
-
Page 90: Index
Index Index Bluetooth Numerics ..74 Change name of your own device ........67 . - Page 91 Index ....... . . 44 ......54 Delete Larger font .
- Page 92 Index ....... 25 ....... . . 38 Google apps Muting .
- Page 93 Index ........34 ........45 Printing Write .
- Page 94 Index ........79 Update Wallpaper ........3 .
- Page 95 Issued by Gigaset Communications GmbH Frankenstr. 2a, D-46395 Bocholt © Gigaset Communications GmbH 2019 Subject to availability. All rights reserved. Rights of modification reserved. www.gigaset.com Google, Android, Google Play and other brands are trademarks of Google Inc.