Table of Contents
Advertisement
Available languages
Available languages
Quick Links
CKSTPCEC57M_20SEM3 (LA).indd 1
CKSTPCEC57M_20SEM3 (LA).indd 1
MODELOS
MODELS
Manual de Instrucciones
MULTI-OLLA RÁPIDA ELÉCTRICA OSTER®
LEA TODAS LAS INSTRUCCIONES ANTES DE USAR ESTE APARATO
Instruction Manual
OSTER® RAPID MULTI-COOKER
READ ALL INSTRUCTIONS BEFORE USING THIS APPLIANCE
CKSTPCEC57M-013
CKSTPCEC57M-052
CKSTPCEC57M-053
8/7/20 10:32
8/7/20 10:32
Advertisement
Table of Contents

Related Manuals for Oster CKSTPCEC57M-013


Summary of Contents for Oster CKSTPCEC57M-013
- Page 1 CKSTPCEC57M-013 MODELOS CKSTPCEC57M-052 MODELS CKSTPCEC57M-053 Manual de Instrucciones MULTI-OLLA RÁPIDA ELÉCTRICA OSTER® LEA TODAS LAS INSTRUCCIONES ANTES DE USAR ESTE APARATO Instruction Manual OSTER® RAPID MULTI-COOKER READ ALL INSTRUCTIONS BEFORE USING THIS APPLIANCE CKSTPCEC57M_20SEM3 (LA).indd 1 CKSTPCEC57M_20SEM3 (LA).indd 1 8/7/20 10:32...
- Page 2 MEDI DA S DE P ROTECC IÓ N I MPO RTAN T ES 1. Lea todas las instrucciones antes de utilizar este producto. 2. Para evitar descargas eléctricas, no coloque ni sumerja el cable, los conectores o el aparato en agua ni en ningún otro líquido. 3.
- Page 3 17. PRECAUCIÓN: Para evitar descargas eléctricas y daños en el producto, no cocine directamente en la base de calentamiento. Cocine solo en la olla extraíble proporcionada. 18. ADVERTENCIA: La comida derramada puede provocar quemaduras graves. Mantenga el aparato y el cable alejados de los niños. No deje nunca el cable en el borde de una encimera, no utilice nunca una toma eléctrica situada debajo de la encimera y no utilice nunca un cable alargador.
- Page 4 PRODUCTO PARA USO DOMÉSTICO EXCLUSIVAMENTE INSTRUCCIONES DEL CABLE DE ELECTRICIDAD: Un cable de corriente eléctrica corto es utilizado en este producto para disminuir el riesgo resultante de ser halado por niños, enredarse al paso o tropezarse con un cable más largo. NOTA: 1.
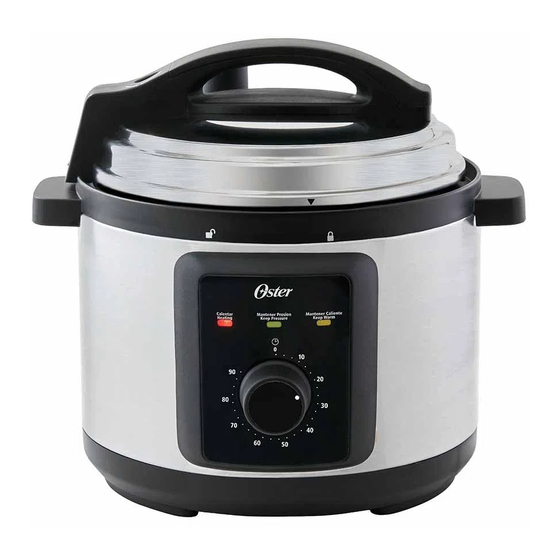
- Page 5 COMPONENTES DE LA MULTI-OLLA RÁPIDA ELÉCTRICA OSTER® Perilla de control de tiempo Cable de alimentación Válvula flotante Pestillo de bloqueo de la tapa Válvula de liberación del vapor Asa de la tapa Colector de condensación Tapa Puerto del cable de alimentación Olla de cocción...
- Page 6 COMPONENTES DE LA MULTI-OLLA RÁPIDA ELÉCTRICA OSTER® PANEL DE CONTROL CARA INFERIOR DE LA TAPA Anillo de fijación de la junta Luz indicadora de Calentar (roja) Cubierta de la válvula de Luz indicadora de Mantener liberación del vapor Presion (verde)
-
Page 7: Montaje
2. Quite la olla de cocción y el colector de condensación, lávelos en agua tibia y jabonosa. Séquelos bien antes de volver a posicionarlos en la Multi-Olla. La Multi-Olla Rápida Eléctrica Oster ha sido diseñada pensando en ser completamente ®... -
Page 8: Primeros Pasos
(amarilla) de Mantener Caliente se encenderá. Para comenzar a calentar, gire la Perilla de Control de Tiempo hasta el tiempo de cocción deseado. 12. Los ajustes de presión y temperatura en la Multi-Olla Rápida Eléctrica Oster ® están preestablecidos para funcionar en presión MEDIA. Cuando se establece el tiempo de cocción deseado y la unidad alcanza la presión óptima, la luz indicadora... -
Page 9: Cocción A Presión
5. Cuando la Multi-Olla alcanza la presión óptima, la luz indicadora de Mantener Presión (verde) se encenderá, la unidad comenzará a cocinar a presión y el temporizador comenzará la cuenta regresiva. 6. Después de que haya transcurrido el tiempo de cocción establecido, la Multi-Olla emitirá... - Page 10 LIBERACIÓN DE LA PRESIÓN AL FINALIZAR LA COCCIÓN A. Método de liberación natural de la presión: Tras finalizar el ciclo de cocción, deje que la presión de la multi-olla se libere de forma natural a través de la válvula flotante. La unidad se enfriará gradualmente por sí sola. Espere al menos 10 minutos después de finalizar la cocción y, seguidamente, empleando un utensilio de cocina, levante la pestaña de la válvula de liberación del vapor hacia la posición “Abierta”...
-
Page 11: Conservación Y Limpieza
CONSERVACIÓN Y LIMPIEZA Limpiar la unidad debería realizarse solamente cuando la Multi-Olla Rápida Eléctrica de Oster esta fría y desenchufada. Deje que la Multi-Olla se enfríe completamente antes ®... - Page 12 El sello puede necesitar ser reemplazado anualmente o cada 2 años dependiendo de cuanto sea el uso de la Multi-Olla. Contacte su servicio técnico autorizado de Oster en caso de necesitar piezas de refacción. ®...
-
Page 13: Solución De Problemas
Suavemente presione el seguro y asegúrese que esté libre de residuos de comida antes de empezar a usar la Multi- Olla. Nota: 1. Humedad puede ser acumulada dentro de la base calefactora bajo la olla de cocción removible. Esto es normal. Deje que la unidad se enfríe y luego seque utilizando una toalla de cocina. -
Page 14: Consejos Y Recomendaciones
CONSEJOS Y RECOMENDACIONES Consejos y recomendaciones para obtener el mejor uso de su Multi-Olla Rápida Eléctrica Oster : diríjase al website de Oster www.oster.com para recetas adicionales, ® ® consejos, recomendaciones y mucho más. -
Page 15: Guía De Cocción
6. La rejilla para cocer al vapor provista está diseñada para ser usada en esta Multi- Olla. No debería dañar la superficie antiadherente de la olla de cocción interna. 7. Cuando retire la tapa, use un guante de cocina para agarrar la manilla de la tapa y levantar en la dirección contraria a su cuerpo, permitiendo que el vapor salga. -
Page 16: Important Safeguards
IM PORTAN T SA FEG UA RDS 1. Read all instructions before using this product. 2. To protect against electric shock, do not place or immerse cord, plugs, or appliance in water or other liquid. 3. This appliance is not intended for use by children or by persons with reduced physical, sensory, or mental capabilities, or lack of experience and knowledge. -
Page 17: Power Cord Instructions
19. This appliance cooks under pressure when using pressure cooking functions. Improper use may result in scalding injury. Make certain unit is properly closed before operating. See Operating Instructions. 20. Do not fill the unit over maximum fill line at 2/3 full. When cooking foods that expand during cooking such as rice or dried vegetables, do not fill the unit beyond the recommended level at 1/2 full. - Page 18 2. During initial use of this appliance, some slight smoke and/or odor may be detected. This is normal with many heating appliances and will not recur after a few uses. 3. Please use caution when placing your Cooking Pot on a ceramic or smooth glass cook top stove, countertop, table or other surface.
-
Page 19: Control Panel
OST ER ® R APID MULTI -C OO KE R C OMP ON ENT S CONTROL PANEL UNDERSIDE OF LID Heating light (red) Gasket Fixing Ring Steam Release Valve Cover Keep Pressure light (green) Sealing Gasket Keep Warm light (yellow) Bobber Valve Time Control Knob Steaming Rack... - Page 20 HOW TO USE YOUR OSTER® RAPID MULTI-COOKER Getting started: Remove all packaging, paper, and cardboard (including any located between the Cooking Pot and Heating Base). Read and save the literature and be sure to read the service and warranty information.
-
Page 21: Preparing For First Time Use
11. As soon as the Power Cord is plugged into a power outlet the (yellow) Keep Warm indicator light will turn on. To begin heating, turn the Time Control Knob clockwise to the desired cook time. 12. Pressure and temperature settings on the Oster Rapid Multi-Cooker are preset ®... -
Page 22: Pressure Cooking
CAUTION: The Cooking Pot and Heating Base will get very hot while using this Multi- Cooker. Do not touch hot surfaces. Always use pot holders or oven-mitts when using this Multi-Cooker. Always lift the Lid by tilting away from you to avoid the steam. COOKING POT MARKINGS Inside the removable Cooking Pot are markings to guide the fill level of the Cooking Pot. - Page 23 Valve REMOVE Pressure Release Valve Valve CLOSED (“Seal”) Valve OPEN (“Release”) Figure 2 CAUTION: 1. Do not force the Lid to open. If it does not open easily this means that the Multi- Cooker is still under pressure. 2. During cooking, steam will build up in the Multi-Cooker, so when lifting the Lid use a kitchen glove or mitt to protect your hand.
-
Page 24: Care And Cleaning
CARE AND CLEANING Cleaning should only be carried out when the the Oster Rapid Multi-Cooker is cool and ® unplugged. Allow the Multi-Cooker to completely cool before cleaning. Do not use the removable Cooking Pot on the stovetop, inside a microwave oven or inside an oven. - Page 25 Steam Release Valve Cover The Steam Release Valve Cover is on the underside of the Lid. Ensure it is clear from debris before you begin using the Multi-Cooker. To clean, carefully pull the cover off and clean using warm, soapy water. Press the cover back into its place after cleaning is complete.
-
Page 26: Troubleshooting
TROUBLESHOOTING Subject Question Solution Power My Multi-Cooker will not Make sure outlet is functioning properly turn on Check that the Multi-Cooker is plugged in Call Customer Service, details for your country in the Warranty Card. Doneness of My food was undercooked Make sure the Lid is properly placed and locked, and that food Steam Release Valve in “Seal”... -
Page 27: Hints And Tips
HINTS AND TIPS Hints and Tips to get the best use of your Oster Rapid Multi-Cooker: Go to the ® Oster website at www.oster.com for additional recipes, hints, tips and much more. ® With your Oster Rapid Multi-Cooker you can create a large variety of delicious meals, ®... - Page 28 XXX where X is any number between 0 and 9 or any letter between A and Z. La siguiente información es para México solamente. The following information is intended for Mexico only. Multi-Olla Rápida Eléctrica Oster ® MODELOS: CKSTPCEC57M, CKSTPCEC57M-013 LA SIGUIENTE INFORMACIÓN ES PARA MÉXICO:...