
Related Manuals for Philips FX70


Summary of Contents for Philips FX70
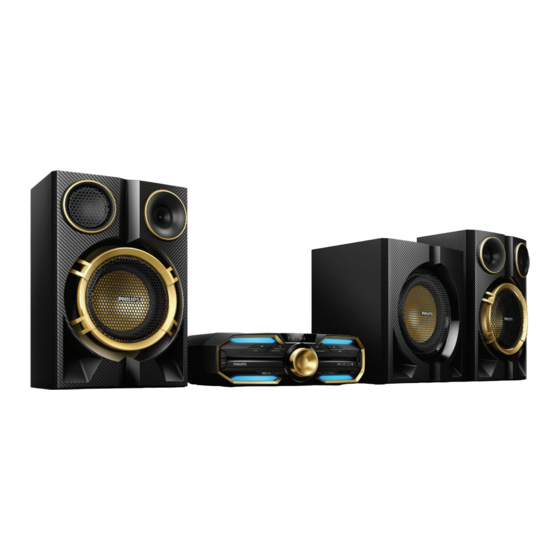
- Page 1 Always there to help you Register your product and get support at www.philips.com/support FX70 Question? Contact Philips User manual...
-
Page 3: Table Of Contents
Contents 7 Adjust volume level and sound 1 Important effect Safety Adjust volume level Notice Mute sound Boost sound power 2 Your Mini Hi-Fi System Select a preset sound effect Introduction Enhance bass What's in the box Overview of the main unit 8 Listen to radio Overview of the remote control Tune to a radio station... -
Page 4: Important
1 Important h Do not install near any heat sources such as radiators, heat registers, stoves, or other apparatus (including amplifiers) that produce heat. Safety i Protect the power cord from being walked on or pinched, particularly at plugs, convenience receptacles, and the Know these safety symbols point where they exit from the apparatus. -
Page 5: Notice
Ensure curtains or other objects human health. never cover the ventilation slots on this Please visit www.recycle.philips.com for apparatus. additional information on a recycling center in your area. Warning •... - Page 6 The Bluetooth word mark and logos are ® registered trademarks owned by Bluetooth SIG, Inc. and any use of such marks by Gibson Innovations Limited is under license. Other trademarks and trade names are those of their respective owners. Other trademarks and trade names are those of their respective owners.
-
Page 7: Your Mini Hi-Fi System
Check and identify the contents of your package: • Main unit Congratulations on your purchase, and • 2 x loudspeakers welcome to Philips! To fully benefit from the • 1 x subwoofer support that Philips offers, register your product • 1 x plug adapter at www.philips.com/welcome. -
Page 8: Overview Of The Main Unit
Overview of the main unit r qp o LATIN EQ c d e f g h i j k j AUDIO IN • Turn on the unit. • Connect an external audio device through a 3.5mm audio cable (not • Switch to normal standby or Eco supplied). -
Page 9: Overview Of The Remote Control
• Start, pause, or resume play. • Turn on the unit. • Switch to normal standby or Eco s ANTENNA (AM) Power standby mode. • Connect the supplied AM antenna. t ANTENNA (FM) • Open or close the disc compartment. •... - Page 10 m CLOCK/DISPLAY • Set the clock. • Select display information. n SLEEP/TIMER • Set the sleep timer. • Set the alarm timer. • Turn on or off sleep/alarm timer. o USB REC • Record to a USB mass storage device. •...
-
Page 11: Get Started
Always follow the instructions in this chapter in sequence. If you contact Philips, you will be asked for the model and serial number of this apparatus. The model number and serial number are on the back of the apparatus. -
Page 12: Connect Power
Connect power Install radio stations automatically Caution • Make sure that the power supply socket used can When you connect power and no radio support at least 10A current loading. stations are stored, the unit automatically begins • Before connecting the AC power cord, make sure that to store radio stations. -
Page 13: Turn On
• During setting, you can press to exit clock setting without saving the earlier operation. • During setting, if no action is taken within 90 seconds, the device exits clock setting automatically without saving the earlier operation. • During play or in ECO Power standby mode, you press CLOCK to view the set clock. -
Page 14: Play
4 Play Pair and connect Option 1: Pair and connect through NFC Near Field Communication (NFC) is a technology that enables short-range wireless Play from a Bluetooth- communication between various NFC enabled device compatible devices, such as mobile phones and IC tags. -
Page 15: Play A Disc
Bluetooth devices that can be paired LATIN EQ (see the user manual of the device). Press SOURCE repeatedly to select the Select 'Philips FX70' on your Bluetooth disc source. enabled device and if necessary input '0000' as the pairing password. -
Page 16: Play From Usb
Play from USB LATIN EQ Note • Make sure that the USB device contains playable audio contents in supported formats. The NTFS file format is not supported. • A USB hub is not supported. • Some card readers may not be supported. Plug the USB device into the socket on the main unit. -
Page 17: Listen To An External Device
5 Listen to an Listen to an external audio external device device with RCA connectors You can listen to an external audio device through the speakers of this unit. Listen to an MP3 player LATIN EQ Press SOURCE repeatedly to select the AUX IN source. -
Page 18: Play Options
6 Play options Display play information • During play, press CLOCK/DISPLAY repeatedly to select different play information. Repeat and shuffle play • During disc play, press MODE repeatedly to select: • REPEAT ONE: the current track is played repeatedly. • REPEAT ALL: all tracks are played repeatedly. -
Page 19: Adjust Volume Level And Sound Effect
7 Adjust volume Select a preset sound effect level and sound • During play, press EQ repeatedly to select effect special sound effects: [ROCK] (rock) • [POP] (pop) • [HIP-HOP] (hip-hop) • Note [REGUETON] (regueton) • • MAX sound and bass boost cannot be activated at the [PARTY] (party) •... -
Page 20: Listen To Radio
8 Listen to radio Tune to a radio station. Press PROG to activate program mode. Press to allocate a number to this radio station, then press PROG to confirm. Repeat the above steps to program other Tune to a radio station stations. -
Page 21: Usb Record
9 USB record Record CDDA contents to USB at any playback time Note Audio CD tracks and MP3 files are recorded in .mp3 format. • Make sure that the USB storage device is connected to the main unit. The first time you record to USB, a folder is automatically created in the USB device. -
Page 22: Other Features
10 Other features To deactivate or re-activate an alarm timer In standby mode, press SLEEP/TIMER • repeatedly. » When the alarm timer is deactivated, ''TIMER OFF is displayed. » When the alarm timer is re-activated, Set the alarm timer 'TIMER ON' is displayed. This unit can be used as an alarm clock. -
Page 23: Product Information
11 Product Tuner information FM tuning range FM: 87.5 - 108MHz AM: 531 - 1602KHz(9KHz); 530 - 1700KHz(10KHz) Note Tuning grid 100kHz (FM), • 9KHz/10KHz (AM) Product information is subject to change without prior notice. Number of Presets 20 FM; 10 AM Sensitivity - Mono, 26dB S/N <... -
Page 24: Usb Playability Information
• Number of albums/ folders: maximum Bluetooth Bluetooth® version V4.0 EDR • Number of tracks/titles: maximum 999 Frequency band 2.402GHz ~ 2.480GHz • ID3 tag v2.0 or later ISM Band • File name in Unicode UTF8 (maximum Bluetooth Profile length: 128 bytes) A2DP, AVRCP1.4 Range Unsupported formats:... -
Page 25: Maintenance
Clean the disc lens • After prolonged use, dirt or dust may accumulate at the disc lens. To ensure good play quality, clean the disc lens with Philips CD lens cleaner or any commercially available cleaner. Follow the instructions supplied with cleaner. -
Page 26: Troubleshooting
If the problem remains • Use a finalized CD or correct format disc. unsolved, go to the Philips web site (www. philips.com/welcome). When you contact Cannot display some files in USB device Philips, ensure that the apparatus is nearby •... - Page 27 The audio quality is poor after connection with a Bluetooth-enabled device. • The Bluetooth reception is poor. Move the device closer to the unit or remove any obstacle between the device and the unit. Cannot connect with the unit. • The device does not support the profiles required for the unit.
- Page 28 Gibson Innovations Ltd., and Gibson Innovations Ltd. is the warrantor in relation to this product. Philips and the Philips Shield Emblem are registered trademarks of Koninklijke Philips N.V. and are used under license from Koninklijke Philips N.V. FX70_UM_EN_V1.0...