Table of Contents
Advertisement
Available languages
Available languages
Quick Links
Advertisement
Table of Contents

Related Manuals for Kodak RODPJSTS80.16

Summary of Contents for Kodak RODPJSTS80.16
- Page 1 KODAK PROJECTION SCREEN WITH TRIPOD STAND & CARRYING BAG Quick Start Guide...
-
Page 2: Table Of Contents
CONTENTS INTRODUCTION PACKAGE CONTENTS PRODUCT OVERVIEW INSTALLATION INSTRUCTIONS TO PACK UP THE SCREEN AFTER USE CARE/MAINTENANCE CUSTOMER SERVICE INTRODUCTION 10-11 CONTENU DE L'EMBALLAGE APERÇU DES PRODUITS INSTRUCTIONS D'INSTALLATION 13-14 POUR EMBALLER L'ÉCRAN APRÈS UTILISATION ENTRETIEN SERVICE CLIENTÈLE EINLEITUNG 17-18 PAKETINHALT PRODUKTÜBERSICHT INSTALLATIONSANWEISUNGEN 20-21... - Page 3 INTRODUCCIÓN 24-25 EL CONTENIDO DEL PAQUETE RESUMEN DEL PRODUCTO INSTRUCCIONES DE INSTALACIÓN 27-28 PARA EMPAQUETAR LA PANTALLA DESPUÉS DE SU USO CUIDADO MANTENIMIENTO SERVICIO DE ATENCIÓN AL CLIENTE INTRODUZIONE 31-32 CONTENUTO DELLA CONFEZIONE PANORAMICA DEI PRODOTTI ISTRUZIONI PER L'INSTALLAZIONE 34-35 PER IMBALLARE LO SCHERMO DOPO L'USO MANUTENZIONE SERVIZIO CLIENTI...
-
Page 4: Introduction
INTRODUCTION Thank you for purchasing the KODAK PROJECTION SCREEN with Tripod Stand & Carrying Bag. This User Guide is intended to provide you with guidelines to ensure that operation of this product is safe and does not pose risk to the user. -
Page 5: Package Contents
PLEASE MAKE SURE TO VIEW AND DOWNLOAD THE LIMITED WARRANTY AT: https://www.kodakphotoplus.com/pages/kodak-projection-screen-80-with-tripod-stand-carry-bag-support https://www.kodakphotoplus.com/pages/kodak-projection-screen-100-with-tripod-stand-carry-bag-support KODAK PROJECTION SCREEN 80" KODAK PROJECTION SCREEN 100" WITH TRIPOD STAND & CARRYING BAG WITH TRIPOD STAND & CARRYING BAG PACKAGE CONTENTS Projection screen Tripod stand Carrying bag... -
Page 6: Product Overview
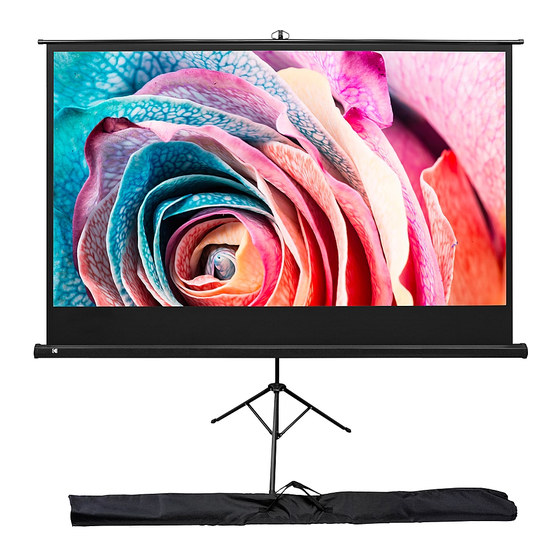
PRODUCT OVERVIEW 1. Screen Handle 2. Tripod Bar 3. Hanging Hook 4. Black Border 5. Screen 6. Screen Housing 7. Assembly Connector 8. Tripod 9. Locking Sleeve Ring 10. Assembly Nut 11. Adjustable Tripod Handle EN | 5... -
Page 7: Installation Instructions
INSTALLATION INSTRUCTIONS TRIPOD SETUP: 1. Choose a suitable place to set up. 2. Open the tripod feet and place tripod. 3. Loosen the locking sleeve ring on the tripod bar to pull up the bar. Then, tighten the locking sleeve ring to lock the bar in place. 4. - Page 8 5. Hold the screen handle and pull the screen out until you see the black border. Then, hang the screen handle on the hanging hook on top of the tripod bar. NOTE: To adjust the screen height from the bottom, unlock the adjustable tripod handle and move the handle to the desired height.
-
Page 9: To Pack Up The Screen After Use
TO PACK UP THE SCREEN AFTER USE 1. Remove the screen handle from the hanging hook. 2. Let the screen automatically roll back up into the housing. 3. Turn the assembly nut to unlock the connector and pull the connector out of the assembly nut. -
Page 10: Customer Service
International Support: kodakintl@camarketing.com www.kodakphotoplus.com The Kodak trademark, logo, and trade dress are used under license from Eastman Kodak Company. All other products, brand names, company names, and logos are trademarks of their respective owners, used merely to identify their respective products, and are not meant to connote any sponsorship, endorsement, or approval. -
Page 11: Introduction
INTRODUCTION Merci d'avoir acheté l'ÉCRAN DE PROJECTION KODAK avec trépied et sac de transport. Ce guide de l'utilisateur est destiné à vous fournir des directives pour garantir que l'utilisation de ce produit est sûre et ne présente aucun risque pour l'utilisateur. -
Page 12: Contenu De L'emballage
VEUILLEZ VOUS ASSURER DE CONSULTER ET DE TÉLÉCHARGER LA GARANTIE LIMITÉE SUR: https://www.kodakphotoplus.com/pages/kodak-projection-screen-80-with-tripod-stand-carry-bag-support https://www.kodakphotoplus.com/pages/kodak-projection-screen-100-with-tripod-stand-carry-bag-support ÉCRAN DE PROJECTION KODAK 80" ÉCRAN DE PROJECTION KODAK 100" AVEC TRÉPIED ET SAC DE TRANSPORT AVEC TRÉPIED ET SAC DE TRANSPORT CONTENU DE L'EMBALLAGE Écran de projectio Trépied... -
Page 13: Aperçu Des Produits
APERÇU DES PRODUITS 1. Poignée d'Écran 2. Barre de Trépied 3. Crochet de Suspension 4. Frontière Noire 5. Écran 6. Logement de l'Écran 7. Connecteur d'Assemblage 8. Trépied 9. Bague de Verrouillage 10. Écrou d'Assemblage 11. Poignée de Trépied Réglable 12 | FR... -
Page 14: Instructions D'installation
INSTRUCTIONS D'INSTALLATION CONFIGURATION DU TRÉPIED: 1. Choisissez un lieu approprié pour vous installer. 2. Ouvrez les pieds du trépied et placez le trépied. 3. Desserrer la bague de verrouillage de la barre du trépied pour faire monter la barre. Puis, serrez la bague de verrouillage de la douille pour verrouiller la barre en place. - Page 15 5. Tenez la poignée de l'écran et tirez sur l'écran jusqu'à ce que vous voyiez la bordure noire. Ensuite, accrochez la poignée de l'écran au crochet de suspension en haut de la barre de trépied. REMARQUE: Pour régler la hauteur de l'écran par le bas, déverrouillez la poignée du trépied réglable et déplacez la poignée à...
-
Page 16: Pour Emballer L'écran Après Utilisation
POUR EMBALLER L'ÉCRAN APRÈS UTILISATION 1. Retirez la poignée de l'écran du crochet de suspension. 2. Laisser l'écran se remonter automatiquement dans le boîtier. 3. Tournez l'écrou d'assemblage pour déverrouiller le connecteur et tirez le connecteur hors de l'écrou d'assemblage. 4. -
Page 17: Service Clientèle
La marque Kodak, le logo et l'habillage commercial sont utilisés sous licence de la société Eastman Kodak. Tous les autres produits, noms de marque, noms de société et logos sont des marques commerciales de leurs propriétaires respectifs, utilisées uniquement pour identifier leurs produits respectifs, et ne sont pas censées convenir à... -
Page 18: Einleitung
EINLEITUNG Vielen Dank für den Kauf des KODAK PROJEKTIONSBILDSCHIRMS mit Stativständer und Tragetasche. Dieses Benutzerhandbuch soll Ihnen Richtlinien zur Verfügung stellen, um sicherzustellen, dass der Betrieb dieses Produkts sicher ist und kein Risiko für den Benutzer darstellt. Jede Verwendung, die nicht mit den in diesem Benutzerhandbuch beschriebenen Richtlinien übereinstimmt,... -
Page 19: Paketinhalt
BITTE STELLEN SIE SICHER, DASS SIE DIE BESCHRÄNKTE GARANTIE UNTER EINSEHEN UND HERUNTERLADEN: https://www.kodakphotoplus.com/pages/kodak-projection-screen-80-with-tripod-stand-carry-bag-support https://www.kodakphotoplus.com/pages/kodak-projection-screen-100-with-tripod-stand-carry-bag-support KODAK PROJEKTIONSSCHIRM 80" KODAK PROJEKTIONSSCHIRM 100" MIT STATIVSTÄNDER & TRAGETASCHE MIT STATIVSTÄNDER & TRAGETASCHE PAKETINHALT Projektionsschirm Stativ-Ständer Tragetasche Benutzerhandbuch 18 | DE... -
Page 20: Produktübersicht
PRODUKTÜBERSICHT 1. Bildschirm-Handgri 2. Die Stativstange 3. Hängender Haken 4. Schwarzer Rand 5. Bildschirm 6. Das Bildschirm-Gehäuse 7. Montage Verbinder 8. Stativ 9. Verriegelungshülse Ring 10. Montage Mutter 11. Verstellbarer Stativgri DE | 19... -
Page 21: Installationsanweisungen
INSTALLATIONSANWEISUNGEN STATIV AUFSTELLUNG: 1. Einen geeigneten Ort zum Aufstellen wählen. 2. Ö nen Sie die Stativfüße und stellen Sie das Stativ auf. 3. Lösen Sie den Sicherungshülsenring an der Stativstange, um die Stange nach oben zu ziehen. Ziehen Sie dann den Verriegelung- shülsenring fest, um die Stange an ihrem Platz zu arretieren. - Page 22 5. Halten Sie den Bildschirmgri fest und ziehen Sie den Bildschirm heraus, bis Sie den schwarzen Rand sehen. Hängen Sie dann den Bildschirmgri an den Aufhäng haken oben an der Stativstange. HINWEIS: Um die Bildschirmhöhe von unten einzustellen, entriegeln Sie den verstellbaren Stativgri und bewegen Sie den Gri auf die gewünschte Höhe.
-
Page 23: Um Den Bildschirm Nach Gebrauch Zusammenzupacken
UM DEN BILDSCHIRM NACH GEBRAUCH ZUSAMMENZUPACKEN 1. Entfernen Sie den Bildschirmgri vom Aufhängehaken. 2. Den Bildschirm automatisch wieder in das Gehäuse zurückrollen lassen. 3. Drehen Sie die Montagemutter, um den Verbinder zu entriegeln, und ziehen Sie den Verbinder aus der Montagemutter heraus. 4. -
Page 24: Kundenservice
Internationale Unterstützung: kodakintl@camarketing.com www.kodakphotoplus.com Die Kodak-Marke, das Kodak-Logo und die Handelsaufmachung werden unter Lizenz der Eastman Kodak Company verwendet. Alle anderen Produkte, Markennamen, Firmennamen und Logos sind Marken ihrer jeweiligen Eigentümer, die lediglich zur Identifizierung ihrer jeweiligen Produkte verwendet werden und nicht als Sponsoring, Befürwortung oder Genehmigung zu verstehen sind. -
Page 25: Introducción
INTRODUCCIÓN Gracias por comprar la PANTALLA DE PROYECCIÓN KODAK con soporte para trípode y bolsa de transporte. Esta Guía del usuario tiene por objeto proporcionarle las directrices para garantizar que el funcionamiento de este producto sea seguro y no suponga un riesgo para el usuario. Cualquier uso que no se ajuste a las directrices descritas en esta Guía del usuario puede anular la... -
Page 26: El Contenido Del Paquete
POR FAVOR, ASEGÚRESE DE VER Y DESCARGAR LA GARANTÍA LIMITADA EN: https://www.kodakphotoplus.com/pages/kodak-projection-screen-80-with-tripod-stand-carry-bag-support https://www.kodakphotoplus.com/pages/kodak-projection-screen-100-with-tripod-stand-carry-bag-support PANTALLA DE PROYECCIÓN KODAK 80" PANTALLA DE PROYECCIÓN KODAK 100" CON SOPORTE PARA TRÍPODE Y BOLSA CON SOPORTE PARA TRÍPODE Y BOLSA DE TRANSPORTE DE TRANSPORTE CONTENIDO DEL PAQUETE Pantalla de proyección... -
Page 27: Resumen Del Producto
RESUMEN DEL PRODUCTO 1. Mango de la Pantall 2. Barra de Trípode 3. Gancho para Colgar 4. Frontera Negra 5. Pantalla 6. Pantalla de Alojamiento 7. Conector de Montaje 8. Trípode 9. Anillo de la Manga de Cierre 10. Tuerca de Montaje 11. -
Page 28: Instrucciones De Instalación
INSTRUCCIONES DE INSTALACIÓN CONFIGURACIÓN DEL TRÍPODE: 1. Elegir un lugar adecuado para instalarse. 2. Abra los pies del trípode y coloque el trípode. 3. Afloje el anillo de la manga de cierre de la barra del trípode para tirar de la barra. Luego, apriete el anillo de la manga de cierre para bloquear la barra en su lugar. - Page 29 5. Sostenga la manija de la malla y tire de la malla hacia afuera hasta que vea el borde negro. Luego, cuelgue la manija de la malla en el gancho de colgar en la parte superior de la barra del trípode. NOTA: Para ajustar la altura de la pantalla desde la parte inferior, desbloquee la manija del trípode ajustable y mueva la manija a la...
-
Page 30: Para Empaquetar La Pantalla Después De Su Uso
PARA EMBALAR LA PANTALLA DESPUÉS DE SU USO 1. Quita el mango de la pantalla del gancho de colgar. 2. Deje que la pantalla se enrolle automáticamente en la carcasa. 3. Gire la tuerca de montaje para desbloquear el conector y saque el conector de la tuerca de montaje. -
Page 31: Servicio De Atención Al Cliente
La marca Kodak, el logo y la imagen comercial de Kodak se usan bajo licencia de la Compañía Eastman Kodak. Todos los demás productos, nombres de marca, nombres de compañías y logotipos son marcas comerciales de sus respectivos propietarios, utilizadas únicamente para identificar sus respectivos productos, y no se pretende que connote ningún patrocinio, respaldo o aprobación. -
Page 32: Introduzione
INTRODUZIONE Grazie per aver acquistato la KODAK PROJECTION SCREEN con treppiede Stand & Carrying Bag. Questo manuale d'uso ha lo scopo di fornire le linee guida per garantire che il funzionamento di questo prodotto sia sicuro e non rappresenti un rischio per l'utente. Qualsiasi uso non conforme alle linee guida descritte in questo Manuale d'uso può... -
Page 33: Contenuto Della Confezione
ASSICURATEVI DI VISUALIZZARE E SCARICARE LA GARANZIA LIMITATA AL SEGUENTE INDIRIZZO: https://www.kodakphotoplus.com/pages/kodak-projection-screen-80-with-tripod-stand-carry-bag-support https://www.kodakphotoplus.com/pages/kodak-projection-screen-100-with-tripod-stand-carry-bag-support SCHERMO DI PROIEZIONE KODAK 80" SCHERMO DI PROIEZIONE KODAK 100" CON SUPPORTO PER TREPPIEDI E BORSA CON SUPPORTO PER TREPPIEDI E BORSA PER IL TRASPORTO PER IL TRASPORTO... -
Page 34: Panoramica Dei Prodotti
PANORAMICA DEI PRODOTTI 1. Maniglia dello Schermo 2. Barra Treppiede 3. Gancio per Appendere 4. Confine Nero 5. Schermo 6. Alloggiamento dello Schermo 7. Connettore di Montaggio 8. Treppiede 9. Anello per Manicotto di Bloccaggio 10. Dado di Montaggio 11. Maniglia Regolabile per Treppiede IT | 33... -
Page 35: Istruzioni Per L'installazione
ISTRUZIONI PER L'INSTALLAZIONE CONFIGURAZIONE DEL TREPPIEDE: 1. Scegliere un luogo adatto per l'installazione. 2. Aprire i piedi del treppiede e posizionare il treppiede. 3. Allentare l'anello del manicotto di bloccaggio sulla barra del treppiede per tirare verso l'alto la barra. Poi, stringere l'anello del manicotto di bloccaggio per bloccare la barra in posizione. - Page 36 5. Tenere la maniglia dello schermo ed estrarre lo schermo fino a quando non si vede il bordo nero. Quindi, appendere la maniglia dello schermo al gancio per appenderlo sopra la barra del treppiede. NOTA: Per regolare l'altezza dello schermo dal basso, sbloccare la maniglia del treppiede regolabile e spostare la maniglia all'altezza desiderata.
-
Page 37: Per Imballare Lo Schermo Dopo L'uso
PER IMBALLARE LO SCHERMO DOPO L'USO 1. Rimuovere la maniglia dello schermo dal gancio di sospensione. 2. Lasciate che lo schermo si arrotoli automaticamente all'interno dell'alloggiamento. 3. Ruotare il dado di montaggio per sbloccare il connettore ed estrarre il connettore dal dado di montaggio. 4. -
Page 38: Servizio Clienti
Il marchio Kodak, il logo e il trade dress Kodak sono utilizzati su licenza della Eastman Kodak Company. Tutti gli altri prodotti, nomi di marchi, nomi di società e loghi sono marchi dei rispettivi proprietari, utilizzati semplicemente per identificare i rispettivi prodotti, e non sono intesi a connotare alcuna sponsorizzazione, approvazione o approvazione.