
Related Manuals for Singer S0235


Summary of Contents for Singer S0235
- Page 1 OVERLOCK SEWING MACHINE S0235 OVERLOCK SEWING MACHINE MÁQUINA OVERLOCK Instruction Manual Instrucciones de uso...
- Page 2 This household sewing machine is designed to comply with IEC/EN 60335-2-28 and UL1594. IMPORTANT SAFETY INSTRUCTIONS When using an electrical appliance, basic safety precautions should always be followed, including the following: Read all instructions before using this household sewing machine. Keep the instructions at a suitable place close to the machine.
- Page 3 • If the cord connected with the foot control is damaged, it must be replaced by the manufacturer or its service agent or a similarly qualified person, in order to avoid a hazard. • This sewing machine is provided with double insulation. Use only identical replacement parts. See instructions for Servicing of Double-Insulated Appliances.
-
Page 4: Table Of Contents
Congratulations on the purchase of this sewing machine. We are certain you will be very happy with this product. To ensure you will be using the product in safely and correctly, we ask you to observe the following instructions. Read these instructions for use before use, and follow the safety instructions and information. Keep these instructions for future reference and be sure to pass them on to other users. -
Page 5: About Your Machine
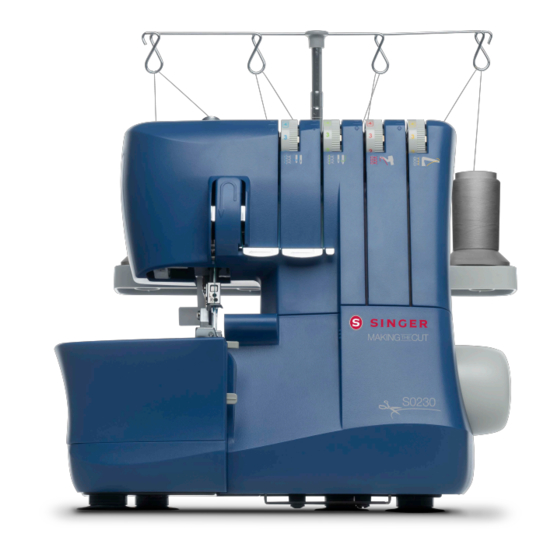
ABOUT YOUR MACHINE Parts of the Machine Front and Side of Machine 1. Telescopic thread stand — helps maintain the flow of the thread during sewing (page 3) 13 14 15 2. Spool stand and spool pin — holds the thread spools 3. -
Page 6: Inside Of Machine
8. Lower looper thread guides — help maintain the flow of the thread during sewing Accessories 1. Needle pack including two needles, size #14/90 (SINGER® Overlock needles #2022) 2. Screwdriver 3. Tweezers 4. Allen key to change needles 5. 2-thread overlock converter 6. -
Page 7: Connecting The Foot Control And The Power Supply
Connecting the Foot Control and the Power Supply Among the accessories you will find the power cord and the foot control. Note: Consult a qualified electrician if you are in doubt about how to connect the machine to the power source. Unplug the power cord when the machine is not in use. -
Page 8: Open And Close The Front Cover
Open and Close the Front Cover Open the Front Cover First push the cover to the right as far as it will go and then pull it downward toward you. Close the Front Cover First pull the cover upward and then slide it to the left until it locks. Note: The front cover has a safety switch and the machine will not sew if the front cover is open. -
Page 9: Changing The Needles
Changing the Needles Turn off the main power switch and unplug the machine. 1. Turn the hand wheel toward you until the needles are at the highest position. 2. Loosen, but do not remove the left (B) and/or right (A) needle clamp screw with the allen key while you are holding the needles. -
Page 10: Deactivate The Upper Cutter
Deactivate the Upper Cutter • Turn the hand wheel toward you until the upper cutter is in its lowest position. • Turn off the upper cutter by switching the upper cutter switch to non-cutting position (A). Reactivate the Upper Cutter •... -
Page 11: Getting Ready To Sew
(denim, jersey, tweed, etc.) Needles Needles Needles size #12/80 needles, suitable for size #14/90 needles, suitable for size #14/90 needles, suitable for overlock machines (SINGER® Overlock overlock machines (SINGER® Overlock overlock machines (SINGER® Overlock needles #2022) needles #2022) needles #2022) Thread Thread suitable for overlock machines Getting Ready to Sew –... -
Page 12: Threading The Upper Looper (Red)
Threading the Upper Looper (Red) When threading the upper looper, follow the thread path marked with a red dot. • Open the front cover. Raise the needle to highest position by turning the hand wheel toward you. Raise the presser foot. Pass the thread from back to front through the thread guide on the thread stand (1). -
Page 13: Threading The Lower Looper (Yellow)
Threading the Lower Looper (Yellow) When threading the lower looper, follow the thread path marked with a yellow dot. • Pass the thread from back to front through the thread guide on the thread stand (1). Use the tweezers to make the threading easier. -
Page 14: Threading The Left Needle (Blue)
Threading the Left Needle (Blue) When threading the left needle, follow the thread path marked with a blue dot. • Pass the thread from back to front through the thread guide on the thread stand (1). Use the tweezers to make the threading easier. -
Page 15: Thread Tension Settings
Thread Tension Settings Set the thread tension to suit the type of fabric and thread used. As the number on the thread tension discs increases, the thread tension becomes tighter. See Stitch Overview, page 15 for thread tension recommendations for each stitch. Color Explanation Sheet Right side of fabric Right needle thread... -
Page 16: Differential Feed Adjustment
Differential Feed Adjustment The differential feed system consists of two sets of feed teeth arranged one behind the other (A). Both feed teeth work independently of each other to provide good results when sewing on speciality fabrics. When the amount of feed by the front feed teeth is changed in relation to the feed by the rear feed teeth it will "stretch"... -
Page 17: Presser Foot Pressure Adjustment
Presser Foot Pressure Adjustment The presser foot pressure is pre-set for sewing on medium weight fabric. When sewing in different fabric weights, adjustment might be needed. Generally, decrease the presser foot pressure when sewing in light weight fabric and increase it when sewing in heavy weight fabrics. -
Page 18: Stitch Length Settings
Stitch Length Settings The stitch length dial should be set to "3" for most sewing. Adjust the stitch length to 4mm when sewing on heavy weight fabrics. Adjust the stitch length to 2mm when sewing on light weight fabrics. Stitch Finger Lever Setting The stitch finger lever should be set to "N"... -
Page 19: Sewing
SEWING On your overlock machine, different stitches are obtained by combining different needle positions, threading methods, tension settings, and the use of the 2-thread overlock converter. See Getting Ready to Sew, page 7, for references on how to set your machine. Stitch Overview The settings shown in the table below are our recommendations based on normal conditions. -
Page 20: 3-Thread Overlock, Wide (And Narrow)
3–Thread Overlock, Wide (and Narrow) For sewing two layers of stretchy fabric or overcasting a single layer of light to medium fabric. Use heavier threads in the loopers to create decorative edges. Note: Use the right needle instead for a narrow stitch. Recommended thread tension settings within brackets in the chart. Thread Tension Stitch/Fabric (—) -
Page 21: 3-Thread Rolled Edge
3–Thread Rolled Edge For edging lightweight fabrics. It gives a nice finish on silky scarves, pillow ruffles and napkins. For a beautiful rolled edge, thread the loopers with a decorative lightweight thread, such as 40 weight rayon, for a beautiful satin edge and the needle and lower looper with lightweight regular thread. -
Page 22: 2-Thread Rolled Edge
2–Thread Rolled Edge For edging lightweight fabrics. It gives a nice finish on silky scarves, pillow ruffles and napkins. Thread the looper with a decorative lightweight thread, such as 40 weight rayon for a beautiful satin edge (2-thread converter required). Note: Not recommended for heavy weight fabrics. -
Page 23: Start Sewing
Start Sewing 1. When the machine is completely threaded, close the front cover and bring all of the threads over the stitch plate and slightly to the left under the presser foot. 2. Ensure that the upper blade moves against the lower blade correctly by turning the hand wheel slowly toward you. -
Page 24: Corded Overlock
Corded Overlock Corded overlock can be used to strengthen stitches when joining elastic fabrics such as knits. Cording prevents knit fabrics from stretching and also stabilizes the seams. 1. Insert the cord through the hole in the front of the foot. 2. -
Page 25: Rolled Edge Sewing
Rolled Edge Sewing The rolled edge stitch is appropriate for light weight fabrics such as lawn, voile, organdy, crepe, etc. The rolled edge is achieved by adjusting the thread tension to make the fabric edge roll under the fabric while overlocking. Adjust the thread tension to change the degree of rolling. -
Page 26: Flatlock Sewing
Flatlock Sewing A Flatlock (A) is made by adjusting the tension of the 3-thread overlock stitch, sewing the seam and pulling the fabrics apart to flatten the seam. The tensions must be adjusted correctly for the fabric to pull flat properly. A Flatlock can be used both as a decorative construction stitch, sewing two pieces together (Standard Flatlock), or for decoration only on one piece of fabric (Decorative Flatlock). -
Page 27: Machine Maintenance
MACHINE MAINTENANCE An overlock requires more frequent maintenance than a conventional sewing machine for two reasons: • A lot of lint is produced when the cutters are cutting the fabric. • An overlock runs at a very high speed and needs to be oiled frequently to lubricate the internal working parts. -
Page 28: Replacing The Upper Cutter
Replacing the Upper Cutter Turn off the main power switch and unplug the machine. The upper cutter should be changed when it becomes blunt. Change it by following the below instructions. If you are having any difficulties, consult your service agent to make the necessary adjustments. - Page 29 Thread Breaks Possible Cause: Machine may not be threaded correctly; threads threaded in the incorrect sequence. Solution: Check that machine is threaded in correct order (page 7). Possible Cause: Thread is not unreeling smoothly off the thread spool. Solution: Check the thread spool to ensure thread is not getting caught. Possible Cause: Needle(s) may have a bent, dull or broken point.
-
Page 30: Technical Specifications
Sewing Speed Stitch Length Needle Bar Stroke Maximum 1200 ± 100 rpm 1–4mm 25 ± 3mm Presser Foot Rise Needles Stitch Width SINGER® EL #2022 #90/14 2.3–7mm 5–7mm Number of Needles Differential Feed Ratio Weight 1–2 0.7–2.0 6.3kg Number of Threads... - Page 31 The Singer Sewing Company disclaims liability under this warranty for any damage or defect resulting from the use of other than SINGER parts and approved service in the repair and maintenance of your machine. To keep your machine operating properly, we recommend that you follow the operation instructions and periodically have your machine serviced and tuned by an authorized SINGER sewing machine technician.
- Page 33 MÁQUINA OVERLOCK S0235 MÁQUINA OVERLOCK Instrucciones de uso...
- Page 34 Esta máquina de coser doméstica ha sido diseñada de conformidad con las normas IEC/EN 60335-2-28 y UL1594. INSTRUCCIONES DE SEGURIDAD IMPORTANTES Cuando utilice un aparato eléctrico, debe respetar siempre las precauciones de seguridad básicas, incluyendo las siguientes: Lea todas las instrucciones antes de utilizar esta máquina de coser doméstica. Conserve las instrucciones en un lugar adecuado, cerca de la máquina.
- Page 35 • No utilice la máquina si está mojada. • Si la bombilla LED está dañada o rota, debe ser reemplazada por el fabricante o su agente de servicio o una persona igualmente cualificada, para evitar riesgos. • Si el cable conectado con el pedal está dañado, debe ser reemplazado por el fabricante o su agente de servicio o una persona igualmente cualificada, para evitar riesgos.
- Page 36 Enhorabuena por haber adquirido esta máquina de coser. Estamos seguros de que quedará muy satisfecho con este producto. Para asegurarnos de que utiliza este producto de una forma segura y correcta, le rogamos que tenga en cuenta las siguientes instrucciones. Lea estas instrucciones de uso antes de utilizar el producto y siga las instrucciones e información de seguridad.
-
Page 37: Información Sobre Su Máquina
INFORMACIÓN SOBRE SU MÁQUINA Partes de la máquina Frente y lado de la máquina 1. Soporte telescópico para hilos — ayuda a mantener el flujo del hilo durante la costura (página 3) 13 14 15 2. Soporte del portacarrete y portacarrete — sujeta los carretes de hilo 3. -
Page 38: Interior De La Máquina
8. Guiahilos de la devanadora inferior — ayudan a mantener el flujo del hilo durante la costura Accesorios 1. El paquete de agujas incluye dos agujas, tamaño #14/90 (agujas SINGER® Overlock #2022) 2. Destornillador 3. Pinzas finas 4. Llave Allen para cambiar agujas 5. -
Page 39: Conexión Del Pedal Y La Toma De Alimentación
Conexión del pedal y la toma de alimentación Entre los accesorios encontrará el cable de alimentación y el pedal. Nota: Consulte a un electricista especializado si tiene alguna duda sobre cómo conectar la máquina a la fuente de alimentación. Desenchufe el cable de alimentación cuando no vaya a utilizar la máquina. -
Page 40: Apertura Y Cierre De La Tapa Delantera
Apertura y cierre de la tapa delantera Apertura de la tapa delantera Presione la tapa hacia la derecha todo lo posible y después tire hacia abajo, hacia usted. Cierre de la tapa delantera Primero tire de la tapa hacia arriba y después deslícela hacia la izquierda hasta que se bloquee. -
Page 41: Cambio De Las Agujas
Cambio de las agujas Apague el interruptor y desenchufe la máquina. 1. Gire el volante hacia usted hasta que las agujas estén en su posición más alta. 2. Afloje, pero no extraiga el tornillo de sujeción de la aguja izquierda (B) y/o derecha (A) con la llave Allen, mientras sujeta las agujas. -
Page 42: Desactivación De La Cuchilla Superior
Desactivación de la cuchilla superior • Gire el volante hacia usted hasta que la cuchilla superior esté en su posición más baja. • Apague la cuchilla superior al colocar el interruptor de la cuchilla superior en la posición sin corte (A). Reactivación de la cuchilla superior •... -
Page 43: Preparativos Para Coser
(lino, crepe, crespón, Georgette, etc.) Agujas Agujas Agujas tamaño #12/80, adecuadas para tamaño #14/90, adecuadas para tamaño #14/90, adecuadas para máquinas overlock (agujas SINGER® máquinas overlock (agujas SINGER® máquinas overlock (agujas SINGER® Overlock #2022) Overlock #2022) Overlock #2022) Hilo Hilo adecuado para máquinas overlock Preparativos para coser –... -
Page 44: Enhebrado De La Devanadora Superior (Rojo)
Enhebrado de la devanadora superior (rojo) Al enhebrar la devanadora superior, siga el recorrido del hilo marcado con un punto rojo. • Abra la tapa delantera. Suba la aguja hasta su posición más alta al girar el volante hacia usted. Levante el prensatelas. Pase el hilo de atrás hacia delante por la guía de la aguja en el soporte para hilos (1). -
Page 45: Enhebrado De La Devanadora Inferior (Amarillo)
Enhebrado de la devanadora inferior (amarillo) Al enhebrar la devanadora inferior, siga el recorrido del hilo marcado con un punto amarillo. • Pase el hilo de atrás hacia delante por la guía de la aguja en el soporte para hilos (1). Use las pinzas para facilitar el enhebrado. -
Page 46: Enhebrado De La Aguja Izquierda (Azul)
Enhebrado de la aguja izquierda (azul) Al enhebrar la aguja izquierda, siga el recorrido del hilo marcado con un punto azul. • Pase el hilo de atrás hacia delante por la guía de la aguja en el soporte para hilos (1). Use las pinzas para facilitar el enhebrado. -
Page 47: Configuración De La Tensión Del Hilo
Configuración de la tensión del hilo Ajuste la tensión del hilo para adaptarlo al tipo de tela y de hilo que está usando. Al aumentar el número de discos de tensado de los hilos, aumenta también la tensión del hilo. Consulte Vista general de las puntadas, página 15 las recomendaciones sobre la tensión del hilo para cada puntada. -
Page 48: Ajuste Del Arrastre Diferencial
El hilo de la aguja derecha está demasiado flojo (G) Si el hilo de la aguja derecha está demasiado flojo, apriete la tensión del hilo de la aguja derecha. El hilo de la aguja derecha está demasiado apretado (H) Si el hilo de la aguja derecha está demasiado apretado, afloje la tensión del hilo de la aguja derecha. -
Page 49: Ajuste De La Presión Del Prensatelas
Ajuste de la presión del prensatelas La presión del prensatelas está pre-configurada para coser sobre telas de peso medio. Al coser en distintos pesos de tela, se pueden requerir ajustes. Por lo general, reduzca la presión del prensatelas al coser en tela ligera y auméntela al coser en telas pesadas. -
Page 50: Configuración De La Longitud
Configuración de la longitud La rueda de longitud de puntada debe estar en "3" para la mayoría de costuras. Ajuste la longitud de la puntada a 4 mm si cose sobre telas pesadas. Ajuste la longitud de la puntada a 2 mm si cose sobre telas ligeras. -
Page 51: Costura
COSTURA En su máquina Overlock, se obtienen distintas puntadas al combinar diferentes posiciones de aguja, métodos de enhebrado, configuraciones de tensión y el uso del conversor Overlock de 2 hilos. Consulte Preparativos para coser, página 7, para obtener referencias sobre cómo configurar su máquina. Vista general de las puntadas Los ajustes que se muestran en la siguiente tabla son nuestras recomendaciones en condiciones normales. -
Page 52: Overlock De 3 Hilos, Ancha (Y Estrecha)
Overlock de 3 hilos, ancha (y estrecha) Para coser dos capas de tela elástica o sobrehilar una sola capa de tela ligera a mediana. Utilice hilos más gruesos en las devanadoras para crear dobladillos decorativos. Nota: Utilice en su lugar la aguja correcta para una puntada estrecha. Las configuraciones recomendadas de tensión de hilo se muestran entre paréntesis en la tabla. -
Page 53: Dobladillo Enrollado De 3 Hilos
Dobladillo enrollado de 3 hilos Para ribetear telas ligeras. Permite un bonito acabado en fruncidos de almohadas, servilletas y bufandas de seda. Para obtener un dobladillo enrollado hermoso, enhebre las devanadoras con un hilo fino decorativo, como el rayón de grosor 40, para lograr un hermoso borde de festón y la aguja y la devanadora inferior con un hilo regular ligero. -
Page 54: Dobladillo Enrollado De 2 Hilos
Dobladillo enrollado de 2 hilos Para ribetear telas ligeras. Permite un bonito acabado en fruncidos de almohadas, servilletas y bufandas de seda. Enhebre la devanadora con un hilo fino decorativo, como el rayón de 40 para lograr un hermoso borde de festón (el conversor de 2 hilos es necesario). -
Page 55: Comenzar A Coser
Comenzar a coser 1. Cuando la máquina esté totalmente enhebrada, cierre la tapa y coloque todos los hilos en la placa de agujas y ligeramente hacia la izquierda debajo del prensatelas. 2. Asegúrese de que la hoja superior se mueva contra la hoja inferior correctamente al girar el volante lentamente hacia usted. -
Page 56: Overlock Con Cordón
Overlock con cordón La puntada Overlock con cordón se puede usar para reforzar puntadas al unir tejidos elásticos como los géneros de punto. El cordón evita que los géneros de punto se estiren y además, estabiliza las puntadas. 1. Inserte el cordón por el orificio delante del pedal. 2. -
Page 57: Coser Un Dobladillo Enrollado
Coser un dobladillo enrollado La puntada de dobladillo enrollado es adecuada para tejidos ligeros como el lino o el algodón, gasa, organdí, crepe, etc. El dobladillo enrollado se logra al ajustar la tensión del hilo para lograr que el borde del tejido se enrolle por debajo del mismo durante el remallado. -
Page 58: Coser Overlock Triple
Coser Overlock triple Una puntada de Overlock triple (A) se logra al ajustar la tensión de la puntada Overlock de 3 hilos, coser y apartar la tela para allanar la puntada. Las tensiones se deben ajustar correctamente para que el tejido quede liso de forma adecuada. La puntada Overlock triple se puede utilizar tanto como elemento decorativo, al coser dos piezas juntas (puntada Overlock triple estándar), o como decoración sobre una sola pieza de tela... -
Page 59: Mantenimiento De La Máquina
MANTENIMIENTO DE LA MÁQUINA La máquina Overlock requiere un mantenimiento más frecuente que una máquina de coser convencional por dos motivos: • Se produce mucha pelusa cuando las cuchillas cortan la tela. • Una Overlock funciona a mayor velocidad y necesita un engrase frecuente para lubricar sus piezas internas. -
Page 60: Sustitución De La Cuchilla Superior
Sustitución de la cuchilla superior Apague el interruptor y desenchufe la máquina. La cuchilla superior se debe cambiar cuando pierde su filo. Para cambiarla, siga las siguientes instrucciones. Si tiene dificultades para hacerlo, consulte a su agente de servicio para realizar los ajustes necesarios. - Page 61 Causa posible: Es posible que la aguja no sea del tamaño correcto para la tela que se está cosiendo. Solución: Utilice un tamaño de aguja que sea compatible con la tela (página 7). Si se rompe el hilo Causa posible: Es posible que la máquina no esté...
-
Page 62: Especificaciones Técnicas
Recorrido de la barra de la aguja Máxima 1200 ± 100 rpm 1–4 mm 25 ± 3 mm Agujas Ancho de puntada Alcance del prensatelas SINGER® EL #2022 #90/14 2,3–7 mm 5–7 mm Peso Número de agujas Coeficiente de arrastre diferencial 6,3 kg 1–2... - Page 63 Estado a otro. Cualquier garantía implícita, incluyendo sin limitaciones a garantías de mercantilización o condición apropiada para un propósito específico, aplicables a esta máquina de coser es limitada en duración a la duración de esta garantía por escrito. La empresa Singer Sewing Company no será...
- Page 64 VSM GROUP AB Drottninggatan 2 SE-561 84 Huskvarna Sweden 021LBA0104(A)(EN.ES)