Advertisement
Quick Links
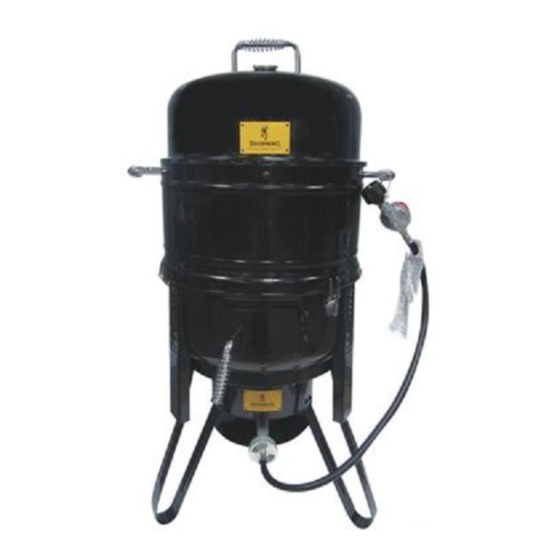
4 in 1 Multi-Function Smoker / Grill / Fryer
Model: SC2039002-BN-00
Tools required:
Philips screwdriver / Adjustable wrench
This instruction manual contains important information necessary for the proper
assembly and safe use of the appliance.
Read and follow all warnings and instructions before assembling and using the
appliance.
Follow all warnings and instructions when using the appliance.
Keep this manual for future reference.
This appliance is NOT for frying turkeys.
SC2039002-BN-00 - ENG
For Outdoor Use Only
Page 1 of 24
20121206 –V1
Advertisement

Summary of Contents for Browning SC2039002-BN-00
- Page 1 Read and follow all warnings and instructions before assembling and using the appliance. Follow all warnings and instructions when using the appliance. Keep this manual for future reference. This appliance is NOT for frying turkeys. 20121206 –V1 SC2039002-BN-00 - ENG Page 1 of 24...
- Page 2 7. The minimum environmental temperature of this appliance is -21°F (-10°C).Do not use this appliance under above rated temperature. Failure to follow these instructions could result in fire, explosion or burn hazard which could cause property damage, personal injury or death. SC2039002-BN-00 - ENG Page 2 of 24 20121206-V1...
- Page 3 WARNING: Indicates a potentially hazardous situation which, if not avoided, will result in death or serious injury. CAUTION CAUTION: Indicates a potentially hazardous situation or unsafe practice which, if not avoided, may result in minor or moderate injury. SC2039002-BN-00 - ENG Page 3 of 24 20121206-V1...
- Page 4 In the event of an oil or grease fire DO NOT attempt to extinguish with water. Immediately call the FIRE DEPARTMENT. A Type BC or ABC fire extinguisher may, in some circumstances contain the fire. SC2039002-BN-00 - ENG Page 4 of 24 20121206-V1...
- Page 5 Never drop food or accessories into hot cooking liquid. Lower food and accessories slowly into the cooking liquid in order to prevent splashing or overflow. When removing food from the appliance care must be taken to avoid burns from hot cooking liquids. SC2039002-BN-00 - ENG Page 5 of 24 20121206-V1...
- Page 6 LP gas is non-toxic, odorless and colorless when produced. For your safety, LP gas has an odor (similar to rotten eggs) so that it can be smelled. LP gas is highly flammable and may ignite unexpectedly when mixed with air. SC2039002-BN-00 - ENG Page 6 of 24 20121206-V1...
- Page 7 WARNING If “growing” bubbles appear, do not use or move the LP tank. Contact an LP gas supplier or your fire department. SC2039002-BN-00 - ENG Page 7 of 24 20121206-V1...
- Page 8 If leak is detected at any time, STOP. If you cannot stop a gas leak, immediately close LP tank valve, leave area of appliance, and call LP gas supplier or your fire department! SC2039002-BN-00 - ENG Page 8 of 24 20121206-V1...
- Page 9 To re-light, repeat steps 1 – 8. Always use CAUTION as cooker will be hot. 10 If ignition does not occur in 5 seconds, turn the burner control(s) off, wait 5 minutes, and repeat the lighting procedure. SC2039002-BN-00 - ENG Page 9 of 24 20121206-V1...
- Page 10 FLEXIBLE venture brush or bend a small hook on one end of a long flexible wire such as the one shown in Fig. 2 one small picture. 4. Inspect and clean the burner if needed. 5. Reattach brass connector to burner. SC2039002-BN-00 - ENG Page 10 of 24 20121206-V1...
- Page 11 Replace corroded or damaged burners that would emit excess gas. For cooking surfaces like pots and pans: Clean the cooking surface with soapy water and a nylon cleaning pad. SC2039002-BN-00 - ENG Page 11 of 24 20121206-V1...
- Page 12 Product Diagram SC2039002-BN-00 - ENG Page 12 of 24 20121206-V1...
- Page 13 15. Burner and Gas 16. Burner Bracket Charcoal Bowl Regulator 14a: Door – 1pc 15a: Regulator – 1pc 15b: Burner – 1pc 14b: Door Handle -1pc Qty:2 Qty:1 14c: Lock plate -1pc 15c: Nut -1pc SC2039002-BN-00 - ENG Page 13 of 24 20121206-V1...
- Page 14 17. 10QT Pot 18. Strainer Basket 19. Basket Handle 20. 6” Thermometer 20a: Thermometer – 1pc 20b: Clip – 1pc Qty:1 Qty:1 Qty:1 21. Locking Clip 22. Heat Shield Qty:3 Qty:1 SC2039002-BN-00 - ENG Page 14 of 24 20121206-V1...
-
Page 15: Hardware List
M6X10 Philips Head Flange Bolt M5X10 Philips Head Flange Bolt M5 Serrated Flange Nut (1 pc spare) M6 Wing Nut M8 Wing Nut (pre-assembled on thermometer) M5 Locknut M5X12 Philips Head bolt (1 pc spare) SC2039002-BN-00 - ENG Page 15 of 24 20121206-V1... - Page 16 Step 1- Attach the Basket Handle (19) to Strainer Basket (18) using 3 sets M5x12 Bolts (H) and M5 Nuts (D). Step 2- Put the 6” Thermometer (20) and Strainer Basket (18) in the 10QT Pot (17). SC2039002-BN-00 - ENG Page 16 of 24 20121206-V1...
- Page 17 Step 4- Assemble the Burner and Gas Regulator (15), Burner Bracket (16) and Heat Shield (22) to Cooker Stand Body (4) using 4 pcs M6x10 Bolts (B) and Nut (This nut is pre-assembled on the burner). This nut is pre-assembled on the burner SC2039002-BN-00 - ENG Page 17 of 24 20121206-V1...
- Page 18 Bowl (3) using 9 pcs M6x18 Bolts (A) and 6 pcs M6 Wing Nuts (E). Step 6- Assemble the Locking Clips (21) to the Bottom Bowl (3) using 6 sets of M5x10 Bolts (C) and M5 Lock Nuts (G). SC2039002-BN-00 - ENG Page 18 of 24 20121206-V1...
- Page 19 Step 8- Assemble the Spring coil Handles (7) to Body (2) using 4 pcs M6x10 Bolts (B). Assemble the Short Grate Brackets (10) to Body (2) using 3 pcs M6x10 Bolts (B). SC2039002-BN-00 - ENG Page 19 of 24 20121206-V1...
- Page 20 (F). This nut is pre-assembled on the Thermometer. F – This wing nut is pre-assembled on the thermometer Step 10- Put the Cooking Grates (9), Water Bowl / Charcoal Bowl (13), Charcoal Grate (12) in the smoker as shown. SC2039002-BN-00 - ENG Page 20 of 24 20121206-V1...
- Page 21 Prior to lighting, position thermometer clip so that at least 2.75” of thermometer tip is submerged in oil. Reposition thermometer as necessary to cook. Continue to use thermometer until burner is turned off. SC2039002-BN-00 - ENG Page 21 of 24 20121206-V1...
- Page 22 Add additional charcoal to the charcoal grate through page 9 in this instruction manual. the door on the bottom bowl. When food is ready to remove, turn OFF the regulator control valve and then gas cylinder. SC2039002-BN-00 - ENG Page 22 of 24 20121206-V1...
-
Page 23: Troubleshooting
Adjust flow of gas via regulator control valve ENJOY YOUR “4 in 1” Multi-Function Smoker/Fryer Should you encounter any problem, CALL US FIRST DO NOT return the product to the store. WE CAN HELP 1–888–837–1380 SC2039002-BN-00 - ENG Page 23 of 24 20121206-V1... -
Page 24: Limited Warranty
DO NOT return product to the store! CUSTOMER SERVICE RANKAM (CHINA) MANUFACTURING COMPANY LIMITED 1618 W. Rosecrans Ave., Gardena, CA 90249, U.S.A. 1 – 888 – 837 – 1380 CustomerService@Rankam.com Made in China SC2039002-BN-00 - ENG Page 24 of 24 20121206-V1...