
Related Manuals for Smeg BLF01


Summary of Contents for Smeg BLF01
- Page 1 取扱説明書 ミキサー MANUALE D’USO FRULLATORE INSTRUCTION MANUAL BLENDER MANUEL D’UTILISATION MIXEUR GEBRAUCHSANWEISUNG STANDMIXER...
- Page 2 この度はイタリア SMEG 社製 レトロシリーズ ミキサーを お買い上げいただき、誠にありがとうございます。 正しく安全にお使いいただくため、ご使用前にこの取扱説明書を 必ずお読みください。読み終わったあとは大切に保管してください。 BLF01 モデルミキサー...
-
Page 3: Table Of Contents
目次 1 注意事項 はじめに 取扱説明書に関する注意 取扱に関する注意 安全に関する注意 メーカー責任 製品ラベルに関する注意 廃棄に関する注意 2 本製品について 各部名称 各部について 3 ご使用について 初めてお使いになる前に ミキサーカッターの取リ外し方 ミキサーの使い方 機能について スピードの設定について 4 お手入れについて 注意事項 ミキサー本体部分のお手入れ ミキサー容器とミキサーカッターのお手入れ クリーニング機能の使い方 部品のお手入れ 故障かな?と思ったら 5 レシピ... -
Page 4: 注意事項
注意事項 1 注意事項 1.2 取扱説明書に関する注意 1.1 はじめに 本取扱説明書は本製品の一部です本製 品を廃棄するまで、大切に保管してく 本製品をご使用になる際の重要な情報は ださい。 以下のように分類されています。 1.3 取扱に関する注意 注意事項 • 本取扱説明書に記載されている 「注 本製品を安全にお使いいただく 意事項」は必ずお守りください。 ための情報と廃棄に関する情報 • 本製品は必ず屋内で使用してくださ が記載されています。 い。 • 本製品は、個人もしくはご家庭で使 本製品について 用することを目的に設計されていま 本製品に関する説明が記載さ す。本来の目的以外のご使用はお控 れています。 えください。本製品は以下の環境で もご使用いただけます。 ご使用について 会社や事務所、店舗などの従業員 ▶ 本製品の使い方に関する情報が 用として 記載されています。 農場や農場の宿泊施設内... -
Page 5: 安全に関する注意
注意事項 1.4 安全に関する注意 • 食器洗い機で本製品を洗わないでく ださい。 本製品を安全にご使用いただくため、 • 使用中のガスレンジや高温になって 以下の注意事項をお守りください。 いる IH 調理器の近く、もしくは加 熱されたオーブンの中に置かないで • ご使用の前にこの取扱説明書を必ず ください。 お読みください。 • 湿気の多い場所で使用しないでくだ 濡れた手で、電源プラグの抜き差し • さい。故障の原因となることがあり はしないでください。感電の原因に ます。 なります。 • お手入れの際は必ず電源を切り、電 電源コードや電源プラグを破損させ • 源プラグをコンセントから抜いてか るようなことはしないでください。 ら行ってください。 • 電源コードは傷付けたり、加工した • 事故防止のため、延長コードを使用 り、熱器具に近づけたり、無理に曲 しないでください。 げたり、ねじったり、ひっぱったり、 •... - Page 6 注意事項 本製品に関する注意 • 本製品は、必ず傾斜の無い平らで水 気の無い場所でご使用ください。 • 怪我もしくは本製品の破損を防ぐた • 中身が空の状態でミキサーの電源を め、手や髪の毛、衣服等を、ミキサー 入れないでください。 カッターに近づけないよう注意して • ミキサーを他のメーカーの部品や付 ください。 属品と組み合わせて使用しないでく • 使用中は回転しているミキサーカッ ださい。 ターに手や指を近づけないでくださ • メーカーが推奨する純正部品のみを い。また、容器の中に箸やスプーン 使用してください。メーカーが推奨 などを入れないでください。怪我を していない交換部品の使用は、火災 したり、本製品が破損したりするお や感電、怪我をするおそれがありま それがあります。ミキサーの電源が す。 入っていない状態であれば、木やプ • ミキサー容器を物入れとして使用し ラスチック製のへらをご使用頂けま ないでください。使用後はミキサー す。 を空の状態にしてください。 • お手入れの際はミキサー容器内を空 • 使用後はミキサー容器内をきれいに...
-
Page 7: メーカー責任
注意事項 1.5 メーカー責任 • 使わなくなった本製品を他の家庭ご みと一緒に廃棄しないでください。 メーカーでは以下に起因する損害につい 正しい廃棄を行うことで材料をリサ て、一切の責任を負いません。 イクルしたり、環境を保護したりす • 本製品の本来の目的とは異なる使用 ることができます。 • 取扱説明書を読んでいない • 本製品の梱包材には、リサイクル可 • 本製品の改造 能な非汚染物質を使用しています。 非純正部品の使用 • • 安全に関する注意事項の不遵守 プラスチック製梱包材 窒息の危険 1.6 製品ラベルに関する注意 • 梱包材もしくはその一部を放置し 製品ラベルには 「製品型番」 「 電気的仕様」 ないでください。 「シリアル番号」 「PSE マーク」 「販売元 • ビニール袋でお子様が遊ばないよ... -
Page 8: 本製品について
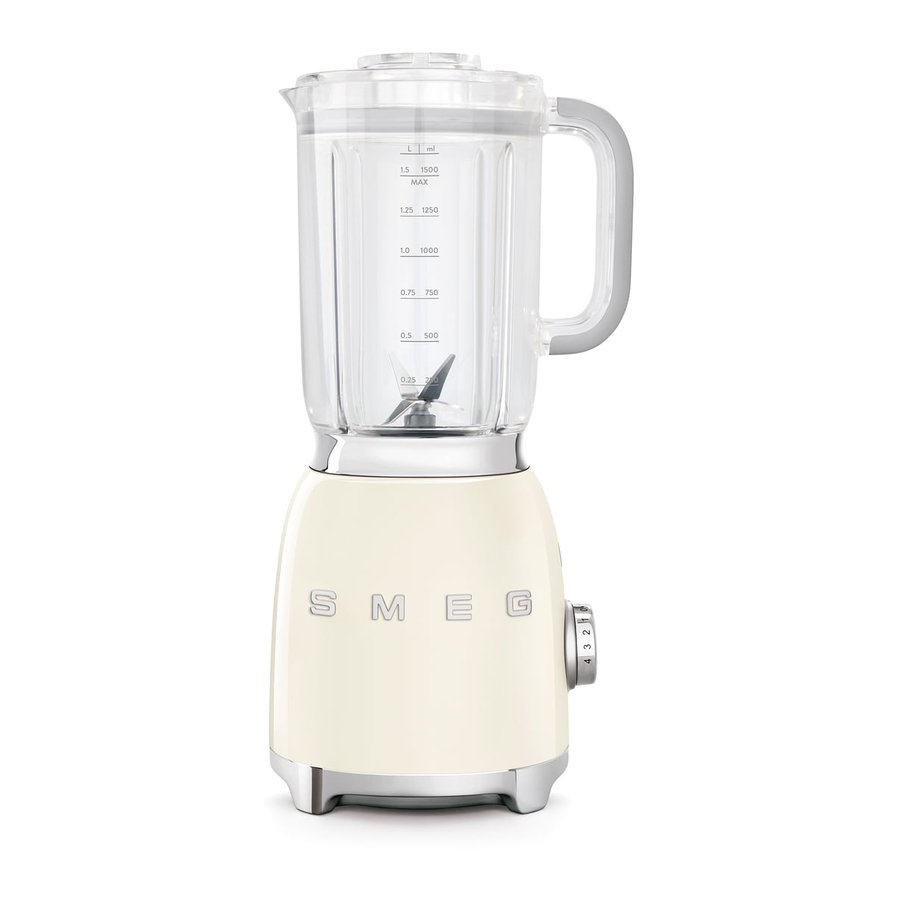
本製品について 2 本製品について 2.1 各部名称 BLF01 モデル - ミキサー 計量カップ 注ぎ口付きミキサーふた Tritan 製 BPA フリーミキサー容器(1.5 リットル) ミキサーカッター(取り外し可) ミキサー本体 パルスボタン 調節ダイヤル スタート / ストップボタン ハンドル コード巻取りベース... -
Page 9: 各部について
本製品について 2.2 各部について 計量カップ(1) Tritan 製 BPA フリーミキサー容器 (1.5 リットル) (3) 材料の計量とミキサー容器からカッター を取り外す際に使用することができる便 利な計量カップです。 「3.2 ミキサーカッ ターの取リ外し方」 を参照してください。 注ぎ口付きミキサーふた(2) 大きなミキサー容器は、安全で軽く、扱 いやすい Tritan 製です。さらに、こ の Tritan は、衝撃や傷、高温にも優 れた耐久性を持っています。ミキサー容 器には注ぎ口が付いており、リットルと それに相当するカップ量を示す目盛りが 刻まれています。その容量は、最小目 盛り 0.25 リットルから最大目盛り 1.5 リットルまでとなっています。 このふたにはパッキンがついており、ミ キサー容器を密閉します。さらに、ミキ サーの使用中に材料を追加しやすくする ため、中央に穴が開いています。... - Page 10 本製品について ミキサーカッター<取り外し可>(4) ミキサー本体(5) ステンレス製のミキサーカッターは氷を 内部には 500W のモータが収納されて 砕いたり、ミルクセーキやスムージーや います。 カクテルなどを作る事ができます。 洗う際はミキサー容器の底部分から取り 外すことができます。 本製品への損傷を避けるため、 鋭 利 な カ ッ タ ー このミキサーには安全ロックが 裂傷の危険 付いております。 • ミキサーカッターに手を触れない ミキサー容器が取り外されると でください。 運転を中断します。 さらに、 オー ミキサーカッターを取り外す際は、 バーヒートを検出するとモータ • 「3.2 ミキサーカッターの取リ外し 保護装置が作動します。 方」の指示に従い、必ず、計量カッ プを使用してください。 食品と接触する付属品は現行の 法律に適合した素材で作られて います。...
- Page 11 本製品について パルスボタン(6) スタート / ストップボタン(8) 最高速度でブレンディングしたい時は、 ミキサーの運転を開始したり、停止した このパルスボタンを押してください。特 りする際は、このスタート / ストップボ に多くの材料を使用する時に最適な機能 タンを押してください。 となっています。一度に使用できるのは 2 秒までとなっています。 調節ダイヤル(7) この調節ダイヤルでは、4段階のスピー ド設定に加え、スムージーモードと砕氷 モードの 2 つのモードが備えられてい ます。 設定するスピードに関しては「3.5 ス ピードの設定について」を参照してくだ さい。...
-
Page 12: ご使用について
ご使用について 3 ご使用について 3.2 ミキサーカッターの取リ外し方 ハンドル(1)を持ち、ミキサー容器 を持ち上げます。 感電の危険 • 電源プラグは適切なコンセントに 差し込んでください。 • 変換アダプタを使用しないでくだ さい。 • 延長コードを使用しないでくださ い。 • この注意が守られない場合、感電 や火災、死亡事故などを招くおそ れがあります。 3.1 初めてお使いになる前に すべての梱包材を剥がしてから、湿 らせた布でミキサーの外側部分をき れいにします。 ふた(2)をミキサー容器から取り外 ミキサーからミキサー容器を取り外 して、さらに計量カップ(3) をふた します。 から取り外します。 ミ キ サ ー カ ッ タ ー を 取 り 外 し ま す (... - Page 13 ご使用について ミキサー容器を逆さにして、傾斜の 計量カップを反時計回りに回転させ 無い安定した場所に置きます。計量 て、ミキサー容器に固定されている カップ (3) の下の部分をミキサーカッ ミキサーカッター(4)を緩めます。 ターのベース部分に差し込みます。 ミキサー容器本体 からミキサーカッ ター(4)を手で抜き取ります。...
-
Page 14: ミキサーの使い方
ご使用について 3.3 ミキサーの使い方 ミキサー容器と計量カップ、 ミキサー カッターを洗います。 (ミキサーカッターは食器洗い機で洗 ミキサー容器を本体部分にセットし わないでください) ます。 ご使用についてのヒント ミキサー容器を食器洗い機で洗う際 は、逆さにしないようにしてください (下の図を参照) 。 ミキサー容器に材料を入れます。最 大容量(1.5 リットル)を超えないよ うに注意してください。 しっかり乾燥させてから、ミキサー カッターをミキサー容器にセットし ます。ミキサーカッターを正しい位 置にセットできているか確認してく ださい。... - Page 15 ご使用について 計量カップをセットした状態でふた このパルスボタンは単体で使用 をミキサー容器にセットします。ふ したり、調理の途中で最高速度 たがしっかり閉まっているか確認し にするために 1 から 3 のスピー てください。 ドと合わせて使用することがで きます。 スタートボタンを押すとブレンディ ングがスタートします。使用目的に 適したスピード設定については、 「3.5 スピードの設定について」の表を参 照してください。 ミキサーの電源プラグをコンセント に差し込みます。赤い LED ランプが ス ピ ー ド 1 か ら 4 は、 継 続 し 点灯し、電源が入っていることを確 てブレンディングすることがで 認します。お好みのスピードもしく きます。ストップボタンを押す は調節ダイヤルでプログラムを選ぶ...
- Page 16 ご使用について 運転している最中でも他の材料を追 終了後、1 から 4 のスピードを設定 加することができます。計量カップ した場合は、ストップボタンを押し を外して、ふたにあいた穴から追加 て、調節ダイヤルを「0」に合わせた したい材料を入れてください。 後に、コンセントからミキサーの電 源プラグを抜いてください。 運転を中断する スタート / ストップボタンを押すことで 中断させることができます。...
-
Page 17: 機能について
ご使用について 3.4 機能について 最適なブレンディングを実現するため にスピードを自動修正、停止する 2 つ の機能です。 安全ロック このミキサーには、ミキサー本体から容 ■砕氷プログラム 器を取り外すと自動でミキサーの電源が 氷や冷凍した果物を使った飲み物をブレ 切れる安全ロック機能が備えられていま ンディングするには、短時間で一気に処 す。さらに、オーバーヒートを検出する 理する砕氷プログラムを使用してくださ と作動するモータ保護装置も備えられて い。 います。 ■スムージープログラム 果物やアイスクリーム、ヨーグルトなど スムーズスタート機能 をブレンディングしたり、クリーミーな スムーズスタート機能とは、調節ダイ フラッペを作る際には、このスムージー ヤルで設定したスピードとは関係なく、 プログラムを使用してください。 ゆっくりとしたスピードでブレンディン グを開始する機能です。 このスピードは徐々に加速し、指定した 《事前設定されている時間》 速度へと達します。 砕氷プログラム:約 50 秒間 このスムーズスタート機能を使うこと スムージープログラム:約 60 秒間 で、材料を徐々に処理し、ブレンディン... -
Page 18: スピードの設定について
ご使用について 3.5 スピードの設定について スピード 使用例 • 氷 • クリーニング機能( 「4.4 クリーニング機能の使い方」 ) パルス • ムースやシャーベット 1 または 2 • ドレッシング • フローズンドリンク • ソースやスープ 3 または 4 • 生クリーム • 果物や野菜のペーストやピューレ • スムージー • フラッペとミルクセーキ スムージー • 冷凍果物を使ったミルクセーキ • 氷 •... - Page 19 ご使用について ミキサーを使用する際の ヒント • しっかりとブレンディングするため に材料は四角状にカットすることを お勧めします。 • 乾燥した材料を使用する場合は、パ ルスモードを一度に 2 秒以上使用し ないでください。必要に応じて、ブ レンディングを中断し、へらを使っ てミキサー容器の側面に付着した材 料を下に落としてください。 • 水分を含んだ材料と乾燥した材料を 同時に使用する際は、先に水分を含 んだ材料を入れてから乾燥した材料 を追加するようにしてください。 • ミキサーカッターを破損する可能性 があるので、果物の芯は取り除いて ください。 • 食材をミキサー容器内に放置しない でください。食材が付着したままで 放置すると乾燥してしまい、取り除 きにくくなることがあります。簡単 に取り除けない場合は、少量のお湯 を入れて、柔らかくなるまで放置し てください。...
-
Page 20: お手入れについて
お手入れについて 4 お手入れについて 裂傷の危険 4.1 注意事項 • ミキサーカッターに手を触れないで ください。 感電の危険 • ミキサーカッターを取り外す際は、 必ず付属の計量カップを使用してく ださい。 ミキサーのお手入れを始める前に、 • コンセントから電源プラグを抜い てください。 4.3 ミキサー容器とミキサーカッター ミキサー本体部分を水やその他の • のお手入れ 液体に浸さないでください。 ミキサー容器及びミキサーカッターを洗 う際は、鋭利な道具や強力な洗剤を使用 せず、柔らかいスポンジと薄めた中性洗 表面を破損する危険 剤を使用してください。また、ミキサー • 本製品のお手入れに高圧スチーム カッターに直接手を触れない等、取り扱 を使用しないでください。 いには十分注意してください。 • 塩素、アンモニアを使用した洗剤ま たは漂白剤を使用しないでくださ 4.4 クリーニング機能の使い方 い。 ミキサー容器とミキサーカッターは、... -
Page 21: 故障かな?と思ったら
お手入れについて 4.6 故障かな?と思ったら 問題 原因 対策 モータがオーバーヒー 電源プラグを抜いて、 トしている モータが冷めるまでお待 ちください。 電源プラグがコンセン 電源プラグをコンセント トに差し込まれていな に差し込みます。変換ア モータが動かない い ダプタや延長コードを使 用しないでください。 「お客様相談窓口」へ コードが破損している ご連絡ください。 ミキサーが安定した面に ミキサーを平らな安定し た場所に置いてくださ 置かれていない い。 ゴムの滑り防止脚が摩 「お客様相談窓口」に連 絡 し て 修 理 を 依 頼 し て 耗している ミキサーが揺れる... - Page 22 お手入れについて 問題 原因 対策 ミキサーの電源は入るが、 ミキサー容器がモータ本 ミキサー容器を取り外し ミキサーカッターが回転 体に正しくセットされて て、専用ベースに正しく しない いない。 セットし直してください。 使用中にミキサーが停止 モータがオーバーヒート 電源プラグ抜いて、モー する している タが冷めるまでお待ちく ださい。 LED ランプが点滅する ミキサー容器が専用ベー ベースのミキサー容器の スに正しくセットされて 位置を確認してください。 いない 使用中にミキサーが停止 ミキサーカッターが妨害 電源プラグを抜いて、 し、白の LED ランプが点 されている へら等を使いミキサー 滅する カッターを妨害している ものを取り除いてくださ い。 それでも問題が解消しない、 もしくはその他の問題が発生...
-
Page 23: レシピ
レシピ 5 レシピ ミックススムージー 豆乳 材料 材料 黄色大豆 100g 種を取り除いて、細かくカットした 桃(またはその缶詰)2 個 水 1.4 リットル 冷凍ラズベリー 125g 冷凍イチゴ 125g 作り方 黄色大豆 100g を水洗いして、冷水に オレンジジュース 125ml リンゴジュース 125ml 浸した状態で、ふたをして 18 時間か ら 24 時間寝かします。 作り方 24 時間が経過したら、大豆をよく洗 桃とすべてのジュースをミキサー容 い、水を切ってから 400ml の水と一 器に入れます。... - Page 24 レシピ 生クリーム 野菜のピューレ 材料 材料 冷えた生クリーム 500ml ズッキーニ 300g パウダーシュガー 50g 水またはブイヨンスープ 100g 作り方 作り方 冷えた生クリームをミキサー容器に ズッキーニを蒸して、2~3cm 角に切 入れ、スピード 3 で約 30 秒間、泡 り分けます。 立てます。 切り分けた野菜をミキサー容器に入 パウダーシュガーを追加します。 れ、滑らかなクリーム状になるまで、 スピード 4 を選んで、15 秒間、完全 水またはブイヨンスープを少しずつ に泡立つまでブレンディングします。 加えながら、スピード 4 で 45 秒間 ブレンディングします。...
- Page 26 Un elettrodomestico Smeg, infatti, si coordina sempre perfettamente con altri prodotti in gamma e, nel contempo, può costituire un oggetto di design per la cucina. AugurandoLe di apprezzare appieno le funzionalità del Suo elettrodomestico, Le porgiamo i nostri più...
- Page 27 4.5 Pulizia delle altre parti del frullatore 4.6 Cosa fare se... 5 Ricette Consigliamo di leggere attentamente questo manuale, che riporta tutte le indicazioni per mantenere inalterate le qualità estetiche e funzionali dell’apparecchio acquistato. Per ulteriori informazioni sul prodotto: www.smeg.com...
-
Page 28: Avvertenze
Avvertenze 1 Avvertenze 1.2 Questo manuale d’uso Questo manuale d’uso costituisce parte 1.1 Introduzione integrante dell’apparecchio e deve essere conservato integro e a portata di mano Informazioni importanti per l’utente: dell’utente per tutto il ciclo di vita Avvertenze dell’apparecchio. Informazioni generali su questo 1.3 Destinazione d’uso manuale d’uso, di sicurezza e per lo smaltimento finale. -
Page 29: Avvertenze Generali Di Sicurezza
Avvertenze 1.4 Avvertenze generali di sicurezza Seguire tutte le avvertenze di sicurezza per • In caso di guasto fare riparare un utilizzo sicuro dell’apparecchio. l’apparecchio esclusivamente da un tecnico qualificato. • Prima di utilizzare l’apparecchio leggere attentamente questo manuale d’uso. •... - Page 30 Avvertenze Per questo apparecchio • Durante il funzionamento evitare il • Non utilizzare il frullatore per riporre contatto con le parti in movimento. oggetti. Tenere il frullatore vuoto prima e Tenere mani, capelli, vestiti e utensili dopo l’uso. lontano dalle lame durante il •...
-
Page 31: Responsabilità Del Costruttore
Avvertenze 1.5 Responsabilità del costruttore • Le vecchie apparecchiature elettriche non devono essere smaltite insieme ai Il costruttore declina ogni responsabilità per rifiuti domestici! Nel rispetto della danni subiti da persone e cose causati da: legislazione vigente, gli apparecchi • uso dell’apparecchio diverso da quello elettrici giunti a fine vita devono essere previsto;... -
Page 32: Descrizione
Descrizione 2 Descrizione 2.1 Descrizione del prodotto Modello BLF01 - Frullatore 1 Tappo dosatore 2 Coperchio con foro versatore 3 Caraffa in Tritan senza BPA da 1,5 litri 4 Gruppo lame rimovibile 5 Base del motore 6 Pulsante Pulse 7 Manopola di comando... -
Page 33: Descrizione Delle Parti
Descrizione 2.2 Descrizione delle parti Tappo dosatore (1) Caraffa in Tritan senza BPA da 1,5 litri (3) Comodo tappo dosatore. Può essere utilizzato per dosare gli ingredienti e per svitare il gruppo lame dalla base della caraffa. Vedi ”3.2 Come rimuovere il gruppo lame”. - Page 34 Descrizione Gruppo lame rimovibile (4) Base del motore (5) Il gruppo lame rimovibile in acciaio inox permette di tritare cubetti di ghiaccio o La base racchiude un potente motore da preparare frullati, frappè, cocktail, ecc. 800 Watt. Può essere svitato dalla base della caraffa Per evitare danni all’apparecchio, per effettuarne la pulizia.
- Page 35 Descrizione Pulsante Pulse (6) Pulsante START/STOP (8) Premere il pulsante Pulse per frullare alla Premere il pulsante START/STOP per massima velocità. Perfetto per le operazioni avviare/arrestare il frullatore. più complesse. Può essere utilizzato per un massimo di 2 secondi alla volta. Manopola di comando (7) La manopola di comando permette di selezionare una delle quattro velocità...
-
Page 36: Uso
3 Uso 3.2 Come rimuovere il gruppo lame 1. Afferrare la maniglia (1) e sollevare la caraffa del frullatore. Pericolo di folgorazione • Inserire la spina in una presa di corrente conforme e dotata di messa a terra. • Non manomettere la messa a terra. •... - Page 37 3. Capovolgere la caraffa e appoggiarla 4. Ruotare il tappo dosatore in senso su una superficie piana. Introdurre la antiorario e svitare il gruppo lame (4) parte inferiore del tappo dosatore (3) dal corpo della caraffa. Rimuovere nella base del gruppo lame. manualmente il gruppo lame (4) dal corpo della caraffa.
-
Page 38: Modo D'uso Del Frullatore
5. Lavare la caraffa, il tappo dosatore e il 3.3 Modo d’uso del frullatore gruppo lame in acqua calda e sapone o 1. Inserire la caraffa del frullatore nella in lavastoviglie (ad eccezione del base del motore. gruppo lame). La caraffa del frullatore può essere lavata in lavastoviglie inserendola senza capovolgerla (vedi figura sottostante). - Page 39 3. Posizionare il coperchio con il tappo Il pulsante PULSE può essere dosatore sulla caraffa. Assicurarsi che il utilizzato da solo o in coperchio sia ben serrato. combinazione con le velocità comprese tra 1 e 3 per raggiungere la velocità massima. 5.
- Page 40 6. È possibile aggiungere altri ingredienti 7. Al termine della miscelazione, se è stata durante la miscelazione rimuovendo il selezionata una velocità da 1 a 4, tappo dosatore e versando gli premere il pulsante STOP, ruotare la ingredienti attraverso il foro del manopola di comando su ‘0’...
-
Page 41: Funzioni
3.4 Funzioni Blocco di sicurezza Programmi Tritaghiaccio e Smoothie Il frullatore è provvisto di un blocco di I programmi pre-impostati sicurezza che spegne il frullatore ‘Tritaghiaccio’ e ‘Smoothie’ modificano automaticamente alla rimozione della automaticamente la velocità per ottimizzare caraffa del frullatore. Dispone inoltre di un la miscelazione per un tempo impostato di dispositivo di protezione del motore che default per poi disattivarsi... -
Page 42: Suggerimenti Per L'impostazione Della Velocità
3.5 Suggerimenti per l’impostazione della velocità Velocità Adatta per • Cubetti di ghiaccio • Carne • Opzione di pulizia automatica (”4.4 Utilizzo dell’opzione di PULSE pulizia automatica”). • Mousse/Sorbetti 1 o 2 • Pastelle/Condimenti per insalate • Bibite ghiacciate miscelate •... - Page 43 Suggerimenti per utilizzare il frullatore • Per ottenere risultati migliori si consiglia • Non lasciare che i residui di cibo si di tagliare a cubetti il cibo da frullare. secchino all’interno della caraffa e sulle lame per troppo tempo: potrebbero •...
-
Page 44: Pulizia E Manutenzione
Pulizia e manutenzione 4 Pulizia e manutenzione 4.3 Pulizia della caraffa del frullatore e del gruppo lame 4.1 Avvertenze Pulire l’apparecchio seguendo le istruzioni nel paragrafo ”3.2 Come rimuovere il Uso non corretto gruppo lame”. Pericolo di folgorazione Lame affilate •... -
Page 45: Cosa Fare Se
Pulizia e manutenzione 4.6 Cosa fare se... Problema Possibile causa Soluzione Disconnettere dalla corrente Il motore si è surriscaldato. elettrica e lasciare raffreddare il motore. Inserire la spina nella presa di corrente. Non utilizzare La spina non è correttamente adattatori o prolunghe. inserita nella presa di corrente. - Page 46 Pulizia e manutenzione Problema Possibile causa Soluzione La caraffa non è stata inserita Rimuovere la caraffa ed Il frullatore si accende, ma le correttamente nella propria inserirla correttamente nella lame non girano base. propria base. Disconnettere dalla corrente Il frullatore si ferma durante il Il motore si è...
-
Page 47: Ricette
Ricette 5 Ricette Latte di soia Mix di frutta Ingredienti per 1 litro di latte di soia: Ingredienti: 100 g di soia gialla 2 nettarine denocciolate (o sciroppate) e tagliate a pezzi 1,4 litri di acqua 125 g di lamponi surgelati 125 g di fragole congelate Esecuzione 125 ml di succo d’arancia... - Page 48 Ricette Panna montata Purea vegetale Ingredienti: Ingredienti: 500 g di panna fredda 300 g di zucchine 50 g di zucchero a velo 100 g di acqua o brodo Esecuzione Esecuzione 1. Montare la panna a velocità 3 per 30 1. Cuocere a vapore le zucchine e tagliarle secondi circa.
- Page 50 By choosing one of our products, you have selected an appliance which combines iconic style with innovative technical design and attention to detail. This appliance co-ordinates perfectly with other Smeg products, or works equally great as a standalone statement piece in your kitchen.
- Page 51 4.5 Cleaning other blender parts 4.6 What to do if... 5 Recipes We advise you to read this manual carefully, as it contains all the instructions for maintaining the appliance’s aesthetic and functional qualities. For further information on the product: www.smeg.com...
-
Page 52: Instructions
Instructions 1 Instructions 1.2 This user manual This user manual is an integral part of the 1.1 Introduction appliance and must therefore be kept in its entirety and within the user’s reach for the Key information for the user: whole working life of the appliance. Instructions 1.3 Intended use General information on this user... -
Page 53: General Safety Instructions
Instructions 1.4 General safety instructions Follow all safety instructions in order to be • In the event of a fault, repairs should only able to use the appliance safely. be carried out by a qualified engineer. • Read this user manual carefully before •... - Page 54 Instructions For this appliance • Avoid touching moving parts. Keep • Do not use the blender as a storage hands, hair and clothing, and utensils compartment. Keep it empty before and away from the blades during operation, after use. to prevent personal injury and/or •...
-
Page 55: Manufacturer Liability
Instructions 1.5 Manufacturer liability • Old appliances do not belong in household waste! To comply with The manufacturer shall not be liable for current legislation, old appliances, on damage to persons or property caused by: reaching the end of their useful lives, •... -
Page 56: Description
Description 2 Description 2.1 Product description Model BLF01 - Blender 1 Measuring cup 2 Lid with pouring hole 3 1.5 litre Tritan BPA-Free jug 4 Detachable blade assembly 5 Motor base 6 Pulse button 7 Control knob 8 START/STOP button... -
Page 57: Description Of Parts
Description 2.2 Description of parts Measuring cup (1) 1.5 litre Tritan BPA-Free jug (3) Convenient measuring cup. It can be used for measuring ingredients and as a device to unscrew the blade assembly from the base of the jug. See ”3.2 How to remove the blade assembly”. - Page 58 Description Detachable blade assembly (4) Motor base (5) Stainless steel detachable blade to crush ice cubes and prepare delicious smoothies, The base houses a powerful 800 watt motor. milkshakes, cocktails, etc. To avoid damage to the blender, It can be unscrewed from the base of the the appliance is equipped with a jug to be cleaned.
- Page 59 Description Pulse button (6) START/STOP button (8) Press this button to get the maximum Press this button to start/stop blender blending speed. Perfect for most operation. demanding tasks. It can be used for a maximum of 2 seconds at a time. Control knob (7) The control knob allows you to select one of the four speeds available from 1 to 4.
-
Page 60: Use
3 Use 3.2 How to remove the blade assembly 1. Take hold of the handle (1) and lift the Danger of electrocution blender jug. • Plug into a earthed 3-prong outlet. • Do not remove the earth prong. • Do not use an adapter. •... - Page 61 3. Turn the jug upside down and place it on 4. Unscrew the blade assembly (4) from the a flat surface. Insert the open end of the jug body, turning the measuring cup anti- measuring cup (3) into the base of the clockwise.
-
Page 62: Using The Blender
5. Wash the jug, measuring cup, and blade 3.3 Using the blender assembly in warm soapy water or in the 1. Insert the blender jug onto the motor dishwasher (apart from the blade base. assembly). The blender jug can be washed in a dishwasher without placing it upside down (see picture below). - Page 63 3. Position the lid with the measuring cup The PULSE button can be used fitted onto the blender jug. Ensure the lid alone or in combination with is firmly screwed on. speeds 1 to 3 to reach the maximum speed. 5.
- Page 64 6. You can add further ingredients whilst 7. If you have selected a speed between 1 blending by removing the measuring cup and 4, when you have finished blending, and pouring ingredients through the hole press the STOP button, turn the knob to ‘0’ in the lid.
-
Page 65: Functions
3.4 Functions Ice Crush and Smoothie Safety lock system The pre-set ‘Ice Crush’ and ‘Smoothie’ The blender has a safety lock system which programs automatically adjust the speed to automatically shuts off the blender when the optimise blending results for a certain jug is removed from the base. -
Page 66: Speed Setting Suggestions
3.5 Speed setting suggestions Speed Suitable for • Ice cubes • Meat • Self-clean option (”4.4 Using the Self-clean option”). PULSE • Mousses/Sorbets 1 or 2 • Batters/Salad dressings • Blended frozen drinks • Soups/Creamed soups • Whipped cream 3 or 4 •... - Page 67 Tips for using your blender • Cut into cubes the food to be blended to • Do not leave food residues dry on the obtain better results. jug and blades for too long, as they could be very difficult to remove. If you •...
-
Page 68: Cleaning And Care
Cleaning and care 4 Cleaning and care 4.3 Cleaning the blender jug and blade assembly 4.1 Instructions Clean the appliance following the instructions in section ”3.2 How to remove Improper use the blade assembly”. Danger of electrocution Sharp blades • Unplug the blender before cleaning it. Danger of cuts •... -
Page 69: What To Do If
Cleaning and care 4.6 What to do if... Problem Possible cause Solution Unplug the blender and The motor has overheated. leave the motor to cool. Insert the plug into the power socket. Do not use adaptors The plug is not properly or extensions. - Page 70 Cleaning and care Problem Possible cause Solution The blender switches on, but The jug has not been Remove the jug from its base correctly locked into its base. and lock it into place. the blades do not turn The blender stops while Unplug the blender and The motor has overheated.
-
Page 71: Recipes
Recipes 5 Recipes Soy milk Mixed fruit smoothie Ingredients for 1 litre of soy milk: Ingredients: 100 g yellow soy beans 2 nectarines, stones removed (or tinned peaches in syrup) and cut into pieces 1.4 litres water 125 g frozen raspberries 125 g frozen strawberries Method 125 ml orange juice... - Page 72 Recipes Whipped cream Vegetable purée Ingredients: Ingredients: 500 g cold whipping cream 300 g courgettes 50 g icing sugar 100 g water or vegetable stock Method Method 1. Whip the cream in the blender at speed 1. Steam the courgettes and cut them into 3 for approximately 30 seconds.
- Page 74 Cet appareil peut être parfaitement associé aux autres produits Smeg ; utilisé seul, il contribue à donner une touche de style à votre cuisine. Nous espérons que vous pourrez apprécier pleinement votre nouvel appareil électroménager.
- Page 75 4.5 Nettoyage des autres parties du mixeur 4.6 Quoi faire si… 5 Recettes Nous conseillons de lire attentivement ce manuel qui contient toutes les indications nécessaires pour préserver les caractéristiques esthétiques et fonctionnelles de l’appareil acheté. Pour toute information complémentaire concernant le produit : www.smeg.com...
-
Page 76: Avertissements
Avertissements 1 Avertissements 1.2 Ce manuel d’utilisation Ce manuel d’utilisation fait partie intégrante 1.1 Introduction de l’appareil. Conservez-le en parfait état et à portée de main de l’utilisateur pendant Informations importantes pour l’utilisateur : tout le cycle de vie de l’appareil. Avertissements 1.3 Usage prévu Informations générales sur ce... -
Page 77: Avertissements Généraux De Sécurité
Avertissements 1.4 Avertissements généraux de sécurité Suivez tous les avertissements de sécurité • En cas de panne, confiez l’appareil pour une utilisation sûre de l’appareil. exclusivement à un technicien qualifié pour la réparation. • Avant d’utiliser l’appareil, lire attentivement ce manuel d’utilisation. •... - Page 78 Avertissements Pour cet appareil • Durant le fonctionnement, évitez le • N’utilisez pas le mixeur pour y ranger les contact avec les parties en mouvement. objets. Le mixeur doit rester vide avant et Éloignez les mains, les cheveux, les après l’utilisation. vêtements et les ustensiles à...
-
Page 79: Responsabilité Du Fabricant
Avertissements 1.5 Responsabilité du fabricant • Les anciens appareils électriques ne doivent pas être éliminés avec les Le fabricant décline toute responsabilité en déchets domestiques ! Dans le respect cas de dommages subis par les personnes de la législation en vigueur, les appareils et les biens, causés par : électriques arrivés au terme de leur vie •... -
Page 80: Description
Description 2 Description 2.1 Description du produit Modèle BLF01 - Mixeur 1 Bouchon doseur 2 Couvercle avec trou verseur 3 Carafe en Tritan sans BPA de 1,5 litre 4 Groupe amovible des lames 5 Base du moteur 6 Bouton Pulse... -
Page 81: Description Des Pièces
Description 2.2 Description des pièces Bouchon doseur (1) Carafe en Tritan sans BPA de 1,5 litre (3) Bouchon doseur pratique. Il peut être utilisé pour doser les ingrédients et pour dévisser le groupe des lames de la base de la carafe. - Page 82 Description Groupe amovible des lames (4) Base du moteur (5) Le groupe amovible des lames en acier inox permet de broyer des glaçons ou de La base contient un moteur puissant de préparer des purées de fruits, des milk- 800 Watt. shakes, des cocktails, etc.
- Page 83 Description Bouton Pulse (6) Bouton START/STOP (8) Appuyez sur le bouton Pulse pour mixer à Appuyez sur le bouton START/STOP pour la vitesse maximale. Parfait pour les démarrer/arrêter le mixeur. opérations les plus complexes. Il peut être utilisé pendant un maximum de 2 secondes à...
-
Page 84: Utilisation
Utilisation 3 Utilisation 3.2 Comment démonter le groupe des lames 1. Saisissez la poignée (1) et soulevez la Danger d’électrocution carafe du mixeur. • Branchez la fiche sur une prise de courant conforme et munie d’une mise à la terre. •... - Page 85 Utilisation 3. Retournez la carafe et posez-la sur une 4. Tournez le bouchon doseur en sens surface plane. Introduisez la partie inverse horaire et dévissez le groupe des inférieure du bouchon doseur (3) dans la lames (4) du corps de la carafe. base du groupe des lames.
-
Page 86: Mode D'emploi Du Mixeur
Utilisation 5. Lavez la carafe, le bouchon doseur et le 3.3 Mode d’emploi du mixeur groupe des lames dans de l’eau chaude 1. Insérez la carafe du mixeur dans la base ou au lave-vaisselle (à l’exception du du moteur. groupe des lames). Il est possible de laver la carafe du mixeur au lave-vaisselle. - Page 87 Utilisation 3. Positionnez le couvercle avec le Le bouton PULSE peut être utilisé bouchon doseur sur la carafe. Assurez- seul ou associé à des vitesses vous que le couvercle est serré. comprises entre 1 et 3 pour atteindre la vitesse maximale. 5.
- Page 88 Utilisation 6. Vous pouvez ajouter d’autres ingrédients 7. Au terme du mélange, si vous avez durant le mélange en enlevant le sélectionné une vitesse entre 1 et 4, bouchon doseur et en versant les appuyez sur le bouton STOP, tournez la ingrédients à...
-
Page 89: Fonctions
Utilisation 3.4 Fonctions Blocage de sécurité Programmes Glace pilée et Smoothie Le mixeur est muni d’un blocage de sécurité Les programmes présélectionnés ‘Glace qui éteint automatiquement ce dernier pilée’ et ‘Smoothie’ modifient lorsque vous enlevez la carafe. Il dispose automatiquement la vitesse pour optimiser également d’un dispositif de protection du le mélange pendant un temps sélectionné... -
Page 90: Suggestions Pour Le Réglage De La Vitesse
Utilisation 3.5 Suggestions pour le réglage de la vitesse Vitesse Conseillée pour • Glaçons • Viande • Options de nettoyage automatique (« 4.4 Utilisation de l’option PULSE de nettoyage automatique »). • Mousse/Sorbets 1 ou 2 • Pâte à frire/Condiments pour salades •... - Page 91 Utilisation Suggestions pour utiliser le mixeur • Pour obtenir les meilleurs résultats, il est • Ne laissez pas les résidus d’aliments conseillé de couper les aliments à mixer sécher trop longtemps à l’intérieur de la en morceaux. carafe et sur les lames : il pourrait être très difficile de les éliminer.
-
Page 92: Nettoyage Et Entretien
Nettoyage et entretien 4 Nettoyage et entretien 4.3 Nettoyage de la carafe du mixeur et du groupe des lames 4.1 Avertissements Nettoyez l’appareil en suivant les instructions fournies au paragraphe « 3.2 Utilisation impropre Comment démonter le groupe des lames ». Danger d’électrocution Lames affûtées •... -
Page 93: Quoi Faire Si
Nettoyage et entretien 4.6 Quoi faire si… Problème Cause possible Solution Débranchez du secteur et Le moteur a surchauffé. laissez refroidir le moteur. Branchez la fiche sur la prise de courant. N’utilisez ni La fiche n’est pas d’adaptateurs ni de correctement branchée sur la rallonges. - Page 94 Nettoyage et entretien Problème Cause possible Solution La carafe n’a pas été Enlevez la carafe et insérez- Le mixeur s’allume, mais les correctement insérée dans sa la correctement dans sa lames ne tournent pas base. base. Le mixeur s’arrête durant le Débranchez du secteur et Le moteur a surchauffé.
-
Page 95: Recettes
Recettes 5 Recettes Lait de soja Mélange de fruits Ingrédients : Ingrédients : 100 g de soja jaune 2 nectarines dénoyautées (ou au sirop) et coupées en morceaux 1,4 litre d’eau 125 g de framboises surgelées 125 g de fraises surgelées Préparation 125 ml de jus d’orange 1. - Page 96 Recettes Crème chantilly Purée végétale Ingrédients : Ingrédients : 500 g de crème fraîche froide 300 g de courgettes 50 g de sucre glace 100 g d’eau ou de bouillon Préparation Préparation 1. Montez la crème chantilly à la vitesse 3 1.
- Page 98 Verbindung des ikonischen Stils, einer innovativen Entwurfstechnik und der Liebe zum Detail entstand. Dieses Gerät läßt sich mit allen anderen Smeg-Produkten auf harmonische Weise kombinieren und verleiht jeder Küche einen einzigartigen Stil. Wir hoffen, dass Sie Ihr neues Haushaltsgerät voll und ganz schätzen werden.
- Page 99 4.6 Was tun, wenn... 5 Rezepte Wir empfehlen Ihnen, dieses Bedienungshandbuch sorgfältig durchzulesen. Hier finden Sie wichtige Hinweise, um die Ästhetik und Funktionalität Ihres Gerätes wie neu erhalten zu können. Weitere Informationen zu den Produkten sind auf der Internetseite www.smeg.com verfügbar.
-
Page 100: Hinweise
Hinweise 1 Hinweise 1.2 Dieses Bedienungshandbuch Das vorliegende Bedienungshandbuch ist 1.1 Einleitung ein fester Bestandteil des Gerätes und ist deshalb für die ganze Lebensdauer des Wichtige Hinweise für den Benutzer: Gerätes sorgfältig und in Reichweite Hinweise aufzubewahren. Allgemeine Informationen über 1.3 Zweckbestimmung dieses Bedienungshandbuch, die Sicherheit und die Entsorgung. -
Page 101: Allgemeine Sicherheitshinweise
Hinweise 1.4 Allgemeine Sicherheitshinweise Beachten Sie immer alle Sicherheitshinweise, • Im Schadensfall darf das Gerät nur von um den sicheren Gebrauch des Geräts zu einem qualifizierten Techniker repariert gewährleisten. werden. • Lesen Sie vor dem Gebrauch des Gerätes • Modifizieren Sie das Gerät niemals. diese Bedienungsanleitung genau durch. - Page 102 Hinweise Für dieses Gerät • Während des Betriebs den Kontakt mit den • Verwenden Sie den Standmixer, um sich bewegenden Geräteteilen vermeiden. Gegenstände darin aufzubewahren. Der Während des Betriebs müssen Hände, Standmixer sollte vor und nach dem Haare, Kleidungsstücke und Gebrauch leer sein.
-
Page 103: Haftung Des Herstellers
Hinweise 1.5 Haftung des Herstellers • Elektroaltgeräte gehören nicht in den Hausmüll! In Übereinstimmung mit den Der Hersteller haftet nicht für Personen- und geltenden Gesetzen müssen Sachschäden, die auf die folgenden Elektroaltgeräte am Ende ihrer Ursachen zurückzuführen sind: Lebenszeit in speziellen Recyclinghöfen •... -
Page 104: Beschreibung
Beschreibung 2 Beschreibung 2.1 Produktbeschreibung Modell BLF01 - Standmixer 1 Dosierkappe 2 Deckel mit Einfüllöffnung 3 Behälter aus Tritan ohne BPA für 1,5 Liter 4 Entfernbare Messerbaugruppe 5 Motorbasis 6 Pulse Knopf 7 Bedienknebel 8 START/STOP Knopf 9 Griff 10 Kabelstauraum... -
Page 105: Beschreibung Der Teile
Beschreibung 2.2 Beschreibung der Teile Dosierkappe Behälter aus Tritan ohne BPA für 1,5 Liter (3) Bequeme Dosierkappe. Kann verwendet werden, um die Zutaten zu dosieren und um die Messerbaugruppe von der Basis des Behälters abzuschrauben. Siehe „3.2 Wie die Messerbaugruppe entfernt wird“. Der große Behälter besteht aus Tritan Deckel mit Einfüllöffnung (2) dieses Material ist sicherer, leichter und... - Page 106 Beschreibung Entfernbare Messerbaugruppe (4) Motorbasis (5) Die entfernbare Messerbaugruppe aus rostfreiem Stahl kann Eiswürfel zerkleinern In der Basis befindet sich ein leistungsstarker oder Shakes, Frappés, Cocktails usw. 800 Watt Motor. zubereiten. Um Schäden am Gerät zu Für die Reinigung kann es von der Basis des vermeiden, verfügt der Standmixer Behälters abgeschraubt werden.
- Page 107 Beschreibung Pulse Knopf (6) START/STOP Knopf (8) Den Pulse Knopf drücken, um bei maximaler Den START/STOP Knopf drücken, um den Geschwindigkeit zu mixen. Perfekt für die Standmixer an-/auszuschalten. komplexeren Vorgänge. Er kann für maximal 2 Sekunden am Stück verwendet werden. Bedienknebel (7) Mit dem Bedienknebel kann eine der vier Geschwindigkeiten, von 1 bis 4,...
-
Page 108: Gebrauch
Gebrauch 3 Gebrauch 3.2 Wie die Messerbaugruppe entfernt wird 1. Den Griff (1) festhalten und den Behälter Stromschlaggefahr des Standmixers nach oben ziehen. • Stecken Sie den Netzstecker in eine mit den gesetzlichen Vorschriften konforme und vorschriftsmäßig geerdete Steckdose. • Die Erdung niemals verändern. •... - Page 109 Gebrauch 3. Den Behälter umdrehen und ihn auf einer 4. Die Dosierkappe gegen den ebenen Oberfläche abstellen. Den Uhrzeigersinn drehen und das unteren Teil der Dosierkappe (3) in die Messerbaugruppe (4) von der Basis des Basis der Messerbaugruppe einführen. Behälters abschrauben. Mit der Hand die Messerbaugruppe (4) von der Basis des Behälters entfernen.
-
Page 110: Gebrauchsanweisung Des Standmixers
Gebrauch 5. Den Behälter, die Dosierkappe und die 3.3 Gebrauchsanweisung des Standmixers Messerbaugruppe mit warmem Wasser 1. Den Behälter des Standmixers in die und Seife oder in der Motorbasis einsetzen. Geschirrspülmaschine (mit Ausnahme der Messerbaugruppe) reinigen. Der Behälter des Standmixers kann in der Spülmaschine gespült werden, sollte dabei aber nicht auf den Kopf gestellt werden (siehe... - Page 111 Gebrauch 3. Den Deckel mit der Dosierkappe auf den Der PULSE Knopf kann allein oder in Behälter platzieren. Sicherstellen, dass Kombination mit den der Deckel fest verschlossen ist. Geschwindigkeiten 1 bis 3 verwendet werden, um die Höchstgeschwindigkeit zu erreichen. 5. Den START Knopf drücken, um mit dem Mixen zu beginnen.
- Page 112 Gebrauch 6. Während des Mischvorgangs können 7. Am Ende des Mischvorgangs, wenn eine weitere Zutaten hinzugefügt werden, Geschwindigkeit zwischen 1 und 4 indem die Dosierkappe entfernt wird und ausgewählt wurde, den STOP Knopf die Zutaten durch die Einfüllöffnung drücken, den Bedienkneble auf ‘0’ eingefüllt werden.
-
Page 113: Funktionen
Gebrauch 3.4 Funktionen Sicherheitssperre Programme Eiscrusher und Smoothie Der Standmixer besitzt eine Sicherheitssperre, Die voreingestellten Programme die den Standmixer automatisch ausschaltet, ‘Eiscrusher’ und ‘Smoothie’ passen die sobald der Behälter des Standmixers entfernt Geschwindigkeit automatisch an, um das wird. Zusätzlich verfügt er über einen Mischen in einer voreingestellten Standard- Motorschutz, der im Falle einer Überlastung Zeit zu optimieren und um sich... -
Page 114: Empfehlungen Für Die Geschwindigkeitsauswahl
Gebrauch 3.5 Empfehlungen für die Geschwindigkeitsauswahl Geschwindigkeit Geeignet für • Eiswürfel • Fleisch • Option Automatische Reinigung („4.4 Gebrauch der Option PULSE Automatische Reinigung“). • Mousse/Sorbets 1 oder 2 • Flüssiger Teig/Salatdressing • Gemischte Eisgetränke • Samtsuppen/Suppen • Schlagsahne 3 oder 4 •... - Page 115 Gebrauch Empfehlungen für den Gebrauch des Standmixers • Die besten Ergebnisse erhält man, wenn • Essensreste sollten nicht zu lange im die Lebensmittel vor dem Mixen in Inneren des Behälters oder auf der Würfel geschnitten werden. Messerbaugruppe trocknen: es könnte sehr schwer sein, diese wieder zu •...
-
Page 116: Reinigung Und Wartung
Reinigung und Wartung 4 Reinigung und Wartung 4.3 Reinigung des Standmixerbehälters und der Messerbaugruppe 4.1 Hinweise Das Gerät unter Befolgung der Anleitungen im Abschnitt „3.2 Wie die Unsachgemäßer Gebrauch Messerbaugruppe entfernt wird“ reinigen. Stromschlaggefahr Scharfe Messer • Vor der Reinigung des Standmixers den Schneidgefahr Stecker aus der Steckdose ziehen. -
Page 117: Was Tun, Wenn
Reinigung und Wartung 4.6 Was tun, wenn... Problem Mögliche Ursache Lösung Das Gerät von der Der Motor ist überhitzt. Stromversorgung trennen. Den Motor abkühlen lassen. Den Netzstecker an die Steckdose anschließen. Keine Adapter oder Der Netzstecker sitzt nicht Verlängerungskabel korrekt in der Steckdose. verwenden. - Page 118 Reinigung und Wartung Problem Mögliche Ursache Lösung Der Standmixer schaltet sich Der Behälter wurde nicht Den Behälter entfernen und an, aber die Messerbaugruppe richtig in seine Basis ihn korrekt in seine Basis eingesetzt. einsetzen. dreht sich nicht Das Gerät von der Der Standmixer hält während Der Motor ist überhitzt.
-
Page 119: Rezepte
Rezepte 5 Rezepte Sojamilch Früchtemix Zutaten: Zutaten: 100 g gelbe Sojabohnen 2 entkernte und in Würfel geschnittene Nektarinen (oder eingelegt) 1,4 Liter Wasser 125 g tiefgefrorene Himbeeren 125 g tiefgefrorene Erdbeeren Zubereitung 125 ml Orangensaft 1. 100 g gelbe Sojabohnen waschen und in kaltem Wasser einweichen lassen, 125 ml Apfelsaft dann zudecken und für 18-24 Stunden... - Page 120 Rezepte Schlagsahne Gemüsepüree Zutaten: Zutaten: 500 g kalte Sahne 300 g Zucchini 50 g Puderzucker 100 g Wasser oder Brühe Zubereitung Zubereitung 1. Die Sahne bei Geschwindigkeit 3 für ca. 1. Die Zucchini dampfgaren und in 30 Sekunden steif schlagen. Stückchen schneiden.
- Page 122 9 1 4 7 7 8 1 8 6 / C...
- Page 123 メーカーは製品改良のため、予告なく変更する権利を有します。そのため、この取扱説明書に記載 されている内容は参考資料であり、必ずしもその正確性を保証するものではありません。 Il costruttore si riserva di apportare senza preavviso tutte le modifiche che riterrà utili al miglioramento dei propri prodotti. Le illustrazioni e le descrizioni contenute in questo manuale non sono quindi impegnative ed hanno solo valore indicativo. The manufacturer reserves the right to make any changes deemed useful for improvement of its products without prior notice.
- Page 124 9 1 4 7 7 8 1 8 6 / C...