Table of Contents
Advertisement
Quick Links
SECTION « A » DESCRIPTION
Introduction. . . . . . . . . . . . . . . . . . . . . . . . . . . . . . . . . . . . . . . . . . . . . . . . .
Construction . . . . . . . . . . . . . . . . . . . . . . . . . . . . . . . . . . . . . . . . . . . . . . . .
Shipping . . . . . . . . . . . . . . . . . . . . . . . . . . . . . . . . . . . . . . . . . . . . . . . . . . . .
Installation warnings . . . . . . . . . . . . . . . . . . . . . . . . . . . . . . . . . . . . . . . . . .
Distances to respect . . . . . . . . . . . . . . . . . . . . . . . . . . . . . . . . . . . . . . . . . . .
Installation . . . . . . . . . . . . . . . . . . . . . . . . . . . . . . . . . . . . . . . . . . . . . . . . . .
Operation / instruction for oven and proofer. . . . . . . . . . . . . . . . . . . . . . . . A6
Operation for proofer. . . . . . . . . . . . . . . . . . . . . . . . . . . . . . . . . . . . . . . . . .
Trouble shooting . . . . . . . . . . . . . . . . . . . . . . . . . . . . . . . . . . . . . . . . . . . . .
Oven maintenance and cleaning . . . . . . . . . . . . . . . . . . . . . . . . . . . . . . . . .
For more information, please call our office: . . . . . . . . . . . . . . . . . . . . . . . A12
Optional auto steam injection. . . . . . . . . . . . . . . . . . . . . . . . . . . . . . . . . . .
Optional watlow control operation. . . . . . . . . . . . . . . . . . . . . . . . . . . . . . .
SECTION « B » DIMENSIONS
Dimensions . . . . . . . . . . . . . . . . . . . . . . . . . . . . . . . . . . . . . . . . . . . . . . . . .
SECTION « E » COMPONENT PARTS
Component parts. . . . . . . . . . . . . . . . . . . . . . . . . . . . . . . . . . . . . . . . . . . .
SECTION « F » CONTROL PANELS
120V/208V/1PH & 120V/240 V/1PH . . . . . . . . . . . . . . . . . . . . . . . . . . . .
120V/208V/3PH & 120V/240 V/3PH . . . . . . . . . . . . . . . . . . . . . . . . . . . .
208V/1PH, 220V/1PH & 240V/1PH . . . . . . . . . . . . . . . . . . . . . . . . . . . . .
208V/3PH & 240V/3PH . . . . . . . . . . . . . . . . . . . . . . . . . . . . . . . . . . . . . . .
220V/1PH/50 Hz . . . . . . . . . . . . . . . . . . . . . . . . . . . . . . . . . . . . . . . . . . . . .
220V/380V/3PH/50 Hz . . . . . . . . . . . . . . . . . . . . . . . . . . . . . . . . . . . . . . . .
120V/208V/1PH & 120V/240V/1PH (WATLOW) . . . . . . . . . . . . . . . . .
120V/208V/3PH & 120V/240V/3PH (WATLOW) . . . . . . . . . . . . . . . . .
SECTION « G » ELECTRIC SCHEMATICS
120V/208V/1PH & 120V/240V/1PH . . . . . . . . . . . . . . . . . . . . . . . . . . . . . G1
120V/208V/1PH & 120V/240V/1PH (DELAY) . . . . . . . . . . . . . . . . . . . . G2
120V/208V/3PH & 120V/240V/3PH . . . . . . . . . . . . . . . . . . . . . . . . . . . . . G3
120V/208V/3PH & 120V/240V/3PH (DELAY) . . . . . . . . . . . . . . . . . . . . G4
208V/1PH, 220V/1PH & 240V/1PH . . . . . . . . . . . . . . . . . . . . . . . . . . . . .
208V/1PH, 220V/1PH & 240V/1PH (DELAY) . . . . . . . . . . . . . . . . . . . .
208V/3PH & 240V/3PH . . . . . . . . . . . . . . . . . . . . . . . . . . . . . . . . . . . . . . .
JAOP3
TABLE OF CONTENTS
PAGE
A1
A2
A2
A3
A4
A5
A8
A9
A11
A13
A14
B1
E1
F1
F3
F5
F7
F9
F11
F13
F15
G5
G6
G7
Advertisement
Table of Contents
Troubleshooting

Related Manuals for Doyon JAOP3


Summary of Contents for Doyon JAOP3
- Page 1 Trouble shooting ..........Oven maintenance and cleaning ....... . .
- Page 2 208V/3PH & 240V/3PH (DELAY) ......220V/1PH/50 Hz ..........220V/380V/3PH/50 Hz .
-
Page 3: Introduction
This Jet Air oven is manufactured with first quality material by experienced technicians. Proper installation and maintenance will guarantee a reliable service for years to come. A nameplate fixed to the front or right side of the oven specifies the model number, serial number, voltage and amperage. -
Page 4: Construction
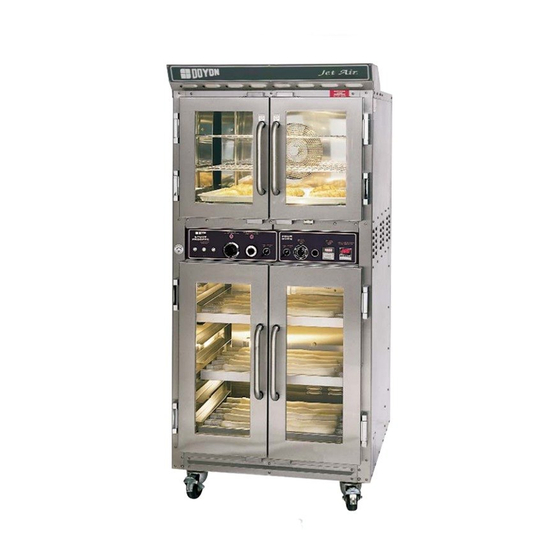
CONSTRUCTION You just bought the most advanced oven in the world, "DOYON" technology at its best. This oven is manufactured using the highest quality components and material. The oven gives a perfect uniform baking with its unique Jet Air convection system. The DOYON oven is designed with parts that are easy to find. -
Page 5: Installation Warnings
Installation and service must be done by specialised technicians. Contact a certified electrician and plumber for set up. The oven must be connected to the utility and electrically grounded in conformity to the effective local regulations. If these are not established, the oven must be connected according to the Canadian Electrical Code (CSA-C22.1-XX) or National Electrical Code (NFPA 70-XX). -
Page 6: Distances To Respect
DISTANCES TO RESPECT Back and sides of the oven: 1 inch. Top of the oven: a clearance of 12 inches to the ceiling must exist to permit adequate venting. Floor: 4 inches minimum. Sides of the oven: do not install other than easily removable equipment for service and maintenance (not closer than 1 inch). -
Page 7: Installation
Connect the steam system (1/4 NPT) to the cold water distribution network. We highly recommend to use a water filter to eliminate minerals in the water. We suggest you to use CUNO # CFS6135 (Doyon part number PLF240). Do not adjust the needle valves, it has been done at the factory. -
Page 8: Trouble Shooting
5. Set the timer to the desired value and start it. (See "TIMER" adjustment on next page.) NOTE: The timer does not shut the oven off at the end of its cycle. It simply activates the buzzer. 6. Wait until the product is ready. Do not open the doors until the product is done. -
Page 9: Instructions For Oven
Steam injection will only work when the ventilator of the oven is working. To inject steam in the oven, press and release the STEAM TIMER button. The light comes on inside the steam button during the steam injection. Steam injection has been factory preset. To have more steam, press steam button a second time, after the light is off. -
Page 10: Operation Of The Proofer
OPERATION OF THE PROOFER 1. Switch "ON". 2. Set the thermostat control at 100 3. Set the humidity control at approximately : 3 for JAOP-3 & JAOP-6 4. If there is too much fog and water drips from the glass doors, adjust humidity control to a lower number. -
Page 11: Trouble Shooting
If the oven is baking too much on the sides, it is possible that the fan is not cycling properly. Verify if the motor turns 2.5 minutes in a direction, stops 30 seconds and starts for 2.5... - Page 12 If there is no heat in the proofer. If there is no humidity in the proofer. The oven must have been heating for at least half an hour before you use the steam system. If not, water will appear at the bottom of the oven.
-
Page 13: Oven Maintenance And Cleaning
• Once a year or as needed, clean the reservoir of the proofer (see parts description for localization). Step by step Clean the inside of the oven and the proofer with water and soap. Take out the grills (the grills of the oven could be cleaned with "Easy-Off"). - Page 14 A 12 FOR MORE INFORMATION, PLEASE CONTACT OUR OFFICE: DOYON EQUIPMENT INC. 1255, rue Principale Linière, Qc, Canada G0M 1J0 Tel. : 1 (418) 685-3431 Canada : 1 (800) 463-1636 U.S. : 1 (800) 463-4273 FAX : 1 (418) 685-3948 Internet: http://www.doyon.qc.ca...
- Page 15 AUTOMATIC STEAM OPTION INTERVALS TIMES SETTING (GREEN) INJECTION TIMES SETTING (RED) SCALE ADJUSTMENT By pushing the GREEN button, the button will light up and the automatic system injection will start. The injection will be done as per the pre-adjustment time on the automatic steam timer. The standard steam timer (white light) will light up during the steam injection.
- Page 16 Digital display must light up, if not verify the breaker on the front panel. 3. Let the oven heat until the set temperature is reached, the LOAD1 red light on the watlow control will go off when the temperature is stabilized.
- Page 17 The Watlow temperature control can record 12 different menus. It must be programmed before use. It will save its programs in case of power failure. Each menu includes 3 "STEPS" and each step includes : • temperature • time • "EVENT" To access the programming mode : •...
- Page 18 CLOCK). The screen will show 00:00. Note: You should always use menu #1 for preheating because the controls starts automatically with this menu. Never use program #1 for a steam cycle because it will start automatically when the oven is Suggested values Suggested values WARNING turned on.
- Page 19 EXAMPLE 2 (Cooking program with steam cycle) -For menu #2, we will program it so that we have a steam injection of 20 seconds, a cooking time of 20 minutes at 375°F followed by a 15 seconds buzzer. To access the programming mode: •...
- Page 20 After fulfillment of this program: • The oven will continue to heat because there was a temperature included in step 3. If the temperature at that step would have been of 0°F, the oven would have stopped at the end of the program.
-
Page 21: Dimensions
SECTION DIMENSIONS... -
Page 26: Component Parts
SECTION COMPONENT PARTS... - Page 28 5A BREAKER ELB097 20A BREAKER ELB098 2A BREAKER(NO 110 VOLTS) ELL650 RED PILOT LIGHT P1419FD RIGHT OVEN DOOR 19 3/8 X 14 9/16 P1419FG LEFT OVEN DOOR 19 3/8 X 14 9/16 QUE500 DOOR GASKET(9`) ELM570 DOOR SWITCH ELM616 ELECTRONIC TIMER OMRON H5CX-L8...
- Page 30 Item Part Number Description QUP520 MAGNETIC HANDLE P1929F-S SUBWAY DOOR OVEN 19 1/2 x 29 1/2 P1929F-S JAOP-3 SUBWAY DOOR OVEN QUE500 DOOR GASKET(9`) STP001 TOP MALE HINGE STP002 TOP FEMALE HINGE STP003 BOTTOM MALE HINGE STP004 BOTTOM FEMALE HINGE...
- Page 32 20A BREAKER ELB096 5A BREAKER ELL650 PILOT LIGHT P1419FG LEFT OVEN DOOR 19 3/8 X 14 9/16 P1419FG LEFT OVEN DOOR 19 3/8 X 14 9/16 P1419FD RIGHT OVEN DOOR 19 3/8 X 14 9/16 P1419FD RIGHT OVEN DOOR 19 3/8 X 14 9/16...
- Page 34 Item Part Number Description ELE165 IMMERSION ELEMENT 120V 1500W ELE130 COIL ELEMENT 120V 1500W ELM730 PROOFER FAN BLOWER ELT712 TRANSFORMER 240/120 50VA(MOD. 220 V ONLY) ELT725 TRANSFORMER 240/120 250VA(MOD. 220 V ONLY) ELT715 TRANSFORMER 240>120 100VA(MOD. 220 V ONLY) ELT725 TRANSFORMER 240/120 250VA(MOD.
- Page 36 ELB097 20A BREAKER ELB098 2A BREAKER(NO 110 VOLTS) ELL650 RED PILOT LIGHT (DELAY OPTION) P1419FD RIGHT OVEN DOOR 19 3/8 X 14 9/16 P1419FG LEFT OVEN DOOR 19 3/8 X 14 9/16 QUE500 DOOR GASKET(10`) ELM570 DOOR SWITCH ELM616 ELECTRONIC TIMER OMRON H5CX-L8...
- Page 37 SECTION CONTROL PANELS...
- Page 39 ELM715 ELC615 ELC617 ELM736 ELC860 ELF960 ELF732 ELM735 SOLID STATE TIMER ICM FOR CH460,JAOP3-G, FC2-G AND E233 ELM614 ELM720 OMRON CONTROL TIMER (11 PIN) H3CR (FOR OPTION DELAY) ELM729 Model : P240S-S5 (JAOP3-E DELAI VAP.) Description TERMINAL BLOCK 3P 175A...
- Page 41 CONTACTOR 2P 30A 110V ELF960 LITTLE-FUSE HOLDER 30A 300V ELF732 LITTLE-FUSE 8A SLO-BLO ELM735 SOLID STATE TIMER ICM FOR CH460,JAOP3-G, FC2-G AND E233 ELM614 OMRON STEAM TIMER H3DE ELM720 OMRON CONTROL TIMER (11 PIN) H3CR (FOR OPTION DELAY) ELM729 11 PIN BASE (FOR OPTION DELAY) Model : P208S-S5 (JAOP3-E DELAI VAP.)
- Page 43 CONTACTOR 2P 30A 110V ELF960 LITTLE-FUSE HOLDER 30A 300V ELF732 LITTLE-FUSE 8A SLO-BLO ELM735 SOLID STATE TIMER ICM FOR CH460,JAOP3-G, FC2-G AND E233 ELM614 OMRON STEAM TIMER H3DE ELM720 OMRON CONTROL TIMER (11 PIN) H3CR (FOR OPTION DELAY) ELM729 11 PIN BASE (FOR OPTION DELAY)
- Page 45 CONTACTOR 2P 30A 110V ELF960 LITTLE-FUSE HOLDER 30A 300V ELF732 LITTLE-FUSE 8A SLO-BLO ELM735 SOLID STATE TIMER ICM FOR CH460,JAOP3-G, FC2-G AND E233 ELM614 OMRON STEAM TIMER H3DE ELM720 OMRON CONTROL TIMER (11 PIN) H3CR (FOR OPTION DELAY) ELM729 11 PIN BASE (FOR OPTION DELAY)
- Page 47 CONTACTOR 2P 30A 110V ELF960 LITTLE-FUSE HOLDER 30A 300V ELF732 LITTLE-FUSE 8A SLO-BLO ELM735 SOLID STATE TIMER ICM FOR CH460,JAOP3-G, FC2-G AND E233 ELM614 OMRON STEAM TIMER H3DE ELM720 OMRON CONTROL TIMER (11 PIN) H3CR (FOR OPTION DELAY) ELM729 11 PIN BASE (FOR OPTION DELAY)
- Page 48 F-11...
- Page 49 CONTACTOR 2P 30A 110V ELF960 LITTLE-FUSE HOLDER 30A 300V ELF732 LITTLE-FUSE 8A SLO-BLO ELM735 SOLID STATE TIMER ICM FOR CH460,JAOP3-G, FC2-G AND E233 ELM614 OMRON STEAM TIMER H3DE ELM720 OMRON CONTROL TIMER (11 PIN) H3CR(OPTION DELAY) ELM729 11 PIN BASE(OPTION DELAY)
- Page 50 F-13...
- Page 51 CONTACTOR 2P 30A 110V ELF960 LITTLE-FUSE HOLDER 30A 300V ELF732 LITTLE-FUSE 8A SLO-BLO ELM735 SOLID STATE TIMER ICM FOR CH460,JAOP3-G, FC2-G AND E233 ELC630 CONTROL RELAY 12A COIL 120V ELC640 CONTROL RELAY BASE ELM720 OMRON CONTROL TIMER (11 PIN) H3CR...
- Page 52 F-15...
- Page 53 CONTACTOR 2P 30A 110V ELF960 LITTLE-FUSE HOLDER 30A 300V ELF732 LITTLE-FUSE 8A SLO-BLO ELM735 SOLID STATE TIMER ICM FOR CH460,JAOP3-G, FC2-G AND E233 ELC630 CONTROL RELAY 12A COIL 120V AND ELC640 CONTROL RELAY BASE ELM720 OMRON CONTROL TIMER (11 PIN) H3CR...
- Page 54 SECTION ELECTRIC SCHEMATICS...
- Page 55 120 / 208 3/4 HP 120 / 240 MOTOR 1 PHASE TOTAL POWER: 19/05/04 STEAM TIMER H3DE OVEN VALVE MODE E 1.5 KW P.L. HEAT P.L. & 11.3 Kw JAOP3 1 PHASE 60 Hz M. FAUCHER STEAM JAOP3V_1 5 & 9...
- Page 56 MUST BE SET AT 5 MIN. ON / OFF / DELAY SELECTOR SWITCH HIGH LIMIT STEAM STEAM TIMER SWITCH H3DE OVEN VALVE MODE E 1.5KW P.L. P.L. HEAT JAOP3 1 PHASE 60 Hz 23/06/04 M. FAUCHER DELAY − STEAM JAP3DV1S...
- Page 57 THIS OVEN (120 / 240V. 3 PH. SYSTEMS). 14/05/04 5 − 6 & 10 STEAM TIMER H3DE B1 15 OVEN VALVE MODE E P.L. 1.5 KW P.L. HEAT 32A 19.5A 11.3 KW JAOP3 3 PHASES 60 Hz M. FAUCHER STEAM JAOP3V_3...
- Page 58 ON / OFF / DELAY SELECTOR SWITCH HIGH LIMIT STEAM TIMER STEAM H3DE SWITCH OVEN VALVE MODE E 1.5 KW P.L. P.L. HEAT 25A 31.7A 19.2A & 11.3 Kw WARNING JAOP3 3 PHASES 60 Hz 19/05/04 M. FAUCHER DELAY − STEAM JAP3DV3S...
- Page 59 PILOT LIGHT 1.5KW PILOT HUMIDITY LIGHT 208V − 240V 1.26KW − 220V 1.5KW HEAT 208V − 240V 1.26KW − 220V 100VA 240−480V> 120−240V ALTERNATE TRANSFORMER JAOP3 1 PHASE 60 Hz 28/06/04 M. FAUCHER STEAM JP32081P 2 − 5 & 9...
- Page 60 1.5KW PILOT HUMIDITY LIGHT 208V − 240V 1.26KW − 220V 1.5KW HEAT 208V − 240V 1.26KW − 220V 100VA 240−480V> 120−240V ALTERNATE TRANSFORMER JAOP3 1 PHASE 60 Hz 28/06/04 M. FAUCHER STEAM − DELAY JP32081P 5 − 7 & 9...
- Page 61 STEAM SWITCH H3DE OVEN VALVE MODE E PILOT LIGHT PILOT LIGHT HEAT 1.5KW − 208V 1.5KW − 240V 1.26KW − 220V 240−480V> 120−240V ALTERNATE TRANSFORMER JAOP3 3 PHASES 60 Hz 28/06/04 M. FAUCHER STEAM JAOP3208 2 − 5 & 9...
- Page 62 H3DE OVEN VALVE MODE E PILOT LIGHT PILOT LIGHT HEAT 1.5KW − 208V 1.5KW − 240V 1.26KW − 220V 240−480V> 120−240V ALTERNATE TRANSFORMER JAOP3 3 PHASES 60 Hz 28/06/04 M. FAUCHER STEAM − DELAY JAOP3208 5 − 7 & 9...
- Page 63 PILOT LIGHT 1.5KW PILOT HUMIDITY LIGHT 208V − 240V 1.26KW − 220V 1.5KW HEAT 208V − 240V 1.26KW − 220V 100VA 240−480V> 120−240V ALTERNATE TRANSFORMER JAOP3 1 PHASE 50 Hz 28/06/04 M. FAUCHER STEAM JP32081P 2 − 5 & 9...
- Page 64 H3DE OVEN VALVE MODE E PILOT PILOT LIGHT LIGHT 1.5 KW AT 240V HUMIDITY 1.5 KW AT 240V HEAT 50VA OR 10VA 240−480V> 120−240V ALTERNATE TRANSFORMER JAOP3 220 / 380V 3 PH. 50 Hz 20/05/04 M. FAUCHER STEAM JAOP32R3 NONE...
- Page 65 T1: STEAM LIMITING TIMER MODE A = 25 SEC. HIGH LIMIT 3−32V DC OVEN STEAM VALVE T1−1 3−32V DC BUZZER BUZZER BAKING ALARM P.L. 1.5 KW P.L. HEAT JAOP3 1 PHASE 60 Hz 29/06/04 M. FAUCHER WATLOW JAOP3_1W 2 & 5...
- Page 66 T1: STEAM LIMITING TIMER MODE A = 25 SEC. HIGH LIMIT 3−32V DC OVEN STEAM VALVE T1−1 3−32V DC BUZZER BUZZER BAKING ALARM P.L. 1.5 KW P.L. HEAT 32A 19.5A WARNING JAOP3 3 PHASE 60 Hz 29/06/04 M. FAUCHER WATLOW JAOP3_3W 2 & 5...
-
Page 67: Limited Warranty
Doyon Equipment Inc. does hereby exclude and shall not be liable to purchaser for any consequential or incidental damages including, but not limited to, damages to property, damages for loss of use, loss of time, loss of profits or income, resulting from any breach or warranty.