Table of Contents
Advertisement
Quick Links
Advertisement
Table of Contents

Summary of Contents for Vector e-bike
- Page 1 Vector e-bike Manual Version 1...
-
Page 2: Table Of Contents
I love Kurochka Welcome to Vector ............................3 Important ..............................4 General Warning ............................. 6 Operational Safety ............................ 7 BATTERY AND CHARGER ........................... 8 TIRES ................................9 BRAKES ..............................9 TRANSMISSION ............................9 DRIVING AND TRANSPORTATION ......................9 CLEANING AND MAINTENANCE ......................11 Power Components’... -
Page 3: Welcome To Vector
First of all, thank you for buying a Vector product. We are proud to have you as our customer. The Vector e-bike is a new concept, the e-Bike that you will enjoy in a way you have never dreamt of before. -
Page 4: Important
Be aware that you will be moving in a fast and quiet vehicle, so take care when around people and animals. In this manual we will give you advice and warnings so you can take full advantage of your Vector and keep it as good as new. We recommend using original parts /accessories and getting them fitted at a Vector Official Dealer or Official Service. - Page 5 CHANGES MADE TO THE VEHICLE MAY AFFECT YOUR SECURITY AND CAUSE INJURY. Any modification made to the vehicle without the Vector dealer’s approval will have the following effects: Loss of warranty rights granted by the manufacturer. Possible need to obtain another certification.
-
Page 6: General Warning
Remember that the owner of this Vector e-bike can be held responsible for the misuse or negligence when using it. Your Vector is not a competition vehicle and it is not designed for such use. Therefore, its use in competition will mean the loss of the warranty provided by Vector. -
Page 7: Operational Safety
Listed below are several things to keep in mind regarding the operation of the vehicle. Whenever you are not using your Vector, put the key in the OFF position. It is easy to forget when it is ON and an accident could occur when getting on or off the bike. -
Page 8: Battery And Charger
AC outlet and charger while charging. If the plug is heated, disconnect the charger and have a qualified electrician replace the AC outlet. Replace the charger if the plug for the AC outlet or the cord is damaged. You must go to a Vector Official Service provider. -
Page 9: Tires
Tire pressure must be checked and adjusted with cold tires (when the tire temperature equals ambient temperature). If tires are excessively worn, have them changed at a Vector Official Distributor or Service provider. The use of the vehicle with excessively worn tires is illegal, reduces stability and you could lose control. - Page 10 Therefore, check this system regularly and if it does not work properly, repair it at a Vector Official Service. If you do not become familiar with the controls you could lose control, with the consequent risk of accident or personal injury.
-
Page 11: Cleaning And Maintenance
Moto-Bike. Always perform the service maintenance of your Moto-Bike at a Vector Official Service provider. If you do not have the original tools or experience to perform a particular job, you should give it to a Vector Official Service provider. - Page 12 To avoid damage or fire in the electrical system, do not use a fuse with a higher amperage than recommended. To repair it you must go to a Vector Official Service provider. Avoid damaging the headlight optics: Do not stick any colored film or adhesives on the headlight optics.
-
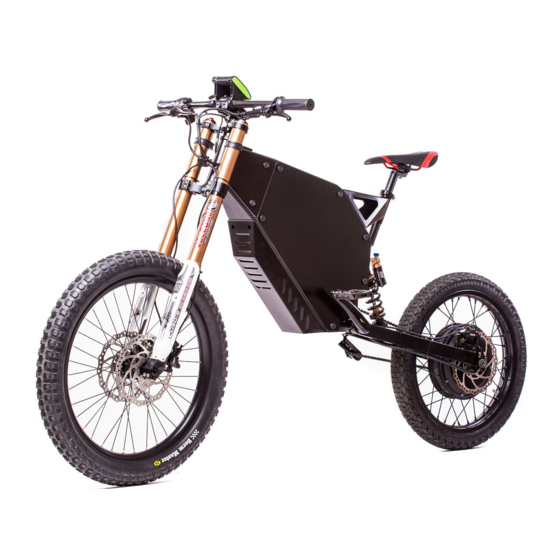
Page 13: Power Components' Location
Vector Official Service provider. Any damage to any of the power components must be repaired immediately by a Vector Official Service. POWER PARTS WILL REMAIN ACTIVE FOR A PERIOD OF TIME AFTER THE VEHICLE HAS BEEN SWITCHED OFF. - Page 14 Location of Components 1 Motor 2 ON/OFF Key 3 Front fork 4 Front light 5 Rear brake caliper 6 Rear shock 7 Rear light 8 Kickstand 9 Controller and controller shield 10 Front brake calipers...
- Page 15 1 Remote for controller display 2 Front brake lever 3 Light and Horn ON/OFF switch 4 Display 5 3 modes/speed switch 6 Front brake lever 7 Twist throttle...
- Page 16 Controller remote has 4 buttons. +, -, Menu, Power 3 speed switch has 3 positions. It is a part of twist throttle.
- Page 17 By pressing the Menu button on the controller remote you can switch between Real time speed, Average speed and Maximum speed.
- Page 18 By pressing the Power button on the controller remote you can switch between Trip meter, Odometer and Time.
- Page 19 By pressing and holding the Menu button on the controller remote you will enter a Settings menu. You can navigate by pressing + and – buttons. Pressing the Power button will open the Basic setting menu page. To exit the menu, go to Exit and press the Menu button.
-
Page 20: How To Prepare The Bike After Delivery
How to prepare the bike after delivery. You will receive the bike in a wooden/carton box. Open the box from the top and from the side... - Page 21 Remove all the parts from the box. Put the fork on a soft surface. Don’t use the kickstand yet. Install the handlebars in the stem by removing 4 bolts.
- Page 22 Tighten up the bolts with the handlebars at the correct angle. Apply an 8H*m torque. Put the bike on a soft stable surface so the front fork is lifted above the floor higher than the front wheel radius.
- Page 23 Remove the front brake pads spacers from the front brake calipers. Insert the front wheel into the fork. Make sure the brake rotors are between the brake pads. Insert the axle from the right leg side.
- Page 24 Push the axle all the way through the left fork leg. Screw the axle cup into the axle.
- Page 25 Screw the fixing bolts on the left and right fork legs. Apply 10H*m torque Push the bike forward 5 meters to see if the wheel is straight and brake rotors don’t touch the brake pads. Pull the front brake lever 10 times to adjust the brake pads position to the brake rotors. Pull the front brakes and push the bike forward, making sure the brake can lock the front wheel.
-
Page 26: Usage Of Battery And Charger
Usage of Battery and Charger It is forbidden to charge the battery at temperatures below 1C, otherwise, the battery will be damaged. Please charge the battery after its temperature recovers. The vehicle has a high-performance and high-rate lithium battery. The safety voltage is 72V. The working temperature range is from -10C to 35C. -
Page 27: Identification Numbers
The controller identification number is engraved on controller. Engine Identification Number The engine identification number is engraved on the side of the engine. DO NOT CHANGE ANY OF THE IDENTIFICATION NUMBERS OF YOUR VECTOR NOR BREAK THEIR SAFETY SEALS, OTHERWISE YOU WILL LOSE YOUR WARRANTY. -
Page 28: Prior Checks
All wires and elements must be in perfect condition and external connectors correctly positioned. Check the battery charge level on the dashboard. If after reading these instructions you still have questions, contact your Vector Official Dealer, who will be happy to help. -
Page 29: Battery And Charger
THE BATTERY HAS A SAFETY SEAL WITH SAFETY WARNINGS. AS IT IS A POWER ELEMENT, IT CAN BE HANDLED BY A VECTOR OFFICIAL DEALER ONLY. IF THE SAFETY SEAL IS BROKEN IT WILL RESULT IN THE AUTOMATIC LOSS OF THE WARRANTY. -
Page 30: Battery Charge
Battery Charge Connect the Vector original charger to the bike and the power outlet (240 V AC 50Hz / 110 V AC 60Hz). ALWAYS CHARGE THE BATTERY WITH THE ORIGINAL VECTOR BATTERY CHARGER. Note that both connectors, male and female, have notches on the inside that must match. Fully introduce the male connector into the female connector and then rotate its housing clockwise a quarter turn to secure it in place. -
Page 31: During The Ride
TEMPORARILY DISCONNECTED UNTIL THE SYSTEM TEMPERATURE DROPS SUFFICIENTLY ENOUGH BEFORE RESTARTING THE VEHICLE. If the RED flashing warning light appears on controller, it is recommended that the Vector power level is reduced and assisted by pedaling, or let the bike components to cool down for 5 minutes. -
Page 32: Stop Your Vector
Stop your Vector Release the accelerator and brake the vehicle until it stops. Turn key to the OFF position. Leave the Moto-Bike leaning on the retractable side stand (if it is equipped with it). THE KEY SWITCH MAY BE USED IN AN EMERGENCY IF YOU WANT TO TURN OFF THE ENGINE. -
Page 33: Riding Instructions
When riding, the electrical components are subjected to a maximum demand that will cause its temperature to rise. You must take this into account. For this reason and to ensure the proper functioning of the battery, the operating temperature range for your e-bike is recommended between -10°C and 35°C. -
Page 34: Adjusting The Rear Suspension: Shock Absorber
10-15 mm for normal riding and 15-20 mm if going downhill. Recommendations for the shock absorber: Do not try to remove the shock absorber. Visit a Vector Official Service if it does not operate normally. Damage caused by misuse or removal will void the warranty. -
Page 35: Adjusting The Front Suspension: Fork
Adjusting the front suspension: Fork The front fork compresses under load and rebounds to recover its entire length. The rebound dampening (or bounce) is the setting that determines how quickly or slowly the fork rebounds. Regular maintenance, cleaning and inspection are required according to the condition of the vehicle to maintain the best performance of the fork. -
Page 36: Brakes
(the so-called “pumping”) until the pads touch the disc. If the pressure point changes in the output, you must go to your Vector Official Service to purge the brake system. -
Page 38: Wheels And Tyres
Make sure that the spoke tension is correct since that can cause unstable behavior. Check that all spokes are tight. In the event of any spoke is not tight enough, go to your Vector Official Dealer or Service. SUGGESTED PRESSURE: 1,8 BAR front –... -
Page 39: Wheel Change
Wheel Change REMOVING THE FRONT WHEEL BEFORE ANY OPERATION, ENSURE YOUR VECTOR IS TURNED OFF. Put the bike on soft support so the front wheel stays in the air. Whenever the Moto-Bike is with the side stand unfolded, the vehicle must not be moved backwards. -
Page 40: Rear Wheel Disassembling
REAR WHEEL DISASSEMBLING BEFORE ANY OPERATION, ENSURE YOUR VECTOR IS TURNED OFF. Remove the side panels from the bike. Turn off the main switch. Remove the 4 bolts that hold the battery from the controller side. Remove the battery from the frame. Isolate the wires on a battery... -
Page 41: Transmission: Chain And Bottom Bracket
Periodically review the chain play. You must pull it carefully as indicated in the picture (for ease we recommend doing this in the area of the chainring). If in doing so you can see at least half-a sprocket of the drive chainring, go to a Vector Official Service provider for a replacement. Clean and lubricate the chain. -
Page 42: Washing
Washing Regular cleaning of your Vector is recommended to extend its lifespan and to ensure proper performance. You must be careful not to damage any of the components. In order to do so we recommend: Before cleaning, check that all electrical components are properly connected and the vehicle is turned off. -
Page 43: Maintenance Table
Maintenance table You must carry out every maintenance service recommended by Vector. If you do not complete them within the indicated dates, you will lose your warranty. -
Page 44: Troubleshooting
If your Vector suffers a problem, we have provided the following indications that may help you through it. However, we recommend that you go to your Vector Official Dealer or Service provider in the event of a fault. - Page 46 Vector has stopped If this occurs during a ride it is possible that: The battery is empty. Check the battery level displayed on the dashboard and if so, look for the charger to charge the battery. The overheating protection system has been activated on any of the power elements (battery, motor, controller).