
Related Manuals for Haier HCE302TB3


Summary of Contents for Haier HCE302TB3
- Page 1 Ceramic Hob Instruction Manual / Installation Manual MODEL HCE302TB3 HCE604TB3 HCE905TB3 Safety and Warnings Your safety is important to us. Please read this information before using your cooktop.
-
Page 3: Installation
INSTALLATION WARNING: Electrical Shock Hazard • Disconnect the appliance from the mains electricity supply before carrying out any work or maintenance on it. • Connection to a good earth wiring system is essential and mandatory. • Alterations to the domestic wiring system must only be made by a qualified electrician. - Page 4 switch) and contact a qualified technician. • Switch the cooktop off at the wall before cleaning or maintenance. • Failure to follow this advice may result in electrical shock or death. WARNING:Health Hazard • This appliance complies with electromagnetic safety standards. WARNING:Hot Surface Hazard •...
- Page 5 • Do not store items of interest to children in cabinets above the appliance. Children climbing on the cooktop could be seriously injured. • Do not leave children alone or unattended in the area where the appliance is in use. •...
-
Page 6: Product Dimensions
Product Dimensions HCE302TB3... - Page 7 HCE302TB3 HCE302TB3 PRODUCT DIMENSIONS Overall height of cooktop Overall width of cooktop Overall depth of cooktop Height of chassis Width of chassis Depth of chassis Height of cooktop glass Depth of front overhang of cooktop glass Depth of rear overhang of cooktop glass...
- Page 8 HCE604TB3...
- Page 9 HCE604TB3 HCE604TB3 PRODUCT DIMENSIONS Overall height of cooktop Overall width of cooktop Overall depth of cooktop Height of chassis Width of chassis Depth of chassis Height of cooktop glass Depth of front overhang of cooktop glass Depth of rear overhang of cooktop glass Depth of side overhang of cooktop glass...
- Page 10 HCE905TB3...
- Page 11 HCE905TB3 HCE905TB3 PRODUCT DIMENSIONS Overall height of cooktop Overall width of cooktop Overall depth of cooktop Height of chassis Width of chassis Depth of chassis Height of cooktop glass Depth of front overhang of cooktop glass Depth of rear overhang of cooktop glass Depth of side overhang of cooktop glass...
-
Page 12: Cutout Dimensions
For the purpose of installation and use, a minimum of 5 cm space shall be preserved around the hole. Be sure the thickness of the work surface is at least 18 mm. As shown below: Model (mm) (mm) (mm) (mm) (mm) (mm) (mm) HCE302TB3 47 min HCE604TB3 50 min HCE905TB3 50 min... -
Page 13: Clearance Dimensions
Clearance Dimensions Under any circumstances, make sure the ceramic cooker hob is well ventilated and the air inlet and outlet are not blocked. Ensure the ceramic cooker hob is in good work state. Please see clearance dimensions required below. Note: The minimum distance between the hotplate and the range hood above the hotplate should be at least 600 mm(A). - Page 14 Before you install the cooktop 1. The ceramic cooker hob must be installed by qualified personnel or technicians. 2. The benchtop is square and level, and no structural members interfere with space requirements. 3. The benchtop is made of a heat-resistant material. 4.
- Page 15 Fastening the cooktop to the bench 1. Turn the cooktop upside down and place it on a soft & stable surface, you can use the packaging. 2. Mount the supplied brackets (A) and tighten the screws (B) onto the cooktop, as shown in below image.
- Page 16 Connecting the cooktop to the mains power supply IMPORTANT! ● This cooktop must be connected to the mains power supply only by a suitably qualified person. ● This cooktop must be earthed. ● Before connecting the cooktop to the mains power supply, check that: ●...
- Page 17 Single phase connection Two phase connection Model: HCE905TB3 / HCE604TB3 Model: HCE302TB3...
-
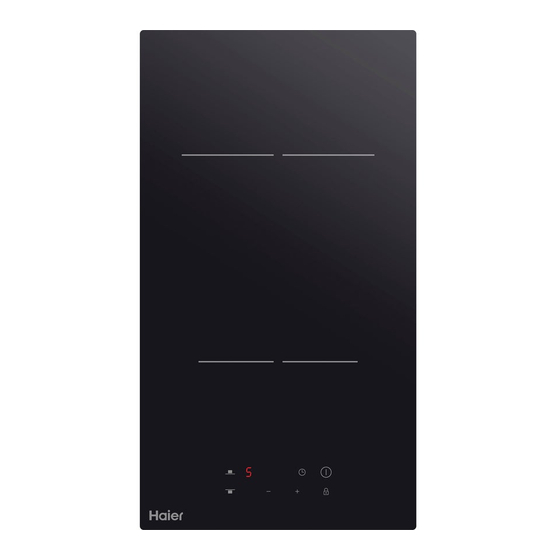
Page 18: Product Overview
Product Overview Top View HCE302TB3 1. 1200W Zone 2. 1800W Zone 3. Glass plate 4. Control panel/Displays Control Panel 1. Heating zone selection controls 2. Timer control 3. Power / Timer setting controls 4. Keylock control 5. ON/OFF control... - Page 19 Top View HCE604TB3 1. 1800W Zone 2. 1200W Zone 3. 1800W Zone 4. 1200W Zone 5. Glass plate 6. Control panel / Displays Control Panel 1. Heating zone selection controls 2. Timer control 3. Power / Timer setting controls 4. Keylock control 5.
- Page 20 Top View HCE905TB3 1. 1800W Zone 2. 1200W Zone 3. 1200W Zone 4. 1800W Zone 5. 2200/1000 W zone 6. Glass plate 7. Control panel / Displays Control Panel 1. Heating zone selection controls 2. Timer control 3. Power / Timer setting controls 4.
-
Page 21: Before Using Your New Ceramic Hob
Product Information of Ceramic Hob • The microcomputer ceramic cooker hob can meet different kinds of cuisine demands because of resistance wire heating, micro-computerized control and multi-power selection, really the optimal choice for modern families. The ceramic cooker hob centers on customers and adopts personalized design. The hob has safe and reliable performances, making your life comfortable and enabling to fully enjoy the pleasure from life. -
Page 22: Using Your Ceramic Hob
Using your Ceramic Hob To start cooking • After power on, the buzzer beeps once, all the indicators light up for 1 second then go out, indicating that the ceramic hob has entered the state of standby mode. 1. Touch the ON/OFF control,all the indicators show “-”... -
Page 23: When You Have Finished Cooking
Active Dual Ring : Touch the dual zone select control , then the indicator of this zone will flash. activating double zone by pressing for once. Turn off the dual zone zone,by press the zone select control accordingly and then press the When you have finished cooking 1. - Page 24 4. Beware of hot surfaces “H” will show which cooking zone is hot to touch. It will disappear when the surface has cooled down to a safe temperature. It can also be used as an energy saving function if you want to heat further pans, use the cooking zone that is still hot.
-
Page 25: Locking The Controls
Locking the Controls • You can lock the controls to prevent unintended use (for example children accidentally turning the cooking zones on). • When the controls are locked, all the controls except the ON/OFF control are disabled. To lock the controls Touch hold the keylock control . -
Page 26: Using The Timer As A Minute Minder
Using the Timer You can use the timer in two different ways: 1. You can use it as a minute minder. In this case, the timer will not turn any cooking zone off when the set time is up. 2. You can set it to turn one cooking zone off or more than one after the set time is up. -
Page 27: Setting The Timer To Turn One Cooking Zone Off
time and the timer indicator will flash for 5 seconds. 6. Buzzer will beep for 30 seconds and the timer indicator shows “- -” when the set time finished. Setting the timer to turn one cooking zone off 1. Touching the heating zone selection control that you want to set the timer for. - Page 28 6. When cooking timer expires, the corresponding cooking zone will be automatically switch off and show “H”.
- Page 29 Setting the timer to turn more than one cooking zone 1. If more than one heating zone use this function, the timer indicator will show the shortest time. (e.g. zone 1# setting time of 3 minutes, zone 2# setting time of 6 minutes, the timer indicator shows “3”.) NOTE: The flashing red dot next to power level indicator means the timer indicator is showing time of the heating zone.
- Page 30 Cookware Do not use cookware with jagged edges or a curved base. Make sure that the base of your pan is smooth, sits flat against the glass, and is the same size as the cooking zone. Always centre your pan on the cooking zone. Always lift pans off the ceramic hob –...
-
Page 31: Cooking Guidelines
Cooking Guidelines Cooking Tips • Using a lid will reduce cooking times and save energy by retaining the heat. • Minimise the amount of liquid or fat to reduce cooking times. • Start cooking on a high setting and reduce the setting when the food has come to the boil or heated through. -
Page 32: Heat Settings
Heat Settings Heat setting Suitability • delicate warming for small amounts of food 1 - 2 • melting chocolate, butter, and foods that burn quickly • gentle simmering • slow warming • reheating 3 - 4 • rapid simmering • cooking rice •... -
Page 33: Care And Cleaning
Care and Cleaning IMPORTANT!: For your safety, switch the power to the cooktop off at the wall before any cleaning. In this case, there will be no ‘Hot surface’ indication, but the cooking zones may still be hot! Take extreme care. What? How? Important! -
Page 34: Troubleshooting
Trouble Shooting Problem Possible causes What to do The cooktop cannot No power. Make sure the cooktop is connected be turned on. to the power supply and that it is switched on. Check whether there is a power outage in your home or area. If you’ve checked everything and the problem persists, call a qualified technician. -
Page 35: Technical Specification
Technical Specification Cooking Hob HCE302TB3 Cooking Zones 2 Zones Supply Voltage & Frequency 220-240V~ ,50-60 Hz Power Rating 2745-3267W Product Size W× D×H(mm) 288X520X52 Cut out Dimensions W×D(mm) X500 Cooking Hob HCE604TB3 Cooking Zones 4 Zones Supply Voltage & Frequency... -
Page 36: Manufacturer's Warranty
You must produce both warranty card and proof of purchase in the event of a warranty repair being required. When you purchase any new Haier Product you automatically receive a two year Manufacturer's Warranty covering parts and labour for servicing. - Page 37 correcting such unauthorised repairs. Normal recommended maintenance as set out in the Product’s User Guide. Repairs when the appliance has been dismantled, repaired or serviced by other than an AUTHORISED CUSTOMER SERVICE CENTRE or the selling dealer. G Pick up and delivery. H Transportation or travelling costs involved in the repair when the product is installed outside the AUTHORISED CUSTOMER SERVICE CENTRE’S normal service area.
-
Page 38: Customer Care
You have read the problem solving section in your User Guide. If after checking these points you still need assistance, please refer to your nearest Haier Authorised Repairer. In New Zealand, if you need assistance...* Call your retailer who is trained to provide information on your appliance, or if we... - Page 39 Product Details Model ---------------------------------------Serial No. ----------------------------- Date of Purchase----------------------------Purchaser----------------------------- Dealer---------------------------------------Suburb--------------------------------- Town----------------------------------------Country-------------------------------- Thank you for choosing Haier. We are confident that you will enjoy many years of good service from your appliance.
- Page 40 Code: Edition: Publication Date:April 6, 2021...