Dell DJ DJ Owner's Manual
Dell dj dj: owners manual
Hide thumbs
Also See for DJ DJ:
- User manual (55 pages) ,
- Quick start (2 pages) ,
- Getting started (9 pages)

Subscribe to Our Youtube Channel
Related Manuals for Dell DJ DJ


Summary of Contents for Dell DJ DJ
- Page 1 Dell™ Digital Jukebox Owner’s Manual Model HVO1T w w w . d e l l . c o m s u p p o r t . d e l l . c o m...
- Page 2 Dell™ Digital Jukebox Owner’s Manual...
- Page 3 Reproduction in any manner whatsoever without the written permission of Dell Inc. is strictly forbidden. Trademarks used in this text: Dell, the DELL logo, Dell DJ, TrueMobile, Inspiron, Dell Precision, Dimension, OptiPlex, Latitude, PowerEdge, PowerVault, PowerApp, and Dell OpenManage are trademarks of Dell Inc.;...
-
Page 4: Table Of Contents
Contents Finding Information PRECAUCIÓN: Instrucciones de Seguridad ....9 Cuando utilice su equipo CAUTION: Safety Instructions ......13 When Using Your Device . - Page 5 Computer ......... . 33 Storing Data files On the Dell DJ ......35 Managing Files from the Main Menu .
- Page 6 Hardware Products (Canada Only)..... 71 "Total Satisfaction" Return Policy (Canada Only) ..75 Dell Software and Peripherals (Canada Only) ... 76 1-Year End-User Manufacturer Guarantee (Latin America and the Caribbean Only) .
- Page 7 Contents...
-
Page 8: Finding Information
Information on using my device. Information on using MusicMatch with my device Information on using Dell DJ Explorer with my device Connecting to and synchronizing with a computer Up-to-date information on your device... - Page 9 Finding Information...
-
Page 10: Precaución: Instrucciones De Seguridad
Energía • Solamente utilice el adaptador proporcionado por Dell, aprobado para su uso con este equipo. El empleo de otro adaptador de CC podría ocasionar un incendio o explosión. PRECAUCIÓN: Instr ucciones de Seguridad... -
Page 11: Viaje Aéreo
• Algunas normas y/o restricciones específicas para líneas aéreas de la Administración Federal de Aviación podrían aplicar a la operación del equipo Dell cuando usted lo lleva a bordo de una aeronave. Por ejemplo, las normas/restricciones podrían prohibir el uso de cualquier dispositivo electrónico personal (PED, por sus siglas en inglés) que tenga la capacidad de transmitir una radiofrecuencia u otras señales... -
Page 12: Instrucciones De Cem
Utilice cables de señal blindados para garantizar que se mantiene la clasificación de compatibilidad electromagnética (EMC, por sus siglas en inglés) adecuada para el entorno propuesto. Si lo prefiere, puede solicitar un cable a Dell a través de su sitio Web en www.dell.com. - Page 13 PRECAUCIÓN: Instrucciones de Seguridad...
-
Page 14: Caution: Safety Instructions
Power • Use only the Dell-provided DC adapter approved for use with this device. Use of another DC adapter may cause a fire or explosion. • Before you connect the device to an electrical outlet, check the DC adapter voltage rating to ensure that the required voltage and frequency match the available power source. -
Page 15: Air Travel
• Certain Federal Aviation Administration regulations and/or airline-specific restrictions may apply to the operation of your Dell device while you are on board an aircraft. For example, such regulations/restrictions may prohibit the use of any personal electronic device (PED) that has the capacity for intentional transmission of radio frequency or other electromagnetic signals while on an aircraft. -
Page 16: When Using Your Device
When Using Your Device Observe the following safe-handling guidelines to prevent damage to your device: • When setting up the device for work, place it on a level surface. • When traveling, do not check the device as baggage. You can put your device through an X-ray security machine, but never put your device through a metal detector. - Page 17 CAUTION: Safety Instructions...
-
Page 18: About Your Device
Introduction Congratulations on purchasing the Dell Digital Jukebox! In this document, you can find instructions on how to use the key features of you new Dell Digital Jukebox (Dell DJ™) with the accompanying software. You can also find more sources of useful information in "Finding Information"... -
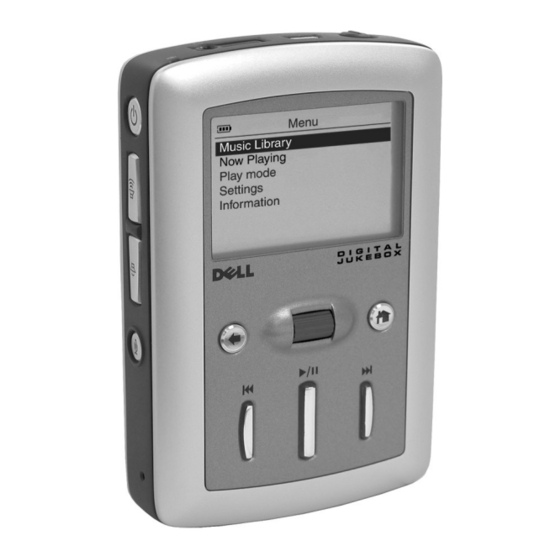
Page 19: Front And Side Views
Front and Side Views integrated microphone power button volume buttons back button record button reset button reverse/skip back button POWER BUTTON — Press and hold the power button for 2 seconds to turn the device on or off. VOLUME BUTTONS — Press and hold the volume buttons to increase or decrease the volume. - Page 20 HOME BUTTON — Press the Home button to access other functions in the device. See "Using Your Dell DJ" on page 25 for information. DC ADAPTER CONNECTOR — Connect the DC adapter.
-
Page 21: Wired Remote (Optional)
Wired Remote (Optional) reverse/skip button lock back button switch play/pause button volume buttons headphone connector REVERSE/SKIP BACK BUTTON — Press the reverse/skip back button to move to the start of the current track, or to go to the previous track. Press and hold the reverse/skip back button to move back within a track. -
Page 22: Installing Software
NOTICE: Close all other applications while installing the software. Insert the Dell DJ Software and Documentation CD into your CD drive. The CD runs automatically, and the installation process begins. If the CD does not run automatically:... -
Page 23: Connecting To A Computer
You can connect your device to a computer using the USB cable provided. Connect your device to a computer to transfer data files or audio tracks. See "Transferring Music to the Dell DJ" on page 28 for information on transferring data files and audio tracks. -
Page 24: Charging The Battery
Charging the Battery NOTICE: Do not use your device until you have charged the battery for at least 6 hours. Your device has an integrated, rechargeable, lithium-ion battery. Before you use your device for the first time, you must charge the battery. Use the battery icon charge. -
Page 25: Performing A Reset
Performing a Reset If your device stops responding, perform a reset. Files or tracks that are being transferred may be lost but other data is normally retained. To perform a reset, insert the end of a thin object, such as a straightened paper clip, into the reset button. -
Page 26: Using Your Dell Dj
28). Playing Digital Music The Dell DJ can play tracks in MP3, WMA or WAV file formats. The Dell DJ comes with a few sample MP3 tracks already loaded into the Music Library. To load your own music files onto the Dell DJ, see "Transferring Music to the Dell DJ"... - Page 27 To play a genre, scroll-select a genre in Genres, then scroll-select Play Genre. NOTE: If you have no playlists in your Dell DJ, see "Creating a Playlist" on page 43 To find and play an album by a particular artist: Press the Home button on your Dell DJ.
- Page 28 All tracks are added to the Selected Music list. Playback starts after all music tracks have been queued. After selecting Play All Music Tracks, your Dell DJ plays all music tracks in the sequence determined by the Play Mode setting.
-
Page 29: Transferring Music To The Dell Dj
With Musicmatch , you can transfer music tracks from your own personal music library to the Dell DJ. MusicMatch has the capability to ’rip’ or convert music CDs to digital music files on your computer. Refer to the MusicMatch Help tutorial to create digital music files from your music CDs. - Page 30 To drag-and-drop, locate and click the track or playlist that you want to copy, then drag it to Dell Digital Jukebox or one of its playlists. To copy-and-paste, locate and right-click the track or playlist that you want to copy, then click Copy. Right-click on Dell Digital Jukebox or one of its playlists, then click Paste.
-
Page 31: Transferring Music Tracks Using Dell Dj Explorer
NOTE: Synchronization is a one-way process. It will only copy files from the computer to the Dell DJ. It will not copy files from the Dell DJ to the computer. NOTICE: On the Synchronization tab, ensure that the option beneath "Protect Content on Device"... - Page 32 Using Copy-and-Paste: Using Dell DJ Explorer, locate the track, file or folder you want to copy. Right-click the track, file or folder you want to copy and click Copy. Locate and right-click the folder in which you want to place the copy, and then click Paste.
-
Page 33: Recording Files Using The Dell Dj
When recording, the available recording time is displayed in the lower right hand corner of the display screen. Available recording time is determined by the amount of available space in your Dell DJ and the remaining battery power. To make a recording: Press and hold the record button for 2 seconds, then release. -
Page 34: Accessing And Managing Your Recordings
Main Menu. Accessing and Managing Your Recordings You can also play, view details, select or delete a recording from your Dell DJ using the following steps: Press the Home button to return to the Main Menu. - Page 35 Explorer, Open Microsoft Windows Explorer, then double-click Dell DJ Explorer. With Dell DJ Explorer open, click Folders in the Dell DJ Explorer toolbar. The drives and main directories associated with the computer will be displayed in the left window. The right window will display the contents of the drive, directory or folder that is selected in the left window.
-
Page 36: Storing Data Files On The Dell Dj
Storing Data files On the Dell DJ Using the included Dell DJ Explorer software, your Dell DJ can be used as a data storage device. You can transfer data files between your Dell DJ and any computer with Dell DJ Explorer installed.. -
Page 37: Managing Files From The Main Menu
Managing Files from the Main Menu The Main Menu of the Dell Digital Jukebox is the starting place for the Dell DJ operations. To get to the Main Menu, press the Home button on your Dell DJ. Music Library is your window to the music tracks stored on your Dell DJ. - Page 38 Recordings made with your Dell DJ automatically become tracks and can be found in All Tracks in Music Library, or in Voice Recordings found in your Dell DJ’s main menu. For the instructions that follow, recordings will be known as "tracks."...
- Page 39 Scroll-select Find Track. A list of characters appears. Scroll-select the first character of the track name. The Dell DJ displays music tracks in alphabetical order, beginning with the character you selected. Scroll-select a different first character to view tracks beginning with that character.
- Page 40 Viewing an Album In Music Library, you can view the contents of an album by an artist. To locate an album by artist: Press the Home button on your Dell DJ. Scroll-select Music Library. Scroll-select Artists. Scroll-select an artist. A list of options appears.
-
Page 41: Now Playing And The Selected Music List
To create a Selected Music list, locate and play a track or category of tracks using one of the previously described methods. To view the Selected Music list: Press the Home button on your Dell DJ. Scroll-select Now Playing. Scroll-select Selected Music. - Page 42 Add to Selected option, or replace the tracks in the Selected Music list using the Play option. To add tracks: Press the Home button on your Dell DJ. Scroll-select Music Library. Scroll-select a category. For example, if you want to add a track from a particular album, scroll-select Albums.
- Page 43 Scroll-select Selected Music, then scroll-select a track. Scroll-select Clear Selection, then scroll-select Yes. Press the Home button on your Dell DJ to return to the Main Menu. NOTE: Tracks that are cleared or removed from the Selected Music list are not deleted from your device. To delete a track from Music Library, see "Deleting Tracks From Your Dell DJ"...
- Page 44 Music Library. You can remove tracks from the Selected Music list without permanently deleting the tracks from your Dell DJ. See "Clearing the Selected Music List" and "Removing a Track from the Selected Music List" on page 42.
- Page 45 Scroll-select Yes to delete the track from your Dell DJ. To delete an entire album, artist, genre, or playlist: Press the Home button on your Dell DJ. Scroll-select Music Library. Scroll-select an audio category. For example, if you want to delete a particular album, scroll-select Albums.
-
Page 46: Play Mode
Shuffle Repeat randomly plays the selected music tracks, then repeats them in a different random sequence until you turn off the Dell DJ or change the play mode. Track Once plays the selected track one time and then stops. -
Page 47: Settings
Repeat All Shuffle Shuffle Repeat Track Once Settings You can customize the Dell DJ to your preferences by adjusting the settings. You can set: • Owner name — enter your name, or a name for your Dell DJ. • EQ preset — choose from available presets or create a custom EQ •... - Page 48 EQ presets, scroll select the preset. To create a custom EQ setting: Scroll-select Custom EQ. The equalizer control box appears. Scroll-select a frequency slider and rotate the scroll dial to adjust sound output. Using Yo ur Dell DJ...
- Page 49 To set the idle shutdown time: Press the Home button. Scroll-select Settings. Scroll-select the current idle shutdown time. A list of available times appears. Scroll-select a shutdown time. To set the display language: Press the Home button. Scroll-select Settings. Using Your Dell DJ icon.
-
Page 50: Information
Scroll-select the current display language. A list of available languages appears. Scroll-select a language. Information You can check your Dell DJ for the following information: • Firmware version • Total amount of space for storing music or data • Available space for storing music or data •... - Page 51 Using Your Dell DJ...
-
Page 52: Frequently Asked Questions
Frequently Asked Questions This section covers common problems you might encounter or questions you might have while using your Dell DJ. If you have a problem that is not addressed in this chapter, visit support.dell.com for more information. Installation I can’t install the Dell DJ software on my computer, which has Microsoft ®... -
Page 53: Usage
The button lock switch on the Wired Remote is in the locked position (red). Move the switch to the unlocked position (black). I can’t turn my Dell DJ on, and all the buttons flash when I hold down the Power button. -
Page 54: General
My computer does not recognize my Dell DJ. You may be using a USB hub to connect your Dell DJ to your computer. Connect your Dell DJ directly to your computer’s USB port. I don’t see the charging icon anymore, but my Dell DJ seems to be working. -
Page 55: Error Indications
I want to delete all the music tracks on my Dell DJ, but I can’t find the option in the main menu. From the main menu, you can only delete one track, album, artist, genre or playlist at a time. -
Page 56: Troubleshooting In Rescue Mode
You must reload all files, music tracks and playlists. • Reload Firmware — clears firmware in the Dell DJ so that you can load updated firmware. NOTE: Do not choose this option until you have downloaded updated firmware into your computer. - Page 57 Dell DJ restarts. Restart your computer if prompted. Reboot Choose this option to get out of Rescue mode, and return to your Dell DJ’s normal display. When in Rescue mode, scroll-select Reboot. You can press and hold the Power button.
-
Page 58: Appendix
Appendix... -
Page 59: Specifications
Specifications Hardware Display Storage media Battery DC-in power PC connection Voice recording Performance Parameters Audio quality Signal-to-noise ratio Channel separation Frequency response Harmonic distortion Playtime Appendix 160 x 104 resolution blue EL back light 15/20 GB HDD Embedded lithium-ion polymer 4V ±5%, 2.4A USB 2.0/1.1 integrated microphone... - Page 60 Performance Parameters Battery charging DC power in — full charge in 6 hours USB charging — full charge in 7.5 hours (battery must have 25% charge for USB charging) Appendix...
-
Page 61: Glossary
Glossary — A bitrate indicates the average number of bits in 1 second of a digital ITRATE audio track. MP3 encoders allow you to specify the bitrate when making MP3 files. The higher the bitrate, the better the audio quality. Unfortunately, this also means a larger file size. - Page 62 grouped by categories, namely, All tracks, Albums, Artists, and Genres. — A grouping of audio tracks. Using a playlist, you can create a playback LAYLIST sequence of audio tracks from multiple albums or categories without actually rearranging any audio tracks in the device’s Music Library. You can also name a playlist, for example, My Favorite Pop Songs.
- Page 63 Appendix...
-
Page 64: Regulatory Notices
A Notice About Shielded Signal Cables: Use only shielded cables for connecting devices to any Dell device to reduce the possibility of interference with radio communications services. Using shielded cables ensures that you maintain the appropriate EMC classification for the intended environment. -
Page 65: Fcc Notices (U.s. Only)
Most Dell devices are classified for Class B environments. However, the inclusion of certain options can change the rating of some configurations to Class A. To determine the electromagnetic classification for your device, see the following sections specific for each regulatory agency. -
Page 66: Ic Notice (Canada Only)
(IC) Interference-Causing Equipment Standard #3 (ICES-003) as Class B digital devices. To determine which classification (Class A or B) applies to your device (or other Dell digital apparatus), examine all registration labels located on the bottom, side, or the back panel of your device (or other digital apparatus). -
Page 67: Nom Information (Mexico Only)
Supply voltage: Frequency: Input Current Consumption: Output voltage: Output current: Appendix Dell Inc. One Dell Way Round Rock, TX 78682 Dell Inc. Paseo de la Reforma 2620 - 11° Piso Col. Lomas Altas 11950 México, D.F. Dell Inc. al Cuidado de Kuehne & Nagel de México S. de R.L. -
Page 68: Limited Warranties And Return Policy
Limited Warranties and Return Policy Dell-branded hardware products purchased in the U.S. or Canada come with either a 90-day, 1-year, 2-year, 3-year, or 4-year limited warranty. To determine which warranty came with your hardware product(s), see your packing slip or invoice. The following sections describe the limited warranties and return policy for the U.S., the limited warranties and return policy... - Page 69 Dell computer on which such parts are installed. The limited warranty on all Dell-branded products begins on the date of the packing slip or invoice. The warranty period is not extended if we repair or replace a warranted product or any parts.
- Page 70 During the 90 days of the 90-day limited warranty and the first year of all other limited warranties, we will repair any Dell-branded hardware products returned to us that prove to be defective in materials or workmanship. If we are not able to repair the product, we will replace it with a comparable product that is new or refurbished.
- Page 71 We are not responsible for lost or corrupted data. What if I purchased a service contract? If your service contract is with Dell, service will be provided to you under the terms of the service agreement. Please refer to that contract for details on how to obtain service.
-
Page 72: Total Satisfaction" Return Policy (U.s. Only)
You must ship the products to Dell within 5 days of the date that Dell issues the Credit Return Authorization Number. You must also return the products to Dell in their original... - Page 73 – Failure to follow the product instructions or failure to perform preventive maintenance – Problems caused by using accessories, parts, or components not supplied by Dell • Products with missing or altered Service Tags or serial numbers • Products for which Dell has not received payment THIS WARRANTY GIVES YOU SPECIFIC LEGAL RIGHTS, AND YOU MAY ALSO HAVE OTHER RIGHTS WHICH VARY FROM PROVINCE TO PROVINCE.
- Page 74 The warranty period is not extended if we repair or replace a warranted product or any parts. Dell may change the terms and availability of limited warranties, at its discretion, but any changes will not be retroactive (that is, the warranty terms in place at the time of purchase will apply to your purchase).
- Page 75 What if I purchased a service contract? If your service contract is with Dell, service will be provided to you under the terms of the service contract. Please refer to that contract for details on how to obtain service. Dell's service contracts can be found online at www.dell.ca or by calling Customer Care at 1-800-...
-
Page 76: Total Satisfaction" Return Policy (Canada Only)
If you are an end-user customer who bought new products directly from Dell, you may return them to Dell up to 30 days after you receive them for a refund or credit of the product purchase price. If you are an end-user customer who bought reconditioned or refurbished products from Dell, you may return them to Dell within 14 days after the date on the packing slip or invoice for a refund or credit of the product purchase price. -
Page 77: Dell Software And Peripherals (Canada Only)
Dell company, you may return Dell Software and Peripherals products that are in as- new condition to Dell up to 30 days from the date on the packing slip or invoice for a refund of the product purchase price if already paid. This refund will not include any shipping and handling charges shown on your packing slip or invoice;... -
Page 78: 1-Year End-User Manufacturer Guarantee (Latin America And The Caribbean Only)
Making a Claim Claims must be made in Latin America or the Caribbean by contacting the Dell point of sale within the guarantee period. The end user must always supply proof of purchase, indicating... - Page 79 Dell Computadores do Brasil Ltda (CNPJ No. 72.381.189/0001-10) Avenida Industrial Belgraf, 400 92990-000 - Eldorado do Sul – RS - Brasil Dell Computer de Chile Ltda Coyancura 2283, Piso 3- Of.302, Providencia, Santiago - Chile Dell Computer de Colombia Corporation...
- Page 80 Software. If you are a commercial customer of Dell or a Dell affiliate, you hereby grant Dell, or an agent selected by Dell, the right to perform an audit of your use of the Software during normal business hours, you agree to cooperate with Dell in such audit, and you agree to provide Dell with all records reasonably related to your use of the Software.
- Page 81 Appendix...
- Page 82 Index adding tracks, 41 automatic shutdown, 46 available space, 49 backlight duration, 46, 48 battery charging, 23 bitrate, 60 button lock switch, 19-20 buttons back, 18 forward/skip forward, 19-20 play/pause, 18, 20 power, 18 record, 18 reset, 18 reverse/skip back, 18, 20 scroll dial, 19 volume, 18, 20 categories, 60...
- Page 83 file management, 36 file transfer, 28 firmware, 60 firmware version, 49 gigabyte (GB), 60 glossary, 60 hardware specifications, 58 Home button, 19 idle shutdown, 46 idle shutdown time, 48 kbps, 60 language, 46 lithium-ion battery (li-ion), 60 locating tracks, 37 Index managing files, 36 megabyte (MB), 60...
- Page 84 58 transferring files, 28 USB, 61 USB charging, 23 using MusicMatch, 28 Selected Music list, 40 using your Dell DJ, 25 viewing an album, 39 viewing track information, 38, views front, 18 side, 18 warranty, 67 wired remote, 19-20, 61...
- Page 85 Index...
Need help?
Do you have a question about the DJ DJ and is the answer not in the manual?
Questions and answers