Advertisement
Quick Links
Advertisement

Related Manuals for Omega ODW101W


Summary of Contents for Omega ODW101W
- Page 1 Instruction Manual Product Type Model ODW101W...
- Page 2 Thank you for purchasing an Omega appliance Tailored for the modern aesthetic and lifestyle of busy people, your new Omega Appliance will make a welcome addition to the family. Omega caters to style-savvy customers who look for balance between stunning form and clever function.
-
Page 3: Table Of Contents
The manufacturer will not be responsible for any damage to property or to persons caused by incorrect installation or improper use of the appliance. Due to continual product development, Omega reserves the right to alter specifications and appearances without notice. -
Page 4: Important Safety Warnings
Important Safety Warnings 1. This appliance is intended to be used in household and similar applications , such as: a. staff kitchen areas in shops, offices and other working environments; b. farm houses; c. by clients in hotels, motels and other residential type environments; d. -
Page 5: Installaton Instruction
Installation Instruction Warning: The installation of the pipes and electrical equipments should be done by qualified professionals. Electrical Shock Hazard: Disconnect electrical power before installing dishwasher. Failure to do so can result in death or electrical shock. Installation preparation The installation position of dishwasher should be near the existing water inlet tap and drain outlet and power socket. - Page 6 Installation Instruction Connection of drain hoses Insert the drain hose into a drain pipe with a minimum diameter of 4cm, or let it run into the sink, making sure to avoid bending or crimping it. The free end of the hose must be at a height lower than 30 cm and must not be immersed into water to avoid the backflow of it.
- Page 7 Installation Instruction How to Drain Excess Water From Hoses If the sink is more than 300mm higher than the floor, the excess water in hoses cannot be drained directly into the sink. It will be necessary to drain excess water from hoses into a bowl or suitable container that is held outside and lower than the sink.
-
Page 9: Operation Instruction
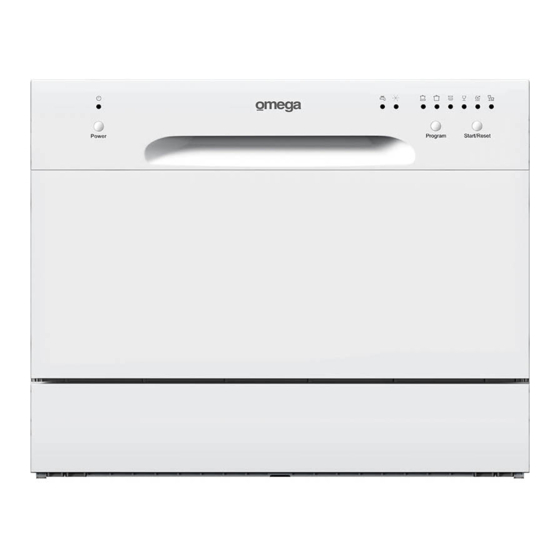
Operation Instruction IMPORTANT: To get the best performance from your dishwasher, read all operating instructions before using it for the first time. Control Panel 1. Power Button: To turn ON/OFF the power supply. 5. Program indicator lights. 2. Power indicator light: To show when the power 6. - Page 10 Operation Instruction Prior to using for the first time Rinse Aid Dispenser The rinse aid is released during the final rinse to prevent water forming droplets on your dishes, which can leave spots and streaks. It also improves drying by allowing water to roll off the dishes. Your dishwasher is designed to use liquid rinse aids.
- Page 11 Operation Instruction Adjusting Rinse Aid Dispenser The rinse aid dispenser has six or four settings. Always start with the dispenser set on "4". If spots and poor drying are a problem, increase the amount of rinse aid dispensed by removing the dispenser lid and rotating the dial to "5".
- Page 12 Operation Instruction Adding detergent to dispenser NOTE: ■ If the lid is closed: push the latch to open. ■ Always add the detergent just before starting each wash cycle. ■ Only use branded detergent and rinse aid for dishwasher. WARNING Dishwasher detergent is poisonous! Take care to keep it out of reach of children.
- Page 13 Operation Instruction Loading the Dishwasher Baskets Recommendation ■ Consider buying utensils which are identified as dishwasher-proof. ■ Use a mild detergent that is described as 'kind of dishes'. If necessary, seek further information from detergent manufacturers. ■ For particular items, select a programme with as low a temperature. ■...
- Page 14 Operation Instruction Loading the Basket Position the dishes and cookware so that they do not get moved by the spray of water. Cutlery Basket Cutlery should be placed into the cutlery basket . WARNING! ■ Do not let any item extend through bottom. ■...
- Page 15 Operation Instruction Starting a washing program Wash Cycle Table Program Cycle Selection Description Detergent Running Energy Water (L) Rinse Aid Information of Cycle pre/main time (min) (Kwh) Intensive For the heaviest Pre- 5/17.5g 0.85 soiled loads, such wash(50°C) as pots, pans, Wash (55 °C) casserole dishes Rinse...
- Page 16 Operation Instruction Turning On the Appliance Start a wash cycle 1. Draw out the basket(see the section entitled "Loading the Dishwasher basket" ). 2. Pour in the detergent (see the section entitled " Detergent and Rinse Aid" ). 3. Insert the plug into the socket. The power supply is 220-240 VAC 50 HZ, the specification of the socket is 10A 250 VAC.
- Page 17 Operation Instruction At the end of the Wash Cycle When the working cycle has finished, the buzzer of dishwasher will sound 8 seconds, then stop. Turn off the appliance using the Power button, shut off the water supply and open the door of the dishwasher. Wait a few minutes before unloading the dishwasher to avoid scald, the dishes and utensils are still hot and more susceptible to breakage.
-
Page 18: Maintenance And Cleaning
Maintenance and Cleaning Filtering System The filter prevents larger remnants of food or other objects from getting inside the pump. The filter system consists of a coarse filter, a flat (Main filter) and a micro filter (fine filter). Main filter Food and soil particles trapped by this filter are pulverized by a special jet on the spray arm and washed down to drain. - Page 19 Maintenance and Cleaning Step 1: Contrarotate the filter assembly(A,B and C), then lift it all up. Step 2: Lift B and C up from A. Step 3: Separate B and C. NOTE: If do it from step1 to step 3, the filter system will be removed; while if do it from Step 3 to Step 1, a the filter system will be installed.
- Page 20 Maintenance and Cleaning Caring for the Dishwasher The control panel can be cleaned by using a lightly dampened cloth. After cleaning, make sure to dry it thoroughly. For the exterior, use a good appliance polish wax. Never use sharp objects, scouring pads or harsh cleaners on any part of the dishwasher. Cleaning The Door To clean the edge around the door, you should use only a soft warm, damp cloth.
- Page 21 Maintenance and Cleaning Cleaning the Spray Arms The spray arms can be easily removed for periodic cleaning of the nozzles to prevent possible clogging. Wash them under running water and carefully replace them in their seats, checking that their rotary movement is in no way impeded.
-
Page 22: Troubleshooting
Troubleshooting Before Calling for Service Review the charts on the following pages may save you from calling for service. Problem Possible Causes What To Do Dishwasher doesn’t Fuse blown, or the Replace fuse or reset circuit breaker. start circuit breaker Remove any other appliances sharing the triggered same circuit with the dishwasher... - Page 23 Troubleshooting Problem Possible Causes What To Do The dishes are The dishes were not loaded See notes in not clean correctly. "Loading the Dishwasher Baskets ". The program was Select a more intensive program. not powerful enough. See" Wash Cycle Table ". Not enough detergent was Use more detergent, or change your detergent.
-
Page 24: Technical Information
Technical Information Height: 438 mm Width: 550 mm Depth: 500 mm Supply Voltage: 220-240V~ 0.04 – 1.0 MPa Water pressure: Power supply: 1170-1380 W Capacity 6 Place settings... -
Page 25: Australian & New Zealand Product Warranty Statements Of Standard Warranty Conditions
The Damage which occurs during delivery or installation. product will be repaired or replaced at the option of Omega, and 10. Claims to product surface coating due to liquid or solid all costs of installation, removal, cartage, freight travelling spill-overs, accidental damage or damage caused from expenses and insurance are to be paid by the customer.