Advertisement
Available languages
Available languages
Quick Links
Grandstream Networks, Inc.
1297 Beacon Street, 2nd Floor
Brookline, MA 02446, USA
Tel : +1 (617) 566 – 9300
Fax: +1 (617) 247 – 1987
www.grandstream.com
For Warranty and RMA information, please visit www.grandstream.com
深圳市南山高新科技园中区
科发路2号1栋(朗峰大厦)5楼
电话: +86 755-2601-4600
传真: +86 755-2601-4601
www.grandstream.cn
GXV 3601_LL
IP C
AMERA
QuickStart
Guide
Advertisement

Related Manuals for Grandstream Networks GXV 3601 LL


Summary of Contents for Grandstream Networks GXV 3601 LL
- Page 1 GXV 3601_LL IP C AMERA Grandstream Networks, Inc. 1297 Beacon Street, 2nd Floor 深圳市南山高新科技园中区 Brookline, MA 02446, USA 科发路2号1栋(朗峰大厦)5楼 Tel : +1 (617) 566 – 9300 电话: +86 755-2601-4600 QuickStart Fax: +1 (617) 247 – 1987 传真: +86 755-2601-4601 Guide www.grandstream.com...
- Page 2 Content English.............1 Español..........11 Français..........21 简体中文 ..........
-
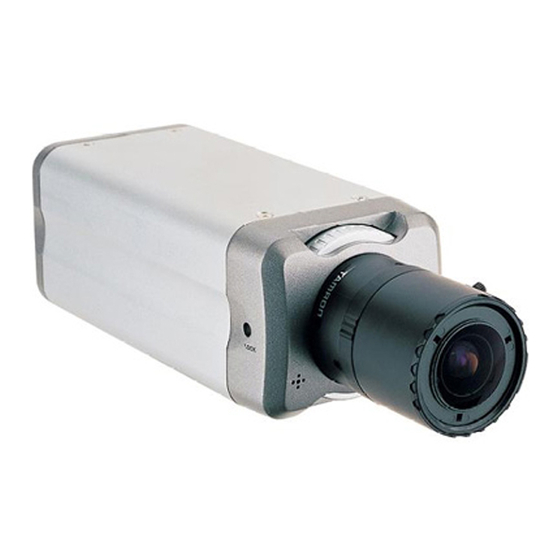
Page 3: Package Contents
RECAUTIONS ONNECTING THE GXV3601_LL • Do not attempt to open, disassemble, or modify Refer to the illustration below when following the the device instructions on the next page. • Do not use a third party power adapter • Do not expose this device to temperatures outside the range of -10ºC to +55ºC Network Port... - Page 4 XV3601_LL CONFIGURATION Option A Configuring the GXV3601_LL using Microsoft tep 1: Insert the power adapter into the 12V DC port on the GXV3601_LL. Plug the other end Internet Explorer of the adapter into an AC power outlet. Connect the GXV3601_LL to the DHCP server tep 2: Plug an RJ45 Ethernet cable into the network port.
- Page 5 tep 7: Once you log into the GXV3601_LL’s web tep 5: Open Microsoft Internet Explorer on your PC. interface Internet Explorer will indicate that Type in the IP in the address bar. “This website wants to install the following add-on: ‘GSViewer.cab’ from Grandstream tep 6: A pop-up window will appear with prompts Networks, Inc.”...
- Page 6 tep 9: tep 3: Click through the menu on the left hand side Open Microsoft Internet Explorer on your PC. of the web UI for more advanced configura- Type 192.168.1.168 in the address bar. tion parameters. tep 4-7: Please refer to Step 6-9 on Page 5. Connect the GXV3601_LL using Static IP If the camera does not get an response from the DHCP server after 3 minutes, it can be accessed by...
- Page 7 XV3601_LL SAMPLE CONNECTION XV3601_LL LENS SPECIFICATIONS DIAGRAM Lens Mount CS, 1’’X1/32’’ - 6g Image Format 1/3” Image Sensor CCD/CMOS Focal Length 3.5 ~ 8 mm Back Focal Length 8.28~13.38mm Aperture 1.4~360 View Angles 100º ~ 43º / 78º ~34º (F.O.V)(W~T)(D/H/V) / 57º...
- Page 8 Precauciones Conexión del GXV3601_LL Observe la ilustración de abajo cuando siga las • No intente abrir, desarmar o modificar la unidad instrucciones en la página siguiente • No use un adaptador de corriente de otra marca • No exponga esta unidad a temperaturas fuera de este rango: -10ºC a +55ºC Puerto de •...
- Page 9 Si el usuario elije opción A, gXV3601_ll onfiguraCión del Paso 1: Configure el GXV3601_LL usando el Explorador Conecte el conector pequeño y redondo del adaptador de corriente en el puerto de Internet de Microsoft corriente. Conecte el otro extremo en la toma de corriente Conecte el GXV3601_LL al servidor DHCP Paso 2:...
- Page 10 Paso 5: Paso 7: Abra Microsoft Internet Explorer en su PC. Luego de ingresar a la pagina web, su Ingrese la dirección IP en la barra de explorador le indicara que “ Esta página direcciones. quiere instalar el siguiente add-on: GSViewerX.cab desde “Grandstream Paso 6: Una ventana aparecerá...
- Page 11 Paso 9: Paso 3: Para mas configuraciones vaya al menú Abra su explorador de Internet Microsoft. principal a la izquierda. Coloque 192.168.1.168 en la barra de dirección. Conecte la GXV3601_LL usando una Paso 4-7: Por favor referirse a los pasos 6-9 en la dirección IP estáticas.
- Page 12 XV3601_LL Especificaciones XV3601_LL Diagrama de del Lente Conexion Montura del Lente CS, 1’’X1/32’’ - 6g Formato de Imagen 1/3” Sensor de Imagen CCD/CMOS Longitud focal 3.5 ~ 8 mm Longitud focal trasera 8.28~13.38mm Abertura 1.4~360 Angulos de visión 100º ~ 43º / 78º ~34º (F.O.V)(W~T)(D/H/V) / 57º...
-
Page 13: Contenu Du Pack
RECAUTIONS ONNEXION DU GXV3601_LL • Ne pas tenter d’ouvrir, de désassembler ou de Reportez-vous à l’illustration ci-dessous en suivant modifier le dispositif les instructions sur la page suivante. • Ne pas utiliser un adaptateur d’alimentation tiers • Ne pas exposer cet appareil à des températures Port hors de la plage de -10 °C à... - Page 14 Si l’utilisateur choisi l’option A GXV3601_LL onfiguration du Etape 1: Insérez l’adaptateur d’alimentation dans Configurer le GXV3601_LL en utilisant le le port 12V DC du GXV3601_LL. Branchez navigateur Microsoft Internet Explorer l’autre extrémité à une prise électrique. Configurer le GXV3601_LL à un serveur Etape 2: Branchez un câble Ethernet RJ45 au port DHCP...
- Page 15 GXV3601_LL, IE indique que “Ce site veut PC. Saisissez l’adresse IP trouvée à l’étape 4 installer l’add-on GSViewerX.cab de dans la barre d’adresse. Grandstream Networks Inc. “ Installez cet add-on en suivant les instructions. Etape 6: Une fenêtre pop-up apparaîtra avec invite à...
- Page 16 Etape 3: Etape 9: Ouvrez le navigateur Microsoft Internet Pour plus de paramètres, Veuillez aller sur Explorer et tapez 192.168.1.168 dans la le menu principal sur le côté gauche. barre d’adresse. Connecter le GXV3601_LL en utilisant une Etape 4-7: adresse IP statique Référez-vous SVP aux étapes 6-9 à...
- Page 17 Spécifications de la lentille du xemple de Diagramme de connexion du GXV3601_LL GXV3601_LL Monture de caméra CS, 1’’X1/32’’ - 6g Format de l’image 1/3” Capteur d’image CCD/CMOS Distance Focale 3.5 ~ 8 mm Distance Focale Arrière 8.28~13.38mm Ouverture 1.4~360 Angles de vue 100º...
- Page 18 XV3601_LL 连接方法 注意事项 请不要打开、拆卸或修改该设备 请参照下图以及下一页的操作说明 • • 请不要使用第三方的电源适配器 • 请不要在超出 至 摄氏度的环境下使用 网络接口 此设备 GXV3601_LL • 请不要将 暴露在超出相对湿度 10-90%范围外的环境下 包装内容 电源接口 GXV3601_LL一个 12V DC 电源一个 方案 使用 RJ45 方案 使用 以太网 电源适配器 接口通过 供电 供电 绿色接线卡槽一个 快速入门指南一本 注意: 选择A方案使用电源适配器给设备供电 或选择B方案使用 给设备供电...
- Page 19 方案A 3601_LL 配置 步骤 1: 将电源适配器与 GXV3601_LL 12V DC 的 连接GXV3601_LL到DHCP服务器环境下,GXV3601_ 端口相连; LL默认通过DHCP获取IP地址 步骤 2: 将 RJ45 网线一端与网络接口相连,另 一端与集线器、交换机或路由器相 步骤1: 通过浏览器访问地址下载IP搜索工具 连。 http://www.grandstream.com/support/gxv_ series_surveillance/general/resources/gs_search.zip 方案B 步骤2:运行下载的IP搜索工具 步骤 1: 将 RJ45 GXV3601_LL 网线一端连入 网络 步驟3:点击 按鈕,搜索该网段下的设 接口,另一端与以太网供电交换机相 备IP地址 连( )。 步驟4:搜索到的设备IP地址及HTTP端口将显示 在以下界面。...
- Page 20 GXV3601_LL 步骤5: 打开IE浏览器,在地址栏输入搜索到 步骤7: 登录到 网络界面后, 浏 的设备IP地址。 览器将提示您“此站点可能需要下列 ActiveX ‘Grandstream 控件:来自 Networks Inc’ ‘grandstream’ 步骤6: 界面将会跳出输入用户名及密码 的 . 单击 的验证框, 出厂时默认的用户名和密 此处安装”。请根据 的指示安装; 码均为:admin ActiveX 步骤 8: 安装好 插件后,网页将如下图 所示,点击播放按钮观看视频; 用户名密码提示窗口...
- Page 21 步骤 9: 点击网络用户界面左侧的菜单进行更 多的高级配置。 通过默认的静态IP地址访问 如果将GXV3601_LL置于非DHCP环境下或者 GXV3601_LL未从DHCP服务器得到响应3分钟之, GXV3601_LL将可以使用默认的静态IP地址: 192.168.1.168访问。 步骤1: 将您的PC与GXV3601_LL通过双绞线相 连,或将您的PC与GXV3601_LL接入同 一网段; 步骤3: 打开微软的 浏览器,在 地址栏中输 步骤2: 将您的PC的IP地址设置为192.168.1.X GXV3601_LL 入 的出厂默认 地址 将子网掩码设置为255.255.255.0。如 192.168.1.168 ; 下图所示: 步骤4:请参考第35頁中步驟6-9 注意:请下载用户手册和常见问题解答,以取 得更详细的配置说明。下载地址: http://www.grandstream.cn/cl3601ll.html...
- Page 22 3601_LL 连接示意图 XV3601_LL 摄像镜头参数 CS, 1’’X1/32’’ - 6g 镜头接口 1/3” 像面尺寸 CCD/CMOS 感测器 3.5 ~ 8 mm 焦距 8.28~13.38mm 后焦距 1.4~360 通光孔径 100º ~ 43º / 78º ~34º 视场角 / 57º ~25.5º (F.O.V)(W~T)(D/H/V) 有效通光口径 前:直径 16.4mm 最近物距 后:直径 光圈 手动 前...