Table of Contents
Advertisement
Advertisement
Table of Contents

Related Manuals for DK Digital DCR-B5000

Summary of Contents for DK Digital DCR-B5000
- Page 2 . . . for choosing one of our Car Stereo Systems. For your own safety and in order to learn all about the functions available, please read this manual and keep it for future reference. And if you once sell the unit please include the manual. www.dk-digital.com © 2006 Copyright, manufacturer: DK digital GmbH...
-
Page 3: Table Of Contents
Contents Important Safety Instructions, please read carefully . Installation instructions . Place of installation. Remove and re-attach the detachable panel . ISO connection . Replacing the fuse . Bluetooth connection Here we go! . Dismounting . The control elements The Display General Operation . -
Page 4: Important Safety Instructions, Please Read Carefully
Important Safety Instructions, please read carefully • This device is designed to receive and play radio programmes and to play various digital sound storage media in motor vehicles. Any use contrary to the instructions may result in electric shock and danger to life may arise. Likewise, any warranty claims become void. -
Page 5: Installation Instructions
Installation instructions We recommend to entrust a garage with the installation of your new car radio. Then please hand these instructions to the garage staff. If you install your new car radio yourself, please follow these instructions carefully. Place of installation If there are several possible places in your car to install the car radio, please bear in mind the following points: Ø... -
Page 6: Iso Connection
ISO connection The car radio is fitted with an ISO connection. Please check before installation if the necessary electrical connections in the dashboard are provided by a corresponding ISO plug. If that is not the case, you can purchase such a plug in a car accessories store. The wiring of the plug is printed on the respective cable sections. -
Page 7: Here We Go
Here we go! Please remove the detachable panel first to avoid damaging it. First loosen the two screws from the upper casing. Now you can push the installation frame backward and remove it from the device Insert the installation frame into the installation hole in the Push the metal links in the upper and lower part of the installation frame outward, so that the installation frame is secured tightly in the installation hole. -
Page 8: Dismounting
You should also fasten the car radio from behind, if possible. Please refer to the illustrations below. After the installation is completed, re-attach the Dismounting If you once should want to dismount the device, please follow these instructions: 1. Remove the detachable control panel. 2. -
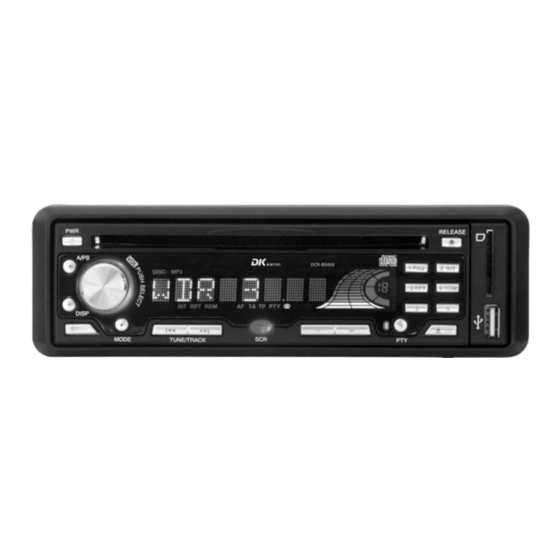
Page 9: The Control Elements
The control elements 1. PWR 2. VOL PUSH SELECT PUSH SELECT 4. 1,2,3,4,5,6 5. AF Button 6. TA Button 7. PTY Button 8. DISP Button 9. MODE Button 10. BAND Button TUNE/TRACK 12. A/PS Button 13. SCN Button 14. LCD Display 15. -
Page 10: The Display
The Display 1. MP3 2. Display area for Volume indicator Disc indicator Station number 7. PTY 8. TP 9. TA announcements 10. AF 11. RDM 12. RPT 13. INT Ø Display elements that only shimmer dark-blue and are not explained in this manual have no functions for this Lights up when a MP3 CD is inserted 1. -
Page 11: General Operation
General Operation Switching the radio on / off Press the PWR button with the car ignition turned on to switch on the device. The buttons now light up in blue and you can read Welcome in the display, which quickly disappears. Then the radio frequency is displayed. - Page 12 broadcasts traffic reports. Turn the VOL knob to select the “TA SEEK” or “TA ALARM” operating mode. 2. MASK DPI / MASK ALL Here you can select, whether the search for alternative frequencies covers all broadcasting stations available (ALL) or only those of the currently tuned station (DPI). 3.
-
Page 13: Radio Mode
10. MONO / STEREO VHF stations normally broadcast in stereo. In areas where reception is difficult, this can lead to interferences or increasing noise. It is then recommended to switch to mono in order to decrease the noise and to increase the playback quality. 11. -
Page 14: Saving Radio Stations
continuing the search run. When the car radio finds a programme you would like to listen to, press the SCN button again to stop the search Saving radio stations Saving radio stations manually If you want to call up your favourite radio stations by station buttons you will have to save them first. -
Page 15: Af - Alternative Frequencies
AF - Alternative frequencies The programme of a radio station is broadcast by several transmitting stations distributed across the receiving area with every station transmitting with a different frequency. The AF function constantly checks if the current radio station could be received on a different frequency transmitting the same programme with a stronger signal. -
Page 16: Cd Mode
CLASSIC Serious classical music OTHER M Special music Weather Weather To start the search for music-orientated programmes, briefly press the PTY button once. 2. Press the corresponding PRESET button, to select the desired programme type: 1. POP M, ROCK M 2. -
Page 17: Differences In The Mp3 Mode
In the play mode you can select certain parts of a track by holding down the TUNE/TRACK buttons and so fast forward ( the track will be played normally again. During fast forward and fast backward the disc in the display will rotate faster. When playing a MP3-CD the volume is muted. Pause To briefly stop playing the disc press the 1 PAU button. -
Page 18: Using External Storage Media
Ø The display now shows the file type “MP3”. Confirm this by pressing the PUSH SELECT button. Ø The display now shows the name of the first MP3 track. Turn the VOL knob by clockwise by one latch, so that the next track is displayed. If the name of the desired track appears, press the PUSH SELECT button in order to start the playback of this track Call up individual files for letters in the name... -
Page 19: How To Use Bluetooth
Before you disconnect the memory card from the car radio stop the card playback. To do so please press the MODE button to switch to another operating mode. To withdraw the card gently press the edge of the card standing out from the casing so as to unlock it. Now you can withdraw the card. -
Page 20: Aux Mode
AUX Mode You can also use your car radio to play the line signal of an external audio device after connecting its output to the stereo line In. Press the MODE button until AUX appears in the display. Start and operate the audio device according to its operating Reset Behind the detachable panel you find the RESET button. -
Page 21: Technical Specification
Technical Specification CD/MP3 PLAYER SECTION Signal to Noise Ratio Channel Separation Frequency Response TUNER (FM) Frequency range Intermediate frequency - 10.7 MHz Sensitivity Stereo separation Signal to noise radio Channel step TUNER (MW) Frequency range Intermediate frequency - Usable Sensitivity LINE-OUT Output Impedance... - Page 24 We reserve the right to correct errors and make technical alterations. This manual is copyrighted. All rights reserved. Neither the manual as a whole nor excerpts may be reproduced without our prior written permission. DK digital GmbH 40878 Ratingen Germany...