ESI ESRTP4 Installation Instructions Manual
Programmable room
thermostat
Hide thumbs
Also See for ESRTP4:
- User and installation instructions manual (32 pages) ,
- User instructions (20 pages)
Table of Contents
Advertisement
Advertisement
Table of Contents

Related Manuals for ESI ESRTP4


Summary of Contents for ESI ESRTP4
- Page 1 ESRTP4 Programmable Room Thermostat Installation Instructions...
- Page 2 Thank you for choosing ESi Controls. All our products are tested in the UK so we are confident this product will reach you in perfect condition and give you many years of service. However, for additional peace of mind, we recommend you register your product online at www.esicontrols.co.uk/warranty for your...
-
Page 3: Table Of Contents
Contents Installer Instructions 1 Technical Specification Programmable Room Thermostat 2 Installation Instructions Installation Safety Instructions General Safety Maintenance Safety Notice Wiring Diagram Fitting the Thermostat 3 Technical Settings Setting TPI, Delayed & Optimum Start Setting Sensitivity/Swing and Calibration Setting the Landlord Service & Time Events Lockout feature Setting the Installer Lockout feature... - Page 5 Installation Instructions...
-
Page 6: Technical Specification
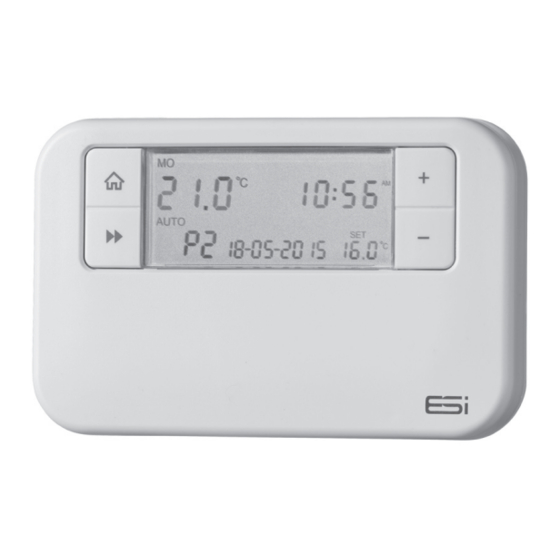
1. Technical Specification Programmable Room Thermostat Programming 7 Day, 5/2 Day & 24Hr 2 x 1.5V Lithium Batteries Power Supply (type: AA size Temperature Sensor Type +/- 1°C at 20°C Temperature Adjustment Range 5°C to 35°C Total Switch Rating 6(2)A 230VAC SPDT Contact Type (Volt Free changeover contacts) -
Page 7: Installation Instructions
2. Installation Installation Safety Instructions The unit must be installed by a suitably qualified person in accordance with the latest IEE Wiring Regulations. Isolate mains supply before commencing installation. Please read all instructions before proceeding. Ensure that the fixed wiring connections to the mains supply is via a fuse rated at not more than 6 amps and class ‘A’... -
Page 8: Safety Notice
Warning Notices WARNING: Always isolate the AC mains supply before installing. This product must be fitted by a competent person, and installation must comply with the guidance provided in the current editions of BS767 (IEE wiring regulations) and part “P” of the building regulations. Wiring diagram 1.0-2.5mm 6mm MAX... - Page 9 1.5m 3. Unscrew the cover that is protecting the live terminals. Lift the cover to expose the wiring block, taking care to retain the screw. 4. Complete the connections in accordance with the wiring diagram (page 16). 5. Replace the thermostat onto the back plate, securing the bottom of the thermostat first and clicking the thermostat into place.
-
Page 10: Technical Settings
3. Technical settings Setting TPI, Delayed or Optimum Start 1. Switch the slider to OFF. Press and keep holding the A and H buttons together (under the fascia), then press the Next button to enter the technical settings. Release all buttons. 2. -
Page 11: Setting Sensitivity/Swing And Calibration
Setting Sensitivity/Swing and Calibration 1. Switch the slider to OFF. Press and keep holding the A and H buttons together (under the fascia), now press the Next button and the technical settings menu will be displayed. Release all buttons. 2. Press the Next button until you get to the SWING settings (5U1n9 is displayed at the bottom of the LCD next to a flashing 0.5). - Page 12 OFF: Turns the service interval off 1: Reminds the user when the annual service is due by displaying SER in the screen 30 days before due date 2: Reminds the user when the annual service is due by displaying SER in the screen 30 days before due date and only allows the system to run for 45 minutes per hour after the due date has passed 3: Reminds the user when the annual service is due by...
-
Page 13: Lockout Feature
equal to the Due Date, the screen will display SER constantly and the system ON time will be controlled by the SER SET. N.B. When the system is running to the ON condition, but is limited by the SER SET (and therefore cannot be ON), the screen will flash the ON symbol. - Page 14 Partial Lockout 3 This mode allows the installer to set the Maximum temperature Setpoint (factory default 21°c), and locks all keys/slider except, to change the time and date, off (frost protection) and allow temporary manual override (temperature Up/Down arrows). Partial Lockout 4 This mode allows the installer to set the Maximum temperature Setpoint (factory default 21°c), and locks all keys/slider except from off (frost protection) and...
- Page 15 We are continuously developing our products to bring you the very latest in energy saving technology and simplicity. However, should you have any questions setting up your controls please email us at sales@esicontrols.co.uk or for technical queries call us on our dedicated technical helpline 07539 117468.
- Page 16 Version 6.10.1...